You can ground an RV inverter using the appropriate gauge wire by securely attaching it to the RV chassis. This connection to the RV frame acts as a protective measure against stray currents, ensuring safety and optimal electrical performance.
In this article, we will guide you through the details of this process, ensuring your inverter is grounded effectively, and your RV’s electrical system operates flawlessly.
Where Can I Ground My RV Inverter?
The most common method of grounding in an RV is through the vehicle’s RV frame. Specifically, you’re delving into DC grounding when dealing with RV inverters.
This involves taking an inverter grounding connection point, typically an inverter grounding wire, and securely connecting one end to the inverter and the other to the RV frame through an inverter ground lug.
This installation method helps stabilize the inverter power and mitigates potential electrical hazards.
Preparing Your Inverter For Grounding
Finding the Right Spot for Your Inverter and Battery Bank
Consider the following points while selecting a spot for your inverter installation.
Easy Access
Easy access to your inverter is essential for various reasons. You can catch potential issues early through routine checks. It can speed up any necessary repairs and maintenance activities.
This ensures that the system remains in optimal condition and reduces potential downtimes.
Ventilation
An inverter can generate heat during operation, affecting its efficiency. A well-ventilated space allows it to cool down naturally, enhancing its lifespan.
Close Proximity
Having a shorter distance between the inverter and power sources reduces energy losses. It Speeds up the power transfer time, making your coach’s electrical system more responsive.
Safety First
Water poses significant risks to electronic devices. Keeping your inverter case dry is vital to avoid the dangers of short circuits or system failures.
Positioning the inverter away from extremely hot regions or flood-prone areas is also advisable.
Making Sure Your Inverter Stays in Place
An inverter that isn’t secure can move with sudden stops or on bumpy roads, leading to potential damage or wire disconnections. To protect your inverter, consider doing these:
Inverter Stability
When you’re mobile, ensuring your inverter’s stability is paramount. You can ensure the inverter stays in place by utilizing brackets or custom-made fixtures.
Verifying that the chosen securing mechanism doesn’t amplify vibrations is essential, as this can harm the inverter over time.
Inverter Protection
To keep everything safe, consider adding a protective panel or casing to prevent accidental damage. Also, it’s a good idea to place the inverter somewhere where people won’t accidentally bump into it or where things do not fall onto it.
Best Practices for Wiring
Proper wiring isn’t just about connections; it’s about ensuring consistent power flow and safety.
Uniform Thickness of Wires
Using wires of the same wire gauge is essential to ensure a steady flow of current. Moreover, always opt for high-quality cables, as they are more wear and tear-resistant.
Right Connections
It’s always important to match the terminals correctly before connecting. And, to keep everything safe, using terminal covers can be a great way to stop any accidental shorts from occurring.
How to Ground An Inverter in an RV in 5 Steps
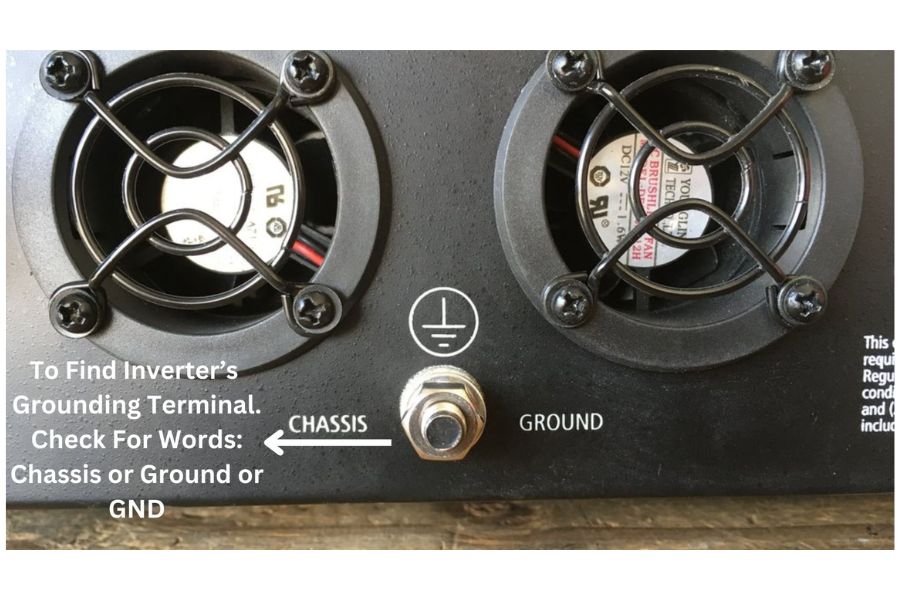
Step 1. Identify Your Inverter’s Grounding Terminal
Every inverter is designed with a specific point intended for grounding. This is essential for safely channeling any fault currents. You can find the inverter grounding terminal by:
Manual Reference: Always refer to your inverter’s user manual. It will provide a wiring diagram or description indicating the proper grounding location.
Visual Inspection: On most inverters, the grounding terminal might be labeled as “Ground” or “GND,” it often looks like a bolt or screw.
Step 2. Choose and Prep the Grounding Cable
The wire you use for grounding plays a pivotal role in safety.
Material: Opt for a stranded copper wire due to its excellent conductivity and flexibility.
Wire Gauge: Ensure the wire thickness (gauge) suits your inverter’s capacity. Your manual should guide this.
Strip the Ends: Using wire strippers, remove the insulation from both ends, exposing the copper strands.
Step 3. Connect the Grounding Wire to the Inverter
Ensure a robust connection between your inverter and the grounding wire. These are the steps to follow:
Loosen the Terminal: Slightly undo the negative terminal on your inverter.
Insert and Secure: Wrap or insert the stripped end of the grounding wire into the terminal, then tighten it securely.
Step 4. Connect the Other End to the RV’s Chassis
The metallic chassis of your RV acts as an effective grounding point. Proceed with the steps below to connect the wire to the RV’s Chassis :
Find an Ideal Spot: Choose a clear section of the RV’s frame, protecting it from moving parts or areas that might collect water.
Clean the Surface: Remove any paint, rust, or dirt from this spot using sandpaper, creating a shiny metal surface.
Attach the Wire: Drill a small hole; if there isn’t one, insert a bolt through the stripped end of the wire. Place a star washer or tooth lock washer between the wire end and the chassis surface. This digs into the metal for a more robust mechanical connection. Finally, secure it tightly to the chassis.
Step 5. Perform a Final Safety Check
After connecting everything, it’s essential to confirm the grounding is effective. You can check the connection in the following ways:
Tug Test: Gently tug on both ends of the grounding wire connections to ensure they’re securely connected.
Visual Inspection: Confirm there’s no wear or damage on the wire, and it isn’t resting on sharp edges that might damage it over time.
Multimeter Check (Optional): Using a multimeter set to continuity or resistance mode, check the connection between the inverter grounding terminal and the RV’s chassis. A zero or low resistance indicates a good ground connection.
Does an RV Need to Be Grounded?
Grounding in an RV is paramount, acting as the silent guardian of the electrical system. It not only ensures the safety of the occupants by preventing electrical mishaps, but it also safeguards sensitive appliances from power surges and stabilizes the energy flow.
RV users risk their equipment’s longevity and well-being without proper grounding. Some of the reasons why you should properly ground your RV.
Protects RV Appliances: The electrical systems in an RV, including your AC appliances, can be sensitive. Proper grounding shields your RV appliances from unexpected power surges.
Stabilizes Inverter Power: In an RV, grounding stabilizes the inverter output voltage. This ensures the power inverter consistently provides the AC power outlets with steady 120v AC. It reduces the risk of fluctuations that can harm sensitive electronics.
Reduces Potential for Reverse Current: A grounding connection point helps direct power to the AC appliances. It also diminishes the chance of reverse current, ensuring the RV inverter works efficiently.
Safety: The most significant reason, however, remains safety. An RV grounded improperly or not grounded at all can result in a ‘hot skin’ condition. IN THIS SCENARIO, the RV’s metallic skin becomes electrified due to a short circuit. If someone touches the electrified exterior of the RV, they might inadvertently channel that electricity, which can result in life-threatening electric shocks.
Safeguarding Complex Off-Grid Systems: Off-grid systems combine multiple power sources, such as solar panels, inverters, and battery banks, creating a multifaceted network of electrical connection points. This complex setup can elevate the potential for electrical faults, surges, or imbalances.
Safety Tips
Safety is paramount when working with electrical systems, especially when figuring out how to ground an inverter in an RV. Attention to detail can prevent accidents, save costs, and ensure your RV electrical systems function correctly.
Here’s a concise guide to help you navigate the safety measures:
Inspect Cables Regularly
Always be on the lookout for damaged cables. If a grounding or any other wire shows signs of wear, replace it immediately. Faulty cables, especially battery connection cables, can compromise the entire electrical system and put you at risk.
Mind Your Devices
Avoid allowing devices like a battery charger or DC converter to draw power directly from your inverter. This can reduce the lifespan of your inverter.
Avoid Dual Power Feed
Never wire the shore power and the power inverter to supply power to your RV outlets simultaneously. Such a setup is an accident waiting to happen. Always use a transfer switch to manage the power sources.
Monitor Voltage Levels
Whenever you’re at a campground, check the voltage from the shore power connection point before connecting your RV system. This ensures the AC power outlets in your RV receive power within a safe voltage range.
Prevent Battery Drain
Running your inverter and converter simultaneously is a fast way to drain your battery bank. It’s essential to manage their usage to ensure your batteries last longer.
Safety at Campsites
Never take the campsite’s electrical system for granted. Even when connecting to shore power, ensure your RV has a proper grounding connection point. This can prevent electrical shocks and issues like “hot skin” in your RV.
Remember the Earth Ground
When parked for extended periods, consider using a ground rod to provide an earth ground. This is an additional safety measure, especially when using devices like portable fuel-powered generators.
Seek Professional Help
If the intricacies of an inverter seem confusing, don’t hesitate to hire a professional. A single mistake in the RV electrical systems can be costly and dangerous.
Sometimes, investing in professional assistance saves more in the long run.
How useful was this post?
Click on a star to rate it!
Average rating 1 / 5. Vote count: 1
No votes so far! Be the first to rate this post.
We are sorry that this post was not useful for you!
Let us improve this post!
Tell us how we can improve this post?
charlesnoble
Here at Spheral Solar, I’m a hands-on solar power enthusiast, constantly exploring and experimenting with DIY solutions. I’m dedicated to sharing my discoveries, insights, and even the bumps I hit along the way, all in the pursuit of a more sustainable future.
Why Your DIY Solar Project Needs a Commercial-Grade Inverter by Charlesnoble May 5, 2026 Compare your power needs against inverter capacity ratings before choosing between string, central, or micro-inverter configurations—commercial systems typically handle 10kW to 500kW, far exceeding residential 3-10kW units. Calculate your total panel wattage, then add 25% overhead to account for startup surges and future expansion. A 50kW system, for instance, performs…
Why Your RV Inverter Keeps Failing (And How to Fix It Fast) by Charlesnoble January 11, 2026 Check your battery connections first—loose or corroded terminals account for nearly 60% of inverter issues I’ve seen in my years working with RV solar systems. Remove both positive and negative cables, clean them with a wire brush and baking soda solution, then reconnect tightly. While you’re at it, use a…
10 Best Pure Sine Wave Inverters in 2023 by Nick August 13, 2021 The best pure sine wave inverters are the ones that can keep multiple sensitive electronics charged while protecting them from harm. Other important characteristics of the ideal pure sine inverter are solid warranties. If something goes wrong with the device, size, and weight, that won’t be too cumbersome for the…
How to Wire Inverter To RV Breaker Box by Charlesnoble July 7, 2023 Knowing how to wire an inverter to an RV breaker box allows for efficient electrical power utilization when camping or traveling in an RV. Wiring a power inverter to your RV’s breaker box involves creating a connection between your battery bank, inverter, and RV’s breaker panel, often using changeover switches.…
Why Most RV Solar Setups Fail (And How to Build Yours Right) by Charlesnoble December 21, 2025 Calculate your daily power consumption by listing every device you’ll run in your RV—from the refrigerator drawing 40-60 amp-hours daily to your phone charger using just 5 amp-hours—then multiply by 1.3 to account for system losses and cloudy days. This single step prevents the most common mistake I see fellow…
Why Grid-Tie Solar Inverters Are Your Gateway to… by Charlesnoble December 4, 2025 Grid-tie solar inverters transform your solar panels’ DC electricity into AC power that feeds directly into your home’s electrical system and the utility grid, eliminating the need for expensive battery banks while letting you earn credits for excess power you generate. When your panels produce more electricity than you’re using,…
Subscribe for handpicked DIY projects, exclusive tips, and giveaways.
Installing a whole house ventilation system powered by solar takes about 6 to 8 hours for a moderately skilled DIYer and delivers continuous fresh air circulation without touching your electric bill. The core method involves mounting a solar panel on your roof to power an intake or exhaust fan, routing ductwork through your attic or… Read more: How to Install a Whole House Ventilation System Using Solar Power
Connecting your SolarEdge inverter to your home network via Ethernet cable takes about 15 minutes and gives you real-time access to your system’s performance data from any device with internet access. You’ll plug a standard Ethernet cable into the RJ45 port on your inverter (usually labeled “LAN” or “Ethernet”), run it to your router, and… Read more: How to Connect SolarEdge to Ethernet for Seamless System Monitoring
You can build a DIY solar tube for $50 to $150 and start harvesting natural daylight in a weekend. This simple project combines a reflective tube, clear dome, and diffuser to channel sunlight from your roof into dark interior spaces, delivering illumination equivalent to multiple bulbs without electrical costs or ongoing energy consumption. I remember… Read more: How to Make DIY Solar Tubes for Free Natural Lighting in Your Home


")


")
")

")


")
")


