The optimal size of a DC-to-DC charger depends on several factors, including the total auxiliary battery capacity, maximum charge rate, alternator output, and additional charging sources or loads.
Accounting for these aspects and selecting a properly sized charger is crucial for maximizing charging efficiency.
In this article, you’ll learn a step-by-step process for calculating the right charger capacity based on your battery bank, alternator output, and other charging sources.
How to Determine the Optimal DC-DC Charger Size
Figuring out the optimal size DC-DC charger for your application involves four main steps:
Calculate your auxiliary battery bank’s total amp hour (Ah) capacity and maximum charge current.
Determine your alternator’s output current capacity.
Consider any additional charging sources and loads.
Select a DC to DC charger size based on steps 1-3.
Let’s go through each of these steps in detail:
Step 1: Calculate Total Auxiliary Battery Bank Capacity and Max Charge Current
If you have multiple batteries wired together in your auxiliary bank, you first need to calculate the total capacity by adding up each battery’s amp hour rating:
For example, if you have two 100 Ah batteries connected in parallel, your total capacity would be:
\(100\ Ah\ + 100\ Ah\ = 200\ Ah\)
Next, determine the maximum charge current your battery bank can accept. This depends on the battery chemistry:
Lead Acid batteries (Flooded, AGM, Gel) – maximum charge current is generally 20-30% of capacity.
Lithium batteries – maximum charge current is typically 50% of capacity.
Refer to your specific battery’s specs for the recommended maximum charge rate.
Using our example above with two 100 Ah lead acid batteries in parallel (200 Ah total capacity), the max charge current would be:
\(200\ Ah * 20\% = 40\ Amps\)
So for our 200 Ah lead acid battery bank, the maximum charge current is 40 Amps.
Step 2: Determine Your Alternator’s Output Current
You must ensure the DC to DC charger’s output current does not exceed your alternator’s capacity, usually rated in amps. As a general guideline:
Smaller vehicles/vans often have 70-120A alternators.
Larger vehicles/vans and big rigs often have 120-200A+ alternators.
Check the alternator markings/label or vehicle documentation for the amperage rating to find your specific alternator’s output. An auto parts store can determine your alternator specs based on vehicle make and model.
Generally, your DC to DC charger’s input current should not exceed 50% of your alternator’s rated output current.
For example, if your alternator is rated for 120A output, the DC to DC charger’s input current should not exceed 60A (50% of 120A).
Step 3: Consider Additional Charging Sources and Loads
If you have other charging sources like solar, shore power, or a generator, or if you plan on running loads while driving, you need to account for that additional current flow when sizing your DC to DC charger.
Given the increasing popularity of dual battery systems, understanding these considerations becomes even more critical.
For example:
If you have a 300W (25A) solar charger and plan on driving in full sunlight, your DC to DC charger must be sized for the alternator input plus the 25A solar input.
If you plan on running a refrigerator or other loads while driving that draw 10A, your DC to DC charger output needs to provide current for charging and the load(s).
Take the time to consider all current flow into and out of your auxiliary battery bank during operation and size your charger accordingly. Having some headroom is also a good idea.
Step 4: Selecting the Optimal DC to DC Charger Size
Now that you’ve calculated the maximum current for your battery bank (step 1) and alternator output (step 2) and accounted for other current flows (step 3), you can select the properly sized DC to DC charger:
Your charger’s input current should not exceed 50% of your alternator’s rated output current.
The output current should not exceed your battery bank’s recommended maximum charge current.
Allow for some headroom if adding additional batteries or loads in the future. Most chargers come in increments of 10A (20A, 30A, 40A, etc).
Let’s look at some examples to select the optimal charger size based on the steps above:
Example 1
Let’s consider a system with:
A 200Ah Lead Acid Auxiliary Battery Bank with a maximum charging current equal to 40A.
A 110A Alternator.
No other charging sources or loads.
For charging purposes, the alternator will provide half of its maximum output, which is,
\(110A * 0.5 = 55A\)
Based on the information, a suitable choice would be a 60A DC to DC charger.
Example 2
Let’s consider another system with the following:
A 400Ah Lithium Battery Bank with a max charging current of 200A.
A 200A Alternator.
Additionally, there’s a 500W Solar Charger in the system. Assuming a voltage of 12V, it provides an output of 42A.
Again, the alternator will contribute half of its maximum output for charging, which is,
\(200A * 0.5 = 100A\)
There are no other loads in this system.
Based on the combined inputs from the alternator and solar charger (142A), a suitable choice would be a 150A DC to DC charger.
DC to DC Charger Voltage Considerations
When selecting your DC to DC battery charger, you must ensure it is compatible with your electrical system voltage. Here are the main options:
12V Input to 12V Output Chargers
This charger configuration primarily accepts the 12V DC output from your vehicle’s alternator, fine-tuning and regulating it to optimally charge a 12V auxiliary battery or battery bank.
Moreover, many of these chargers can seamlessly integrate with a 12V solar system, maximizing the efficiency of the solar input voltage.
This type of charger is particularly well-suited for compact systems found in smaller vehicles, RVs, and boats where a 12V electrical system is standard.
12V Input to 24V Output Chargers
Designed to bridge the voltage gap, this charger accepts a 12V electrical source from an alternator and steps it up to charge a robust 24V battery bank.
This transition allows a 24V battery system to run high-voltage appliances with reduced current, offering potential savings on thicker, costlier wiring.
It’s an ideal solution for those who wish to have high-voltage battery benefits while using a standard 12V vehicle alternator.
24V Input to 24V Output Chargers
Tailored for more expansive systems found in larger vehicles, buses, or boats, this charger configuration operates with a 24V electrical system.
It efficiently manages the 24V alternator output to charge a 24V auxiliary battery bank, ensuring streamlined and consistent charging.
Given its specialized nature, it’s perfect for setups where both the source and auxiliary systems operate at 24V.
12V or 24V Input to 48V Output Chargers
For those applications demanding even higher voltages, these chargers are uniquely designed. They can elevate a 12V or 24V input to deliver a solid 48V DC output for charging higher-voltage battery banks.
Though not as common, these chargers are sought after in unique applications with high power demands, such as certain industrial settings or specialized vehicles.
Other Features to Consider When Selecting a DC-DC Battery Chargers
By selecting a DC-to-DC charger with the appropriate charging capacity and features that meet your needs, you will have an efficient alternator charging system for your auxiliary battery bank without overburdening your starter battery.
Here are some other helpful features to look for when selecting a DC-to-DC charger:
Battery Chemistry Support
Different batteries have distinct charging profiles. Whether it’s lead acid batteries, lithium batteries, or others, ensure your DC-to-DC charger is compatible with your specific battery chemistry.
Most modern DC chargers support multiple types of batteries, offering versatility if you decide to switch battery types in the future.
Remote Monitor Capability
Many DC-DC chargers let you connect external devices, like cell phones, to monitor your charger’s performance remotely. Some models also let you configure charging parameters remotely, offering enhanced convenience.
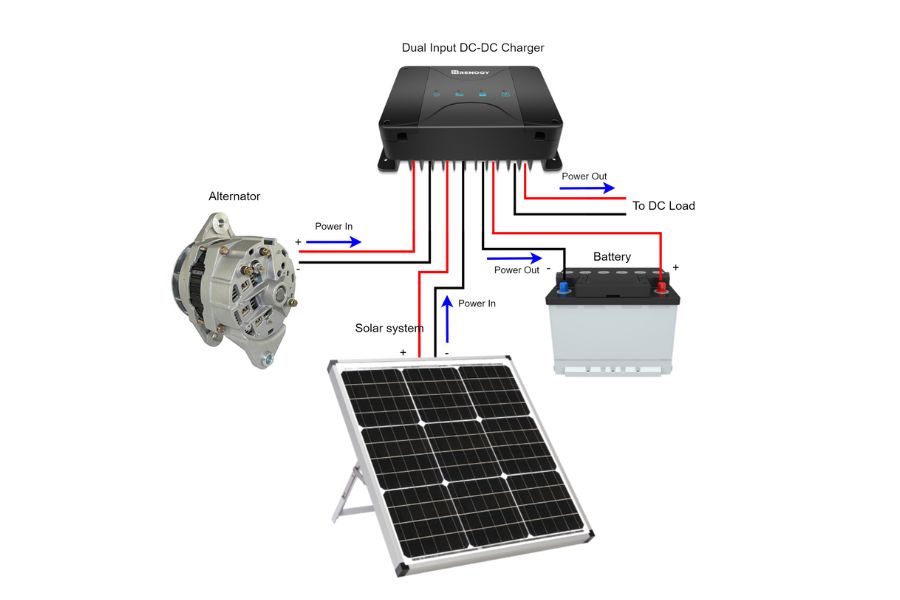
Ignition/D+ Signal
This function is crucial, especially for vehicles. A wire that links to the ignition, or a D+ signal, informs the DC-DC battery charger when the engine starts, prompting it to begin charging the auxiliary battery.
Load Output
Some DC chargers come with a load output. This lets you power DC loads directly from the charger, optimizing the efficiency of the electrical system.
Solar Charge Controller
Integrating solar power into your charging system can be beneficial. When considering DC-to-DC chargers, search for ones with built-in MPPT solar charge controllers.
Using MPPT charge controllers maximizes the efficiency of solar input from your solar panels.
Temperature Sensor
Batteries are sensitive to temperature changes. A built-in temperature sensor lets the charger modify the charge voltage depending on the environment. This not only ensures optimal charging but can also extend battery lifespan.
Voltage Step-Up
For electrical systems that exceed 12V, a charger capable of stepping up the voltage is beneficial. For instance, transforming a 12V input to a 24V output is essential for specific applications.
Current Limiting
Overcharging can be detrimental to any battery bank. The current limiting feature helps regulate the output current, ensuring that the battery bank is not overwhelmed, which can prolong the life of batteries.
Remote On/Off Control
This feature allows users to activate the charger remotely, often based on the vehicle’s ignition status. In a dual battery system, this ensures that the auxiliary battery only charges when necessary.
Multiple Mounting Options
Depending on where you want to install your charger, whether in the engine compartment or elsewhere, choosing a DC charger that offers surface-mounted and flush/recessed mounting options is beneficial.
Warranty
Quality is crucial when it comes to chargers. Opt for brands that provide an extended warranty, ideally two years or more, to ensure you get a product behind which the manufacturer stands.
What Size Wire Do I Need for My DC to DC Charger?
Getting wires of the correct size for your DC-to-DC charger installation is equally important as selecting the right sized DC-DC charger, not just for the charger’s efficiency but also for the safety and longevity of the entire electrical system.
An inadequately sized wire can result in voltage drops, energy inefficiencies, or potential hazards. To highlight the importance of proper sizing, consider the following impacts:
Efficiency: A wire that’s too thin can cause resistance, resulting in voltage drops. This inefficiency means your battery may not charge optimally or fully.
Safety: Overloading a thin wire can generate heat, leading to melting insulation, fires, or even damage to your equipment.
Lifespan: Properly sized wires tend to wear less, ensuring a longer lifespan for both the wire and the charger.
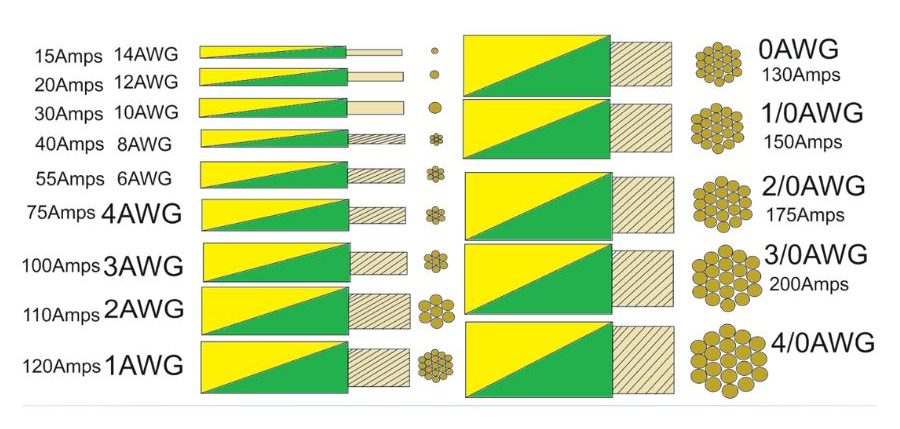
Guideline for Wire Sizing
Based on your charger’s maximum current output, consider the following wire sizes:
Up to 20A: Use 12 AWG
20-35A: Use 10 AWG
35-50A: Use 8 AWG
50-70A: Use 6 AWG
70-100A: Use 4 AWG
100-125A: Use 2 AWG
125-150A: Use 1 AWG
DC to DC Charger Installation Tips and Best Practices
Proper installation of your DC-DC chargers is a cornerstone for ensuring their safety and efficient operation
Given that the central question is about the charger’s size, it’s worth noting that the charger you choose will invariably affect the installation process, from cable length to mounting space.
Below, we elaborate on some important guidelines and best practices for DC-DC battery charger installation.
Mounting Location Tips
When selecting a place to mount your DC-to-DC charger, several considerations come into play to ensure optimal performance and longevity. Here’s a breakdown:
Efficient Cable Runs: The mounting spot for your charger should ideally be a midpoint between your main and auxiliary batteries. This ensures minimized cable length, reducing voltage drops, which is crucial for efficient power transfer.
Environment Consideration: While DC-to-DC chargers are built rugged, they’re not invincible. Ensure you mount the charger in a dry, debris-free location, safeguarded from water hazards like bilge areas in boats.
Ventilation: Electronics generate heat. Choose a location that provides ample airflow around the charger to avoid overheating. This not only ensures consistent operation but also extends the charger’s life.
Sturdy Mounting: Especially in moving vehicles or boats, it’s paramount to use robust mounting systems, like metal brackets, to avoid movement or vibration-induced wear.
Wiring and Connection Recommendations
When setting up your DC-to-DC charger, the intricacies of wiring and connection often hold the key to efficient operation and long-term safety. Let’s navigate through these essential aspects:
Symmetry in Sizing: Always ensure the positive and negative cables leading to the charger’s input and output are sized identically, basing the size on the maximum current.
Cable Length: Shorter cable runs minimize resistance. Aim to keep them as brief as feasible. However, if the runs exceed 5 feet, moving up one wire size is good practice to account for potential resistance over the longer distance.
Connection Quality: To ensure a solid connection, use high-quality crimp connections or soldering. After making the connection, insulation is crucial. Use heat shrink or electrical tape to securely cover and insulate all connections to avoid short circuits or accidental contacts.
Environmental Factors: Considering marine-grade or weather-resistant wiring can add an extra layer of protection if your installation is exposed to the elements.
Strategic Wiring Routes: The paths for input and output cables should be well-thought-out. Avoiding parallel runs for long stretches will minimize potential electromagnetic interference between them.
Protection and Isolation: Wiring isn’t just about connecting A to B. Protecting those cables from potential wear, abrasion, or damage is equally vital. Using wire looms or conduits and regular wire clips ensures they stay protected and in place.
Compatibility Checks: It might seem elementary, but always match the voltage between your charger and battery bank. An oversight here can lead to ineffective charging or potential damage.
Battery Terminal Maintenance: Inspect battery terminals before attaching any new device, including the charger. Ensure they’re free from corrosion and are tightly secured, as loose connections can be a significant source of inefficiency or failure.
Safety Checks: Once everything is wired, before powering on, double-check all connections. Ensure the positives and negatives are correctly aligned and no unintended shorts. Using a multimeter can be helpful here.
Manufacturer’s Guidance: While these guidelines provide a general overview, your charger’s manufacturer will provide specific details tailored to that model.
Always consult and follow these instructions for optimal performance.
How useful was this post?
Click on a star to rate it!
Average rating 0 / 5. Vote count: 0
No votes so far! Be the first to rate this post.
We are sorry that this post was not useful for you!
Let us improve this post!
Tell us how we can improve this post?
charlesnoble
Here at Spheral Solar, I’m a hands-on solar power enthusiast, constantly exploring and experimenting with DIY solutions. I’m dedicated to sharing my discoveries, insights, and even the bumps I hit along the way, all in the pursuit of a more sustainable future.
Why Your Motorhome Electrical System Keeps Failing… by Charlesnoble November 18, 2025 Picture this: You’re three days into a dream cross-country trip when your lights flicker, the refrigerator stops cooling, and you’re left wondering whether to call for expensive roadside assistance or figure it out yourself. I’ve been there, and here’s what I wish someone had told me before my first electrical…
Why Your Camper Van Power System Keeps Failing (And… by Charlesnoble January 24, 2026 Picture this: You’re parked along a stunning coastline, laptop open, fridge humming, and lights glowing as the sun sets—all powered by the system you built yourself. A well-designed camper van power system transforms your vehicle from basic transportation into true freedom on wheels, letting you work remotely, cook meals, and…
Why Your RV Appliances Keep Tripping the Breaker… by Charlesnoble November 17, 2025 Turn off shore power and disconnect your battery bank before touching any wire in your RV—this single step prevents the most common DIY electrical accidents. Check your circuit breaker panel ratings against your actual appliance loads, because that microwave drawing 1500 watts on a 15-amp circuit is exactly why you’re…
Wire Your RV Tow Vehicle the Right Way (7-Pin… by Charlesnoble May 14, 2026 Identify the seven wires in your RV connector by their standard color codes: brown carries running lights, yellow handles left turn signal and brake, green manages right turn signal and brake, white serves as ground, blue powers electric brakes, black provides 12V battery charge, and red or purple connects auxiliary…
Why 48V is the Sweet Spot for Your RV Solar System by Charlesnoble May 20, 2026 Calculate your actual power consumption before jumping to 48V—most RVers overestimate their needs and waste money on unnecessary voltage conversions. Pull out your last month of camping data and add up the watt-hours your appliances actually use daily, not what you think you might need someday. If you’re consistently pulling…
Build a Solar Kiln That Actually Works (Without… by Charlesnoble November 2, 2025 Build a solar kiln in your backyard and you’ll cut lumber drying time from months to weeks while spending zero on electricity. Position your kiln where it receives 6-8 hours of direct southern exposure daily, construct the framework using pressure-treated 2x4s with transparent polycarbonate panels for maximum heat capture, and…
Subscribe for handpicked DIY projects, exclusive tips, and giveaways.
A portable power station will typically run your camping devices for anywhere from a few hours to several days on a single charge, depending on what you’re powering and the station’s capacity. As for lifespan, most quality units last between 3 to 10 years before the battery degrades enough to need replacement. The distinction matters… Read more: Your Portable Power Station Won’t Last as Long as You Think (Here’s Why)
A J1772 solar charger combines a standard J1772 charging connector (the same Type 1 plug used by most North American EVs and electric bikes) with solar panels and battery components to create an off-grid or grid-supplemented charging system. You’ll need three core elements: solar panels (typically 400-800 watts for practical ebike charging), a battery storage… Read more: How to Choose a J1772 Solar Charger for Your Ebike: A Buying Guide
Installing a whole house ventilation system powered by solar takes about 6 to 8 hours for a moderately skilled DIYer and delivers continuous fresh air circulation without touching your electric bill. The core method involves mounting a solar panel on your roof to power an intake or exhaust fan, routing ductwork through your attic or… Read more: How to Install a Whole House Ventilation System Using Solar Power


")
")
")
")

")
")
")
")
")

")


