Ring Solar Panel Not Charging: A Troubleshooting Guide
Updated:

Insufficient sunlight, compatibility problems, defective parts, or faulty installation often cause a Ring solar panel not charging. With the right information and a systematic approach, solar energy can power your Ring devices up quickly.
In this guide, you’ll learn step-by-step troubleshooting tips to get your Ring solar panel charging again.
Let’s begin troubleshooting your solar panel charging issue.
Step-by-Step Troubleshooting Guide
Follow these methods one by one until you resolve the charging issue with your Ring solar panel:
Check Battery Level
You’ll first want to verify that your Ring device’s battery is not fully charged.
Ring solar panels are designed to stop charging once the battery reaches 90% capacity. This feature optimizes lithium-ion battery performance and prevents overcharging, which can shorten battery life.
To check the current battery percentage:
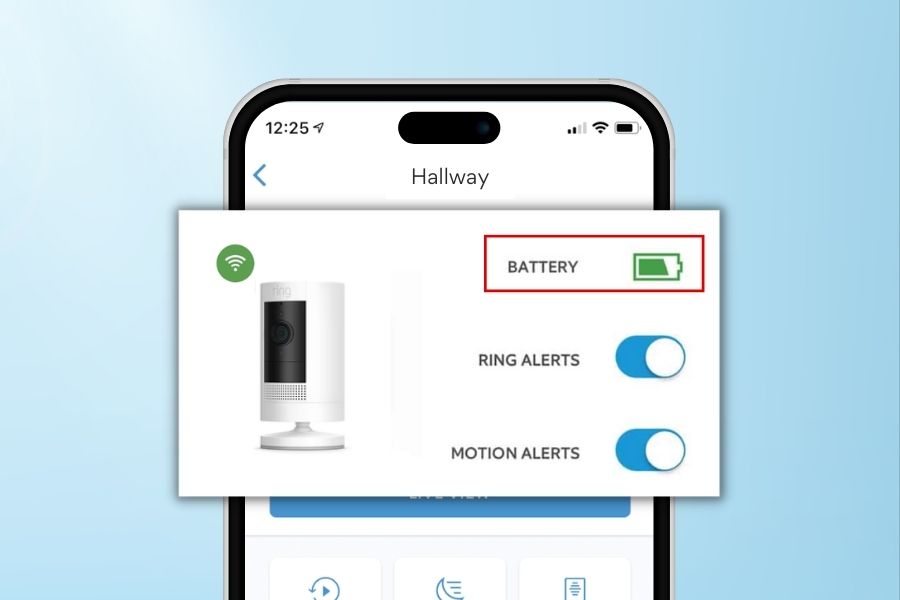
Open the Ring app on your smartphone or tablet.
- Select your specific Ring device connected to the solar panel, such as your ring camera, from the devices list.
- Look for the battery icon displayed in the app – this will show the remaining battery percentage.
- If the battery level is at 90% or above, the solar panel will not provide any additional charging. Use the device, as usual, to drain the battery before testing the solar panel status again.
Inspect Solar Panel Condition and Connections
Thoroughly examine the physical solar panel itself as well as all wiring connections between the panel and your Ring device:
- Check the solar cells on the panel for any cracks, scratches, changes in color, or bent casing.
- Ensure all the wires and cables are in good shape, with no fraying or exposed copper. Gently wiggle each wire plug to check it is plugged in tightly.
- Ensure no dirt, leaves, or other things block the solar cells. Gently clean with a dry cloth if needed.
- Check the power cord is firmly plugged into the outlet for plug-in panels. Try an alternate outlet to rule out receptacle issues.
- If you see any damage to the panel or wires, you will likely need to replace those parts to fix the charging issues.
Ensure Adequate Sunlight
One of the most frequent reasons a Ring solar panel fails to charge properly is insufficient direct sunlight exposure throughout the day:
- Ring solar panels need at least 4 to 5 hours of direct, unobstructed sunlight daily for optimal charging functionality. This provides the solar power device with the solar energy required to generate a usable charging current.
- Make sure the panel gets full sun most of the day. Trees, awnings, poles, buildings, or other things should not shade it.
- Adjust the solar panel’s tilt angle and direction to maximize sunlight exposure based on the sun’s positioning in your location. Facing south is ideal for those in the northern hemisphere and vice versa.
- Check the daily weather forecast and allow several sunny days to test charging capability. Cloudy or stormy weather can affect charging performance.
Verify Device Compatibility
Ring’s solar panels are designed and tested to work with certain Ring device models, such as a Ring doorbell camera or Ring video doorbell. It’s important to confirm compatibility to rule out pairing issues:
- Look at the solar panel compatibility chart on Ring’s website to see if your solar panel and Ring device match.
- If they don’t match, you’ll need to buy the right solar panel for your Ring device, like a camera or doorbell.
- If you have an older Ring device, you might need a software update for the solar panel to work. Check Ring’s support site for updates.
Try Reinstalling the Solar Panel

Faulty initial installation can sometimes prevent a solar panel from charging properly. Try removing and reinstalling the panel:
- Disconnect the solar panel’s wiring from your Ring device and remove any mounting hardware or brackets used to affix the panel.
- Inspect the wiring, cables, and connectors for nicks, corrosion, or bent pins.
- Use a soft brush and mild soap to gently clean any dirt or debris from the solar cells and panel casing.
- Securely remount the solar panel in the optimum sunlight location using quality hardware.
- Carefully reconnect the wiring, avoiding bending or pinching the cables. Listen for clicking to confirm solid connections.
- Test the charging function after reinstallation. This will often resolve wiring faults or connection issues from the initial setup.
Reset the Ring Device
Resetting your Ring device can clear out any software bugs or glitches that may be preventing proper charging:
- Locate the small setup button on the device and long press for 20-30 seconds until the device reboots and resets.
- In the Ring smartphone app, reconnect the device to your Wi-Fi network. Follow the on-screen setup process if prompted.
- In the app, check the solar panel connection status after the reset. If it now shows the panel is “Connected” then the reset likely resolved any software issues interfering with charging.
Check for Defective Parts
If you’ve verified adequate sunlight, ruled out compatibility issues, and addressed wiring problems, the issue may come down to a defective component:
- Connect your solar panel to another Ring device you know is working fine. Check to see if the solar panel charges that device. This will tell you if the solar panel itself is working properly.
- Connect a different solar panel you know works to the Ring device with issues. This will help you see if the problem is with the Ring device itself.
- By doing these swaps, you’ll be able to find out if the problem is with the solar panel or the Ring device. If one part works fine, but the other doesn’t, you know which is faulty.
- After identifying the problem, you might need to replace the faulty part, either the damaged solar panel or the Ring device, to get everything working again
Contact Ring Support

If you’ve tried every troubleshooting step and the solar panel still fails to charge your Ring device, it’s time to involve Ring customer support:
- Go to Ring’s website and contact their support team. Clearly explain what problem you’re experiencing and what you’ve tried to fix it so far.
- The Ring technicians can guide you through additional tests you might not have considered. This can help find any issues you may have missed.
- If you find out that you need to replace some parts, Ring’s support team can walk you through the process if the parts are still under warranty.
- If your parts are out of warranty, Ring’s support can help you figure out what replacement parts you need to order.
Preventing Future Charging Issues
Once your solar panel is charging reliably again, a little preventive maintenance can prevent headaches down the road:
- Clean Solar Cells Regularly: Use a soft brush and mild soap every 2-3 months to remove dirt, dust, bird droppings, etc. Take care not to scratch the delicate solar cell surface. Thorough cleaning allows for maximum sunlight capture.
- Inspect Wiring Monthly: Check wiring connections between the solar panel and Ring device monthly. Look for loose plugs, bent pins, frayed insulation, or exposed copper. Address any minor issues found to prevent bigger problems down the line.
- Use Surge Protection: For solar panels plugged into AC outlets, use a heavy-duty outdoor surge protector to protect against electrical spikes. Surges can damage charging circuitry.
- Follow Install Guidelines: When first installing, follow Ring’s guidelines for placement, wiring, ventilation, etc. Proper initial setup prevents many problems from occurring later on.
- Test Annually: Run an annual test to check voltage and current output. This can detect decreased performance, indicating a need for troubleshooting and maintenance.
- Inspect Mounting: Check mounting brackets and hardware twice yearly for corrosion, looseness, or damage. Tighten or replace as needed to keep the panel securely mounted.
- Check Connector Condition: Inspect wire connectors, ports, and plugs for corrosion, breaks, etc., a few times yearly. Bad connections can impede charging.
- Update Firmware: Keep the Ring device’s firmware updated per Ring’s instructions. Updates often improve device performance and compatibility.
- Store Spare Parts: Keep spare wiring, mounting hardware, tools, etc., on hand for quick repairs. Having the right parts ready prevents downtime.
FAQs About Ring Solar Panel Charging
Here are answers to some frequently asked questions about solar panel charging issues:
Why Does My Ring Solar Panel Charge and Then Stop?
The Ring solar panel stops charging once the device’s battery level hits 90%. This is a safety feature to prevent overcharging and potential battery damage.
The solar panel will start charging again when the battery level drops below 90%
How Many Hours of Sun Do Ring Solar Panels Need?
Ring recommends at least 4-5 hours of direct, unobstructed sunlight daily for proper charging function. Less sunlight can lead to intermittent or slow charging.
Why Is My Ring Solar Panel Flashing Red?
A flashing red light usually means the solar panel isn’t getting enough sunlight.
Remove any objects blocking the solar panel and try changing its angle to catch more sun.
Do Ring Solar Panels Work in Cloudy Weather?
They can still provide a partial charge but may charge slowly or intermittently on overcast days. Full sun is required for reliable, maximum charging.
How Long Should a Ring Solar Panel Last?
With proper maintenance and barring any manufacturing defects, a Ring solar panel will typically last 2-3 years or more. Harsh weather and environmental conditions can shorten lifespan.


