Why Z Brackets Are Your Secret Weapon for Small Solar Panel Setups
Updated:
**Mount your solar panels with confidence using Z brackets—the simplest, most versatile hardware solution for small-scale solar projects.** These L-shaped metal brackets bolt directly to your panel’s frame on one side and your mounting surface on the other, creating a low-profile, secure connection that works equally well on RV roofs, shed walls, or portable camping setups.
I discovered Z brackets during my first RV solar installation after struggling with bulky rail systems that added unnecessary weight and complexity. Within 30 minutes, I had four panels securely mounted using just eight brackets, a drill, and basic hand tools—no specialized equipment required.
**Choose Z brackets when you need flexibility.** Unlike fixed-tilt mounts or elaborate tracking systems, these brackets let you adjust panel angles by shimming or spacing them differently, making them perfect for situations where you’re mounting on uneven surfaces or need to experiment with optimal positioning. They’re also significantly lighter than rail-mounted systems, a crucial consideration when every pound matters on an RV roof or portable setup.
**The real advantage? Cost and simplicity.** You’ll spend $20-40 for a complete bracket set versus $100+ for pre-fabricated mounting kits, and installation requires no special skills—just careful measurement and basic drilling techniques. Whether you’re adding solar to a tiny house, building an off-grid cabin system, or creating a portable power station for weekend camping, Z brackets give you professional-grade mounting strength without the professional-grade price tag or complexity.
What Exactly Are Solar Panel Z Brackets?
If you’ve ever looked at solar panel mounting hardware and wondered why some brackets are shaped like the letter “Z,” you’re not alone! When I first started working with solar panels on my own projects, I remember staring at these metal pieces thinking they looked more like angular bookends than mounting equipment. But trust me, that distinctive Z-shape is exactly what makes them so effective for smaller solar installations.
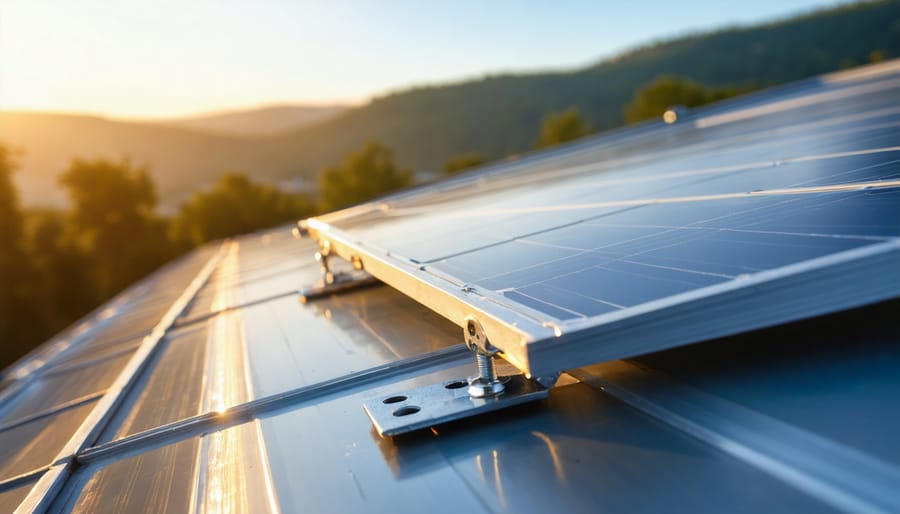
Z brackets are typically made from durable aluminum—lightweight yet strong enough to hold your panels securely in place. Picture the letter “Z” turned on its side: one flat section bolts directly to your mounting surface (like an RV roof or shed wall), while the opposite flat section attaches to the solar panel frame. The angled middle section connects these two surfaces, creating that characteristic Z profile. This simple but clever design allows the bracket to bridge the gap between your panel and the mounting surface while providing solid structural support.
What sets Z brackets apart from other mounting options? Unlike tilt mounts that angle your panels toward the sun at adjustable degrees, Z brackets typically install panels in a low-profile, parallel position close to the mounting surface. They’re different from flush mounts too—flush mounts sit completely flat against a surface with minimal spacing, while Z brackets create a small air gap (usually 1-3 inches) underneath your panel. This gap is actually beneficial because it allows airflow beneath the panel, which helps keep it cooler and more efficient.
The beauty of Z brackets lies in their simplicity. They’re straightforward to install, affordable, and perfect for applications where you need a secure, semi-permanent mounting solution without complicated hardware or professional installation.
Z brackets get their name from their distinctive Z-shaped profile, which creates standoff space between the solar panel and mounting surface.
Why Z Brackets Work So Well for Small Solar Panels
Simplicity Meets Versatility
One of the biggest advantages of Z brackets is their straightforward, no-fuss installation process. I remember when I first started working with solar panels—I was intimidated by complex mounting systems that required specialty tools I didn’t own. Z brackets changed that entirely. Most installations only need basic tools you probably already have: a drill, wrench, and screwdriver.
The beauty of Z brackets lies in their adjustability. Whether you’re mounting a compact 100-watt panel on your camper van or securing larger panels on your backyard shed, these brackets accommodate various panel sizes through their slotted design. You can fine-tune positioning to achieve the perfect angle for maximum sun exposure without complicated adjustments.
Z brackets truly shine in their versatility across different surfaces. They work brilliantly on RV roofs—both aluminum and fiberglass—where you need a secure yet lightweight solution. Wood structures like sheds or cabins? No problem. The brackets adapt seamlessly. Even metal frames and pole mounts accommodate Z brackets with ease. This universal compatibility means you’re not locked into one specific application, giving you the freedom to expand your solar setup as your needs grow without investing in entirely different mounting hardware.
The Airflow Advantage
Here’s something I learned the hard way during my first solar installation: heat is your panel’s enemy. When I mounted my initial setup flat against my RV roof, I noticed the panels got scorching hot on sunny days, and the power output wasn’t quite what I expected.
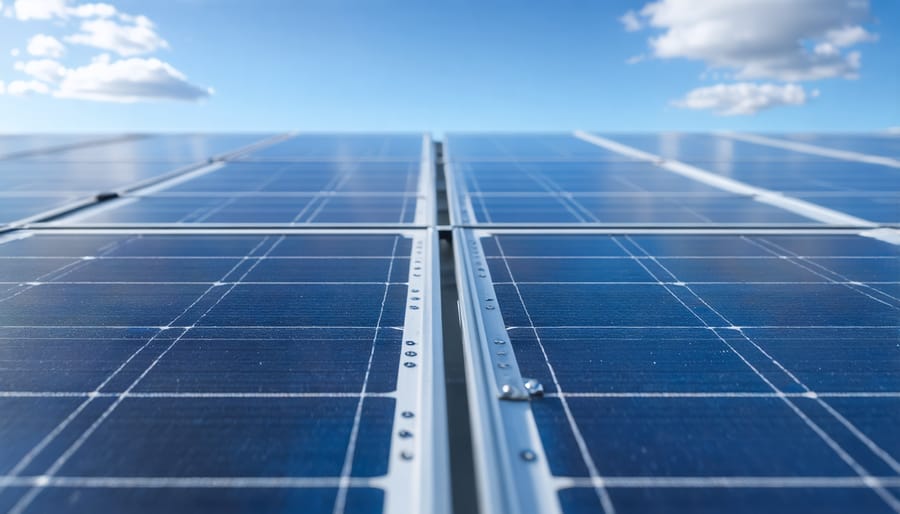
That’s where Z brackets really shine. Their standoff design creates a crucial gap—usually 3 to 6 inches—between your solar panel and whatever surface you’re mounting it on. Think of it like giving your panels room to breathe. This air gap allows natural convection to work its magic, letting hot air rise up and away from the back of the panels while cooler air flows in from below.
Why does this matter? Solar panels actually produce less electricity as they heat up. For every degree Celsius above their optimal temperature, most panels lose about 0.5% of their efficiency. That might not sound like much, but on a scorching summer day, the difference between a panel mounted flat and one on Z brackets can be 10-15% in actual power production. Better cooling means better panel efficiency, which translates directly into more usable energy for your setup—whether that’s keeping your RV fridge running or charging your off-grid batteries.
Z brackets create essential airflow space between the solar panel and RV roof, improving cooling efficiency and panel performance.
Budget-Friendly and Accessible
One of the best things about Z brackets? They won’t break the bank. When I first started exploring solar options for my camping trailer, I was shocked at how expensive some mounting systems were—hundreds of dollars for what seemed like simple hardware. Z brackets changed that equation for me entirely.
Compared to more complex mounting solutions like rail systems or adjustable tilt mounts, Z brackets typically cost a fraction of the price. You can often find quality sets for $20-$40, depending on how many brackets you need and the materials used. That’s significantly less than rail-based systems, which can easily run $100-$300 or more for similar panel capacity.
The accessibility factor is equally impressive. Z brackets are available practically everywhere—from online retailers like Amazon and eBay to local hardware stores and RV supply shops. You’re not hunting down specialty equipment or waiting weeks for custom orders. This widespread availability means you can often get your project started within days, not weeks.
For budget-conscious DIYers or those testing the solar waters before committing to larger investments, Z brackets offer an affordable entry point without sacrificing quality or reliability.
Perfect Applications for Z Bracket Mounting
RVs and Camper Vans
RVs and camper vans present unique challenges that make Z brackets an excellent mounting solution. Whether you’re working with a curved Airstream roof or a flat-topped conversion van, these versatile brackets adapt to various surfaces without requiring penetrations that could compromise your vehicle’s waterproofing.
I remember helping my neighbor Charles install panels on his vintage VW camper last summer. He was nervous about drilling into the roof, but Z brackets allowed us to use existing roof rails and heavy-duty adhesive mounts instead. The key consideration for mobile solar setups is wind resistance—you’re not just mounting panels for stationary use, but for highway speeds. Position your Z brackets to create a low-profile installation, typically no more than 2-3 inches of tilt, which reduces wind lift without sacrificing too much solar efficiency.
For weekend warriors who want quick setup and takedown, consider portable Z bracket systems that secure to roof racks. This approach lets you add or remove panels seasonally without permanent modifications. The aluminum construction keeps weight minimal—crucial when you’re mindful of your vehicle’s payload capacity. Most RV installations take just an afternoon with basic tools, giving you energy independence for off-grid adventures without the complexity of traditional mounting systems.
Portable Solar Setups for Camping
Z brackets shine when it comes to creating portable solar setups for your camping adventures. I learned this firsthand during a week-long camping trip where my quick-deploy solar system kept our phones charged and lights running without hassle.
The beauty of Z brackets for camping lies in their versatility. You can mount them to lightweight aluminum frames or attach them to portable folding cases, creating semi-permanent systems that pack flat for transport but deploy quickly at your campsite. Simply secure the brackets to your frame using basic bolts, and you’ve got a stable platform that can be angled toward the sun throughout the day.
Many campers prefer building hinged systems where Z brackets allow panels to fold like a book, protecting the solar cells during travel while maintaining the mounting integrity. These setups are perfect for weekend warriors who want reliable power without the complexity of permanent installations—just unfold, prop up, and you’re generating clean energy within minutes.
Sheds, Cabins, and Off-Grid Structures
Z brackets really shine when you’re setting up solar on sheds, garden structures, or remote cabins where simplicity is everything. I’ve mounted panels on three different sheds using Z brackets, and honestly, they’re perfect for these applications—no fancy rails needed, just straightforward mounting that gets the job done.
For shed roofs, Z brackets let you attach small panels directly to existing corrugated metal or shingle roofing with minimal fuss. If you’re powering a workshop or garden shed, you’ll typically only need 2-4 panels, making Z brackets the most cost-effective choice. The low profile also means less wind resistance—important when mounting on smaller structures that might not be as robust as your house.
Off-grid cabins benefit tremendously from this approach too. When you’re hauling equipment to a remote location, compact Z brackets are much easier to transport than bulky rail systems. I remember carrying mounting gear to a friend’s cabin last summer—the Z brackets weighed almost nothing compared to traditional hardware.
Just ensure your shed’s roof structure can support the weight, and you’re golden!
DIY Solar Generators and Backup Systems
Z brackets shine in portable solar applications, and I’ve seen some incredibly creative DIY backup systems built around them. If you’re constructing a custom solar generator box—whether it’s a rolling power station for emergencies or a compact camping unit—Z brackets offer the perfect mounting solution for attaching panels to plywood or metal enclosures.
The beauty here is flexibility. You can position your panels at optimal angles by mounting the Z brackets on raised platforms or adjustable frames you’ve built yourself. I remember helping a neighbor mount a 100-watt panel on his homemade generator box using just four Z brackets and basic hand tools—the whole setup took under 30 minutes and has powered his essentials through multiple outages.
These brackets work particularly well because they create standoff space for ventilation while keeping everything secure during transport. Just ensure your generator box frame can handle the panel weight and wind loads if you’re using it outdoors.
How to Choose the Right Z Brackets for Your Project
Sizing Considerations
Getting your Z bracket sizing right is crucial for a safe, sturdy installation—and it’s simpler than you might think! The key is matching bracket capacity to your panel dimensions and weight.
Here’s a practical rule of thumb I’ve learned through my own projects: for panels under 100W (typically measuring around 47″ x 21″ and weighing 15-20 pounds), four Z brackets—two on top, two on bottom—work perfectly. When I installed my first 50W panel on my camper, this setup provided rock-solid stability even at highway speeds.
For larger panels between 100-200W, you’ll want to bump up to six brackets (three pairs) to distribute the weight evenly. Anything over 200W? Consider eight brackets or switching to a rail-based mounting system instead.
Always check your bracket’s weight rating—most standard Z brackets handle 30-50 pounds each. A good safety margin is planning for double your panel’s actual weight to account for wind load and vibration. When in doubt, add an extra pair of brackets; it’s inexpensive insurance for your investment!
Material and Durability
When I first installed Z brackets on my RV, I learned the hard way that material choice really matters. Most quality Z brackets come in either aluminum or galvanized steel. Aluminum brackets are lightweight, naturally rust-resistant, and perfect for smaller panels—I’ve had mine exposed to sun and rain for three years without any corrosion. Steel brackets offer superior strength for heavier panels and high-wind areas, but make sure they’re hot-dip galvanized or powder-coated to prevent rust.
Look for brackets at least 3mm thick for aluminum or 2mm for steel. Quality brackets should have smooth edges without sharp burrs, uniform coating, and pre-drilled mounting holes that actually line up! Check customer reviews for real-world durability reports—photos of brackets after months outdoors tell you everything. Remember, these brackets are your panel’s lifeline, so spending a few extra dollars on corrosion-resistant hardware now saves headaches later.
Adjustability and Angle Options
Most Z brackets come in two varieties: fixed and adjustable. Fixed brackets lock your panels at a single angle—typically flush against your mounting surface or at a slight pre-set tilt. They’re simpler, more affordable, and perfect for installations where you’ve already calculated the ideal angle for your location.
Adjustable Z brackets, on the other hand, let you change the tilt angle throughout the year. I remember Charles mentioning how he tweaks his RV panel angles when traveling between summer camping in Oregon and winter trips to Arizona—those seasonal adjustments can boost energy capture by 10-25%.
For stationary setups like sheds or cabins, adjustable brackets shine during spring and fall transitions. Winter sun sits lower on the horizon, so a steeper tilt helps. Summer sun rides high, benefiting from a flatter angle.
Consider adjustable brackets if you’re in an area with dramatic seasonal sun variations or if your setup moves frequently. Stick with fixed brackets for permanent installations where simplicity and weather-resistance matter most.
Installing Z Brackets: A Step-by-Step Walkthrough
Tools and Materials You’ll Need
Before you start mounting your solar panels with Z brackets, let’s gather everything you’ll need. Having the right tools on hand makes the installation process much smoother—trust me, there’s nothing worse than being halfway up a ladder and realizing you forgot the drill bit!
**Essential Tools:**
– Power drill with appropriate drill bits (sized for your mounting surface)
– Socket wrench or driver set
– Stainless steel screws and bolts (typically included with quality Z brackets)
– Silicone sealant or butyl tape for weatherproofing
– Measuring tape and pencil
– Level (a small torpedo level works great)
**Optional but Helpful Items:**
– Stud finder (especially for roof installations)
– Safety goggles and work gloves
– Cable ties for wire management
– UV-resistant thread locker for securing bolts in high-vibration applications like RVs
Most Z bracket kits come with basic hardware, but I always recommend having extra screws on hand—just in case!
Planning Your Panel Placement
Before you grab your drill, let’s talk location—because even the best Z brackets won’t help if your panels are shaded half the day. I learned this the hard way when I mounted my first panel on what seemed like a perfect shed roof, only to realize a nearby tree created shadows every afternoon. Not my finest moment!
Start by observing your intended mounting surface throughout the day. You want maximum sun exposure, ideally south-facing in the Northern Hemisphere (north-facing down under). Walk around at different times—morning, noon, and late afternoon—to spot potential shade from trees, buildings, or other obstacles. Even partial shading can significantly reduce your panel’s output.
Next, think about cable routing. Your panels need to connect to your charge controller or inverter, so plan a clean path that protects wires from weather and foot traffic. Measure twice, mount once!
Once you’ve chosen your spot, use a pencil or chalk to mark where each Z bracket will sit. Hold your panel up temporarily to visualize the final placement, ensuring brackets align with the panel’s mounting holes. Space them evenly—typically one bracket at each corner for smaller panels, or additional mid-point brackets for larger ones. This planning prevents those “oops” moments that require filling unnecessary holes later.
Mounting the Brackets Securely
Now comes the crucial part—actually securing those Z brackets to your mounting surface. I learned this the hard way during my first RV installation when a poorly sealed bracket let water seep in during a rainstorm. Let’s make sure that doesn’t happen to you!
Start by positioning your bracket exactly where you marked earlier. For **wood surfaces** (like shed roofs or RV panels), pre-drill pilot holes slightly smaller than your lag bolts to prevent splitting. Use stainless steel hardware to avoid rust. On **metal surfaces**, self-tapping screws work beautifully, but double-check you’re hitting solid framework, not just thin sheeting. **Fiberglass roofs** require extra care—use backing plates inside when possible to distribute the load and prevent cracking.
Before tightening everything down, apply a generous bead of marine-grade sealant (like Dicor or 3M 4200) around each bolt hole and under the bracket’s base. This creates a waterproof barrier that’s absolutely essential for outdoor installations. Tighten bolts firmly but avoid overtightening, which can compress sealant too much or crack fiberglass.
Finally, run your finger around each bracket to smooth excess sealant into a small “dam” that redirects water away from the fasteners. Let it cure for 24 hours before mounting panels.
Installing Z brackets requires only basic tools and can be completed by DIY enthusiasts in a single afternoon.
Attaching Your Solar Panel
Once your Z brackets are securely mounted, it’s time to attach your solar panel—this is where everything comes together! Start by carefully lifting the panel onto the brackets, making sure the mounting holes on the panel’s frame align perfectly with the bracket slots. I remember my first installation; I was so eager that I nearly dropped the panel trying to do it alone. Trust me, grab a friend for this part, especially if you’re working on a roof or RV.
With the panel positioned, insert stainless steel bolts through the frame holes and into the Z bracket channels. Hand-tighten them first to ensure everything lines up correctly, then use a socket wrench to secure them firmly—but don’t overtighten, as this can crack the panel frame. Check that your panel sits flush against the brackets without wobbling.
Before you celebrate, double-check the panel’s alignment using a level, and verify all electrical connections are away from edges where they might get pinched. Safety first: always work with a partner, wear gloves to protect against sharp edges, and never install during windy conditions.
Common Mistakes and How to Avoid Them
When Charles installed his first RV solar panel, he learned some valuable lessons the hard way—and you can benefit from his experience! One of the most common mistakes is inadequate sealing around bolt holes. Even tiny gaps can let water seep in, leading to roof damage over time. Always use marine-grade sealant generously, and don’t skip the step of checking your seals every few months, especially before rainy seasons.
Another frequent error is incorrect bracket spacing. Charles initially placed his Z brackets too far apart, thinking he’d save money on hardware. The result? His panel flexed uncomfortably during highway drives. Follow manufacturer recommendations closely—typically brackets should be positioned no more than 18-24 inches apart for optimal support. When in doubt, add an extra bracket rather than skipping one.
Over-tightening bolts might seem like a good idea for extra security, but it actually creates problems. Charles cracked his first set of mounting feet by cranking down too hard with his drill. Hand-tighten your bolts first, then use a torque wrench if specified. You want firm and secure, not stripped threads or stressed metal.
Perhaps the biggest oversight? Ignoring wind load considerations. Your setup needs to withstand more than just sunny days. Charles hadn’t considered that his van would travel at highway speeds—essentially creating significant wind pressure. Calculate the wind load for your specific situation, and don’t hesitate to add reinforcement if you’re mounting in exposed locations or planning frequent travel.
Remember, every experienced DIYer started as a beginner. These mistakes are part of the learning process, and catching them early means a safer, longer-lasting solar installation.
You’ve now got everything you need to bring your small solar projects to life. Z brackets really do remove the biggest barriers—they’re affordable, straightforward to work with, and forgiving enough for first-timers. I remember my own hesitation before my first installation, second-guessing every measurement. But once I actually started, I realized these simple pieces of metal make the whole process surprisingly manageable.
Don’t let perfectionism hold you back from getting started. Your first installation might not be flawless, and that’s completely okay. Every solar enthusiast began somewhere, and the hands-on experience you’ll gain is invaluable. Whether you’re mounting a single panel on your shed or setting up a small array for your RV, you’re taking a meaningful step toward energy independence.
We’d love to hear how your project goes! Share your setup photos, ask questions when you’re stuck, or offer tips you’ve discovered along the way. This community thrives when we learn from each other’s successes and challenges. What will you power with your first solar installation?
How useful was this post?
Click on a star to rate it!
Average rating 0 / 5. Vote count: 0
No votes so far! Be the first to rate this post.
We are sorry that this post was not useful for you!
Let us improve this post!
Tell us how we can improve this post?
charlesnoble
Here at Spheral Solar, I’m a hands-on solar power enthusiast, constantly exploring and experimenting with DIY solutions. I’m dedicated to sharing my discoveries, insights, and even the bumps I hit along the way, all in the pursuit of a more sustainable future.
Why Your Solar Panels Need the Right Mounting System… by Charlesnoble February 7, 2026 Your solar panels are only as reliable as what holds them in place. A solar array mounting system is the structural foundation that secures your panels to rooftops, ground surfaces, RVs, or portable setups, and choosing the wrong one can lead to damage, reduced efficiency, or even safety hazards. Think…
Why Your Solar Panel Connectors Matter More Than You Think by Charlesnoble March 4, 2026 Choose MC4 connectors for most residential solar installations—they’ve become the industry standard since 2011, offering waterproof reliability and simple snap-together connections that even first-time DIYers can master in minutes. I learned this the hard way when my first solar setup used mismatched connectors that corroded after one rainy season, costing…
Wire Your Solar System Right the First Time (Before… by Charlesnoble March 18, 2026 Sketch your complete solar system on paper before purchasing a single component—mapping the physical distance from your solar panels to the charge controller, then to the battery bank, and finally to your inverter will reveal the exact wire gauges you need and prevent the costly mistake of voltage drop that…
Why Series-Parallel Is the Sweet Spot for Small Solar Setups by Charlesnoble December 2, 2025 Connect two panels in series to double your voltage, then wire two of these series pairs in parallel to maintain higher voltage while increasing your amperage—this series-parallel configuration gives you the sweet spot between performance and practicality for most small-scale solar setups. I learned this the hard way during my…
How to Test Your DIY Solar System Like a Pro… by Charlesnoble March 19, 2026 Flip the main DC disconnect three times while monitoring voltage drop—this single action reveals whether your connections can handle full load without dangerous resistance buildup. Check every MC4 connector with an infrared thermometer under peak sun; any reading more than 10 degrees above ambient temperature signals a faulty crimp that…
How Solar Monitoring Systems Actually Talk to Each… by Charlesnoble January 22, 2026 Check your solar panel’s data sheet for the communication protocol it supports—most modern systems use Modbus RTU, RS485, or CAN bus, and matching this protocol with your monitoring hardware prevents compatibility headaches before you start. Download the manufacturer’s protocol documentation and verify voltage levels match between your inverter’s output (typically…
Subscribe for handpicked DIY projects, exclusive tips, and giveaways.
Monitor your greenhouse temperature daily during peak sun hours—if it consistently exceeds 85°F or condensation builds up on interior surfaces, you’re losing crops to heat stress and creating the perfect environment for fungal diseases. A greenhouse solar ventilation fan addresses both problems without adding a penny to your electricity bill, making it one of the… Read more: Why Your Greenhouse Needs a Solar Ventilation Fan (Before Summer Hits)
Press and hold the adjust button (usually bottom-left) on your G-Shock for three seconds until the time display starts flashing—this unlocks manual time adjustment on most models. Navigate between hours, minutes, and date using the mode button, then use the forward/reverse buttons to change values. If you own a radio-controlled G-Shock with Multi-Band 6 technology,… Read more: How to Adjust Time on Your G-Shock Solar Watch (Without Breaking It)
Picture this: you’ve just installed your third solar panel on the roof, wires dangling everywhere, and suddenly you realize your two-panel string needs to connect with your new addition. You need a solar branch connector, but you’re staring at product listings wondering if you’re about to make an expensive mistake. Solar branch connectors are the… Read more: Why Your Solar Array Needs Branch Connectors (And How to Install Them Right)


")

")

")
")
")

")

")
")