Why Series-Parallel Is the Sweet Spot for Small Solar Setups
Updated:
Connect two panels in series to double your voltage, then wire two of these series pairs in parallel to maintain higher voltage while increasing your amperage—this series-parallel configuration gives you the sweet spot between performance and practicality for most small-scale solar setups.
I learned this the hard way during my first RV solar installation when I wired all four panels in series and discovered my charge controller couldn’t handle the voltage spike. The series-parallel approach solves this by letting you match your system’s voltage requirements while boosting current output, making it ideal for 12V or 24V systems that need more power than two panels can deliver alone.
Here’s why this matters for your project: If you’re running a camper, off-grid cabin, or backup power system, four panels in series-parallel typically generate 400-600 watts while keeping voltage manageable for standard charge controllers and batteries. You’ll get better performance in partial shade compared to pure series wiring, and you’ll avoid the current limitations of pure parallel configurations.
The beauty of this setup lies in its flexibility. You can start with two panels wired in series, test your system, then add the second series pair in parallel when you’re ready to expand. This staged approach reduces upfront costs and lets you troubleshoot each connection before scaling up. Whether you’re chasing energy independence or just want reliable power for weekend adventures, understanding series-parallel wiring unlocks the full potential of your four-panel array without overwhelming your electrical system or your budget.
What Does Series-Parallel Actually Mean?
Series Connection: Stacking Voltage
When you connect solar panels in series, you’re essentially stacking their voltages together. Think of it like connecting batteries end-to-end in a flashlight. Each panel’s voltage adds up while the current (amperage) stays the same as a single panel.
Here’s a practical example from my own setup: I have four 100-watt panels, each producing 18 volts and 5.5 amps. When I connect two of them in series, the voltage doubles to 36 volts, but the current remains at 5.5 amps. It’s like climbing a ladder—each panel lifts you higher in voltage.
Imagine water flowing through pipes at different heights. Series connection is like stacking pipes vertically. The pressure (voltage) builds as you go higher, but the flow rate (current) through each section stays constant. This is why we use series connections when we need to match higher voltage requirements for our charge controllers or inverters.
The key thing to remember: series connections are your voltage boosters. You connect the positive terminal of one panel to the negative terminal of the next, creating a voltage chain. This becomes especially useful when working with MPPT charge controllers that need higher input voltages to operate efficiently.
Parallel Connection: Boosting Current
When you connect solar panels in parallel, you’re essentially creating multiple pathways for electricity to flow. Think of it like opening additional checkout lanes at a grocery store—more lanes mean more customers (or in our case, more electrons) can move through at once.
In a parallel connection, the positive terminals connect together, and the negative terminals connect together. Here’s what happens: the voltage stays the same as a single panel, but the current (measured in amps) adds up. So if you have two 12-volt panels, each producing 5 amps, connecting them in parallel gives you 12 volts at 10 amps total.
I learned this principle the hard way during my first RV installation. I needed more charging power for my battery bank but couldn’t exceed 12 volts. Parallel wiring was the perfect solution—I doubled my amperage without changing voltage, which kept my charge controller happy and my batteries charging faster on cloudy days.
This configuration is particularly useful when your devices need a specific voltage but require more current than a single panel can provide. It’s like having backup generators running simultaneously rather than one powerful unit.
Series-Parallel: Best of Both Worlds
Here’s where things get really interesting. The series-parallel configuration, often called 2s2p (that’s 2 panels in series, 2 panels in parallel), gives you the sweet spot between voltage and current. Think of it as having your cake and eating it too.
When I first discovered this approach during a cabin project in Vermont, it solved a problem I’d been wrestling with for weeks. My charge controller needed higher voltage to work efficiently, but I also wanted the current boost that parallel wiring provides. The 2s2p configuration delivered both.
Here’s how it works: you wire two panels together in series to double your voltage, then you do the same with your other two panels. Next, you connect these two series pairs in parallel. So if you started with four 100-watt panels rated at 18 volts and 5.5 amps each, you’d end up with 36 volts and 11 amps. That’s enough voltage to keep most charge controllers happy while giving you solid current for faster charging.
This balanced approach offers real advantages. You get better performance in partial shade than pure series, since one shaded pair won’t kill your entire system. You also reduce voltage drop in your wires compared to pure parallel, which means less energy wasted as heat. For RV setups and small off-grid cabins, this configuration hits the efficiency sweet spot without overcomplicating things. Plus, most beginner-friendly charge controllers work beautifully with these voltage and current levels.
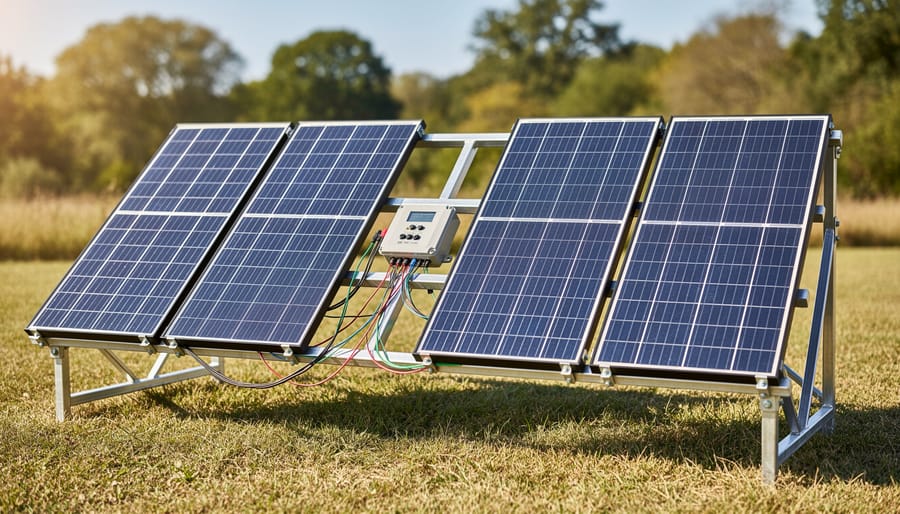
Four solar panels arranged in a series-parallel configuration provide the ideal balance of voltage and current for small off-grid applications.
Why 4 Panels in Series-Parallel Makes Sense for Small Projects
Voltage Compatibility with Common Charge Controllers
Here’s the thing about charge controllers—they’re pretty particular about the voltage they’ll accept. Most common 12V charge controllers work best with panel input between 18-22 volts, while 24V controllers typically need 36-44 volts. Too high and you risk damaging your equipment; too low and charging becomes inefficient or stops altogether.
This is where the 4-panel series-parallel configuration really shines. When I first started experimenting with my RV setup, I learned this lesson the hard way. Running four panels purely in series sent my voltage soaring to nearly 80 volts—way beyond what my controller could handle. But switching to series-parallel? Perfect.
Here’s the practical breakdown: With two panels in series, you’re doubling the voltage of a single panel. If each panel produces 18 volts, your series pair outputs 36 volts—ideal for a 24V system. Connect two of these pairs in parallel, and you maintain that same 36 volts while doubling your current capacity. For 12V systems, panels rated around 18-20 volts work beautifully in this configuration.
The beauty is you’re staying right in that sweet spot where your PWM or MPPT charge controller operates most efficiently, maximizing the power transfer to your batteries without any voltage-related headaches. It’s a Goldilocks solution—not too high, not too low, just right.
Shading Resilience You’ll Actually Notice
Here’s where series-parallel really shines in the real world. I learned this the hard way on a camping trip when a tall pine cast shade across half my panels right around noon—the exact time I needed the most power to charge my gear.
In a pure series setup, shading even one panel can drastically reduce your entire system’s output because all panels are in one chain. It’s like a garden hose with a kink—everything downstream suffers. But with our 4-panel series-parallel configuration, you’ve got two separate strings. When shade hits one string, the other keeps producing at full capacity.
Picture this common scenario: you’re parked at a trailhead and your van’s shadow creeps across two of your panels as the sun moves. With series-parallel, those two shaded panels drop in output, but your other string keeps humming along. You’re still getting roughly 50% power instead of watching everything grind to a crawl.
The parallel connections give your system multiple pathways for electricity to flow. Think of it like having two lanes on a highway instead of one—if there’s construction in one lane, traffic still moves in the other. It won’t match full-sun performance, but you’ll actually notice the difference when comparing your phone’s charge rate to what a pure series setup would deliver in the same conditions.
Safety and Manageability
Here’s what I love about working with four panels—you’re staying in that comfortable DIY safety zone. When you wire two pairs in series-parallel, your voltage typically stays under 100V, which is far more forgiving than those massive grid-tied arrays. I learned this the hard way during my first solar project when I got too ambitious with voltage levels and spent hours troubleshooting problems I’d created for myself.
With four panels, you can actually manage everything yourself without feeling overwhelmed. If something goes wrong, you’ve only got four panels to check instead of a dozen. Testing connections becomes straightforward, and identifying a faulty panel or loose wire takes minutes instead of hours. The reduced system complexity means fewer points of failure, which translates to less frustration and more confidence as you build your skills.
Another safety win: four panels are physically manageable. You can mount, wire, and troubleshoot without needing a second person on a ladder or wrestling with unwieldy arrays. For anyone just getting started with solar, this configuration builds your knowledge without exposing you to the higher voltages and currents that require professional certification.
Real-World Applications Where This Configuration Shines
Series-parallel solar configurations excel in camping and overlanding scenarios, reliably powering refrigerators, lights, and essential devices.
Camping and Overlanding Setups
I’ve watched countless campers struggle with dead batteries until they discovered the reliability of four panels in series-parallel. This setup is perfect for powering your 12V camping fridge, LED lighting strips, phone chargers, and even laptop throughout multi-day trips.
The beauty here is redundancy. If one panel gets shaded by a tree or your roof rack, you’re still generating power from the other three. I learned this the hard way during a rainy weekend in Oregon when two of my panels were partially covered, but my fridge kept humming along thanks to the parallel connections maintaining voltage.
For overlanders, portability matters. Four 100-watt panels offer flexibility—you can set up two near your vehicle and position the others in sunlight as you move camp. Understanding what 100-watt panels can power individually helps you appreciate how four together transform your mobile setup.
Weather considerations are crucial. Always secure panels against wind, and keep wiring connections waterproof with proper junction boxes. Marine-grade connectors have saved my system more than once during unexpected storms.
Small Cabin or Shed Power
A series-parallel setup with four panels hits a sweet spot for small cabin and shed applications. I’ve helped several friends set up weekend retreats this way, and the consistent 24V output makes it perfect for running LED lights, charging power tools, and keeping a small refrigerator going when you’re off-grid.
The beauty here is reliability. When I installed a system at my buddy Mike’s fishing cabin, we calculated his basic needs: lighting, a phone charger, and occasionally a small fan. Four 100-watt panels in series-parallel gave him about 400 watts of capacity with built-in voltage stability. Even on partly cloudy days, he’s got enough juice for essentials.
For mounting small solar panels on shed roofs, this configuration simplifies your charge controller selection since you’re working with standard 24V systems. Most quality charge controllers handle this voltage range beautifully, and you won’t need expensive specialized equipment. Plus, if one panel underperforms due to shade from nearby trees, your parallel connections keep power flowing from the others.
Portable Solar Generators
Here’s where things get really fun for DIYers. A series-parallel setup with 4 panels is perfect for building your own portable power station or upgrading a commercial one. I’ve helped several folks in our community wire panels this way to create rugged, expandable systems for camping and emergency backup.
The beauty is flexibility. You can mount two panels per “bank” on opposite sides of a portable frame, then parallel them together. This gives you redundancy – if one bank gets shaded, the other keeps producing. Most portable power stations accept 12-24V input, making this configuration ideal.
For portable solar projects, use MC4 connectors and keep wire runs short to minimize losses. I recommend adding a small junction box between your panels and charge controller for easy disconnection. Just remember: series connections first within each bank, then parallel those banks together. This approach has saved me countless headaches during setup and teardown at campsites.
How to Wire 4 Solar Panels in Series-Parallel
What You’ll Need
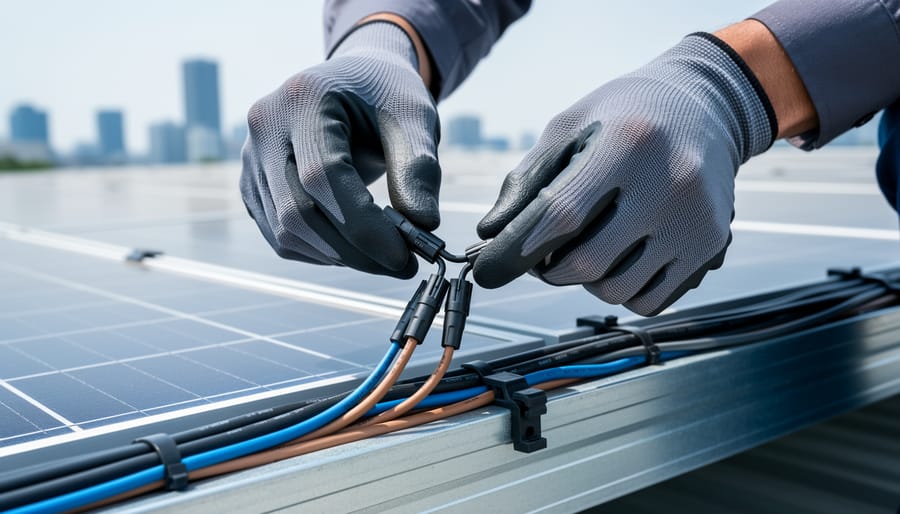
Before you start wiring your panels, let me share what I’ve learned from countless projects: having the right materials saves you from frustration down the road. You’ll need MC4 connectors, which are the industry standard for solar panel connections. These weatherproof connectors snap together easily and ensure reliable electrical contact. Trust me, trying to save money with generic connectors isn’t worth the headache.
For wiring, I recommend 10 AWG cable for most setups under 30 feet, though you might need 8 AWG for longer runs to minimize voltage drop. This matters because undersized wire can waste precious energy.
You’ll absolutely need appropriately rated fuses or circuit breakers between your battery and panels. These protect your investment from shorts and overcurrent situations. I learned this the expensive way when I skipped them on my first project.
Finally, grab a decent multimeter. This simple tool lets you verify voltages and connections before finalizing everything. I use mine constantly to troubleshoot and confirm my wiring is correct. You don’t need a fancy model, just something that reads DC voltage and current accurately.
Step-by-Step Wiring Process
Alright, let’s walk through this together step by step. I remember my first series-parallel setup – I triple-checked everything, and you should too! Safety first: make sure all connections are made with panels facing away from direct sunlight or covered with a tarp to prevent live current generation.
Step 1: Create your first series string. Connect Panel 1’s positive terminal to Panel 2’s negative terminal using appropriately gauged wire. This leaves you with one free positive terminal and one free negative terminal – these become the output leads for String 1. Double-check your polarity with a multimeter before proceeding.
Step 2: Build your second series string identically. Connect Panel 3’s positive to Panel 4’s negative. Again, you’ll have two output leads – one positive, one negative. At this point, you have two independent series strings producing double your panel voltage.
Step 3: Connect the strings in parallel. Take the positive output from String 1 and connect it to the positive output from String 2. Do the same with both negative outputs. Use wire nuts or terminal blocks rated for your amperage. This is crucial – mixing up polarities here can damage your panels.
Step 4: Install protection devices. Add an inline fuse or circuit breaker rated at 125% of your maximum expected current between your parallel connection and the charge controller. If your panels lack bypass diodes, consider adding blocking diodes to prevent reverse current flow at night.
Step 5: Test everything. With panels still covered, verify all connections are tight and properly insulated. Uncover one panel at a time while monitoring voltage and current with your multimeter. You should see your expected voltage (two panels in series) and double the amperage as you uncover both strings.
Take your time with each connection – rushing leads to mistakes that can be dangerous and expensive to fix.
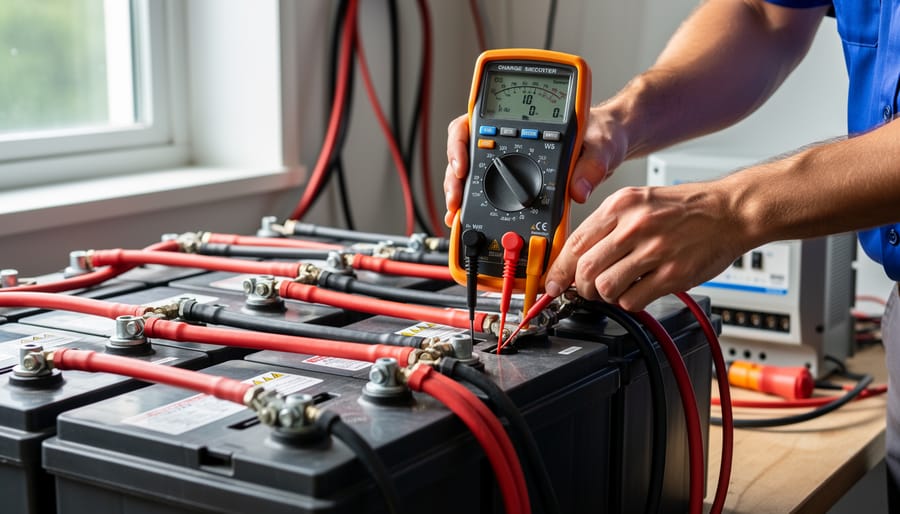
Testing Your Configuration
Before connecting anything to your charge controller, let’s make sure everything’s working correctly. Grab your multimeter and set it to DC voltage. First, test each parallel pair individually. You should see roughly 18-22 volts from each pair, depending on your panel specifications and sunlight conditions. I learned this lesson the hard way when I once skipped testing and spent an hour troubleshooting a loose connection that could’ve been caught in 30 seconds.
Next, measure the voltage across your entire series-parallel configuration. You should see double the voltage of a single pair, around 36-44 volts for most residential panels. If the numbers don’t match, check your connections carefully. Also verify there’s continuity and no voltage drop across your wires. Testing in full sunlight gives the most accurate readings. Once everything checks out, you’re ready to safely connect to your charge controller, knowing your system is properly configured.
Testing voltage and connections with a multimeter ensures your series-parallel configuration is wired correctly before connecting to the charge controller.
Common Mistakes to Avoid (I’ve Made Them So You Don’t Have To)
Mixing Different Panel Specs
Here’s something I learned the hard way during my first series-parallel setup: mixing panels with different specs is asking for trouble. When you connect panels with mismatched wattage, voltage, or current ratings, your system performs at the level of your weakest panel. Think of it like a relay race where one runner is much slower—everyone else has to wait.
In a series connection, mixing panels with different current ratings means the entire string operates at the lowest current. In parallel, voltage mismatches create similar bottlenecks. Even worse, these mismatches can cause hot spots, reduce efficiency by 25% or more, and potentially damage your panels over time.
I once mixed a 100W panel with three 150W panels, thinking I’d still get decent output. The result? My entire array underperformed dramatically. Always check your panel specifications before wiring. Matching panels isn’t just recommended—it’s essential for safety and performance. Trust me, buying matching panels upfront saves headaches and money down the road.
Skipping Overcurrent Protection
When you connect solar panels in parallel, you’re creating multiple pathways for current to flow, which means you need to protect against potential overcurrent situations. Here’s something I learned the hard way during my first RV solar install: skipping fuses seemed like a cost-saving measure until one panel developed a fault and tried to backfeed current through another panel’s wiring. Not fun.
In a series-parallel setup, you need overcurrent protection on each parallel string before they combine. Think of it as giving each panel string its own emergency shut-off valve. Install inline fuses or circuit breakers rated for DC current on the positive wire of each parallel branch, ideally as close to the panel connection point as possible. For a typical 4-panel system with two strings of two panels, you’ll need two fuses.
Use fuses rated slightly above your panel’s short-circuit current—usually 15-20 amps for most residential panels. This protects your wiring from overheating and prevents damaged panels from becoming fire hazards. It’s a small investment that could save your entire system.
Wrong Wire Gauge
Here’s something I learned the hard way during my first RV solar setup: when you connect panels in parallel, the current adds up. If each panel produces 5 amps, two panels in parallel will push 10 amps through your wire. Using wire that’s too thin creates resistance, which means wasted energy as heat and potential fire hazards. For parallel connections, you’ll typically need thicker wire (lower AWG number) than you’d use for series-only setups. I once used 14-gauge wire when I really needed 10-gauge, and my system lost nearly 15% efficiency. Always calculate your total current and check wire gauge charts before making connections.
Quick Reference: Choosing Your Panel Specs
Choosing the right panels for your 4-panel series-parallel setup doesn’t have to feel overwhelming. Let me walk you through some practical considerations that’ll help you make confident decisions.
For most small-scale applications like weekend RV trips or powering a shed workshop, panels in the 100-150 watt range work beautifully in this configuration. I’ve found that four 100-watt panels give you a solid 400-watt system that’s manageable to install and maintain without breaking the bank. If you’re running a small cabin or need more power for appliances, stepping up to 150-watt panels gets you to 600 watts total, which handles refrigerators and basic electronics comfortably.
The key thing to remember is matching your panel wattage ratings to your actual power needs, not just buying the biggest panels you can afford. I learned this the hard way during my first RV project when I overbuilt my system and ended up with panels that were too heavy for my roof rack.
Voltage matters too. Most hobbyists working with 12-volt battery banks should look at panels rated around 18-22 volts. This gives you the voltage headroom needed for proper charging. For 24-volt systems, you’ll want panels in the 36-40 volt range.
Here’s where our calculator tools really shine. Head over to our solar array calculator on the site and plug in your specific power requirements. It’ll help you determine whether 100-watt or 150-watt panels make more sense for your situation, and it factors in real-world efficiency losses that most online calculators ignore.
Remember, four identical panels are essential for this configuration to work properly, so buy all your panels from the same manufacturer batch when possible.
You’ve made it this far, and that’s already something to celebrate! Understanding how to wire 4 solar panels in series-parallel isn’t just about connecting some wires—it’s about taking real control of your energy future, even if you’re starting small.
I remember when I first worked with this exact configuration for a weekend camping setup. I was nervous about getting it wrong, second-guessing every connection. But here’s what I learned: this 4-panel arrangement is genuinely forgiving and perfectly sized for learning the ropes. You’re not overwhelmed with complexity, yet you’re getting hands-on experience with both series and parallel connections that’ll serve you well as you expand.
This configuration works beautifully for RVs, small cabins, backup power systems, or even just experimenting in your backyard. The balanced voltage and current make it practical, and the redundancy built into parallel strings means you’re not completely out of power if something goes sideways.
Here’s my challenge to you: start planning your first setup today. Use our solar calculators on the site to dial in your specific needs—they’ll help you choose the right panel sizes and understand what you can realistically power. And once you’ve got your system running, come back and share your experience in the comments. What worked? What surprised you? Where did you struggle?
The solar community thrives when we learn from each other. Your first project might feel small, but it’s the foundation for something bigger. Take that first step—you’ve got this.
How useful was this post?
Click on a star to rate it!
Average rating 0 / 5. Vote count: 0
No votes so far! Be the first to rate this post.
We are sorry that this post was not useful for you!
Let us improve this post!
Tell us how we can improve this post?
charlesnoble
Here at Spheral Solar, I’m a hands-on solar power enthusiast, constantly exploring and experimenting with DIY solutions. I’m dedicated to sharing my discoveries, insights, and even the bumps I hit along the way, all in the pursuit of a more sustainable future.
Wire Your Solar System Right the First Time (Before… by Charlesnoble March 18, 2026 Sketch your complete solar system on paper before purchasing a single component—mapping the physical distance from your solar panels to the charge controller, then to the battery bank, and finally to your inverter will reveal the exact wire gauges you need and prevent the costly mistake of voltage drop that…
Why 8 AWG Solar Wire Might Be Wrong for Your System… by Charlesnoble December 29, 2025 Calculate your system’s maximum current first—8 AWG solar wire safely handles 40-55 amps depending on installation conditions, making it the sweet spot for mid-sized solar arrays between 1,200 and 3,000 watts at 12-24 volts. If your panels produce more than 40 amps combined, you need thicker wire; less than 30…
Why Your Solar Panel Connectors Matter More Than You Think by Charlesnoble March 4, 2026 Choose MC4 connectors for most residential solar installations—they’ve become the industry standard since 2011, offering waterproof reliability and simple snap-together connections that even first-time DIYers can master in minutes. I learned this the hard way when my first solar setup used mismatched connectors that corroded after one rainy season, costing…
Why Lithium-Ion Batteries Changed Everything About… by Charlesnoble December 3, 2025 Match your battery’s voltage to your solar panel system—12V, 24V, or 48V configurations must align perfectly, or you’ll waste energy through conversion losses and potentially damage expensive equipment. Check the battery’s amp-hour (Ah) rating against your daily power consumption: multiply your total watt-hours by 1.2 to account for inefficiency, then…
Why Your Solar Setup Needs Both a Charge Controller… by Charlesnoble April 6, 2026 Check the maximum voltage and current ratings first—these determine whether your controller can actually handle your solar panel array without frying itself on the first sunny day. I learned this the hard way when my first DIY system shut down every afternoon because I’d paired 600 watts of panels with…
How to Test Your DIY Solar System Like a Pro… by Charlesnoble March 19, 2026 Flip the main DC disconnect three times while monitoring voltage drop—this single action reveals whether your connections can handle full load without dangerous resistance buildup. Check every MC4 connector with an infrared thermometer under peak sun; any reading more than 10 degrees above ambient temperature signals a faulty crimp that…
Subscribe for handpicked DIY projects, exclusive tips, and giveaways.
Monitor your greenhouse temperature daily during peak sun hours—if it consistently exceeds 85°F or condensation builds up on interior surfaces, you’re losing crops to heat stress and creating the perfect environment for fungal diseases. A greenhouse solar ventilation fan addresses both problems without adding a penny to your electricity bill, making it one of the… Read more: Why Your Greenhouse Needs a Solar Ventilation Fan (Before Summer Hits)
Press and hold the adjust button (usually bottom-left) on your G-Shock for three seconds until the time display starts flashing—this unlocks manual time adjustment on most models. Navigate between hours, minutes, and date using the mode button, then use the forward/reverse buttons to change values. If you own a radio-controlled G-Shock with Multi-Band 6 technology,… Read more: How to Adjust Time on Your G-Shock Solar Watch (Without Breaking It)
Picture this: you’ve just installed your third solar panel on the roof, wires dangling everywhere, and suddenly you realize your two-panel string needs to connect with your new addition. You need a solar branch connector, but you’re staring at product listings wondering if you’re about to make an expensive mistake. Solar branch connectors are the… Read more: Why Your Solar Array Needs Branch Connectors (And How to Install Them Right)


")
")

")
")
")
")
")

")
")
")