Why Your Battery Storage System Needs Better Airflow (Before It’s Too Late)
Updated:
Position your Energy Storage System at least three feet away from walls and combustible materials to ensure adequate air circulation prevents dangerous gas buildup and heat accumulation. Last summer, I learned this lesson when a friend’s improperly ventilated battery bank overheated during a heatwave—the batteries swelled, and we had to evacuate his garage for hours. That experience transformed how I approach every installation.
Measure clearances from ceiling to battery top (minimum 12 inches) and verify your ventilation system can exchange the entire room’s air volume at least six times per hour. Many DIYers mistakenly believe cracking a window suffices, but battery systems require calculated airflow rates based on your specific battery chemistry and total amp-hour capacity. Lithium batteries need different ventilation than lead-acid systems because they release different gases under fault conditions.
Install dedicated ventilation fans with battery backup power that activate automatically if hydrogen concentrations exceed 1 percent, particularly crucial for lead-acid batteries that off-gas during charging cycles. Your local electrical code probably requires this, but understanding why matters more than blindly following rules—hydrogen becomes explosive at just 4 percent concentration in air, creating genuine fire risks in enclosed spaces.
Following proper DIY safety practices means treating ventilation as seriously as electrical connections. Calculate your room’s cubic footage, determine your battery’s maximum gas production rate from manufacturer specifications, and size your ventilation accordingly. This mathematical approach removes guesswork and ensures your family’s safety while maximizing your system’s lifespan and performance.
Why Ventilation Isn’t Just About Keeping Things Cool
The Hidden Dangers of Hydrogen Gas
When I first started working with battery banks, a veteran installer shared something that stuck with me: “The danger you can’t see is often the most serious one.” He was talking about hydrogen gas, and he was absolutely right.
Here’s what happens: when certain batteries charge, they produce hydrogen gas through a natural chemical process called electrolysis. This is especially common with flooded lead-acid batteries and some older battery technologies. During charging, water in the battery breaks down into hydrogen and oxygen gases that vent out through the battery caps.
Why should this matter to you? Hydrogen is incredibly flammable. In fact, it has the widest flammability range of any gas. When hydrogen concentrations in air reach just 4 percent, you’ve got an explosive mixture on your hands. That might sound like a lot, but in a small, enclosed space like a closet or cabinet, it doesn’t take long for hydrogen to accumulate to dangerous levels, especially during bulk charging when your batteries are working hardest.
The good news is that hydrogen is lighter than air, so it naturally rises. This is why proper ventilation with vents positioned near the ceiling is so critical. You’re essentially giving that hydrogen a safe escape route before it can build up to dangerous concentrations. Modern sealed batteries like AGM and lithium produce significantly less hydrogen, but proper ventilation remains essential for any battery system as a fundamental safety practice.
Heat Management: Your Battery’s Silent Enemy
Here’s something I learned the hard way during my first battery installation: I mounted my lithium batteries in a tight corner of my garage, thinking I was being space-efficient. Within three months, I noticed my system wasn’t holding charge like it should. The culprit? Heat buildup from poor ventilation had already started degrading my expensive batteries.
Heat is like kryptonite for battery systems. When batteries charge and discharge, they naturally generate heat. If that heat can’t escape, it creates a vicious cycle where elevated temperatures speed up chemical reactions inside the cells, causing even more heat. Think of it like your phone getting hot when you’re using GPS and charging simultaneously, except your home energy storage system is dealing with hundreds of times more power.
Most battery manufacturers specify operating temperatures between 50°F and 86°F (10°C to 30°C) for optimal performance. Once you push past 95°F (35°C), you’re looking at accelerated capacity loss. Every 15°F increase above the ideal range can cut your battery lifespan in half. That’s not just inconvenient, it’s expensive.
But here’s where things get dangerous: extreme heat can trigger thermal runaway, especially in lithium-based systems. This is when internal temperatures rise uncontrollably, potentially leading to fires or toxic gas release. Proper ventilation isn’t just about protecting your investment; it’s about protecting your home and family. That’s why maintaining clearances around your battery enclosure isn’t optional, it’s essential for letting heat dissipate naturally.
Where You Put Your Battery Bank Actually Matters
Indoor Installation: Making Your Space Work Safely
When you’re setting up your battery storage system indoors, thinking like a safety inspector really pays off. I learned this the hard way when I first installed batteries in my basement—turns out, not all indoor spaces are created equal!
Let’s start with room size. Your battery room needs breathing space, literally. For most home ESS systems, you’ll want at least 100 square feet of floor space with 8-foot ceilings minimum. This isn’t arbitrary—batteries need adequate air circulation to prevent heat buildup and gas accumulation. Think of it as giving your system its own dedicated studio apartment rather than cramming it into a closet.
Basements can work great, but avoid placing batteries near furnaces, water heaters, or any ignition sources. Keep at least 6 feet of separation from these heat generators. Garages present unique challenges—if you park cars inside, batteries must be elevated at least 18 inches off the floor. This prevents any gasoline vapors (which sink) from reaching potential spark sources.
Here’s where the safety-first approach becomes critical: never install batteries directly under bedrooms or main living areas without proper fire-rated barriers. If something goes wrong, you want multiple layers of protection between your family and the equipment.
Utility rooms work wonderfully if they have exterior walls for venting. Avoid windowless interior rooms—natural ventilation options matter. And that damp corner of your basement? Hard pass. Moisture and batteries don’t mix, so aim for the driest spot available with good drainage options just in case.
Outdoor Installations: Weather and Wildlife Protection
When I first installed my outdoor battery cabinet in Texas, I learned the hard way that Mother Nature doesn’t care about your ventilation plans. A surprise cold snap had me scrambling to balance airflow with temperature protection, teaching me valuable lessons about outdoor installations.
Outdoor energy storage systems face unique challenges that indoor setups don’t. Your ventilation openings that keep batteries cool in summer can become pathways for freezing air, rain, or curious wildlife. The key is creating weather-resistant ventilation that works year-round without compromising safety.
Start by positioning vent openings strategically. Top vents should have rain hoods or louvers angled to prevent water intrusion while allowing hot air to escape. Bottom intake vents need screens fine enough to block insects and small animals but coarse enough to maintain airflow. I use quarter-inch hardware cloth, which stops most critters without restricting air movement significantly.
Temperature extremes require thoughtful planning. In cold climates, consider adjustable dampers that reduce airflow during winter while preventing complete closure, which could trap dangerous gases. Some DIYers install temperature-activated louvers that automatically adjust based on conditions. In hot climates, ensure your enclosure has adequate shade and reflective surfaces to minimize solar heat gain, reducing the ventilation burden.
Weatherproofing doesn’t mean sealing everything tight. Even with protective measures, maintain your minimum clearances and never block required ventilation paths. Regular inspections for nest building, debris accumulation, or weather damage should become part of your quarterly maintenance routine. Your outdoor installation can be both well-ventilated and weather-protected with the right approach.
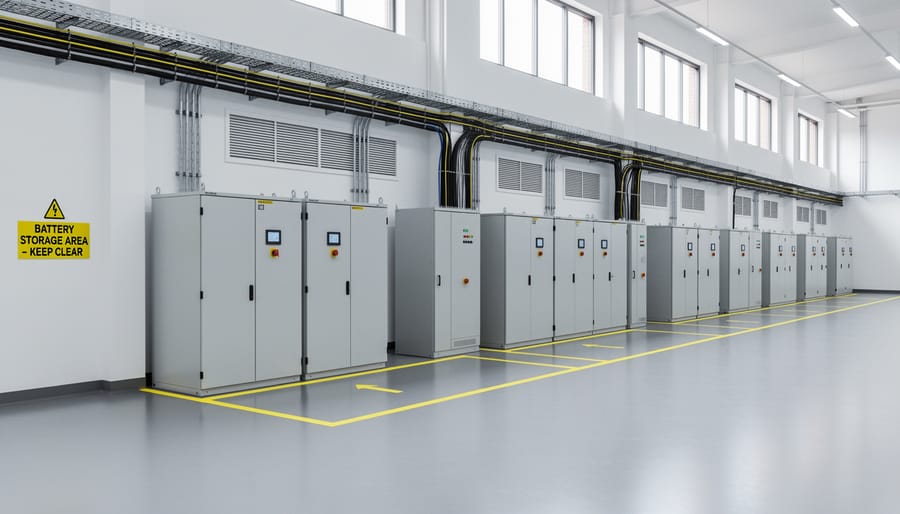
Clearance Requirements That Keep You Safe (And Legal)
Proper clearance and spacing around battery storage systems ensures adequate ventilation and safe maintenance access.
The Six-Inch Rule (And When You Need More)
Here’s the rule of thumb that’s saved me from countless headaches: maintain at least six inches of clearance around all sides of your battery system. Think of it as creating a personal bubble for your batteries—they need room to breathe and release any gases safely.
When I installed my first lithium setup, I learned this the hard way. I tucked my battery bank snugly against a wall, thinking I was being space-efficient. Within weeks, I noticed heat buildup that could have become a serious problem. Six inches on all sides, including the top and bottom, allows proper air circulation and gives you room to work during maintenance.
But here’s where battery chemistry matters. Flooded lead-acid batteries need even more space—sometimes twelve inches or more—because they release hydrogen gas during charging. Lithium batteries are more forgiving with standard six-inch clearances since they’re sealed systems. However, larger lithium installations generating more heat might need eight to twelve inches.
Consider this: if your battery system is rated above 5 kWh or you’re stacking multiple units, add extra clearance. Check your manufacturer’s specifications, as they often provide chemistry-specific requirements. The investment in extra space pays dividends in safety and system longevity.
Working Space: Why You Need Room to Move
Here’s something I learned the hard way during my first battery installation: just because your ESS physically fits in a space doesn’t mean it belongs there. Building codes typically require 36 inches of clearance in front of your system and 30 inches of width for the working space. I squeezed my first setup into a tight corner, thinking I’d save room, only to realize I couldn’t properly check connections or swap out components without contorting myself.
These clearances aren’t arbitrary numbers dreamed up by code writers. They exist so you can safely maintain your system while wearing proper safety equipment, access emergency shutoffs quickly, and work without risking accidental contact with live components. Think about it: when something goes wrong, you need space to move fast and think clearly.
Plan for the future too. Your system will need periodic inspections, possible upgrades, and eventual component replacements. That extra space around your battery bank might feel wasteful now, but you’ll thank yourself later when you’re not wrestling cables in a cramped corner at midnight because your inverter decided to throw an error code.
Setting Up Ventilation That Actually Works
Passive Ventilation: The Low-Tech Solution
Sometimes the simplest solution is the best one. For many home battery setups, especially smaller systems in moderate climates, passive ventilation can provide all the air circulation you need without fans, electricity, or moving parts.
The concept is beautifully straightforward: hot air rises and escapes through upper vents while cooler air gets drawn in through lower vents. This natural convection creates a continuous flow that carries away heat and any gases your batteries might produce.
Here’s how to make it work for you. Calculate your vent size by allowing at least one square inch of vent area per 100 amp-hours of battery capacity, split between high and low openings. For a typical 400Ah system, that means roughly 4 square inches total, or two 2-inch vents. Position your intake vent within 12 inches of the floor and your exhaust vent near the ceiling on the opposite side when possible. This diagonal arrangement encourages better airflow through the entire space.
I learned this the hard way with my first battery cabinet. I installed both vents on the same wall thinking it would be simpler. The air just circulated in a small loop, leaving dead zones where heat collected. Moving one vent to the opposite side made all the difference.
Passive ventilation works great for lead-acid and AGM batteries in spaces under 120°F ambient temperature. However, if you’re in a consistently hot climate, running high-capacity lithium systems, or notice temperatures climbing above comfortable levels, it’s time to consider active ventilation instead.
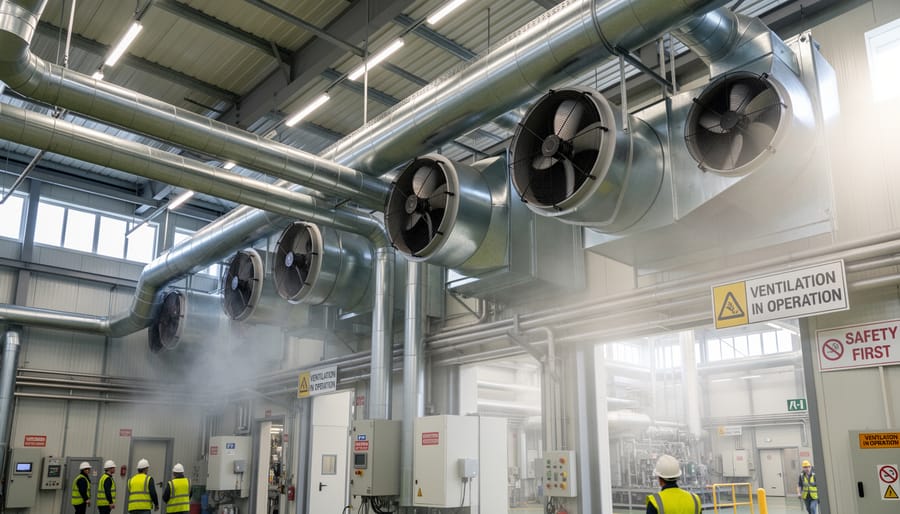
Active Ventilation: Fans and Exhaust Systems
Sometimes natural airflow just isn’t enough, especially in enclosed battery compartments or rooms with minimal openings. That’s when powered ventilation becomes your best friend. I learned this the hard way during my first battery bank setup – I thought two small vents would be plenty, but my hydrogen sensor kept alarming during equalization charging. Adding an exhaust fan solved the problem instantly.
The key question is: when do you need a fan? If your battery enclosure is smaller than a walk-in closet, has limited natural ventilation, or you’re charging sealed lead-acid or flooded batteries regularly, powered ventilation is worth considering. Lithium batteries produce minimal off-gassing under normal conditions, but even they benefit from air circulation to manage heat.
Selecting the right fan means understanding CFM, or cubic feet per minute. The basic rule is to completely exchange the air in your space at least 6-8 times per hour. Here’s the simple math: measure your enclosure’s volume in cubic feet (length × width × height), multiply by 8, then divide by 60 minutes. That’s your minimum CFM rating. For a 4×4×8 foot battery closet, that’s 128 cubic feet × 8 = 1,024, divided by 60 = about 17 CFM minimum. I always recommend adding 25% extra capacity for safety margin.
Charles has built a handy CFM calculator on the site that does this math for you – just plug in your measurements and it tells you exactly what fan size you need.
For wiring, use explosion-proof or sealed fans rated for hazardous locations if you’re dealing with flooded batteries. Mount them high to exhaust lighter-than-air hydrogen, and always wire them to activate automatically during charging cycles.
Active ventilation systems with exhaust fans ensure continuous air circulation to prevent dangerous gas buildup and heat accumulation.
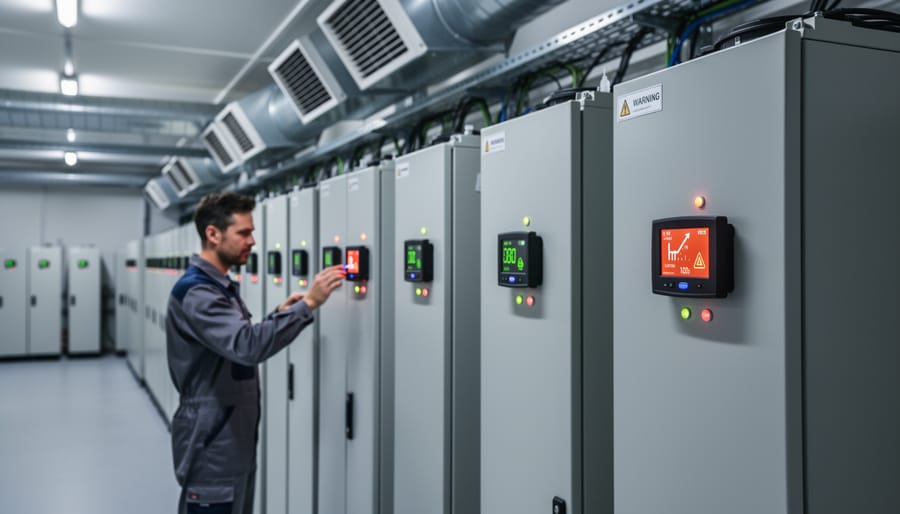
Temperature Monitoring: Your Early Warning System
Think of temperature monitoring as your battery room’s smoke detector – it’s your first line of defense against ventilation failures. I learned this the hard way when a partially blocked vent caused my battery enclosure to heat up 15 degrees before I noticed. Now I never skip this step.
Start simple with an inexpensive digital thermometer that records maximum temperatures. Mount it at the highest point in your battery area, since heat rises and problems show up there first. Set a baseline by recording temperatures during normal operation for a week – anything 10 degrees above your baseline is a red flag.
For around $30, you can upgrade to Wi-Fi-enabled temperature sensors that alert your phone when things get too warm. I use one that texts me if my battery room exceeds 85°F, giving me time to investigate before temperatures reach dangerous levels.
Check your monitor weekly and keep a simple log. Gradual temperature increases often signal developing ventilation issues like blocked vents or failing fans, giving you the early warning needed to prevent thermal runaway or reduced battery life.
Temperature monitoring sensors provide early warning of ventilation problems and overheating conditions in battery systems.
Real-World Mistakes (And How to Avoid Them)
After years of helping DIYers troubleshoot their ESS setups, I’ve seen the same ventilation mistakes pop up again and again. The good news? They’re all completely avoidable once you know what to look for.
One of the most frequent issues Charles encounters involves placing batteries in sealed storage containers. “I get it,” he says. “You want to protect your investment from the elements. But I’ve opened too many plastic bins to find moisture-damaged batteries and corroded terminals.” The problem is simple: no airflow means trapped heat and condensation. Instead, use weather-resistant enclosures specifically designed for battery storage, with built-in vents at top and bottom to create natural air circulation.
Another classic mistake is the “tucked away in the corner” approach. One community member shared how he installed his battery bank in a basement corner thinking the concrete walls would keep things cool. Within months, he noticed significant performance drops. Heat has nowhere to go when batteries are boxed in by walls on multiple sides. The fix is straightforward: maintain at least six inches of clearance on all sides, and twelve inches if you’re running a larger system above 10kWh.
The “just one more battery” syndrome also catches people off guard. You start with a small setup that has adequate ventilation, then expand without reconsidering airflow needs. Each additional battery generates more heat and potentially more off-gassing. Before scaling up, recalculate your ventilation requirements and adjust accordingly.
Many of these common DIY mistakes stem from treating ESS components like regular household items rather than the heat-producing, chemistry-driven systems they are. When in doubt, remember this rule: if you wouldn’t feel comfortable spending an hour in that space on a hot day, your batteries won’t either. Plan for more ventilation than you think you need, not less.
Quick Safety Checklist Before You Power Up
Before you flip that switch and bring your ESS online, take fifteen minutes to run through this safety checklist. I learned the hard way that skipping these steps isn’t worth the risk. Print this out and keep it with your system documentation for regular reference.
Pre-Installation Verification:
Check all ventilation openings are completely clear. Walk around your installation and verify nothing blocks air intake or exhaust points, including packaging materials, tools, or mounting hardware you might have set aside.
Measure clearances from all four sides. Use a tape measure to confirm you’ve got at least 12 inches from walls and 18 inches from ceilings. If your measurements fall short, now is the time to relocate, not after installation.
Inspect for combustible materials within 36 inches. Remove cardboard boxes, cleaning supplies, paint cans, or anything flammable from the area.
Verify room ventilation is adequate. Stand in the installation space for a few minutes. Does it feel stuffy? Can you identify where fresh air enters? If not, you need additional ventilation before proceeding.
Test smoke and carbon monoxide detectors in the installation area. Replace batteries if needed.
Confirm emergency shutoff accessibility. Make sure you can reach the main disconnect switch in under 5 seconds without moving obstacles.
Document baseline temperatures with an infrared thermometer for future comparison during operation.
Take photos of your final setup. These become invaluable references for maintenance and troubleshooting.
Look, I get it—sometimes we’re tempted to squeeze our battery setup into that perfect corner or skip a ventilation step because it seems like overkill. I’ve been there myself, staring at a tight space and thinking “this’ll probably be fine.” But here’s the thing: proper ventilation isn’t just another box to check off your project list. It’s literally what stands between a smooth-running system and a potentially dangerous situation.
Taking the time to measure your clearances correctly, ensuring adequate airflow, and following those safety guidelines we’ve discussed isn’t about being overly cautious—it’s about respecting the power of the technology we’re working with. Getting it right the first time means you’ll sleep better at night knowing your system is both efficient and safe.
I’d love to hear how your installations went. What challenges did you face with ventilation? Did you discover any clever solutions for tight spaces? Drop a comment below and share your experience with our community—your insights might just help someone else navigate their own installation journey. Remember, there’s no prize for cutting corners, but there’s huge satisfaction in knowing you’ve built something that works safely and reliably for years to come. You’ve got this.
How useful was this post?
Click on a star to rate it!
Average rating 0 / 5. Vote count: 0
No votes so far! Be the first to rate this post.
We are sorry that this post was not useful for you!
Let us improve this post!
Tell us how we can improve this post?
charlesnoble
Here at Spheral Solar, I’m a hands-on solar power enthusiast, constantly exploring and experimenting with DIY solutions. I’m dedicated to sharing my discoveries, insights, and even the bumps I hit along the way, all in the pursuit of a more sustainable future.
Why Your PV Wire Management Could Fail Inspection… by Charlesnoble April 9, 2026 Route your PV wires through UV-resistant conduit within 18 inches of leaving the solar array, securing it every 3 feet with proper clamps to prevent wind damage and code violations. This single step prevents 80% of the wire degradation issues I’ve seen in DIY solar installations over the past decade.…
Why Your DIY Solar System Needs Proper Grounding… by Charlesnoble January 31, 2026 Ground your solar system before you connect a single wire—improper grounding has destroyed thousands of dollars in equipment and created deadly shock hazards in homes just like yours. I learned this the hard way when a lightning strike fried my neighbor’s ungrounded inverter, teaching me that grounding isn’t optional paperwork…
Why Your Solar Conduit Installation Could Start a… by Charlesnoble March 27, 2026 Measure your conduit run before purchasing materials by mapping the exact path from your solar array to the inverter and battery location, accounting for a 10% waste factor and additional length for bends. PVC electrical conduit remains the most cost-effective protective solution for DIY solar installations, but improper installation creates…
Why Your Solar Ground Rod Might Be Too Short (And… by Charlesnoble January 15, 2026 Drive your 8-foot copper-clad steel grounding rod at least eight feet into the earth, or to the depth where you meet solid bedrock. This isn’t arbitrary—the National Electrical Code requires this specific length because it ensures your solar panels and battery storage system have a reliable path to dissipate dangerous…
Why Your 6-Wire Solar Setup Needs the Right Conduit… by Charlesnoble March 6, 2026 Measure your wire gauge and count of six conductors before selecting conduit—most residential solar installations running six AWG 10 wires require 1-inch conduit, while six AWG 6 wires need 1.5-inch conduit, and six AWG 2/0 wires demand 2.5-inch conduit minimum. Calculate fill capacity using the 40% rule for three or…
Don’t Risk Your Life Installing Solar Panels: Fall… by Charlesnoble December 26, 2025 Secure yourself with a personal fall arrest system before stepping onto any roof pitch over 4:12—that’s a harness, lanyard, and proper anchor point rated for 5,000 pounds per worker. Install temporary roof anchors at the ridge line or use permanent mount anchors if you’re planning multiple trips up for maintenance,…
Subscribe for handpicked DIY projects, exclusive tips, and giveaways.
Electricity powers our homes from five main sources: solar panels, wind turbines, hydroelectric generators, fossil fuel generators, and battery storage systems. If you’re building a reliable off-grid setup or backing up your solar array, understanding how these sources work together transforms a single-point-of-failure system into resilient, year-round power. I learned this the hard way during… Read more: 5 Sources of Electrical Energy Every Solar DIYer Should Know for Complete Off-Grid Power
Connect your panels to a charge controller or battery system by running positive terminals to positive and negative to negative. This parallel configuration doubles your available current (amperage) while keeping voltage the same, which is exactly what you need when your system demands more power than a single panel can deliver. I learned this the… Read more: Why Two Solar Panels Beat One Every Time (Parallel Connection Explained)
Monitor your greenhouse temperature daily during peak sun hours—if it consistently exceeds 85°F or condensation builds up on interior surfaces, you’re losing crops to heat stress and creating the perfect environment for fungal diseases. A greenhouse solar ventilation fan addresses both problems without adding a penny to your electricity bill, making it one of the… Read more: Why Your Greenhouse Needs a Solar Ventilation Fan (Before Summer Hits)

")
")
")
")
")

")
")
")
")
")


