Why Your Solar Panels Need the Right Mounting System (Before You Drill Anything)
Updated:
Your solar panels are only as reliable as what holds them in place. A solar array mounting system is the structural foundation that secures your panels to rooftops, ground surfaces, RVs, or portable setups, and choosing the wrong one can lead to damage, reduced efficiency, or even safety hazards.
Think of mounting systems as the backbone of your solar installation. They do more than just hold panels steady—they determine the optimal angle for sun exposure, protect against wind loads and weather extremes, and ensure your investment lasts decades. Whether you’re installing a rooftop system on your home, setting up a ground-mounted array in your backyard, or outfitting your camper van for off-grid adventures, the mounting system you select directly impacts performance and longevity.
The challenge is that mounting systems come in dozens of configurations: fixed-tilt, adjustable, flush-mount, ballasted, pole-mount, and portable frames all serve different purposes. Specifications like weight capacity, wind rating, material grade, and compatibility with your panel size matter significantly. When I installed my first DIY solar setup, I underestimated how critical proper mounting was—a lesson learned during the first major windstorm.
This guide breaks down what specifications actually matter, how different mounting types perform in real-world conditions, and how to match the right system to your specific project. You’ll learn to evaluate load requirements, understand installation complexity, and make confident decisions whether you’re tackling a permanent installation or need flexibility for mobile applications.
What Exactly Is a Solar Array Mounting System?
Think of a solar array mounting system as the skeleton that holds your solar panels in place—it’s the unsung hero that keeps everything secure, properly angled, and working efficiently for years to come. Whether you’re installing panels on your roof, in your backyard, or even on your RV, this mounting system is what transforms loose solar panels into a stable, functional power-generating setup.
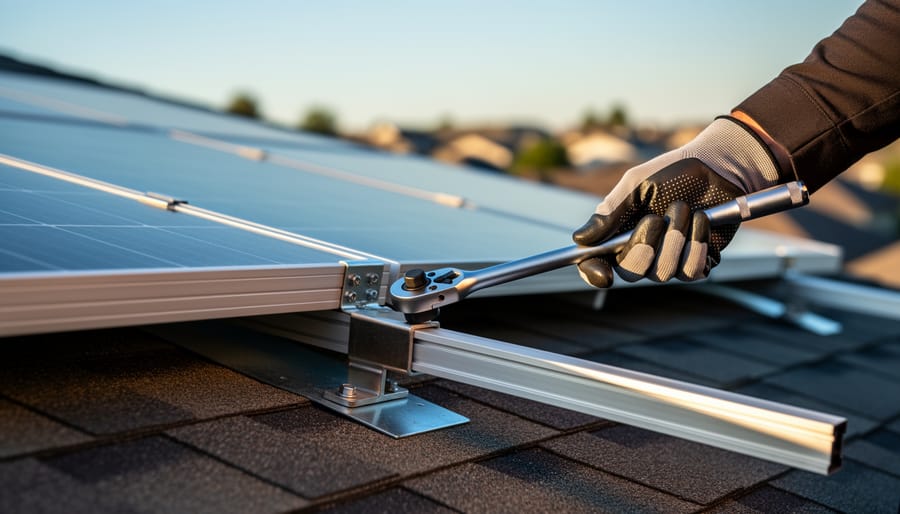
At its core, a mounting system is pretty straightforward. It’s a collection of carefully designed parts that work together to anchor your panels and position them for maximum sun exposure. The main components include rails (those long metal tracks that panels attach to), clamps (which grip your panels firmly without damaging them), brackets (the connection points between your panels and the surface you’re mounting to), and various pieces of hardware like bolts, nuts, and washers that tie everything together.
Here’s how it all works: The brackets attach to your mounting surface—whether that’s roof rafters, the ground, or a pole. Rails then connect to these brackets, creating a framework. Your solar panels slide or clamp onto these rails, and finally, everything gets locked down with clamps and hardware. It’s kind of like building with an adult version of construction toys, where each piece has a specific job.
I remember when Charles first explained mounting systems to our community, he compared it to setting up a tent. Just like a tent needs poles, stakes, and guy lines working together to stay upright in wind and weather, your solar panels need this complete system to handle sun, rain, snow, and everything Mother Nature throws at them.
The beauty of understanding these systems is that you can choose the right components for your specific situation. Simple setups might use Z brackets for mounting a few panels, while larger installations require more robust rail systems. Either way, knowing what you’re working with makes the whole process less intimidating and more exciting.
Solar mounting system components including rails, clamps, and brackets form the foundation that secures panels safely in place.
Why Your Mounting System Matters More Than You Think
When I first started working with solar panels, I’ll be honest—I thought the mounting system was just fancy scaffolding. Boy, was I wrong! During a windstorm that first year, I watched my neighbor’s poorly mounted panels lift at the corners like they were trying to take flight. That’s when I realized these systems are the unsung heroes of any solar installation.
Your mounting system does so much more than keep panels from sliding off your roof. First and foremost, it’s your roof’s best friend. A properly designed mounting system distributes the weight of your panels evenly and creates a weatherproof seal around any penetrations. I’ve seen DIY installations where water leaked through poorly sealed mounting points, causing thousands in damage. The right system actually protects your roof rather than compromising it.
Then there’s performance optimization. The angle and orientation of your panels directly affects how much energy you’ll generate. Your mounting system determines whether your panels sit at the ideal tilt for your latitude or just wherever they happen to land. Even a few degrees off can mean losing 10-15 percent of your potential energy production over a year. That’s real money left on the table.
Structural integrity is another biggie. Your mounting system needs to handle wind loads, snow accumulation, and the constant expansion and contraction from temperature changes. Engineers calculate these forces down to specific wind speeds and snow weights for your area. Skimping here means risking everything.
Finally, here’s something many people overlook: warranty compliance. Most panel manufacturers require proper mounting to honor their warranties. If something goes wrong and your mounting doesn’t meet their specifications, you might find yourself without coverage when you need it most.
The Main Types of Solar Mounting Systems (And Which One You Actually Need)
Roof-Mounted Systems
When you’re installing solar panels on a pitched roof, you’ve got two main mounting options to consider: flush mounts and tilted mounts. Let me walk you through both so you can figure out which works best for your home.
Flush mounts, sometimes called parallel mounts, sit close to your roof’s surface, following its natural slope. These are incredibly popular for residential installations because they look sleek and unobtrusive. Your neighbors might barely notice them! I remember when Charles first installed flush mounts on his garage roof back in 2019. He chose them specifically because his homeowners association had strict rules about roof modifications. The low profile meant quick approval and minimal fuss.
The beauty of flush mounts lies in their simplicity. They’re generally easier to install, require fewer structural modifications, and present less wind resistance. However, you’re locked into whatever angle your roof happens to have. If your roof pitch isn’t optimal for your latitude, you might sacrifice some efficiency.
Tilted mounts solve this problem by elevating panels at a specific angle, independent of your roof’s slope. This lets you optimize for maximum sun exposure throughout the year. Charles switched to tilted mounts on his main house because his roof only had a 15-degree pitch, but his location needed closer to 30 degrees for peak performance. The result? About 20 percent more energy production.
The trade-off? Tilted systems cost more, take longer to install, and can catch wind like a sail if not properly secured. For DIYers, this means extra attention to structural calculations and local building codes. You’ll need to ensure your roof can handle both the weight and wind loads.
Most residential DIY projects work perfectly fine with flush mounts, especially if your roof pitch already falls between 15 and 40 degrees.
Roof-mounted solar arrays use specialized racking systems designed to integrate seamlessly with residential architecture while withstanding environmental loads.
Ground-Mounted Systems
If you’ve got open land on your property, ground-mounted systems offer some serious advantages that might make them your best option. These systems come in two main varieties: fixed ground mounts and pole mounts, each with their own sweet spots depending on your situation.
Fixed ground mounts are the workhorses of solar installations. They consist of metal frames anchored directly into the ground, holding your panels at a fixed angle. Think of them like a sturdy table for your solar panels. The beauty here is accessibility. When Charles installed his first ground mount system at his property, he was amazed at how much easier maintenance became compared to his roof system. “I can walk right up to the panels with a hose and squeegee,” he told me. “No ladder gymnastics required, and I actually enjoy the cleaning routine now.”
Pole mounts take a different approach by elevating panels on a single pole or post, kind of like a solar tree. These work particularly well in areas with heavy snow since you can position panels higher off the ground. Some pole mounts even include tracking systems that follow the sun throughout the day, though that’s definitely an advanced feature.
For DIY enthusiasts, ground mounts are generally more forgiving than roof installations. You’re working at ground level, which means safer conditions and easier error correction. Off-grid projects particularly benefit from ground systems because you can position panels in the sunniest spot on your property rather than being limited to your roof’s orientation.
The main consideration is space. You’ll need clear, unshaded land, and you should check local zoning regulations. Charles learned this the hard way when his initial site choice turned out to be too close to his property line. A quick call to the county planning office saved him from having to relocate everything later.
Ground-mounted systems offer easier DIY installation and flexible positioning, making them ideal for properties with available land and off-grid applications.
Flat Roof Mounting Systems
If you’re working with a flat surface like an RV roof, a shed, or even a flat residential roof, ballasted mounting systems are your best friend. These are also called non-penetrating systems, and here’s why they’re brilliant: they don’t require drilling holes through your roof. Instead, they use weight to hold everything securely in place.
I remember when I first installed panels on my friend’s RV. We were both nervous about puncturing that rubber roof membrane, knowing one wrong move could mean expensive leak repairs down the road. That’s when ballasted systems really shine. They typically use weighted trays or concrete blocks combined with racking that distributes the load evenly across the roof surface.
The key consideration here is weight distribution. You need to ensure your roof can handle the combined weight of the panels, mounting hardware, and ballast. For most RVs, this means keeping your system relatively modest, perhaps 200-400 watts maximum. Residential flat roofs can usually handle more, but always check your roof’s load-bearing capacity or consult a structural engineer if you’re unsure.
Wind resistance is the other major factor. Good ballasted systems include aerodynamic features and low-profile designs that minimize wind uplift. Some use rubber pads underneath to increase friction without damaging the roof membrane. The beauty of these systems is their flexibility. You can add or remove panels relatively easily, and if you move your RV, the system can travel with you with minimal fuss.
Portable and Specialty Mounts
When you’re hitting the road or heading into the wilderness, portable and specialty mounting systems make solar power truly mobile. I remember my first camping trip with a foldable solar panel—it changed everything about how I thought about off-grid power!
Portable arrays designed for camping typically fold into compact cases with built-in kickstands, letting you angle them toward the sun while your gear charges nearby. These systems usually feature lightweight aluminum frames and integrated charge controllers, making setup incredibly simple. Look for units with carrying handles and protective cases that double as mounting bases.
RV enthusiasts have fantastic options too. Awning-mounted panels utilize existing RV hardware, while roof-mounted systems with adjustable tilt mechanisms maximize sun exposure whether you’re parked or on the move. Vehicle-specific mounting brackets designed for different RV models ensure secure installation without compromising your roof warranty.
For those exploring portable solar projects, magnetic mounts work brilliantly on metal surfaces, and suction cup systems attach temporarily to windows or smooth vehicle panels. The key is choosing mounts rated for vibration and movement—essential when you’re bouncing down dirt roads. These specialty systems prove that solar power isn’t just for rooftops; it travels wherever adventure takes you.
Key Specifications You Can’t Ignore (The Technical Stuff Made Simple)
Load Ratings and Wind/Snow Resistance
Understanding load ratings is crucial for ensuring your solar array stays put through whatever Mother Nature throws at it. Think of it this way: your mounting system needs to be the superhero that keeps your panels safe during windstorms and heavy snowfall.
Wind uplift ratings tell you how much wind force your system can withstand before panels lift off or the structure fails. These ratings are typically measured in pounds per square foot or miles per hour. I learned this the hard way during my first installation when I underestimated local wind conditions—let’s just say watching your panels wobble during a storm is not fun! Most residential systems should handle winds of at least 90 mph, but coastal areas or tornado-prone regions may need ratings of 120 mph or higher.
Snow load specifications indicate how much snow weight your system can support without collapsing. This is measured in pounds per square foot. A typical residential system should handle 30-50 pounds per square foot, but northern climates with heavy snowfall need much higher ratings.
Here’s the practical part: check your local building codes and historical weather data. Your city or county building department can tell you the required wind and snow load ratings for your area. Match or exceed these numbers when selecting your mounting system. Don’t forget that rooftop installations face different challenges than ground-mounted systems—wind can create uplift under roof-mounted panels, requiring additional reinforcement.
Remember, oversizing your load capacity provides peace of mind and protects your investment for years to come.
Material Quality and Corrosion Resistance
When I first built my rooftop solar array, I’ll admit I got caught up in panel efficiency and overlooked something crucial: what holds everything together. Your mounting system needs to outlast your panels, and choosing the right materials makes all the difference.
Most mounting systems use either aluminum or steel as their primary material. Aluminum is the lightweight champion, naturally resistant to corrosion and perfect for residential installations where you’re working with your roof’s weight limits. It won’t rust, which is a huge advantage in coastal areas where salt air wreaks havoc on metal. Steel, on the other hand, offers greater strength and typically costs less upfront. For ground-mounted arrays or installations needing extra structural support, steel might be your go-to option.
Here’s where protection matters. Steel mounting systems rely on galvanization, a zinc coating that shields the metal from moisture and oxygen. Hot-dipped galvanized steel provides the best protection and can last 25-30 years in most climates. Aluminum systems often feature anodizing, an electrochemical process that thickens the natural oxide layer, adding extra defense against weathering.
Don’t overlook the small stuff. Stainless steel hardware for bolts, nuts, and clamps is non-negotiable. These components face constant exposure to the elements, and cheap hardware will corrode first, compromising your entire system’s integrity.
Climate considerations are straightforward: coastal and humid environments demand aluminum or marine-grade stainless components. Desert installations can handle galvanized steel beautifully, while snowy regions need materials rated for freeze-thaw cycles. Think long-term, because replacing corroded mounting hardware five years down the road isn’t anyone’s idea of fun.
Compatibility and Adjustability
One of the biggest headaches I’ve encountered in my solar journey—and Charles mentions this all the time—is discovering that your mounting system doesn’t play nice with your panels. Let’s talk about making sure everything fits together perfectly.
Rail spacing is your first consideration. Most residential solar panels measure between 65-67 inches in height, and your mounting rails need to support them across that span without sagging. Standard systems typically space rails 40-50 inches apart, but always check your panel specifications first. Some lightweight thin-film panels need closer spacing, while heavy crystalline panels might need additional support points.
Panel size compatibility matters more than you might think. Universal mounting systems accept various panel dimensions through adjustable clamps that slide along the rails, giving you flexibility if you upgrade or replace panels down the road. Brand-specific systems might offer tighter integration but can lock you into particular manufacturers—something to consider for future-proofing.
Tilt angle adjustability ranges from fixed-tilt systems (most common and affordable) to adjustable brackets that let you change angles seasonally for optimal energy capture. If you’re setting up an RV or portable system, adjustable options maximize your flexibility. Ground mounts often include tilt adjustment built-in, while roof mounts typically match your roof pitch.
Here’s my future-proofing tip: choose systems with readily available replacement parts and standard hardware sizes. Charles learned this lesson when he needed to add panels three years after his initial installation—his universal system accepted newer, slightly larger panels without requiring a complete overhaul. That foresight saved him hundreds of dollars and considerable hassle.
How to Choose the Right Mounting System for Your DIY Solar Project
Choosing the right mounting system doesn’t have to feel overwhelming. I’ve been there myself, standing in my garage surrounded by solar panels and mounting hardware, wondering if I’d made the right choices. Let me walk you through a practical approach that’ll save you time, money, and a few headaches.
Start by evaluating your installation location. Are you mounting on a roof, ground, RV, or perhaps a boat? Each scenario requires different considerations. When I installed my first ground-mount system, I didn’t initially account for snow load in my area and had to reinforce the structure later. Learn from my mistakes and check your local climate conditions upfront, including average wind speeds, snowfall, and temperature extremes.
Next, assess your roof type if that’s where you’re installing. Composition shingle, metal, tile, and flat roofs all need specific mounting solutions. Walk around your property and take photos from different angles. Note the roof pitch using a simple level and measuring tape. Most residential roofs have a pitch between 4/12 and 8/12, which works great for standard rail systems.
Now comes the fun part: sizing your solar array. Head over to Spheral Solar’s interactive calculators to determine how many panels you’ll need based on your energy consumption. This directly impacts your mounting system choice because more panels mean more structural support requirements. The calculator will help you understand the total weight and dimensions you’re working with.
Consider your panel orientation needs. Do you want a fixed system or adjustable mounts? Fixed systems are simpler and more affordable, perfect for permanent roof installations. Adjustable mounts let you change the angle seasonally, which I use on my RV setup to maximize sun exposure wherever I’m parked.
Check your structural capacity. For roofs, you might need to consult your home’s building plans or hire a structural engineer if you’re installing a large array. Don’t skip this step. Ground mounts need adequate foundation support, whether you’re using concrete piers, helical piles, or ballasted systems.
Finally, calculate your budget including all components: rails, clamps, flashing, grounding equipment, and fasteners. Quality mounting hardware typically represents 10-15 percent of your total solar project cost. Remember, this isn’t where you want to cut corners. Your panels will sit exposed to the elements for decades, so invest in corrosion-resistant materials rated for your climate zone.
Common Mounting System Mistakes (That I’ve Made So You Don’t Have To)
Look, I’m going to be honest with you—I’ve learned more from my mounting mistakes than from doing things right the first time. And trust me, there have been plenty of mistakes. Let me share a few so you can skip the headaches I’ve endured.
My first major blunder was over-tightening the lag bolts on a rooftop installation. I figured tighter meant more secure, right? Wrong. I actually cracked the rafter beneath the mounting foot, which could have led to serious structural problems down the road. Thankfully, I caught it during inspection and had to remove the entire rail and patch the roof properly. The lesson? Use a torque wrench and follow the manufacturer’s specifications exactly. Those numbers aren’t suggestions—they’re there for a reason.
Then there was the flashing incident that still makes me cringe. I installed what I thought was perfectly adequate flashing around my roof penetrations, but I didn’t account for the specific way water flows on my particular roof pitch. After the first heavy rain, I noticed a small drip in my attic. Small leaks become big problems fast, folks. I ended up redoing the entire flashing system using proper techniques and even added extra sealant where water naturally channels. Now I always recommend watching several detailed flashing tutorials specific to your roof type before starting.
Grounding was another area where I cut corners initially. I thought the mounting rails being metal was enough for grounding purposes. Turns out, proper electrical grounding requires dedicated bonding connections between all metallic components and a proper ground path back to your electrical panel. This isn’t just best practice—it’s required by electrical code and essential for safety. I had to go back and add grounding lugs and bonding wire to bring everything up to code.
Speaking of codes, that’s probably my biggest warning: never underestimate local requirements. I assumed my county followed standard residential solar codes, but they had specific wind load requirements that meant upgrading my mounting hardware. The permit rejection cost me two weeks of delays and extra money on beefier rails. Always check with your local building department before purchasing equipment.
Installation Tips for the DIY Solar Builder
Before you climb onto that roof with your new mounting system, let me share something I learned the hard way during my first installation—proper planning prevents both headaches and hospital visits. Let’s talk about what you actually need to know before you start drilling holes in your roof.
First, the unglamorous but essential truth: check your local building codes and permit requirements before buying a single bolt. I know, paperwork isn’t exciting, but trust me on this. Most jurisdictions require permits for solar installations, and inspectors will check that your mounting system meets local wind and snow load requirements. Call your local building department early in the planning phase. Some areas have surprisingly straightforward processes, while others might require engineered drawings.
Safety-wise, never work alone on a rooftop installation. I always rope in my neighbor Dave for my projects, and I return the favor when he needs an extra set of hands. Beyond the obvious fall risks, mounting systems involve heavy components that are awkward to position solo. Invest in a proper safety harness, use stable ladders, and work on calm, dry days.
For tools, you’ll need a quality drill with appropriate bits for your roof type, socket wrenches, torque wrenches (critical for proper bolt tension), sealants rated for outdoor use, and flashing materials. Don’t skimp on waterproofing—this is where many DIY installations fail. Every penetration through your roof is a potential leak point. Use proper flashing boots, high-quality sealants, and follow the manufacturer’s waterproofing guidelines religiously.
Speaking of following guidelines, pay attention to proper wiring considerations as you plan your array layout. Wire routing affects both system performance and code compliance.
Finally, know your limits. Structural assessments, complex roof geometries, or multi-story installations warrant calling a professional. There’s no shame in hiring help for the tricky parts while handling simpler aspects yourself.
Choosing the right solar array mounting system is more than just a purchase decision—it’s an investment in the long-term performance and durability of your entire solar setup. A well-selected mounting system protects your panels from the elements, optimizes energy production, and can last for decades with minimal maintenance. As Charles often reminds our community members, rushing this decision is one of the most common mistakes new solar enthusiasts make.
Take your time exploring the different options available. Consider your specific environment, whether you’re dealing with heavy snow loads, coastal winds, or desert heat. Use the interactive tools and calculators available on our site to help narrow down what specifications matter most for your situation. These resources can save you hours of research and help you avoid costly mismatches between your panels and mounting hardware.
Remember, you’re not alone in this journey. Our community is filled with experienced DIYers and newcomers alike who love sharing their successes, challenges, and creative solutions. Don’t hesitate to ask questions, share your project plans, and learn from others who’ve been exactly where you are now.
You’ve got this. Start your solar journey with confidence, knowing that with the right mounting system foundation, you’re building something that will serve you reliably for years to come.
How useful was this post?
Click on a star to rate it!
Average rating 0 / 5. Vote count: 0
No votes so far! Be the first to rate this post.
We are sorry that this post was not useful for you!
Let us improve this post!
Tell us how we can improve this post?
charlesnoble
Here at Spheral Solar, I’m a hands-on solar power enthusiast, constantly exploring and experimenting with DIY solutions. I’m dedicated to sharing my discoveries, insights, and even the bumps I hit along the way, all in the pursuit of a more sustainable future.
Wire Your Solar System Right the First Time (Before… by Charlesnoble March 18, 2026 Sketch your complete solar system on paper before purchasing a single component—mapping the physical distance from your solar panels to the charge controller, then to the battery bank, and finally to your inverter will reveal the exact wire gauges you need and prevent the costly mistake of voltage drop that…
Why Your Solar Panel Connectors Matter More Than You Think by Charlesnoble March 4, 2026 Choose MC4 connectors for most residential solar installations—they’ve become the industry standard since 2011, offering waterproof reliability and simple snap-together connections that even first-time DIYers can master in minutes. I learned this the hard way when my first solar setup used mismatched connectors that corroded after one rainy season, costing…
Why Z Brackets Are Your Secret Weapon for Small… by Charlesnoble November 4, 2025 **Mount your solar panels with confidence using Z brackets—the simplest, most versatile hardware solution for small-scale solar projects.** These L-shaped metal brackets bolt directly to your panel’s frame on one side and your mounting surface on the other, creating a low-profile, secure connection that works equally well on RV roofs,…
Why 8 AWG Solar Wire Might Be Wrong for Your System… by Charlesnoble December 29, 2025 Calculate your system’s maximum current first—8 AWG solar wire safely handles 40-55 amps depending on installation conditions, making it the sweet spot for mid-sized solar arrays between 1,200 and 3,000 watts at 12-24 volts. If your panels produce more than 40 amps combined, you need thicker wire; less than 30…
Why Your Solar Setup Needs Both a Charge Controller… by Charlesnoble April 6, 2026 Check the maximum voltage and current ratings first—these determine whether your controller can actually handle your solar panel array without frying itself on the first sunny day. I learned this the hard way when my first DIY system shut down every afternoon because I’d paired 600 watts of panels with…
Why Series-Parallel Is the Sweet Spot for Small Solar Setups by Charlesnoble December 2, 2025 Connect two panels in series to double your voltage, then wire two of these series pairs in parallel to maintain higher voltage while increasing your amperage—this series-parallel configuration gives you the sweet spot between performance and practicality for most small-scale solar setups. I learned this the hard way during my…
Subscribe for handpicked DIY projects, exclusive tips, and giveaways.
AGM batteries outperform traditional flooded lead acid batteries in nearly every practical measure that matters for solar installations, but whether that performance justifies their 50-100% higher upfront cost depends entirely on how hands-off you want your system to be and how often you’ll cycle the battery deeply. After running both types through real-world solar setups… Read more: AGM vs. Lead Acid Batteries: Which Is Better for Your Solar Setup?
A portable power station will typically run your camping devices for anywhere from a few hours to several days on a single charge, depending on what you’re powering and the station’s capacity. As for lifespan, most quality units last between 3 to 10 years before the battery degrades enough to need replacement. The distinction matters… Read more: Your Portable Power Station Won’t Last as Long as You Think (Here’s Why)
A J1772 solar charger combines a standard J1772 charging connector (the same Type 1 plug used by most North American EVs and electric bikes) with solar panels and battery components to create an off-grid or grid-supplemented charging system. You’ll need three core elements: solar panels (typically 400-800 watts for practical ebike charging), a battery storage… Read more: How to Choose a J1772 Solar Charger for Your Ebike: A Buying Guide


")


")
")

")


")
")


