Grid-Tied Solar: Why Most DIYers Choose It (And When You Shouldn’t)
Updated:
Imagine flipping a switch and watching your electric meter spin backward while your solar panels pump clean energy into the grid—earning you credits that slash your utility bill to nearly zero. That’s the everyday reality of grid-tied solar, the most popular solar setup in America, powering millions of homes and businesses without the complexity or expense of battery storage.
Grid-tied systems work like a two-way energy highway: your panels generate electricity during sunny hours, you use what you need, and any excess flows back to the utility grid. At night or on cloudy days, you simply draw power from the grid as usual. Your utility company tracks this exchange through net metering, crediting you for the energy you contribute and billing you only for the net difference. It’s brilliantly simple—no batteries to maintain, no worry about running out of power, and significantly lower upfront costs than an off-grid solar installation.
But grid-tied isn’t perfect for everyone. When the grid goes down, your system shuts off automatically (a safety feature protecting utility workers), leaving you without power unless you add battery backup. Understanding these tradeoffs is crucial before investing thousands in solar equipment.
Whether you’re a homeowner eyeing lower electric bills or a DIY enthusiast ready to tackle a solar project, this guide breaks down everything you need to know about grid-tied systems—from how they actually work to choosing the right components and navigating utility interconnection agreements.
What Grid-Tied Solar Actually Means (In Plain English)
Grid-tied solar systems remain connected to utility power lines, allowing electricity to flow in both directions between your home and the grid.
The Two-Way Street: How Your Meter Runs Backwards
Think of your electric meter like a two-way scoreboard. During sunny days when your panels are cranking out power, they first supply electricity to everything running in your home—your fridge, lights, that laptop you’re working on. But here’s where it gets exciting: if your panels produce *more* energy than you’re using at that moment, the excess doesn’t go to waste. It flows backward through your meter and onto the grid, literally spinning your meter in reverse (well, digitally these days).
This is net metering in action, and it’s honestly one of my favorite things about grid-tied systems. When I first saw my meter running backwards on a brilliant Saturday afternoon, I’ll admit—I did a little victory dance in my driveway. Your utility company tracks this excess energy and credits your account, essentially banking those sunny-day kilowatts for later use.
So what happens when the sun goes down or clouds roll in? Your system stops producing, but no worries—you seamlessly draw power from the grid just like always. Those credits you built up during peak production offset what you pull at night. It’s like having the entire electrical grid as your battery, without the expense of actual battery storage. Most utilities calculate your net usage monthly, so ideally, your credits balance out your consumption, leaving you with a minimal bill—or sometimes even a surplus credit that rolls forward.
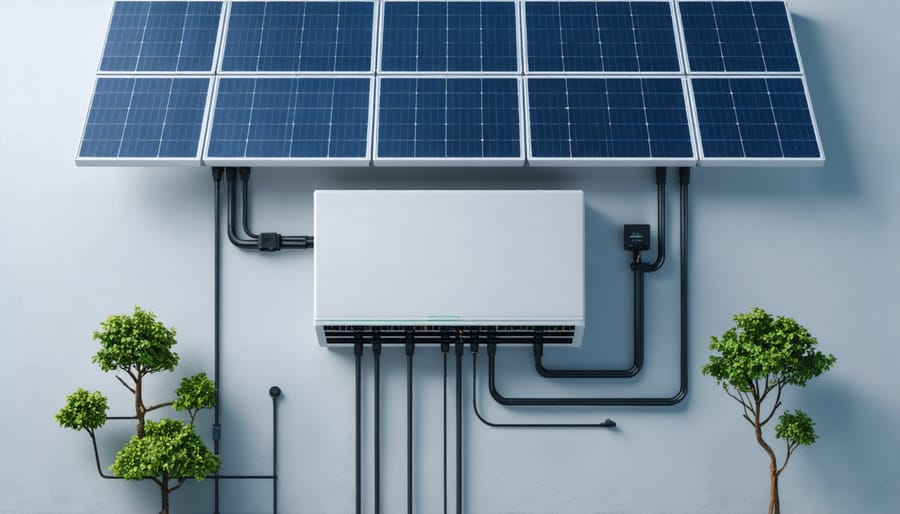
The Components You’ll Actually Need
Let’s break down what you’ll actually need to get your grid-tied system up and running. I’ve made my share of shopping mistakes over the years, so I’ll keep this straightforward and focused on what really matters.
**Solar Panels** are your workhorses—they convert sunlight into DC electricity. For most DIY installations, you’ll want monocrystalline panels between 300-400 watts each. They’re efficient, durable, and have come down significantly in price. Calculate your roof space and energy needs before buying, since you’ll likely be stuck with what fits.
**Grid-Tied Inverter** is where the magic happens, and this is crucial—it converts your DC power into AC power that matches your home’s electricity and the grid’s requirements. Unlike off-grid inverters, grid-tied models automatically sync with utility power and shut off during outages (a safety feature that prevents you from electrocuting line workers). Most DIYers go with string inverters or microinverters. String inverters are cheaper and easier to install, while microinverters offer panel-level optimization.
**Mounting Hardware** keeps everything secure on your roof or ground mount. You’ll need rails, clamps, and flashings appropriate for your roof type. Don’t skimp here—wind and weather are relentless.
**Disconnect Switches** are required by code and let you safely isolate your system for maintenance. You’ll typically need both DC and AC disconnects, and they must be readily accessible.
**Monitoring Systems** aren’t strictly required, but they’re invaluable for tracking production and catching problems early. Many modern inverters include built-in monitoring via smartphone apps, which honestly makes the whole experience more satisfying—there’s something addictive about watching your panels generate power in real-time.
The grid-tied inverter is the central component that converts solar DC power to AC electricity and manages the connection to utility power.
Why Grid-Tied Systems Win for Most DIY Projects
The Cost Factor: Half the Investment, Same Solar Power
Let me tell you about the moment I realized just how much money grid-tied solar could save. I was helping my neighbor compare quotes for his solar setup, and when we ran the numbers side-by-side, his jaw literally dropped. The difference? Batteries—or rather, the lack of them.
Here’s the reality: off-grid battery banks typically represent 40-60% of your total system cost. We’re talking about a massive chunk of your investment disappearing when you choose grid-tied.
**Quick Budget Breakdown:**
A typical 5kW off-grid system might cost you $15,000-$20,000, with $8,000-$12,000 going toward batteries alone. That same 5kW grid-tied system? You’re looking at $7,000-$10,000 total. Yes, you read that right—essentially half the price.
I remember Charles saying at our last workshop, “The grid IS your battery, and it’s already paid for.” That really stuck with me. Instead of maintaining expensive battery banks that need replacement every 5-10 years, you’re using the utility grid as a giant energy storage system.
Let’s make this practical. Say you have $10,000 saved for solar. With grid-tied, you could install a robust 6-7kW system that covers most of your home’s energy needs. That same budget in an off-grid setup might only get you 3kW with minimal battery backup—barely enough to run essentials during outages.
The maintenance savings add up too. No battery monitoring, no replacement costs every decade, no worrying about discharge cycles. It’s solar made simple.
Simplicity: Fewer Parts That Can Go Wrong
One of the biggest appeals of grid-tied solar systems is their elegant simplicity. Unlike off-grid setups that require batteries, charge controllers, and complex monitoring systems, a grid-tied system keeps things refreshingly straightforward. You’ve got your solar panels, an inverter to convert DC power to AC, and a connection to the utility grid—that’s essentially it.
I remember when my neighbor Charles first looked into solar. He was intimidated by all the equipment off-grid systems required, but once he understood grid-tied setups, he said it felt like “the difference between building a spaceship and assembling a really smart extension cord.” That simplicity translates directly into maintenance advantages. With fewer components, there’s simply less that can break down or require monitoring.
Your main maintenance task? Keep those panels clean and occasionally check that your inverter’s status light is green. No battery water levels to check, no charge controller settings to adjust, no wondering if your storage capacity will get you through a cloudy week. The grid handles all that complexity for you.
This streamlined design makes grid-tied systems particularly attractive for DIY projects. You’re not troubleshooting five different components when something seems off—you’re checking panels and an inverter. That’s it. Fewer moving parts mean more time enjoying the benefits of your solar investment and less time playing technician.
Net Metering: The Grid Becomes Your Battery
Net metering is honestly one of the coolest features of grid-tied solar—it essentially turns the entire electric grid into your personal energy bank. Here’s how it works: when your panels produce more electricity than you’re using (like on sunny afternoons), that excess power flows back into the grid. Your meter literally spins backward, earning you credits with your utility company. Then, when you need power at night or on cloudy days, you draw from the grid using those banked credits.
This means you can offset your energy costs without investing in expensive battery storage systems. I’ve seen friends completely eliminate their electric bills this way, even though they’re still connected to the grid.
However—and this is crucial—net metering policies vary dramatically by location. Some states offer full retail credit for excess power, while others provide wholesale rates or have monthly credit caps. A few utilities are even phasing out favorable net metering programs altogether. Before committing to grid-tied solar, check your local utility’s current net metering policy. It can make or break your system’s economics and payback timeline.
The Big Catch: When the Grid Goes Down, So Do You
Here’s the honest truth that catches a lot of people off guard: when your neighborhood loses power, your grid-tied solar system shuts down too. Yes, even on a brilliantly sunny day with your panels cranking out electricity, you’ll be sitting in the dark along with everyone else.
I know what you’re thinking—it sounds completely backwards. But there’s actually a really good reason for this, and it’s all about safety.
When the grid goes down, utility workers head out to fix the problem. Grid-tied inverters are required by law to automatically disconnect during an outage to prevent your system from sending electricity back into the power lines. Without this safety feature, called “anti-islanding,” your solar panels could electrocute a line worker who assumes the wires are dead. It’s a critical protection that saves lives.
Charles learned this the hard way during his first winter with solar. “We had this ice storm knock out power for about six hours,” he recalls. “My panels were covered in snow anyway, but I remember standing there thinking, ‘Wait, I have a solar system!’ Didn’t matter one bit. The inverter had shut itself off the moment the grid went down, and it wouldn’t come back on until the utility restored power.”
So who does this affect most? If you live in an area with reliable power and rare outages, this limitation probably won’t bother you much. But if you’re in a region prone to storms, wildfires, or grid instability—or if you have medical equipment, a home office, or food storage that can’t afford downtime—you’ll want to think carefully about your backup needs.
Charles suggests asking yourself: “How many hours per year is my power actually out?” For most people, it’s surprisingly few. If backup power is truly essential, you might consider adding battery storage to your grid-tied system or exploring hybrid options that give you the best of both worlds.
Residential vs Commercial Grid-Tied Systems: What Changes
Residential: Start Small, Think Modular
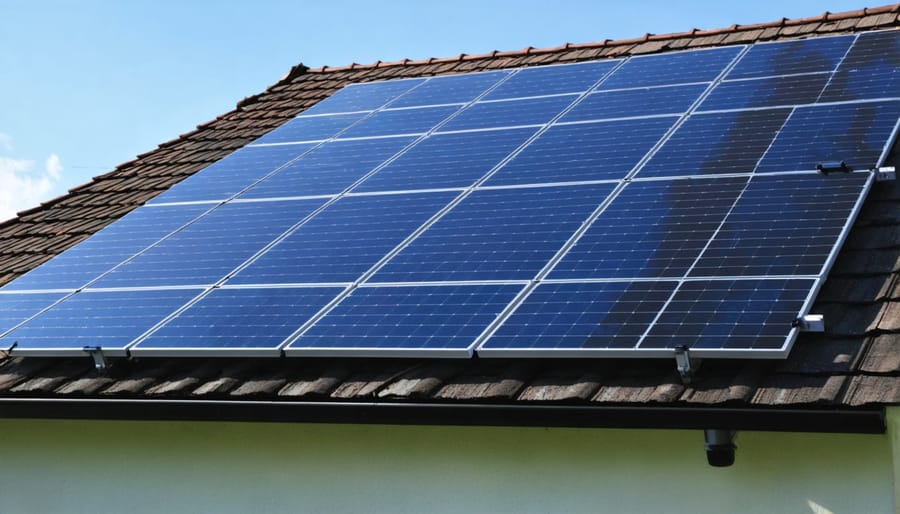
If you’re just starting your solar journey, here’s my best advice: resist the urge to go big immediately. When I installed my first grid-tied system, I began with just four panels—barely enough to offset my home office electricity—but that small start taught me everything I needed to know before scaling up.
Most homeowners find their sweet spot between 3kW and 10kW systems. A typical 5kW installation (about 15-17 panels) covers roughly half of an average home’s energy needs and costs between $10,000-$15,000 before incentives. The beauty of grid-tied systems is their modular nature—you can add more panels as your budget allows or your energy needs grow.
Before ordering anything, contact your local building department about permits. Requirements vary wildly by location, but most residential installations need electrical permits and sometimes structural reviews. Don’t let this intimidate you! Many jurisdictions have streamlined solar permitting, and the process is often simpler than kitchen renovations.
The DIY-friendly aspect of residential solar has improved dramatically. Microinverters and plug-and-play mounting systems mean you’re mostly working with straightforward mechanical assembly. That said, always hire a licensed electrician for the final grid connection—it’s usually required by code and ensures everything’s safe and compliant. Think of it as a partnership: you handle the roof work and planning, professionals handle the high-voltage hookup.
Commercial: Bigger Panels, Bigger Paperwork
Stepping into commercial solar territory is like upgrading from a backyard garden to a small farm—everything scales up, including the complexity. I learned this firsthand when a friend asked me to help evaluate solar for his workshop. We quickly realized that commercial installations involve three-phase power systems, which are completely different beasts from the single-phase setups most homes use.
Your utility company becomes an even more significant player here. They’ll require detailed engineering plans, impact studies, and sometimes equipment upgrades on their end before flipping the switch. Expect months of back-and-forth paperwork rather than weeks. The good news? Business tax incentives can be fantastic—the federal Investment Tax Credit applies to commercial projects too, and you might qualify for accelerated depreciation through programs like MACRS.
Here’s my honest take: unless you’re an electrical engineer with commercial experience, this is when you absolutely want professionals involved. The regulatory maze, liability concerns, and technical requirements make DIY commercial installations extremely risky. Think of your role as the informed project manager who understands the basics and can ask smart questions, rather than the person wielding the wrench. Your energy is better spent optimizing your system design and maximizing those business incentives than wrestling with three-phase inverter configurations.
Your Utility Company: Friend, Foe, or Frenemy?
Here’s the reality: your utility company holds some pretty important cards in your grid-tied solar journey. They’re not exactly your enemy, but they’re not going to throw you a parade either. Think of them as that neighbor who’s technically friendly but has very specific rules about where you can park.
**The Interconnection Agreement: Your Golden Ticket**
Before your system can send a single watt back to the grid, you’ll need an interconnection agreement. This is essentially a contract that says, “Yes, we’ll let your solar panels play nice with our grid.” The application process varies wildly by location—some utilities have streamlined online portals, while others still require paper forms that feel straight out of 1987.
I remember waiting three months for my interconnection approval while watching my installed panels sit there like expensive lawn ornaments. The lesson? Start this process *early*, ideally before you even order equipment.
**Net Metering: The Great Regional Lottery**
Net metering policies—where you get credit for excess power you send back—vary dramatically by state and utility. California’s net metering has evolved through multiple versions, each less generous than the last. Meanwhile, some Southern states offer minimal credits, making grid-tied systems less financially attractive. Before investing thousands, research your specific utility’s net metering terms. Many utilities now have “NEM 3.0” or similar programs with reduced compensation rates.
**Your Action Plan**
Start by visiting your utility’s website and searching for “solar interconnection.” Look for their application checklist, typical approval timeline, and any upfront fees (yes, some charge you to connect). Call their renewable energy department directly—you’d be amazed what you can learn in a ten-minute conversation. Check local solar forums or Facebook groups where neighbors share real experiences with your specific utility.
Use our utility research calculator to compare your local policies against national averages and see how solar-friendly your provider really is.
Working with your utility company requires navigating interconnection agreements, inspections, and net metering applications before your system goes live.
Three Scenarios Where You Should Skip Grid-Tied
Grid-tied solar is fantastic for most homeowners, but let me be honest with you—it’s not the perfect solution for everyone. Here are three scenarios where you might want to pump the brakes and consider alternatives.
**You’re truly off the grid.** If your property is more than a quarter-mile from existing power lines, or if the utility wants to charge you $20,000+ just to run lines to your house, grid-tied doesn’t even make sense as an option. No grid connection means no grid-tied system, period. In these cases, you’ll want to explore a complete off-grid setup with battery storage. I’ve talked with folks building cabins in remote areas who initially thought they’d connect to the grid, only to discover the connection costs more than a robust off-grid system.
**Your power goes out constantly.** Here’s something that surprises people: standard grid-tied systems shut down during outages for safety reasons. If you live somewhere with frequent blackouts—whether from storms, wildfires, or aging infrastructure—a basic grid-tied system won’t keep your lights on when you need them most. You’ll need battery backup or a hybrid system instead.
**Your utility plays hardball.** Not all utilities are solar-friendly. Some offer terrible net metering rates (paying you pennies for excess power while charging you dollars), impose hefty interconnection fees, or create bureaucratic nightmares. Before committing to grid-tied, research your specific utility’s policies. If they’re hostile to solar, the payback period might stretch so long that other options become more attractive financially and emotionally.
Your First Grid-Tied Project: Charles’s Start-Simple Approach
Many DIY enthusiasts successfully install their own grid-tied solar systems, starting with simple residential projects and following proper safety protocols.
The Paperwork Checklist Nobody Tells You About
Let me be honest—when I installed my first grid-tied system, the paperwork felt more overwhelming than the actual installation. But here’s the thing: it’s completely manageable when you know what’s coming.
**Your Essential Document Journey:**
Start with your **building permit application** from your local building department. You’ll need your system design specs, electrical diagrams, and proof that your equipment meets fire code. Most jurisdictions require these upfront, and processing typically takes 2-4 weeks.
Next comes the **utility interconnection agreement**. This is where you officially tell your power company, “Hey, I’m sending electricity back your way!” Each utility has its own forms, but they all want to see your system size, inverter specs, and sometimes an electrician’s stamp of approval.
Don’t forget the **electrical permit**—separate from your building permit in most places. A licensed electrician usually needs to sign off, even on DIY installations.
Finally, schedule your **inspection trifecta**: electrical inspection, building inspection, and utility final inspection. I recommend creating a simple spreadsheet to track deadlines and submission dates.
**Pro tip from experience:** Call your local permitting office before starting. A quick conversation can reveal local quirks that online guides miss entirely.
For most DIY solar enthusiasts, grid-tied systems represent the most practical and accessible starting point on your renewable energy journey. They’re cost-effective, reliable, and they allow you to begin offsetting your electricity bills without the complexity and expense of battery storage. I’ve seen countless hobbyists start with a simple grid-tied setup and gradually expand as their confidence and knowledge grow—it’s a learn-as-you-go approach that works beautifully.
That said, honest self-assessment is crucial. If you live in an area with frequent outages or if energy independence during emergencies is non-negotiable for your family, you’ll need to explore hybrid or off-grid options down the road. But even then, many people start grid-tied to understand the fundamentals before adding batteries later.
Ready to take the next step? Head over to our solar calculators to determine the right system size for your home’s energy needs. These interactive tools take the guesswork out of planning and help you create a realistic roadmap for your installation. And don’t forget to join our community forum, where experienced DIYers share their successes, troubleshoot challenges, and offer encouragement to newcomers just like you.
The transition to renewable energy doesn’t require a massive leap—just that crucial first step. You’ve already started by educating yourself. Now it’s time to turn that knowledge into action and become part of the solar revolution, one panel at a time.
How useful was this post?
Click on a star to rate it!
Average rating 0 / 5. Vote count: 0
No votes so far! Be the first to rate this post.
We are sorry that this post was not useful for you!
Let us improve this post!
Tell us how we can improve this post?
charlesnoble
Here at Spheral Solar, I’m a hands-on solar power enthusiast, constantly exploring and experimenting with DIY solutions. I’m dedicated to sharing my discoveries, insights, and even the bumps I hit along the way, all in the pursuit of a more sustainable future.
Community Solar Projects Made Simple: How You Can… by Charlesnoble March 19, 2026 Picture this: You’re renting an apartment with a north-facing roof, or your property is shaded by towering oak trees, yet you’re determined to power your life with clean solar energy. Community solar makes this possible. Instead of installing panels on your own property, you buy or lease a portion of…
Why DC Microgrids Are Perfect for Your DIY Solar Setup by Charlesnoble January 7, 2026 Picture this: you’re running LED lights, a laptop, and a small fridge in your off-grid cabin, and every device is drawing power directly from your solar panels without converting DC to AC and back again. That’s the elegant simplicity of a DC microgrid system, where electricity flows in its natural…
This DIY Floating Solar Pool Heater Slashed My… by Charlesnoble January 18, 2026 Place your floating solar heater on the pool’s sunny side during morning hours, positioning it where water circulation naturally draws heated water toward your skimmer return. You’ll capture 5-10 degrees of temperature gain on clear days without spending thousands on permanent installations. Build your first unit using black irrigation tubing…
Why CSP Solar Never Made It Into Your Backyard (And… by Charlesnoble January 30, 2026 When you see massive solar installations in the desert generating headlines, they’re often concentrating solar power plants—but the panels on your neighbor’s roof? Those are photovoltaics, and understanding the distinction matters more than you might think. Concentrating solar power uses mirrors or lenses to focus sunlight onto a receiver, creating…
Why Your DIY Solar Microgrid Will Fail Without the… by Charlesnoble November 22, 2025 Understand that a microgrid energy storage system is your battery bank plus the smart components that decide when to store solar power, when to use it, and when to pull from the grid or a backup generator. This integrated approach transforms disconnected parts into a cohesive power management solution that…
The Battery That Keeps Your Off-Grid Solar Running… by Charlesnoble March 13, 2026 Understand your energy storage needs by calculating your daily power consumption in watt-hours—multiply each appliance’s wattage by hours used, then add 20% for system losses and another 25% for days of autonomy when panels aren’t producing. This calculation determines your minimum battery bank capacity and prevents the costly mistake of…
Subscribe for handpicked DIY projects, exclusive tips, and giveaways.
Match your solar panels to microinverters or power optimizers based on your roof’s shading patterns—even partial shade from a chimney or tree during morning hours means module-level power electronics will recover 15-25% more energy than string inverters lose to the weakest panel. Install power optimizers when you’re working with mixed panel orientations across multiple roof… Read more: Why Smart Solar Modules Could Save Your DIY Array (Before It’s Too Late)
Measure your conduit run before purchasing materials by mapping the exact path from your solar array to the inverter and battery location, accounting for a 10% waste factor and additional length for bends. PVC electrical conduit remains the most cost-effective protective solution for DIY solar installations, but improper installation creates fire hazards, code violations, and… Read more: Why Your Solar Conduit Installation Could Start a Fire (And How to Do It Right)
Walk down to your nearest stream with a five-gallon bucket and a stopwatch. Fill that bucket and time how long it takes—this simple test reveals whether you have enough flowing water to power your off-grid home. If you can fill it in under 10 seconds from a source that drops at least 10 feet in… Read more: The Stream Behind Your House Could Power It (Here’s How Micro Hydro Works)

")


")

")
")


")

")


