The Right Tilt Angle Can Boost Your Solar Panel Output by 30% (Here’s How to Find It)
Updated:
Position your solar panels at an angle equal to your latitude for year-round performance, or adjust seasonally by adding 15 degrees in winter and subtracting 15 degrees in summer to capture maximum sunlight during each season’s sun path. Use a simple angle finder app on your smartphone against the back of your panel to verify you’ve hit the target angle, or create a basic adjustable mount using hinges and a protractor marked on plywood for precise positioning.
Calculate your optimal tilt using free online solar calculators that factor in your specific location’s latitude, typical weather patterns, and seasonal sun angles. These tools provide customized recommendations that can boost your energy production by 10-35% compared to flat-mounted panels. For ground-mounted systems, experiment with different angles throughout the year by marking optimal positions on your mounting structure with paint or tape, then track your daily output to see real-world differences.
The physics behind tilt is straightforward: solar panels generate maximum power when sunlight hits them at a 90-degree angle. Since the sun’s position changes throughout the day and across seasons, finding the right compromise angle ensures your panels capture strong, direct sunlight during peak production hours. In my early DIY days, I mounted panels flat on a shed roof and wondered why my output seemed disappointingly low. After tilting them to match my 38-degree latitude, production jumped by nearly 25% without any other changes.
Fixed-tilt mounting offers simplicity and reliability for most DIY installations, while adjustable mounts let you fine-tune angles seasonally if you’re willing to climb up twice a year. The sweet spot between complexity and performance usually means setting a fixed angle optimized for your primary energy needs, whether that’s summer air conditioning loads or consistent year-round production.
Why Solar Panel Tilt Matters More Than You Think
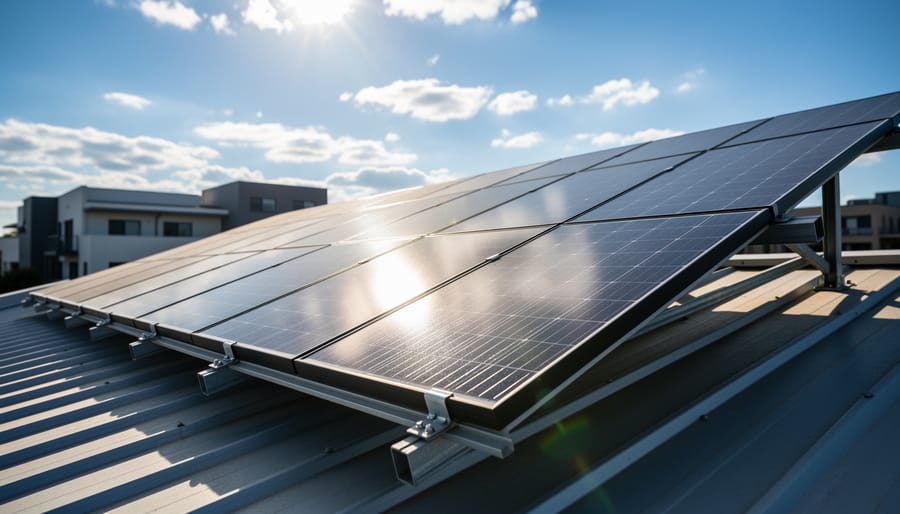
Solar panels mounted at an optimized tilt angle demonstrate how proper angling maximizes sun exposure throughout the day.
The Sun’s Daily Journey and Your Panels
Picture the sun as a ball tossed across the sky each day. It rises in the east, arcs overhead, then sets in the west. Now imagine your solar panel as a baseball mitt trying to catch as much of that light as possible. The better positioned your mitt, the more energy you’ll catch.
Here’s the thing I learned early on in my solar journey: the sun doesn’t take the same path every day. In summer, it climbs higher overhead, almost directly above you at noon. In winter, it stays lower on the horizon, like a gentle rainbow arc. This changing path is exactly why tilt matters so much.
When your panel faces the sun head-on, you’re capturing maximum energy. But as the sun moves across the sky, that angle changes constantly. A flat panel on your roof might catch great rays at noon but misses out during morning and evening hours. By tilting your panel at the right angle, you’re essentially positioning that baseball mitt to catch the average sweet spot throughout the day and across seasons, maximizing your year-round energy harvest.
Seasonal Changes and Energy Production
The sun doesn’t stay in one place throughout the year, and this seasonal movement has a huge impact on your solar energy production. Understanding these changes helped me significantly improve my system’s year-round performance.
During summer, the sun travels a higher arc across the sky. In most of the Northern Hemisphere, the sun reaches its peak at around 70-75 degrees above the horizon at solar noon. This means summer sunlight hits your panels at a steeper angle. Conversely, winter brings a much lower sun path, often just 25-30 degrees above the horizon at midday. That’s nearly a 45-degree difference, which dramatically affects how sunlight strikes your panels.
Here’s what this means practically: a panel tilted at your latitude works reasonably well year-round, but it’s actually a compromise. In summer, that panel is slightly too flat for the high sun, and in winter, it’s not steep enough to catch those low rays effectively. This is why winter solar performance often drops more than people expect.
When I first installed my panels, I noticed my winter production was about 60% lower than summer, even on clear days. The low sun angle was a major factor. Many DIYers address this by adjusting their tilt twice yearly: flatter in summer (latitude minus 15 degrees) and steeper in winter (latitude plus 15 degrees). These seasonal adjustments can boost annual energy capture by 10-15% compared to a fixed setup, making the effort worthwhile for maximizing your renewable energy harvest.
Finding Your Perfect Tilt Angle: Three Practical Approaches
The Quick-and-Easy Latitude Rule
Here’s the simplest rule you’ll find for tilting solar panels: set your tilt angle equal to your latitude. If you live at 35 degrees latitude, tilt your panels at 35 degrees. That’s it.
I remember when Charles first installed his panels in Arizona, he started with this exact approach. “I figured if everyone was recommending it, there had to be something to it,” he told me. And honestly, for year-round installations where you’re not planning to adjust seasonally, this rule works surprisingly well.
The latitude rule is based on solid reasoning. Your latitude represents your position relative to the equator, and setting your panels at this angle generally positions them perpendicular to the sun’s rays during the spring and fall equinoxes. This gives you a nice balance between summer and winter sun exposure without overthinking things.
Finding your latitude is straightforward. Just search “what is my latitude” in any search engine, and you’ll get your location’s coordinates instantly. The first number is your latitude. You can also find it in your smartphone’s compass app or weather applications.
This rule works best if you want decent year-round performance without seasonal adjustments, you’re located between 25 and 50 degrees latitude, and you’re looking for simplicity over perfection.
The beauty of this approach? You can set it and forget it. No complicated calculations, no seasonal tweaking, just reliable solar production all year long. It won’t be absolutely optimal, but it’ll get you 90 percent of the way there with minimal effort.
Seasonal Adjustments for Better Year-Round Performance
If you’re comfortable climbing up to your panels twice a year, seasonal adjustments can give you a noticeable boost in energy production. The general rule of thumb is straightforward: take your latitude angle and add 15 degrees for winter positioning, or subtract 15 degrees for summer. So if you live at 40 degrees latitude, you’d tilt your panels to 55 degrees in winter to catch those lower-angle sun rays, and 25 degrees in summer when the sun rides higher in the sky.
Charles discovered this firsthand when he started tracking his output more carefully. “I was skeptical about whether the effort was worth it,” he admits, “but after my first seasonal adjustment, I saw about a 12-15% increase in winter production compared to leaving them at a fixed angle. That extra power during shorter winter days made a real difference.” He now marks his calendar for the spring and fall equinoxes as reminder days to adjust his ground-mounted array.
The beauty of seasonal adjustments is that you don’t need to be precise to the degree. Getting within 5 degrees of the target angle still delivers most of the benefit. You’re essentially helping your panels face the sun more directly during the extremes of the year when the sun’s path changes most dramatically.
This approach works best for ground-mounted systems or accessible roof installations where safety isn’t a concern. If adjusting twice yearly feels manageable for your setup, the performance gains make it worthwhile for many DIY solar enthusiasts.
Using Online Calculators for Precision
Let me be honest with you—when I first started tinkering with solar panels, I relied heavily on guesswork and approximations. That approach works okay, but if you want to squeeze every possible watt out of your setup, online solar angle calculators are absolute game-changers. The best part? They’re completely free and surprisingly easy to use.
These calculators take the headache out of complex trigonometry by doing all the math for you. You simply plug in a few basic details about your location and installation, and they’ll tell you exactly what angle will give you optimal performance. Most calculators need just three key inputs: your latitude (which you can find by simply typing your city name into any search engine), your longitude, and whether you want year-round optimization or seasonal adjustments.
At Spheral Solar, we’ve developed our own suite of tools specifically designed with DIYers in mind. Our calculators are built to be intuitive—no engineering degree required. When you visit our angle calculator, you’ll notice it asks for your zip code first, which automatically populates your coordinates. Then you select whether you want the optimal fixed tilt angle or monthly recommended adjustments for those of you willing to tweak your setup throughout the year.
What I love about these tools is how they account for real-world factors. They consider your specific hemisphere, seasonal sun path variations, and even suggest practical mounting angles that match common hardware configurations. Within seconds, you get personalized recommendations rather than generic guidelines.
Don’t overthink this process. Bookmark a couple reliable calculators, punch in your details, and trust the results. You’ll immediately see the difference precision makes in your energy production numbers.
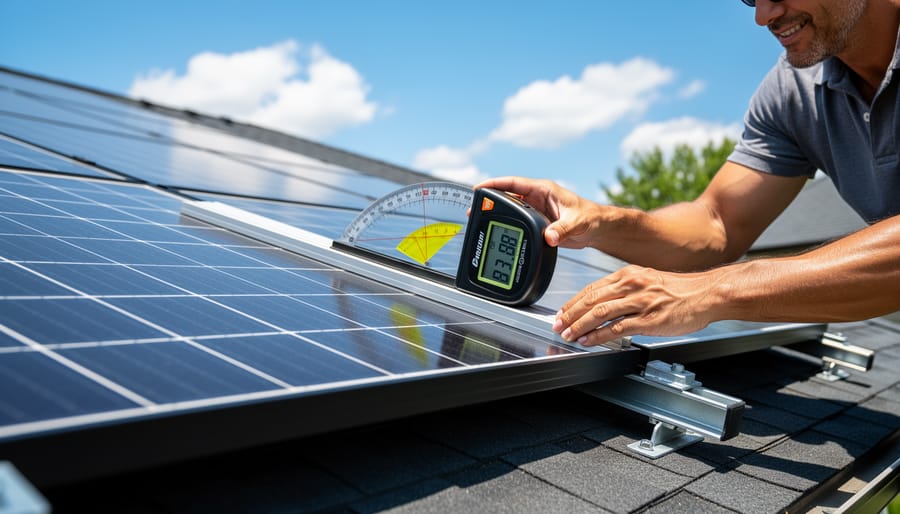
Using a digital angle finder makes it simple to verify your solar panel tilt matches your calculated optimal angle.
Fixed Tilt vs. Adjustable Mounting: What’s Right for Your Project?
Fixed-Tilt Mounts: Simple and Reliable
For most DIY solar enthusiasts just getting started, fixed-tilt mounts represent the sweet spot between simplicity and performance. I remember installing my first panel setup years ago, and choosing a fixed mount was one of the best decisions I made as a beginner.
These mounts are exactly what they sound like: your panels stay at one angle year-round. The biggest advantage? Zero maintenance. Once you’ve set your panels at the optimal angle for your latitude, you’re done. No moving parts means nothing to break, adjust, or worry about during storms. Plus, fixed mounts cost significantly less than adjustable or tracking systems, typically running 40-60% cheaper.
The durability factor shouldn’t be overlooked either. Without hinges, motors, or adjustment mechanisms, fixed mounts can withstand harsh weather conditions for decades with minimal wear. This makes them perfect for roof installations or hard-to-reach locations.
The tradeoff is efficiency. Since the sun’s path changes throughout the year, a fixed angle means you’re not capturing maximum energy every single day. You’ll typically lose 10-25% potential output compared to tracking systems.
Fixed mounts work best when you have the space to install extra panels to compensate for seasonal variations, or when you’re primarily using power during specific seasons. They’re also ideal for bifacial solar panels, where ground reflection helps balance year-round performance.
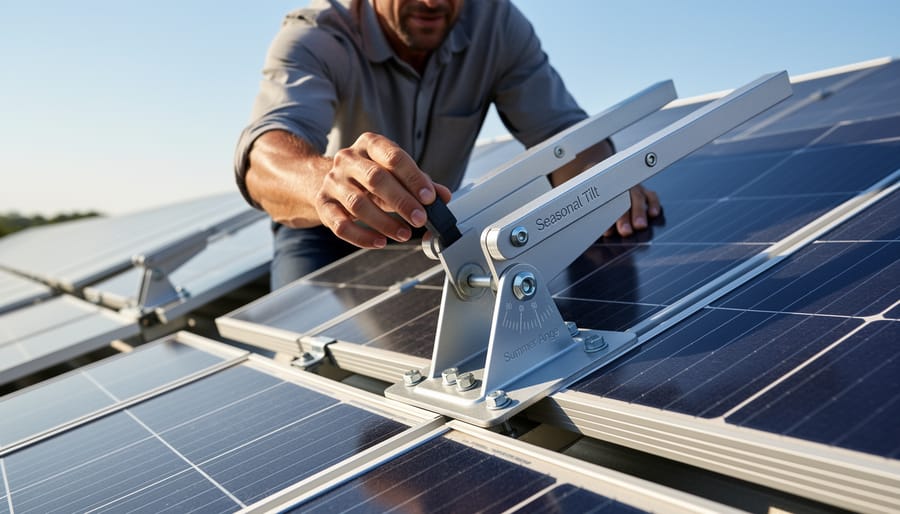
Adjustable mounting hardware allows seasonal tilt changes to optimize energy production year-round without permanent modifications.
Adjustable Mounts: The DIY Middle Ground
If you’re not quite ready for automated trackers but want better performance than fixed mounts, adjustable systems offer the perfect middle ground. I learned this firsthand when my neighbor Charles installed adjustable mounts on his garage—he gets most of the benefits of tracking without the complexity or cost.
Manually adjustable mounts let you change your panel angle two to four times per year to match seasonal sun positions. Most designs use simple bolt adjustments or pin-and-hole systems that take about 15 minutes to modify. You’ll typically adjust to a steeper angle in winter (when the sun is lower) and a shallower tilt in summer. This seasonal tweaking can boost your energy production by 10-15% compared to fixed installations.
The extra effort makes sense if you have easy roof access or ground-mounted panels and don’t mind climbing up a few times yearly. However, skip this option if your installation is difficult to reach or if mobility is a concern—no energy savings justify risking a fall.
Safety first: always work with a partner, use proper ladder techniques, and disconnect panels before making adjustments. Many DIYers mark their seasonal positions with paint or labels to make future adjustments foolproof. Some even create a simple calendar reminder to maintain their adjustment schedule, turning what could be a chore into a satisfying ritual of system optimization.
Solar Trackers: Worth the Investment?
Solar trackers sound futuristic, and they do work—but are they right for your backyard setup? Let’s break it down. Single-axis trackers follow the sun’s east-to-west path throughout the day, while dual-axis trackers also adjust for seasonal height changes. They can boost energy capture by 25-40%, which sounds amazing until you factor in the cost.
Here’s my honest take: for most DIYers, trackers don’t make financial sense. They’re expensive (often $500-$2,000+ per panel), require maintenance, and have moving parts that can fail. Unless you’re installing a larger system where that efficiency gain translates to thousands in savings, fixed-tilt mounting is smarter.
I tried a small tracker on my first setup—exciting at first, but the mechanical headaches weren’t worth the modest gain. Save your money for more panels or smart solar modules instead. Fixed angles are reliable, maintenance-free, and perfect for residential installations. Trackers shine in commercial-scale projects where space is limited but budget isn’t.
Real-World Tilt Considerations Beyond the Perfect Angle
Working with What You’ve Got: Roof and Space Constraints
Let’s get real for a moment. Most of us aren’t starting with a blank canvas when it comes to solar installation. You’ve got the roof you’ve got, and sometimes that means working with what nature (and your builder) gave you.
Here’s the good news: your existing roof pitch might already be close to ideal, especially if you live in mid-latitudes where roofs typically sit between 20-40 degrees. I learned this the hard way when I spent weeks agonizing over adding adjustable mounts to my 30-degree roof, only to calculate that my existing pitch was within 5 degrees of optimal. The potential efficiency gain? Less than 3 percent annually.
If your roof pitch isn’t perfect, ask yourself whether the complexity and cost of adding tilt mounts justifies the extra power you’ll capture. Sometimes close enough truly is good enough, particularly when you factor in wind loading, installation difficulty, and aesthetic concerns.
Space constraints matter too. Ground mounts offer flexibility for achieving perfect angles, but not everyone has sprawling yards. Flat roofs provide opportunity for optimal tilting, but remember that tilted panels take up more horizontal space than their flat footprint suggests. A simple rule: a panel tilted at 30 degrees needs about 1.15 times its length in roof space to avoid shading the row behind it.
Snow, Wind, and Weather: Tilt for Your Climate
Your local climate plays a bigger role in tilt angle than you might think. I learned this the hard way during my first winter with solar panels – waking up to find them buried under a foot of snow that just wouldn’t budge!
In snowy regions, steeper angles are your friend. Aim for 60-70 degrees during winter months to help snow slide off naturally. This prevents the weight buildup that can damage panels and obviously blocks your energy production. Flatter angles mean you’re stuck clearing snow manually, which gets old fast. Check out our guide on snow shedding strategies for more winter-specific tips.
On the flip side, if you live somewhere consistently sunny without snow concerns – think Arizona or Southern California – you can optimize purely for sun angle. Year-round angles closer to your latitude work beautifully.
For portable setups, wind becomes critical. Higher tilt angles catch more wind, potentially toppling your panels. Consider adding stabilizing weights or guy-lines if you’re angling above 45 degrees in exposed locations. During windstorms, temporarily lowering your panels to a flatter position protects your investment while sacrificing minimal energy production.
Steeper tilt angles in snowy climates allow snow to slide off naturally, maintaining energy production during winter months.
Portable and Camping Solar: Tilt on the Go
When you’re hitting the road with solar panels, whether in an RV, camper van, or tent camping setup, portability becomes just as important as efficiency. The good news? Adjustable tilt doesn’t have to mean complicated hardware.
Portable kickstand-style mounts are your best friend for on-the-go solar. These simple metal frames let you prop panels at different angles throughout the day, similar to adjusting a picture frame. I learned this the hard way during a week-long camping trip in Arizona—my flat panels were generating maybe 60% of their potential until I propped them up with some rocks and firewood. Not exactly elegant, but it taught me the value of proper positioning!
For camping setups, look for lightweight aluminum stands with pre-set angle notches. They fold flat for storage and pop open in seconds. Many RVers use adjustable legs on their roof-mounted panels, allowing quick tilt changes from ground level with a telescoping pole—no ladder climbing required.
The key consideration is ease of adjustment. You’ll likely reposition panels 2-3 times daily for optimal charging. Manual positioning works perfectly here since you’re present and active at your campsite. Quick-release clamps and friction hinges make adjustments effortless while keeping panels secure during travel.
Remember, even crude adjustments beat no adjustment at all when you’re off-grid.
Step-by-Step: Setting Up Your Solar Panels at the Right Tilt
Tools and Materials You’ll Need
Good news—you probably already have most of what you need in your garage or toolbox! For adjusting your solar panel tilt, gather an adjustable wrench or socket set (the most common bolt sizes are 10mm to 13mm), a drill with basic bits if you’re mounting brackets, and a level to ensure accuracy. A tape measure helps verify distances and angles. I learned the hard way that a good level makes all the difference—my first attempt without one left my panels slightly crooked for months!
For materials, you’ll need L-brackets or adjustable mounting brackets (available at hardware stores for under $20), stainless steel bolts and nuts to resist weather, and possibly some scrap wood or metal for custom angle supports. Many DIYers repurpose materials from old projects. A simple angle finder or protractor (even a smartphone app works great) helps measure your tilt precisely. If you’re working on a roof, safety equipment like harnesses and non-slip shoes are essential—never compromise on safety, regardless of your experience level.
Measuring and Setting Your Angle
Getting your tilt angle right doesn’t require fancy equipment. I learned this the hard way when I first started – I spent hours eyeballing my panels, only to discover I was off by nearly 10 degrees!
The simplest method is using a smartphone app. Download a free inclinometer or angle finder app (most measure angles accurately to within a degree). Place your phone flat against the panel surface, and the app displays your exact tilt angle. Just remember to calibrate the app on a level surface first.
If you prefer dedicated tools, a digital angle finder costs around $15-30 and clips right onto your panel frame. These are incredibly reliable and don’t drain your phone battery during installation.
For the ultimate DIY approach, create a simple angle template using cardboard and a protractor. Draw your desired angle, cut it out, and use it as a guide when positioning your panels. It’s not as precise, but it works in a pinch.
To verify your angle, check it from multiple points along the panel – frames can warp slightly. Also, revisit your measurements after tightening all mounting hardware, since adjustments can shift during the final securing process. A difference of 5 degrees or less from your target is perfectly acceptable for most home installations.
Safety First: Securing Your Installation
Working on a roof or ladder always demands respect and caution. I learned this the hard way years ago when I almost dropped a panel while reaching too far—trust me, you only make that mistake once! Before you start, make sure your ladder is secured on level ground and consider using a safety harness if you’re working on a steep roof. Never work alone, and always keep someone nearby who knows you’re up there.
Structural integrity is equally crucial. Your roof needs to support not just the panels, but also wind loads and snow accumulation. Check that your mounting hardware is rated for local wind speeds—in some areas, panels can become dangerous projectiles during storms if improperly secured. Use lag bolts that penetrate into rafters, not just roof sheathing, and seal all penetrations properly to prevent leaks.
For ground mounts, ensure your foundation is deep enough to prevent frost heave and secure enough to withstand high winds. Just like proper wiring configuration protects your electrical investment, solid mounting protects your physical one. Take time to do it right—a few extra hours now beats replacing damaged equipment or, worse, dealing with injuries later.
Getting your solar panels tilted at the right angle is honestly one of the simplest ways to squeeze more energy out of your system. I’ve seen folks boost their production by 20-30% just by adjusting their tilt—and the best part? It doesn’t require expensive equipment or advanced technical skills.
Whether you’ve calculated your exact latitude-based angle, used online tools, or simply eyeballed a reasonable tilt, you’re already ahead of the game. Remember, an imperfect angle is infinitely better than flat panels or no solar installation at all. Even a basic seasonal adjustment twice a year can make a meaningful difference in your energy harvest.
The beauty of solar is that you can start simple and optimize over time. If you’ve been hesitating to set up your system because you’re worried about getting everything perfect, let this be your permission to just get started. You can always fine-tune later as you learn what works for your specific location and energy needs.
I’d love to hear about your own tilt optimization journey. Have you experimented with different angles? Found creative mounting solutions? Your experiences could help fellow solar enthusiasts in our community, so please share your stories and tips in the comments below.
Ready to dial in your perfect angle? Head over to Spheral Solar’s tilt calculator to get personalized recommendations for your location. It takes just minutes and could transform your solar production for years to come.
How useful was this post?
Click on a star to rate it!
Average rating 0 / 5. Vote count: 0
No votes so far! Be the first to rate this post.
We are sorry that this post was not useful for you!
Let us improve this post!
Tell us how we can improve this post?
charlesnoble
Here at Spheral Solar, I’m a hands-on solar power enthusiast, constantly exploring and experimenting with DIY solutions. I’m dedicated to sharing my discoveries, insights, and even the bumps I hit along the way, all in the pursuit of a more sustainable future.
Why Your Bifacial Solar Panels Need a Completely… by Charlesnoble March 22, 2026 Flip your bifacial solar panels over and you’ll find a second active surface that can boost your system’s energy production by 10-30% – but only if you design your array to take advantage of it. Unlike traditional panels that capture sunlight from one side, bifacial modules harvest energy from both…
Snow on Your Solar Panels? Here’s What Actually… by Charlesnoble March 25, 2026 Brush snow off your panels with a soft-bristled roof rake from ground level, working gently from bottom to top to avoid scratching the glass or damaging your DIY solar setup. Use lukewarm water in a spray bottle for stubborn ice patches, never hot water that could crack cold panels from…
Why Series-Parallel Wiring Could Save Your Solar… by Charlesnoble March 24, 2026 When your solar array needs more power than a simple series connection provides, but your charge controller can’t handle high voltages, series-parallel wiring becomes your solution. This hybrid approach combines the voltage-boosting benefits of series connections with the current-increasing advantages of parallel wiring, giving you the flexibility to match your…
Why Smart Solar Modules Could Save Your DIY Array… by Charlesnoble March 27, 2026 Match your solar panels to microinverters or power optimizers based on your roof’s shading patterns—even partial shade from a chimney or tree during morning hours means module-level power electronics will recover 15-25% more energy than string inverters lose to the weakest panel. Install power optimizers when you’re working with mixed…
Subscribe for handpicked DIY projects, exclusive tips, and giveaways.
Position your solar panels at an angle equal to your latitude for year-round performance, or adjust seasonally by adding 15 degrees in winter and subtracting 15 degrees in summer to capture maximum sunlight during each season’s sun path. Use a simple angle finder app on your smartphone against the back of your panel to verify… Read more: The Right Tilt Angle Can Boost Your Solar Panel Output by 30% (Here’s How to Find It)
Route your PV wires through UV-resistant conduit within 18 inches of leaving the solar array, securing it every 3 feet with proper clamps to prevent wind damage and code violations. This single step prevents 80% of the wire degradation issues I’ve seen in DIY solar installations over the past decade. Group your positive and negative… Read more: Why Your PV Wire Management Could Fail Inspection (And How to Fix It)
Understand that 6000 volts sounds terrifying but delivers surprisingly low amperage—typically around 120 milliamps for just 3/10,000th of a second per pulse. This combination creates an unforgettable shock that trains animals to avoid the fence without causing lasting harm. The voltage pushes current through thick fur and hide, while the minimal amperage and microsecond duration… Read more: Why 6000 Volts Won’t Kill Your Livestock (But Will Stop Predators Cold)


")
")
")

")
")
")

