Why 8 AWG Solar Wire Might Be Wrong for Your System (And How to Know for Sure)
Updated:
Calculate your system’s maximum current first—8 AWG solar wire safely handles 40-55 amps depending on installation conditions, making it the sweet spot for mid-sized solar arrays between 1,200 and 3,000 watts at 12-24 volts. If your panels produce more than 40 amps combined, you need thicker wire; less than 30 amps, and you’re overspending on copper you don’t need.
Measure the distance from your solar panels to your charge controller or inverter before buying anything. At 12 volts, 8 AWG maintains acceptable voltage drop up to about 15 feet for 40-amp loads, but that distance shrinks fast with higher currents. I learned this the hard way on my first rooftop installation when I didn’t account for the 25-foot run from my garage panels—my batteries charged noticeably slower until I upgraded.
Check whether you need single-conductor or duplex cable based on your conduit situation. Exposed rooftop runs demand UV-resistant, wet-rated wire rated for at least 90°C, typically marked as USE-2 or PV wire. Indoor runs offer more flexibility, but never use standard THHN wire outdoors regardless of what’s gathering dust in your garage.
Match your overcurrent protection to both the wire and your equipment specifications. Most 8 AWG installations use 50-amp breakers or fuses, providing the right balance between protecting your wire from overheating and avoiding nuisance trips when clouds part and your panels suddenly hit peak production. Getting this protection sizing right matters more than the wire itself—undersized protection creates fire risks while oversized protection won’t save your wire when something goes wrong.
What Makes 8 AWG Solar Wire Different from Regular Wire
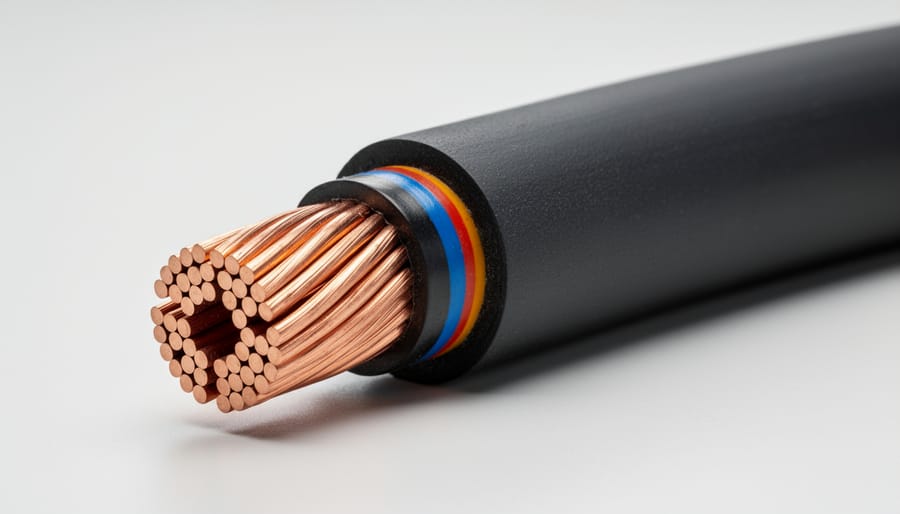
The internal construction of 8 AWG solar wire reveals stranded copper conductors and specialized UV-resistant jacketing designed for outdoor solar applications.
The Numbers Behind the Gauge
When I first started working with solar installations, the AWG numbering system seemed backward to me—and if you’re feeling the same confusion, you’re not alone! Here’s the key thing to remember: the higher the AWG number, the thinner the wire. It’s counterintuitive, but once you get it, everything clicks into place.
The American Wire Gauge system is a standardized measurement that’s been around since the 1850s. Think of it like this: each step up in gauge number represents about a 20% reduction in wire diameter.
For 8 AWG wire specifically, we’re looking at a diameter of roughly 0.128 inches (about 3.26 millimeters). To put that in perspective, it’s slightly thicker than a standard pencil lead holder. Compared to its neighbors, 10 AWG measures about 0.102 inches—noticeably thinner—while 6 AWG comes in at 0.162 inches, giving you considerably more copper to work with.
This difference matters more than you might think. That jump from 10 AWG to 8 AWG means approximately 25% more cross-sectional area, which directly translates to how much current your wire can safely carry. Understanding these differences helps you match the right wire to your specific solar setup without overspending on unnecessarily thick cables or creating safety hazards with undersized ones.
Solar-Rated vs. Regular Electrical Wire
When I first started exploring solar wire options, I assumed wire was wire—boy, was I wrong! Solar-rated wire differs significantly from the standard electrical wire you’d use inside your home, and understanding these differences can save you from costly mistakes and potential safety hazards.
The most common solar-rated wires you’ll encounter are PV wire, USE-2, and THWN-2. PV wire is specifically designed for solar applications and can handle the unique challenges of photovoltaic systems. It’s built to withstand direct sunlight exposure for decades without degrading. USE-2 (Underground Service Entrance) wire is another excellent choice, rated for both wet locations and direct burial, making it incredibly versatile for outdoor solar installations.
Temperature tolerance is where solar wire really shines. Regular household wire typically handles up to 60°C or 75°C, but solar-rated wire is often rated for 90°C or higher. This matters because your solar panels can get scorching hot in summer sun, and the wire connected to them needs to handle that heat without breaking down.
The outer insulation on solar wire is also tougher than regular wire. It’s UV-resistant, moisture-resistant, and designed to handle temperature swings from freezing winters to blazing summers. Regular THHN or THWN wire, while suitable for many electrical applications, simply wasn’t engineered for years of outdoor exposure.
Here’s the bottom line: using regular electrical wire outdoors for your solar project might save a few dollars upfront, but it’s penny-wise and pound-foolish. Solar-rated wire provides the durability and safety margins your system needs for its 25-plus year lifespan.
When 8 AWG Wire Is the Right Choice for Your Solar Setup
Matching Wire Gauge to Your System’s Amperage
Understanding your system’s amperage is crucial before selecting 8 AWG wire. Here’s how I learned this the practical way: I once underestimated the current in my garage setup and ended up with warm wires—not dangerous, but definitely inefficient and a wake-up call!
Start by calculating your system’s current flow using this simple formula: Current (Amps) = Power (Watts) ÷ Voltage (Volts). For example, if you have a 400-watt solar panel operating at 12 volts, you’re looking at about 33 amps (400 ÷ 12 = 33.3). Check your solar panel specifications for exact wattage and voltage ratings.
Once you know your amperage, compare it to 8 AWG’s capacity. In most residential solar applications with proper installation, 8 AWG wire can safely handle 40-55 amps, depending on environmental factors like temperature and wire length. However, you should never operate at maximum capacity continuously. A good rule of thumb is to keep your actual current at 80% or less of the wire’s rated ampacity—this provides a safety buffer and follows National Electrical Code guidelines.
We’ve created a simple wire gauge calculator tool on our resources page that does the math for you. Just input your system’s wattage and voltage, and it’ll recommend the appropriate wire gauge. This takes the guesswork out and helps ensure your installation is both safe and efficient.
Distance Matters: Voltage Drop Explained Simply
Think of voltage drop like water pressure in a garden hose. The longer the hose, the weaker the spray at the end. The same thing happens with electricity traveling through wire. As power moves from your solar panels to your charge controller or battery bank, some of it gets lost along the way as heat. That’s voltage drop, and it matters more than you might think.
For most solar installations, you want to keep voltage drop under 3% for the entire system. Some folks aim for 2% or less to maximize efficiency. Here’s why this matters: if you’re losing 5% of your power to voltage drop, that’s like throwing away one out of every twenty solar panels you paid good money for.
I learned this lesson the hard way on my first installation. I ran 8 AWG wire for what I thought was a reasonable distance, only to discover I was losing nearly 4% of my power. Charles always says, “Measure twice, wire once,” and he’s absolutely right.
With 8 AWG wire carrying typical solar current (around 30-40 amps), you can generally run about 25-30 feet before hitting that 3% threshold on a 12V system. Double your voltage to 24V, and you can roughly double that distance. For 48V systems or series-parallel configurations, you get even more flexibility.
The key takeaway: 8 AWG works beautifully for shorter runs. If you’re looking at distances beyond 30 feet on a 12V system, you’ll want to either step up to a thicker wire gauge or increase your system voltage. There are great online voltage drop calculators that’ll give you exact numbers for your specific setup.
Protection Devices That Pair with 8 AWG Solar Wire
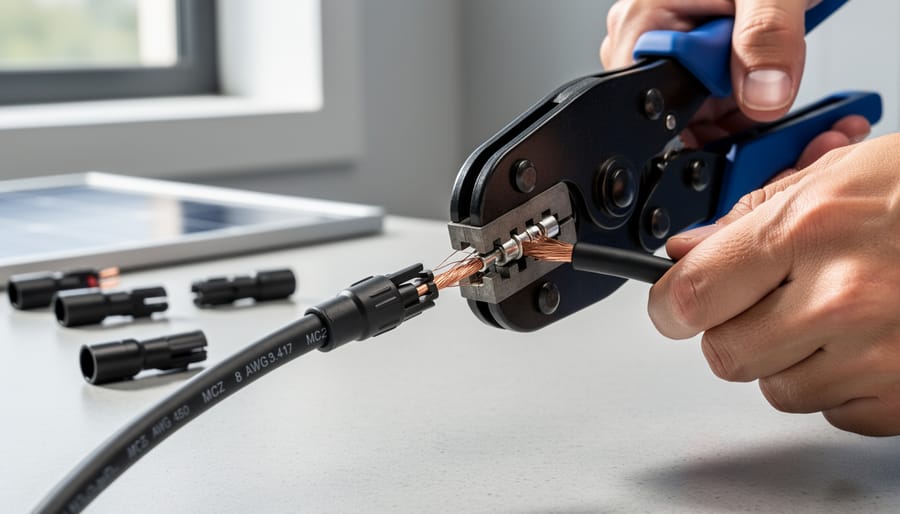
Proper crimping technique ensures secure connections between 8 AWG solar wire and MC4 connectors for reliable system performance.
Fuses and Circuit Breakers: Sizing Them Correctly
Selecting the right fuse or circuit breaker for your 8 AWG solar wire is like choosing the right safety valve for a pressure cooker – you want protection without constant nuisance trips. This is where understanding amperage ratings becomes your best friend.
Here’s the basic rule: your overcurrent protection device (that’s your fuse or breaker) should match the wire’s continuous ampacity, not the maximum current your panels produce. For 8 AWG wire, which typically handles 40-50 amps depending on conditions, you’ll generally want a 40-amp breaker or fuse. This gives you adequate protection without being overly conservative.
I learned this the hard way during my first solar installation when I installed a 60-amp breaker on 8 AWG wire, thinking “bigger is better for safety.” My electrician friend gently explained that oversizing actually reduces safety – the breaker won’t trip fast enough if the wire overheats. Consider it a lesson learned without any burnt wires, thankfully!
The National Electrical Code requires that your overcurrent protection doesn’t exceed 125% of the wire’s ampacity. For typical residential solar applications with 8 AWG wire in conduit (rated at 40 amps), a 40-amp breaker provides that sweet spot of protection. Some installers use 35-amp breakers for extra safety margin, especially in hot climates where temperature derating applies.
Always choose UL-listed breakers or fuses specifically rated for DC applications in solar systems – regular AC breakers won’t safely interrupt DC arcing.
Inline fuse holders and properly rated circuit breakers provide essential overcurrent protection when using 8 AWG wire in solar installations.
Inline Fuse Holders and Disconnect Switches
Here’s something I learned the hard way: no matter how perfectly you size your 8 AWG wire, your system isn’t truly safe without proper inline protection. I once helped a neighbor troubleshoot why his charge controller kept shutting down, only to discover he’d skipped the fuses entirely. Don’t be that person.
Inline fuse holders and disconnect switches serve as your system’s insurance policy. They protect against overcurrent situations, short circuits, and give you a safe way to work on your system. For 8 AWG wire carrying up to 55 amps, you’ll typically want fuse holders rated for at least 60-80 amps to handle surge currents without nuisance tripping.
Where should you place these protection devices? At minimum, install them between your solar panels and charge controller, and between your battery bank and any loads. Many experienced DIYers also add protection between the charge controller and batteries. Think of it as creating safety zones throughout your circuit.
When shopping for fuse holders compatible with 8 AWG wire, look for models with terminals that accommodate wire gauges from 6 to 10 AWG. Marine-grade ANL fuse holders work beautifully for solar applications because they’re built to handle outdoor conditions and vibration. MIDI or MEGA fuse holders are also excellent choices, offering better weather resistance than basic automotive-style holders.
Disconnect switches let you safely de-energize parts of your system for maintenance. A simple battery disconnect switch between your panels and controller can prevent those heart-stopping moments when you’re working with live wires. These aren’t optional extras, they’re fundamental safety components that could prevent fires or electrical shock.
Real-World Applications: Where I Use 8 AWG in My Projects
I’ve learned through trial and error that 8 AWG wire hits a sweet spot for many mid-sized solar projects. Let me share where I’ve actually used it and what I discovered along the way.
My most successful 8 AWG application was a camper van conversion I completed last year. The setup included three 200-watt panels feeding a 30-amp MPPT controller, with about 15 feet of wire run from the roof to the charge controller. The 8 AWG handled the current beautifully without voltage drop issues. I initially considered going with 10 AWG to save a few dollars, but after running the calculations, I realized I’d lose nearly 3% voltage over that distance. That lesson cost me nothing because I did the math first, but I’ve talked to folks who learned it the expensive way.
For a friend’s small cabin project, we used 8 AWG between the battery bank and a 2000-watt inverter. This was pushing the wire’s limits at full inverter load, but since the cabin rarely drew maximum power and runs were under 5 feet, it worked perfectly. The key here was understanding actual versus theoretical loads. Most solar storage systems don’t constantly pull peak amperage, so knowing your real-world usage matters more than spec sheets.
One mistake I avoided was using 8 AWG for longer battery-to-inverter runs. I almost made this error on my workshop system before calculating that a 12-foot run would create unacceptable voltage drop under load. I stepped up to 6 AWG instead, and I’m glad I did.
For portable solar setups like my tailgating rig, 8 AWG provides excellent flexibility while remaining manageable to coil and store. It’s thick enough to feel durable but not so stiff that it becomes frustrating to work with in tight spaces.
The bottom line from my experience: 8 AWG shines in systems between 400-800 watts with moderate wire runs, where it balances cost, capacity, and practicality perfectly.
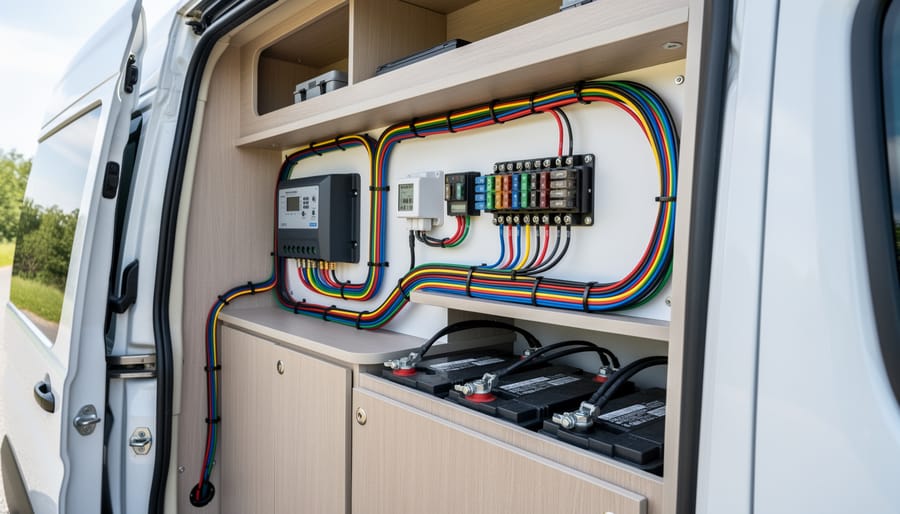
A properly executed van conversion demonstrates clean 8 AWG wire routing from rooftop solar panels to the electrical system.
Shopping for 8 AWG Solar Wire: What to Look For
Certification Labels That Matter
When I was setting up my first solar array, I didn’t think much about certification labels until my insurance company asked for documentation. That was a learning moment! Now I always check for the right certifications before buying any solar wire.
The most important label to look for is UL 4703, which is specifically designed for photovoltaic wire and cable. This certification means the wire has been tested to withstand the unique challenges of solar installations, including exposure to UV radiation, temperature extremes, and outdoor conditions. Without UL 4703 certification, your wire might not meet the National Electrical Code requirements, which could cause headaches during inspections.
You might also see UL-listed or ETL-listed labels, which indicate general electrical safety testing. While these are good, UL 4703 is the gold standard for solar applications. Some wires also carry a flame rating designation, typically showing resistance to fire spread.
Why does this matter beyond just checking boxes? Certified wire protects your investment in multiple ways. First, most building inspectors won’t approve installations without proper certifications. Second, insurance companies often require proof of code-compliant materials to honor claims if something goes wrong. Third, certified wire simply performs better because it’s been rigorously tested for the conditions you’ll actually face.
Think of certifications as your safety net. They’re not just bureaucratic red tape, they’re evidence that experts have verified your wire can handle the job safely.
Stranded vs. Solid Core for Solar Applications
When choosing 8 AWG solar wire, you’ll encounter two main types: stranded and solid core. Each has its place in solar installations, and understanding the differences will help you make the right choice for your project.
Stranded wire consists of multiple thin wire strands twisted together, making it significantly more flexible than solid core. This flexibility is a game-changer when routing wire through tight spaces, around corners, or into conduit. I learned this the hard way on my first ground mount installation when trying to bend solid wire around panel frames – it was like wrestling with a garden hose in winter! Stranded wire also handles vibration better, making it ideal for RV and marine solar applications where movement is constant.
Solid core wire is a single thick conductor that’s more rigid but generally less expensive. It works well for straight runs and permanent installations where you won’t need to manipulate the wire much after installation. Some people prefer solid core for underground conduit runs where the wire stays put once installed.
For most DIY solar projects, stranded 8 AWG is the better choice. The flexibility makes installation easier and reduces stress on connections. However, if you’re doing a simple, straight run with minimal bends in a fixed ground-mount system, solid core can save a few dollars without sacrificing performance.
Common Mistakes DIYers Make with 8 AWG Wire (I’ve Made Them Too)
Look, I’ll be the first to admit I’ve stumbled through plenty of learning experiences with 8 AWG wire. My first solar setup? Let me just say it involved some redos. Here are the mistakes I see most often, and yeah, I’ve made a few myself.
The biggest one is not planning for future expansion. I installed my initial system thinking “this is plenty,” only to want more panels six months later. Since I’d already sized everything to the minimum, adding capacity meant running entirely new wire. If you’re even remotely considering expansion, go up a wire size now. Your future self will thank you, trust me.
Temperature derating is another trap I fell into early on. The NEC tables show 8 AWG can handle certain amperage, but those ratings assume your wire is in a perfect 30-degree Celsius environment. My conduit sits on a south-facing roof. It gets hot. Really hot. In those conditions, you need to derate your wire’s capacity, sometimes by 20 percent or more. I learned this the hard way when my connections started getting warm to the touch.
Crimping technique matters way more than I initially thought. My first attempts looked okay on the outside, but I was either crushing the wire or leaving it too loose. A proper crimp requires the right tool and the right connector for your specific wire. Those cheap multi-purpose crimpers from the hardware store? They’re not really suitable for solar applications where connections need to last decades outdoors.
Finally, I once mixed regular THHN wire with proper solar-rated wire because I ran short mid-project. Different insulation types have different UV resistance and temperature ratings. Mixing them creates weak points in your system. Stick with consistently rated wire throughout your entire run, even if it means making another trip to the supplier.
Quick Reference: 8 AWG Wire Specifications at a Glance
Let me break down the key specs for 8 AWG solar wire in a way that’ll help you quickly figure out if it’s right for your project. I remember when I first started planning my RV solar setup, I wished someone had just laid out the numbers in one simple spot!
Here’s what you need to know about 8 AWG solar wire:
Ampacity (Current Capacity): In typical solar installations, 8 AWG can safely handle 40-55 amps, depending on whether it’s in free air or bundled with other wires. The National Electrical Code ratings are conservative for safety, which is exactly what we want when dealing with electricity.
Maximum Recommended Distances (3% voltage drop):
– 12V systems: Up to 10 feet for 20 amps, 5 feet for 40 amps
– 24V systems: Double the 12V distances (20 feet for 20 amps, 10 feet for 40 amps)
– 48V systems: Double the 24V distances (40 feet for 20 amps, 20 feet for 40 amps)
Temperature Rating: Most quality solar wire is rated for 90°C (194°F) in wet or dry conditions, which handles the heat buildup in conduit or direct sunlight exposure.
Compatible Connectors: Standard MC4 connectors work perfectly with 8 AWG wire. You’ll also find it fits nicely with ring terminals sized for 8 AWG, which you’ll need for battery and charge controller connections.
These numbers are your starting point for planning. Every installation is unique, so consider your specific voltage, distance, and amperage needs.
Choosing the right wire gauge for your solar project doesn’t have to be overwhelming. By now, you should have a solid understanding of whether 8 AWG solar wire fits your specific needs. Remember, it all comes down to your system’s amperage, voltage, and the distance electricity needs to travel. If you’re running a mid-sized solar setup with currents between 40-55 amps and relatively short cable runs, 8 AWG is likely your sweet spot.
I’ve learned over the years that the best solar projects start with careful planning. Before you make your final purchase, take advantage of the voltage drop calculators and wire sizing tools available right here on our site. These interactive resources can save you from costly mistakes and ensure your system runs efficiently for decades.
Still have questions about your specific setup? You’re not alone in this journey. Our community is filled with fellow solar enthusiasts who’ve faced the same decisions you’re making right now. Drop a comment below sharing your project details, challenges you’re facing, or lessons you’ve learned along the way. Your experience might be exactly what someone else needs to hear, and together we can keep building a future powered by clean, renewable energy.
How useful was this post?
Click on a star to rate it!
Average rating 0 / 5. Vote count: 0
No votes so far! Be the first to rate this post.
We are sorry that this post was not useful for you!
Let us improve this post!
Tell us how we can improve this post?
charlesnoble
Here at Spheral Solar, I’m a hands-on solar power enthusiast, constantly exploring and experimenting with DIY solutions. I’m dedicated to sharing my discoveries, insights, and even the bumps I hit along the way, all in the pursuit of a more sustainable future.
Wire Your Solar System Right the First Time (Before… by Charlesnoble March 18, 2026 Sketch your complete solar system on paper before purchasing a single component—mapping the physical distance from your solar panels to the charge controller, then to the battery bank, and finally to your inverter will reveal the exact wire gauges you need and prevent the costly mistake of voltage drop that…
Why Series-Parallel Is the Sweet Spot for Small Solar Setups by Charlesnoble December 2, 2025 Connect two panels in series to double your voltage, then wire two of these series pairs in parallel to maintain higher voltage while increasing your amperage—this series-parallel configuration gives you the sweet spot between performance and practicality for most small-scale solar setups. I learned this the hard way during my…
Why Your Solar Setup Needs Both a Charge Controller… by Charlesnoble April 6, 2026 Check the maximum voltage and current ratings first—these determine whether your controller can actually handle your solar panel array without frying itself on the first sunny day. I learned this the hard way when my first DIY system shut down every afternoon because I’d paired 600 watts of panels with…
Why Lithium-Ion Batteries Changed Everything About… by Charlesnoble December 3, 2025 Match your battery’s voltage to your solar panel system—12V, 24V, or 48V configurations must align perfectly, or you’ll waste energy through conversion losses and potentially damage expensive equipment. Check the battery’s amp-hour (Ah) rating against your daily power consumption: multiply your total watt-hours by 1.2 to account for inefficiency, then…
How to Test Your DIY Solar System Like a Pro… by Charlesnoble March 19, 2026 Flip the main DC disconnect three times while monitoring voltage drop—this single action reveals whether your connections can handle full load without dangerous resistance buildup. Check every MC4 connector with an infrared thermometer under peak sun; any reading more than 10 degrees above ambient temperature signals a faulty crimp that…
Why Your Solar Panels Need the Right Mounting System… by Charlesnoble February 7, 2026 Your solar panels are only as reliable as what holds them in place. A solar array mounting system is the structural foundation that secures your panels to rooftops, ground surfaces, RVs, or portable setups, and choosing the wrong one can lead to damage, reduced efficiency, or even safety hazards. Think…
Subscribe for handpicked DIY projects, exclusive tips, and giveaways.
Position your solar panels at an angle equal to your latitude for year-round performance, or adjust seasonally by adding 15 degrees in winter and subtracting 15 degrees in summer to capture maximum sunlight during each season’s sun path. Use a simple angle finder app on your smartphone against the back of your panel to verify… Read more: The Right Tilt Angle Can Boost Your Solar Panel Output by 30% (Here’s How to Find It)
Route your PV wires through UV-resistant conduit within 18 inches of leaving the solar array, securing it every 3 feet with proper clamps to prevent wind damage and code violations. This single step prevents 80% of the wire degradation issues I’ve seen in DIY solar installations over the past decade. Group your positive and negative… Read more: Why Your PV Wire Management Could Fail Inspection (And How to Fix It)
Understand that 6000 volts sounds terrifying but delivers surprisingly low amperage—typically around 120 milliamps for just 3/10,000th of a second per pulse. This combination creates an unforgettable shock that trains animals to avoid the fence without causing lasting harm. The voltage pushes current through thick fur and hide, while the minimal amperage and microsecond duration… Read more: Why 6000 Volts Won’t Kill Your Livestock (But Will Stop Predators Cold)


")

")
")
")
")
")

")
")
")
")


