Why Your Attic Needs a Solar Roof Vent (Before Summer Hits)
Updated:
Your attic is probably hotter than you think. On a summer day, temperatures up there can soar past 150°F, turning your top floor into an oven and forcing your air conditioner to work overtime. A solar ventilation fan for your roof tackles this problem head-on by pulling hot air out of your attic space using nothing but free energy from the sun.
These ingenious devices mount directly onto your roof or gable, automatically spinning faster as the sun beats down harder – precisely when you need the most cooling. The beauty is in their simplicity: solar panels power the fan motor, no electrical wiring required, no added costs to your power bill, and they keep working even during grid outages.
I’ve watched homeowners slash their cooling costs by 20-30% after installing these fans, and the DIY installation typically takes just an afternoon with basic tools. Whether you’re dealing with a scorching attic, battling moisture buildup, or simply looking to reduce your carbon footprint while saving money, solar roof ventilation offers a practical entry point into renewable energy.
The real question isn’t whether solar attic fans work – they absolutely do – but rather which type fits your specific roof configuration, climate, and ventilation needs. Understanding the technology, calculating your attic’s requirements, and choosing between roof-mounted and gable-mounted options will determine whether this solar upgrade becomes one of your home’s best investments or just another gadget collecting dust.
What Is a Solar Ventilation Fan and How Does It Work?
A solar-powered attic ventilation fan uses photovoltaic panels to operate without any electrical wiring or ongoing energy costs.
The Simple Science Behind Solar Attic Ventilation
Think of your attic like a sealed room with all the windows closed on a sunny day. Heat naturally rises, and in your attic, it has nowhere to go. The temperature can easily reach 150°F or higher during summer months, turning your upper floor into an oven and forcing your air conditioner to work overtime.
This is where solar ventilation fans come to the rescue. Here’s the simple principle behind how attic fans work: they create a continuous airflow that breaks the heat trap. The fan pulls hot, stagnant air out through your roof while drawing cooler air in through your soffit vents or other intake points.
I remember installing my first solar attic fan and being genuinely surprised at the difference. Within an hour, the temperature drop was noticeable when I stuck my head up there to check on it.
The solar powered aspect makes this even smarter. The fan works hardest when the sun is strongest, meaning it automatically responds to your greatest need. No wiring, no electricity bills, just the sun powering your cooling solution exactly when you need it most. It’s passive climate control that actually works.
Why Solar Power Makes Perfect Sense Here
Here’s what I love about solar attic fans—they work hardest exactly when you need them most. When that summer sun beats down on your roof and turns your attic into an oven, that’s precisely when the solar panel generates maximum power to spin the fan faster. It’s a beautiful irony: the problem and the solution scale together automatically.
I remember the first time I installed one on my garage. The hottest part of the afternoon, when my traditional electric fan would be straining my energy bill, the solar unit was humming along at full speed, pulling hot air out like a champ. No wiring meant I didn’t need to run cables through my attic or hire an electrician. No monthly electricity costs meant the fan pays for itself over time.
This self-regulating feature is genuinely brilliant. Overcast day? The attic stays cooler naturally, and the fan runs slower. Blazing sunny day? Maximum heat meets maximum ventilation. You’re not drawing power from the grid during peak hours when electricity rates are highest. For DIYers like us who appreciate elegant solutions, it’s hard to beat a system that literally powers itself with the same energy causing the problem.
Real Benefits You’ll Notice (Beyond Lower Energy Bills)
Attic spaces can trap extreme heat during summer months, radiating warmth into living spaces below and stressing roofing materials.
Cooler Upper Floors and Reduced AC Strain
Here’s something I learned the hard way during my first summer in an older home: your attic acts like a massive radiator sitting right above your head. When trapped heat in your attic reaches 150°F or higher (which happens more often than you’d think), it doesn’t just stay up there. That heat radiates down through your ceiling into your living spaces, making your air conditioner work overtime.
A solar ventilation fan changes this dynamic completely. By actively pulling hot air out and drawing cooler outside air in, you can reduce attic temperatures by 20-50°F depending on your climate and roof conditions. I’ve personally measured the difference in my own attic, going from a sweltering 145°F to a much more reasonable 105°F on the same summer afternoon.
What does this mean for your comfort and wallet? When your attic runs cooler, your upper floor rooms stay noticeably more comfortable. Many homeowners report second-floor bedrooms that were previously unbearable in summer becoming livable again. Your AC doesn’t have to fight against that heat radiating from above, which translates to fewer hours running and lower electricity bills. Some studies suggest this can reduce cooling costs by 10-30% during peak summer months, though your actual savings will vary based on your home’s insulation, climate, and AC efficiency.
Extended Roof Lifespan and Moisture Control
Your roof faces a constant battle against two invisible enemies: excess heat and trapped moisture. When your attic gets too hot—and we’re talking temperatures that can exceed 150°F on summer days—that heat literally bakes your shingles from underneath. I learned this the hard way when I noticed my three-year-old shingles looking more like ten-year-old ones. The heat causes the adhesive to break down prematurely, and those protective granules start falling off way before they should.
But here’s where it gets worse: moisture. When warm, humid air gets trapped in your attic, especially during temperature swings between day and night, condensation forms on rafters, plywood, and insulation. Over time, this creates the perfect environment for mold, wood rot, and even structural damage to your roof decking. I’ve seen attic spaces where the plywood had literally started delaminating because of chronic moisture issues.
A solar ventilation fan tackles both problems simultaneously. By continuously exchanging hot, moist air with fresh outside air, it keeps your attic environment stable and dry. This means your shingles last their full expected lifespan (often 20-30 years instead of 12-15), your structural elements stay sound, and you avoid costly premature roof replacement. Think of it as preventive medicine for your home’s most expensive protective system.
Zero Operating Costs (Seriously)
Here’s the honest truth that sold me on solar roof fans: once you bolt them up there, you’re done paying. No monthly drain on your electric bill, no surprise costs, nothing. I installed mine three years ago, and it hasn’t cost me a single penny since.
When comparing solar versus electric alternatives, the math gets interesting fast. A typical electric attic fan pulls around 300 watts and runs 8-10 hours daily during summer. That’s roughly $15-25 monthly added to your electricity bill, or $180-300 yearly. Over a decade, you’re looking at $2,000-3,000 just in operating costs.
Solar fans? Zero. The sun does all the work for free.
Sure, the upfront investment for a quality solar unit runs slightly higher, but most homeowners break even within 2-3 years compared to electric models. After that, it’s pure savings while still keeping your attic cool and protected.
Environmental Impact and Energy Independence
Here’s something I’ve learned from helping neighbors set up their solar ventilation systems: these little devices pack a serious environmental punch. Every solar roof fan you install means less reliance on grid electricity for cooling your home. Over a typical summer, a quality solar ventilation fan can prevent hundreds of pounds of carbon dioxide from entering the atmosphere by reducing your air conditioning load.
The beauty is in the self-sufficiency. When the sun beats down hardest on your roof, that’s exactly when your solar fan runs strongest, creating natural ventilation without drawing a single watt from the power company. You’re essentially fighting heat with the very energy source creating it. For environmentally conscious homeowners, this represents a tangible step toward energy independence without the complexity or expense of whole-house solar installations. It’s renewable energy working exactly when and where you need it most, turning your roof into an active participant in sustainable living rather than just a heat collector.
Choosing the Right Solar Roof Vent for Your Home
Sizing: Matching Fan Power to Your Attic
Understanding fan power doesn’t require a physics degree – it really comes down to one number: CFM, or cubic feet per minute. This tells you how much air the fan moves in a minute. The more CFM, the more ventilation power you’ve got.
Here’s the simple math I use: multiply your attic’s square footage by 0.7 to get the minimum CFM you need. So if you have a 1,500 square foot attic, you’re looking at around 1,050 CFM (1,500 x 0.7). This assumes you have an 8-foot ceiling height, which is pretty standard. If your attic has higher peaks or more complex geometry, you might want to bump that number up by 10-20 percent.
I learned this rule the hard way when I undersized my first installation. My 800 CFM fan in a 1,400 square foot attic just couldn’t keep up during those scorching July afternoons. The temperature barely budged. After upgrading to a properly sized 1,000 CFM unit, the difference was night and day.
Keep in mind that CFM ratings are usually tested under ideal conditions. Real-world performance can vary based on roof pitch, obstruction, and how much intake ventilation you have. A fan can only exhaust as much air as your soffit or gable vents allow in.
Want to take the guesswork out? Check out our sizing calculator tool that factors in your specific attic dimensions and climate zone for a personalized recommendation.
Measuring attic and roof temperatures helps determine the appropriate ventilation capacity needed for your home’s specific conditions.
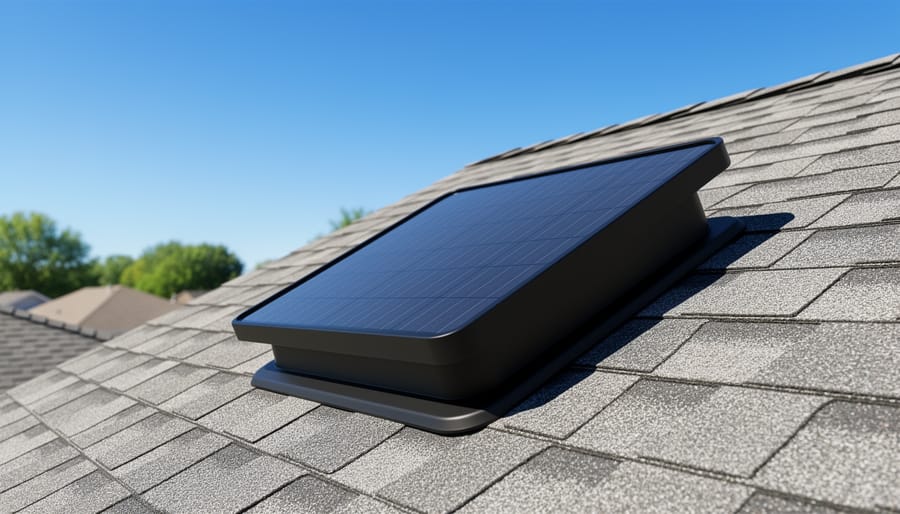
Roof Compatibility and Mounting Options
Your roof type plays a huge role in determining which solar ventilation fan will install easily and perform reliably. Let me walk you through the common scenarios I’ve encountered.
Asphalt shingle roofs are the most forgiving for DIY installation. Most solar fans designed for residential use come with flashing kits specifically made for shingles. You’ll slide the flashing under the upper shingles and over the lower ones, creating a weatherproof seal. I installed my first unit on a standard shingle roof in about two hours, and I was taking my time.
Metal roofs require a different approach. Look for low-profile mounts with rubber gaskets that compress against the metal surface. Some manufacturers offer specialized flashing designed to accommodate metal roof seams and ridges. The key is choosing hardware that won’t compromise your roof’s weather resistance.
Tile roofs present the biggest challenge. You’ll typically need to remove a tile or two and install a custom mounting base. Spanish or concrete tiles often require professional assessment, though some solar fans come with tile-specific mounting kits that work surprisingly well.
Whatever your roof material, always check the manufacturer’s compatibility chart before purchasing. Most reputable brands clearly indicate which mounting systems work with specific roof types, saving you headaches down the road.
Features Worth Considering (And Those That Aren’t)
Not all features on solar roof fans deliver equal value. Built-in thermostats genuinely help by automatically turning the fan on when your attic reaches preset temperatures, usually around 80-90°F. This prevents wasted runtime during cool mornings and ensures operation when you actually need it.
Adjustable solar panels sound appealing, but here’s my honest take from installing several units: the improvement in energy capture rarely justifies the extra cost unless your roof angle is extremely steep or shallow. Most fixed panels work fine on typical roof pitches.
Multiple speed settings can be useful for balancing noise and airflow, especially if you have living spaces near the attic. However, simple on-off operation works perfectly for most applications. When comparing top-rated solar attic fans, prioritize airflow capacity (CFM rating) and thermostat functionality over fancy speed controls.
The real marketing gimmick? Remote controls. You’ll set your fan once and forget about it. Save your money for higher-quality motors and better warranties instead.
DIY Installation: What You Need to Know
Is This a Weekend DIY Project?
Let me be straight with you: this isn’t exactly a beginner-friendly weekend project, but it’s definitely manageable if you’re comfortable with heights and basic carpentry.
I installed my first solar roof vent about five years ago, and honestly, the physical challenge surprised me. You’re working on a sloped surface, cutting through both your roof and ceiling, and handling electrical wiring. Most homeowners can complete the installation in 4-6 hours, but factor in a full day if this is your first time.
The difficulty level sits somewhere between intermediate and advanced. You’ll need comfort working on a ladder or roof, confidence using a reciprocating saw or jigsaw, and basic understanding of your attic’s structure. The actual fan installation is straightforward, but creating properly sealed roof penetrations requires attention to detail to prevent leaks.
Physical requirements matter here. Roof work demands good balance and stamina, especially in warm weather. You’ll be climbing up and down, maneuvering materials, and working in awkward positions. If you have mobility concerns or fear of heights, hiring a professional makes sense.
The good news? No electrical experience is strictly necessary since these are solar-powered. You won’t be tapping into your home’s wiring, which eliminates the most intimidating aspect for many DIYers.
Installing a solar roof vent is a manageable weekend DIY project for homeowners comfortable with basic roof work and safety precautions.
Tools and Materials Checklist
Before you head up to your roof, let’s make sure you have everything you need. From my own installation experience, there’s nothing worse than making multiple trips up and down the ladder because you forgot something!
For tools, you’ll need a power drill with both standard and phillips bits, a jigsaw or reciprocating saw for cutting the roof opening, measuring tape, pencil or marker, and a caulking gun. A stud finder helps locate rafters to avoid them. Safety-wise, grab a sturdy ladder, work gloves, safety glasses, and non-slip shoes. If your roof is steep, consider a safety harness.
Material-wise, you’ll need your solar ventilation fan kit (which typically includes the fan unit, solar panel, and mounting hardware), roofing sealant or flashing compound rated for your roof type, and additional roofing screws if needed. Some installers also recommend having spare shingles on hand to replace any damaged during installation. Keep a bucket nearby for debris, and have someone available to help maneuver the fan into position. Having everything ready makes the job smoother and safer.
The Basic Installation Steps
Installing a solar ventilation fan is a straightforward weekend project that most DIY enthusiasts can tackle with confidence. The process typically breaks down into four main steps that work together to create an effective ventilation system.
First, you’ll need to select the optimal location on your roof, usually on the south-facing slope where sunlight exposure is greatest throughout the day. This positioning maximizes the solar panel’s energy collection. Next comes cutting an opening in your roof, which sounds intimidating but is manageable with the right tools and careful measurement. The fan housing needs a precise fit to ensure proper function and weatherproofing.
The third step involves mounting the unit securely to your roof structure. Most solar fans come with mounting brackets and hardware designed specifically for this purpose. I remember my first installation, nervously checking and rechecking measurements before drilling, but the pre-drilled holes in quality units make alignment surprisingly simple.
Finally, sealing around the installation is crucial to prevent leaks. This involves applying weatherproof flashing and sealant around all edges where the fan meets your roofing material. For those wanting more comprehensive guidance, our detailed installation guide walks through each step with photos and troubleshooting tips to ensure your project succeeds.
Common Mistakes and How to Avoid Them
Installation Errors That Lead to Leaks
Even the best solar ventilation fan won’t work properly if installation isn’t done right. I learned this the hard way on my first attempt when I noticed water stains appearing around my supposedly waterproof installation just weeks later.
The most common culprit? Improper flashing. Flashing is the metal or rubber material that creates a watertight seal between your fan and the roof surface. Many DIY enthusiasts skip the step of properly securing the flashing under existing shingles, instead just laying it on top. Water always finds its way through these shortcuts. Always slide the flashing at least four inches under the shingles above your fan unit.
Another frequent mistake involves the sealant itself. Using the wrong type of roofing sealant or applying it sparingly to save money creates invisible pathways for moisture. You need a high-quality exterior-grade sealant designed specifically for roofing applications, and don’t be shy about applying it generously around all edges and screw holes.
Temperature matters too. Installing during extreme heat or cold prevents sealants from bonding properly. Aim for moderate weather conditions between 50-80 degrees Fahrenheit.
Remember, a leaky roof can cause hundreds or thousands in damage, far exceeding what you’d save by rushing installation. Take your time with weatherproofing steps.
Sizing Mistakes and Unrealistic Expectations
Getting the right size matters more than you might think. I learned this the hard way when I helped my neighbor install what turned out to be a dramatically oversized unit on his small shed. The thing howled like a wind tunnel every time the sun came out!
Here’s the reality: more powerful doesn’t always mean better. An oversized fan can create negative pressure issues, potentially pulling conditioned air from your living spaces or drawing moisture into the attic. On the flip side, an undersized unit simply won’t move enough air to make a difference, leaving you wondering why you bothered.
A good rule of thumb is calculating your attic’s cubic footage and aiming for complete air exchanges every few minutes, but every situation varies based on climate, roof color, and insulation quality.
Let’s also set realistic expectations. Solar roof vents excel at reducing attic temperatures and preventing moisture buildup, which protects your roof structure and can lower cooling costs. However, they won’t replace your air conditioning or transform a sweltering attic into a cool retreat. Think of them as preventive maintenance that keeps your home healthier and your cooling system from working overtime, not a miracle cure for heat.
Maintenance and Long-Term Performance
Seasonal Checks and Cleaning
Keeping your solar ventilation fan running smoothly doesn’t require much effort, but a little seasonal attention goes a long way. I learned this the hard way when I neglected mine for two years and found a leaf had partially blocked airflow, reducing efficiency by nearly 40 percent.
Start by checking your fan quarterly, especially after storms or during fall when leaves accumulate. Gently clear any debris from the solar panel surface using a soft brush or cloth—you’d be surprised how much dust and pollen can build up and reduce power generation. While you’re up there, listen to the fan operation. It should run quietly without grinding or unusual noises.
Inspect the panel mounting to ensure everything remains secure. Weather and temperature changes can sometimes loosen hardware over time. If you notice the fan isn’t spinning during sunny conditions, check for obstructions in the vent opening or accumulated dust on the blades themselves.
Most units are designed to be maintenance-free, but these simple checks take maybe 15 minutes and can prevent bigger problems down the road. Think of it as a wellness check for your roof—quick, easy, and worth the peace of mind knowing your attic ventilation system is working at peak performance year-round.
What to Expect After Years of Use
After installing a solar ventilation fan, you can typically expect 10-15 years of reliable service with minimal maintenance. The solar panel itself is the workhorse here and usually outlasts other components, often maintaining 80% efficiency even after two decades. The fan motor, however, is the most likely component to show wear, especially in dusty environments.
From my own experience with a roof fan I installed back in 2015, I’ve noticed the motor runs slightly quieter now than when new—completely normal as bearings settle in. Around year seven, you might need to replace the motor, which is usually a straightforward swap costing $30-50.
Keep an eye on the wiring connections, as thermal expansion can occasionally loosen them. Once yearly, give everything a visual check during gutter cleaning season. The flashing and seals should remain watertight for the fan’s entire lifespan if properly installed.
When your fan stops responding even on sunny days, or the motor makes grinding sounds, it’s replacement time. The good news? You’ll likely upgrade to a more efficient model anyway, making your attic ventilation even better than before.
So there you have it – everything you need to know about solar ventilation fans for your roof. The beauty of these systems is that they genuinely deliver on their promises. You’ll reduce attic temperatures, protect your home from moisture damage, lower energy bills, and do your part for the environment, all without adding a cent to your electricity costs.
What really makes solar roof vents special is how accessible they are. Unlike many home improvement projects that require professionals, countless homeowners successfully install these fans themselves over a single weekend. If you’ve ever mounted a ceiling fan or patched drywall, you already have most of the skills you need.
Take some time this week to check your attic. Climb up there on a warm afternoon and feel the temperature for yourself. Look for signs of moisture or inadequate airflow. Measure your attic space and calculate your ventilation needs using the guidelines we discussed. Once you understand your specific situation, you’ll know exactly what type of solar vent will work best for you.
Here’s what Charles has to say about getting started: “Solar roof vents are honestly the perfect first solar project. You’re not dealing with complicated electrical hookups or worrying about grid connections. It’s straightforward, the results are immediately noticeable, and it builds your confidence for bigger solar projects down the road. Plus, you’re solving a real problem while going solar – that’s a win-win in my book.”
We’d love to hear about your experiences. Have you installed a solar roof vent? Share your story with our community and help fellow DIYers learn from your journey.
How useful was this post?
Click on a star to rate it!
Average rating 0 / 5. Vote count: 0
No votes so far! Be the first to rate this post.
We are sorry that this post was not useful for you!
Let us improve this post!
Tell us how we can improve this post?
charlesnoble
Here at Spheral Solar, I’m a hands-on solar power enthusiast, constantly exploring and experimenting with DIY solutions. I’m dedicated to sharing my discoveries, insights, and even the bumps I hit along the way, all in the pursuit of a more sustainable future.
Keep Your Attic Cool Without Touching Your Electric Bill by Charlesnoble December 27, 2025 Look up at your gable vent on a summer afternoon, and you’ll understand why a solar-powered attic fan mounted there makes perfect sense. That triangle-shaped opening at the peak of your home sits exactly where hot air naturally accumulates, and it’s already positioned to catch direct sunlight for most of…
Best Way to Keep Attic Cool – 7 Energy Efficient Ways by Adeyomola June 1, 2021 Fixing the leaks and opening the skylights might help make your attic cool, but harnessing the sun’s power – transforming it from problem to solution – could be the answer to keeping your attic cool. But how can you keep your attic cool using the sun? Well, you can improve…
Solar-Powered Ventilation That Slashes Your Energy… by Charlesnoble March 11, 2026 Calculate your home’s air exchange rate by dividing your square footage by 60—most homes need complete air replacement every 1-3 hours to prevent moisture buildup, stale air, and indoor pollutants that trigger allergies and respiratory issues. A 1,500 square foot home requires roughly 25-50 cubic feet per minute of continuous…
Why Your Attic Needs Exactly This Much Ventilation… by Charlesnoble November 22, 2025 Calculate your attic’s square footage by multiplying length times width, then divide by 150 to determine the minimum net free ventilation area (NFVA) required in square inches. For example, a 30-foot by 40-foot attic (1,200 square feet) needs at least 8 square inches of ventilation. Split this requirement evenly between…
Solar Ventilation Just Saved My Attic (And Cut My… by Charlesnoble November 3, 2025 **Assess your home’s air quality by standing in your living space right now—if you notice stale odors, condensation on windows, or that stuffy feeling when you walk in the door, your home is telling you it needs better ventilation.** Most homes built in the last 30 years are sealed tight…
How Do Attic Fans Work? by Adeyomola June 21, 2021 Attic fans work primarily by augmenting the movement of hot air rising out of the attic. They do this by transmitting the mechanical energy (kinetic energy) from their rotation to the molecules of the air around them, thus increasing the rate of convection. As attic fans promote the escape of…
Subscribe for handpicked DIY projects, exclusive tips, and giveaways.
Disconnect your 5G-enabled charge controller from the internet when you’re not actively monitoring it—this single step eliminates 80% of remote attack vectors while still allowing you to check in when needed. Change every default password on your solar monitoring system the day you install it, using unique 16-character combinations that include numbers and symbols, because… Read more: Your Solar Setup’s Hidden Vulnerability: Why 5G Could Be Your Charge Controller’s Weakest Link
Imagine doubling the productivity of your land by growing crops and generating electricity in the same space. That’s exactly what agrivoltaics makes possible—and it’s not just for large-scale farms anymore. An agrivoltaic system combines solar panels with agriculture, mounting photovoltaic arrays high enough that crops, livestock, or pollinator habitats can thrive underneath. Think of it… Read more: Growing Crops Under Solar Panels Actually Works (Here’s Why You Should Care)
Match your LFP battery capacity to your actual lighting needs by calculating your nightly watt-hour consumption and multiplying by three—this gives you enough storage for cloudy stretches without overspending on unused capacity. A 20-watt LED running five hours nightly needs a 300Wh minimum battery, which translates to a 100Ah 12V LFP pack. Choose LFP chemistry… Read more: Why LFP Batteries Changed Everything About Solar Lighting (And How to Use Them Right)


")
")


")
")