Why Your Backup System Needs a Critical Load Panel (And How to Size It Right)
Updated:
Picture this: It’s 2 AM, the power’s out, and your backup battery system is silently draining itself trying to keep your pool pump, water heater, and every other non-essential appliance running. By morning, you’re out of power—right when you actually need it for your refrigerator and medical equipment. I learned this lesson the hard way during my first solar installation, and it’s why understanding critical load panels transformed how I approach backup power systems.
A critical load panel is essentially a secondary electrical panel that connects only your most essential circuits to your battery backup or generator system. Think of it as a lifeline that separates what you absolutely need during an outage—lights, refrigeration, medical devices, well pumps—from everything else. Instead of your backup system struggling to power your entire home and depleting batteries in hours, it focuses exclusively on keeping your critical loads running for days.
The concept sounds simple, but the real power lies in strategic implementation. You’re essentially creating two electrical worlds in your home: one that draws from both grid and backup power, and another that runs on grid power alone. When the grid goes down, your air conditioning and electric dryer go silent, but your freezer full of food, your internet router for work-from-home needs, and that CPAP machine stay operational.
Most homeowners discover they can reduce their backup power requirements by 60-80% through proper critical load separation. This means smaller battery banks, lower equipment costs, and significantly longer runtime during extended outages. Whether you’re planning a full off-grid system or simply want resilience during storm season, a critical load panel isn’t just recommended—it’s the foundation of any intelligent backup power strategy.
What Exactly Is a Critical Load Panel?
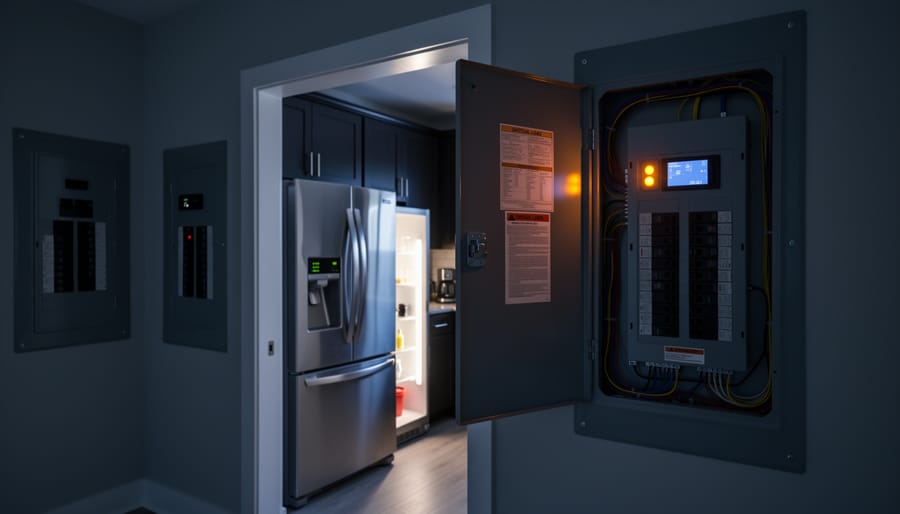
A critical load panel (shown as the smaller secondary panel) separates essential circuits from your main electrical panel, ensuring backup power goes only where needed.
The Smart Triage System for Your Home
Think of a critical load panel as the emergency room triage nurse of your home’s electrical system. When disaster strikes and your main power goes down, this smart system quickly separates what absolutely needs electricity from what can wait—just like a medical professional prioritizes patients based on urgency.
I learned this lesson the hard way during my first power outage after installing solar. I’d connected everything to my backup battery, and within three hours, my refrigerator, computers, and—embarrassingly—my espresso machine had drained the whole system. My neighbor Jim, who’d set up his system with a critical load panel, was still running his essentials three days later while I was drinking instant coffee in the dark.
Here’s how it physically works in your electrical system: Instead of your main panel feeding power directly to every circuit in your home, you install a secondary panel—the critical load panel—between your backup power source and your chosen essential circuits. During normal operation, everything runs as usual from the grid. But when you lose main power and switch to backup (whether that’s solar batteries, a generator, or both), only the circuits you’ve moved to this special panel receive power.
The beauty is in its simplicity. You’re literally creating two separate electrical neighborhoods in your home: the essential district that gets backup power, and everything else that goes dark during an outage. This physical separation means your limited backup power stretches much further, keeping your true necessities running when it matters most.
Why You Can’t (And Shouldn’t) Power Everything
During a power outage, a critical load panel ensures essential appliances like your refrigerator continue running while non-essential loads remain off.
The Math That Changes Everything
Here’s a reality check that changed everything for Charles: his shiny new 3000W inverter couldn’t even handle breakfast.
Let me walk you through the math that makes critical load panels not just useful, but essential. It’s simpler than you think, and once you see it, you can’t unsee it.
Start with your morning routine. That coffee maker? 1200W. The toaster for your bagel? Another 1200W. Already you’re at 2400W, and you haven’t even turned on a light. Now your refrigerator compressor kicks in (800W at startup), and suddenly your inverter is screaming for mercy.
Charles learned this the hard way. “I thought 3000 watts was plenty,” he told me over coffee one afternoon. “Then I actually added up what runs in my house at any given moment. My well pump alone needs 1500W to start. Add the fridge, a few lights, and my laptop charger, and I was constantly tripping the inverter’s overload protection.”
Here’s the breakdown that opens most people’s eyes:
Microwave: 1000-1500W
Hair dryer: 1500-1800W
Electric kettle: 1500W
Space heater: 1500W
Washing machine: 500-2000W (depending on cycle)
Central AC: 3000-5000W
See the problem? Just two or three everyday appliances can max out a typical home inverter. And we haven’t even talked about power tools, which can easily demand 2000W or more.
This is where inverter sizing meets reality. You’re not choosing what you want to power. You’re choosing what you can actually power simultaneously. That aha moment? That’s when people realize they need a critical load panel to strategically separate essential circuits from power-hungry conveniences.
Performing Your Load Analysis: What Actually Matters
Creating Your Essential vs. Nice-to-Have List
When I first started planning my backup power system, I made the classic mistake of trying to power everything. My initial list looked like a complete home inventory, and the battery bank required would’ve cost more than my first car! That’s when I learned the power of honest prioritization.
Let’s break down your household circuits into two categories: critical and nice-to-have. This isn’t about what you want to run—it’s about what you truly need during an outage.
Critical loads are the non-negotiables. Your refrigerator tops this list because losing food during extended outages gets expensive fast. If you’re on a well, your pump is absolutely critical—no water means no cooking, cleaning, or flushing toilets. Heating system controls matter too, especially if you live somewhere cold. Even if your furnace runs on gas, the control board and blower often need electricity. Basic lighting circuits should make the list, but here’s a pro tip: focus on LED bulbs in key areas rather than every light in your house. Finally, communications matter—keeping your internet router and phone chargers powered helps you stay informed and connected during emergencies.
Non-critical loads are things you can survive without temporarily. Central air conditioning is the big one for most folks. Yes, it’s uncomfortable, but fans use far less power. Electric dryers can wait—air-drying works fine for a few days. Pool pumps, electric ranges, multiple entertainment systems, and garage door openers typically fall into this category too.
Here’s your prioritization exercise: Imagine you’re without grid power for three days in January, then again in July. Walk through a typical day mentally. What would genuinely impact your safety, health, or ability to work from home? What’s merely inconvenient?
Write down every circuit in your panel, then honestly assess each one. Your critical load panel should handle genuine necessities, not lifestyle preferences. This discipline will save you thousands in equipment costs while still keeping your household functional when it matters most.
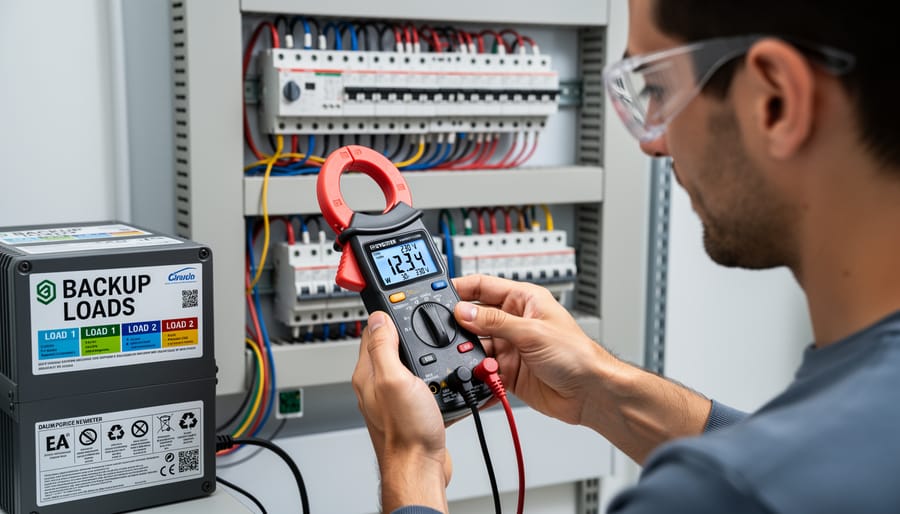
Measuring Your Actual Power Draw
Before you can properly size a critical load panel, you need to know exactly how much power your essential appliances actually use. I learned this the hard way during my first solar setup when I relied on guesswork and ended up with a system that couldn’t quite handle my needs during a cloudy week.
The easiest starting point is reading the labels on your appliances themselves. Look for a nameplate or sticker, usually on the back or bottom, that lists the wattage or amperage. If you only see amps listed, multiply that number by your voltage (120V for most household circuits) to get watts. For example, a device drawing 5 amps uses about 600 watts.
For a more accurate picture, I highly recommend getting a Kill-A-Watt meter or similar plug-in power monitor. These inexpensive devices plug into your outlet, then you plug your appliance into them. They’ll show you real-time power consumption and can track usage over hours or days. This is especially valuable for refrigerators, which cycle on and off throughout the day. You might find your fridge averages only 150 watts over 24 hours, even though its compressor draws 600 watts when running.
Your breaker panel labels can also provide clues about maximum loads on different circuits, though these represent capacity rather than actual usage.
Here’s the critical part: always account for startup surge. Motors in refrigerators, well pumps, and air conditioners can draw two to three times their running watts for a few seconds when starting. Build this cushion into your calculations.
Spheral Solar offers helpful calculators that simplify this process, letting you input your measurements and automatically accounting for surge requirements. These tools can save you hours of spreadsheet work and help ensure you don’t undersize your critical load panel.
Measuring actual power consumption of your circuits helps determine which loads your backup system can realistically support.
Designing Your Critical Load Panel Setup
Choosing Which Circuits Make the Cut
Now comes the part where you get real about what actually matters during an outage. I learned this the hard way during a three-day blackout a few years back when I realized my carefully planned system was powering a guest bedroom lamp while my sump pump sat idle. Not my finest moment.
The circuits you choose depend heavily on your living situation. If you’re in a rural home with a well, that well pump absolutely tops your list, followed by a refrigerator, some lighting, and maybe a few outlets for phone charging and a laptop. Suburban homes might skip the well but prioritize the garage door opener (trust me, manually lifting that door gets old fast), refrigerator, furnace blower, and critical lighting circuits.
For those with RVs or mobile setups, think smaller but smarter. A single 20-amp circuit feeding strategic outlets often beats multiple lighting circuits. You can plug in what you need when you need it.
Here’s where hardwired versus plug-in loads matters. Hardwired items like your furnace, well pump, or septic system need dedicated circuits in your critical panel. But consider leaving some circuits as standard outlets so you can adapt. During winter, maybe that’s a space heater. Summer? A window AC unit or fans.
Walk through different scenarios mentally. Three-day winter storm? You need heat and water. Summer hurricane? Refrigeration and fans become priorities. Extended outage? Add in a freezer circuit and maybe internet equipment if you’re working remotely.
My rule of thumb: start with survival basics (water, food preservation, critical medical), add comfort items (heating/cooling, lighting), then convenience (entertainment, work equipment) only if your system capacity allows. Most homes can get by on 4-6 well-chosen circuits during emergencies.
Sizing Your Panel to Your Power Source
Here’s the thing most people get wrong when setting up a critical load panel—they focus entirely on what they want to power without checking if their system can actually deliver it. I learned this lesson the hard way during my first solar installation when my lights dimmed every time the well pump kicked on!
Your critical load panel’s capacity must match or stay below your power source’s continuous output. If you have a 5kW inverter capacity, your critical loads shouldn’t exceed that limit. Simple, right? Well, there’s more to it.
Start by adding up the wattage of every circuit you plan to include in your critical panel. Remember, we’re talking about potential simultaneous loads. Your refrigerator might draw 200 watts normally, but it pulls 800 watts on startup. These surge demands matter.
Here’s my rule of thumb: never load your panel beyond 80 percent of your power source’s continuous rating. This 20 percent headroom protects your equipment and accounts for those unexpected moments when multiple devices start simultaneously. For a 6kW inverter feeding your critical panel, keep total connected loads under 4800 watts.
Planning for expansion? Leave at least two empty breaker spaces in your panel. Your future self will thank you when you want to add that chest freezer or home office equipment.
Also consider your battery bank’s discharge rate and generator fuel consumption. A properly sized critical load panel ensures your backup power lasts when you need it most.
Installation Considerations (When to Call a Pro)
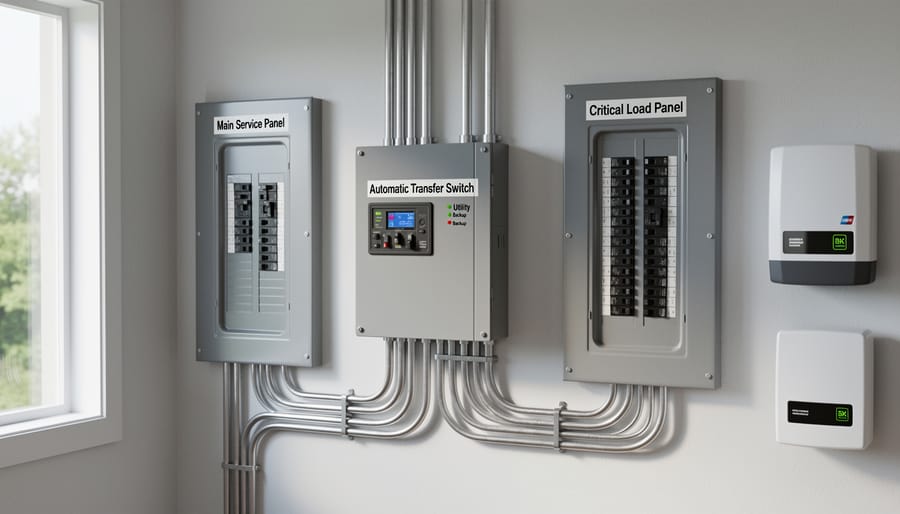
The Transfer Switch Connection
Your critical load panel doesn’t work in isolation—it needs a bridge between your main electrical panel and your backup power source. That’s where the transfer switch comes in, and honestly, this is one of those components that might seem intimidating at first, but it’s actually pretty straightforward once you understand its purpose.
Think of the transfer switch as a smart traffic cop for your electricity. When grid power is flowing normally, it directs that power to your critical load panel. When the grid goes down and your backup power kicks in, the transfer switch redirects traffic so your selected circuits now run on generator or battery power instead. The crucial part? It never allows both power sources to connect simultaneously, which would be dangerous and could damage your equipment or even harm utility workers trying to restore power.
You’ll encounter two main types: automatic and manual transfer switches. Automatic transfer switches do exactly what the name suggests—they detect when grid power fails and switch to backup power without any action from you. This happens in seconds, which is why your internet router might barely blink during a power outage if it’s on your critical load panel. Manual transfer switches require you to physically flip a switch or turn a lever when the power goes out. They’re less expensive but demand that you’re home and awake when an outage occurs.
I learned the importance of this component the hard way during my first installation attempt. Without proper transfer switch integration, you risk backfeeding electricity into the grid, creating serious safety hazards for utility workers and potentially damaging your entire system.
An automatic transfer switch safely connects your critical load panel to backup power sources while preventing dangerous backfeed into the grid.
Real-World Examples: Three Different Approaches
Let me show you how three different households tackled their critical load panels, each with unique priorities and budgets.
The Budget-Conscious Starter Setup ($800-1,200)
Meet Sarah, who lives in an area with occasional storm-related outages. She didn’t need her entire house backed up, just the essentials. Her critical load panel powers eight circuits: refrigerator, garage door opener (for safety), one bathroom light and outlet, her home office (she works remotely), the furnace control board, her internet router, and two bedroom circuits for lights and phone charging.
Sarah’s approach focused on necessity over comfort. She calculated her peak load at around 3,500 watts during the day, dropping to under 1,000 watts at night when the fridge cycles. This modest setup pairs well with a 5kW inverter and 10kWh battery bank, giving her 24-48 hours of backup depending on usage. Total investment for the panel and transfer switch ran about $450, with another $300-400 for professional installation.
Mid-Range Family Home ($2,000-3,500)
The Martinez family wanted more comprehensive coverage without breaking the bank. Their 16-circuit critical load panel includes everything from the starter setup plus their well pump (essential for rural living), kitchen outlets for cooking, multiple bathrooms, living room entertainment, and a window AC unit for summer emergencies.
Their system needed careful load management. The well pump draws 2,400 watts when running, so they can’t simultaneously run the AC and pump. They installed a simple load management relay that prevents overload by prioritizing the well pump. This setup requires a 7.5kW inverter and 15-20kWh of battery storage, providing genuine comfort during extended outages.
Charles’s Comprehensive Off-Grid Setup
I’ll share my own setup because it represents the upper end of what most homeowners might consider. Living off-grid in Colorado, my critical load panel isn’t for backup, it’s my primary power distribution.
I run 24 circuits through my main panel, but I’ve learned that having capacity doesn’t mean using it carelessly. My most power-hungry items are the well pump, a chest freezer, my workshop tools, and surprisingly, the coffee maker (1,500 watts for those first morning minutes really add up). I’ve got propane for heating and cooking, which keeps my electrical loads manageable.
What makes my system work is ruthless prioritization and automation. My battery monitor communicates with smart switches that shed non-essential loads when my battery bank drops below 50 percent. The entertainment system and workshop outlets disconnect automatically, preserving power for truly critical items like the freezer and water pump. This intelligent load management means my 12kW inverter and 30kWh battery bank handles our family of four comfortably year-round, even during Colorado’s cloudy winter stretches.
Common Mistakes and How to Avoid Them
Over the years helping folks in the DIY solar community, I’ve noticed the same mistakes pop up again and again when setting up critical load panels. The good news? They’re all avoidable once you know what to watch for.
The biggest mistake I see is underestimating your actual power needs. People calculate their loads based on nameplates or quick guesses, then wonder why their batteries drain faster than expected. I learned this the hard way during my first winter with solar—I forgot that my well pump runs way more often when the ground is frozen. The fix is simple: track your actual usage for at least a week using a kill-a-watt meter or similar tool. It’s tedious, but you’ll catch surprises before they become problems.
Next up are phantom loads, those sneaky power vampires hiding in plain sight. Your cable box, microwave clock, and wifi router all draw power 24/7, and it adds up fast. Charles, one of our long-time community members, discovered his entertainment center was pulling 40 watts constantly—that’s nearly a kilowatt-hour per day doing nothing! Walk around your house with a power meter and identify these culprits. Either exclude them from your critical panel or use power strips to truly shut them off.
Poor circuit selection is another headache. Don’t just grab whatever circuits are convenient in your main panel. Think about what you actually need during an outage. Do you really need that guest bedroom outlet, or would the garage door opener be more useful?
Finally, inadequate wire sizing causes voltage drops that make everything work harder and less efficiently. Always size up from your calculations, especially for long runs. Your future self will thank you.
Here’s the thing I’ve learned after years of helping folks design their backup power systems: a well-designed critical load panel isn’t just a nice-to-have feature—it’s the difference between a backup system that actually works when you need it and one that leaves you disappointed in the dark. I’ve seen too many people invest thousands in solar panels and batteries only to watch their inverter shut down because they tried to power everything at once.
The good news? You now have all the knowledge you need to avoid that frustration. You understand what a critical load panel does, why it matters, and how to think strategically about which circuits truly need backup power. This isn’t about compromise—it’s about smart planning that maximizes your investment and ensures your family has power for what really counts during an outage.
Your next step is simple: grab a notepad and start your load analysis. Walk through your home, identify those essential circuits, and add up the wattage. Use Spheral Solar’s load calculators to check your math and make sure your numbers align with your planned system capacity. There’s something incredibly empowering about seeing your plan come together on paper before you ever pick up a tool.
I’d love to hear how your planning process goes. What circuits made your critical list? Did anything surprise you when you calculated your loads? Drop your experiences and questions in the community forum below—your insights might be exactly what helps another DIYer succeed with their project.
How useful was this post?
Click on a star to rate it!
Average rating 0 / 5. Vote count: 0
No votes so far! Be the first to rate this post.
We are sorry that this post was not useful for you!
Let us improve this post!
Tell us how we can improve this post?
charlesnoble
Here at Spheral Solar, I’m a hands-on solar power enthusiast, constantly exploring and experimenting with DIY solutions. I’m dedicated to sharing my discoveries, insights, and even the bumps I hit along the way, all in the pursuit of a more sustainable future.
How Much Battery Backup Do You Really Need? (Sizing… by Charlesnoble March 6, 2026 Calculate your actual power needs before committing to a 5kW battery backup system by listing every device you want to run during an outage and adding up their wattages. A 5kW system means you can draw 5,000 watts of power at any given moment, but the real question is for…
This Critical Safety Switch Could Save Your Solar… by Charlesnoble February 22, 2026 Picture this: you’ve just finished mounting your solar panels, the sun is shining, and DC power is flowing through your system at voltages high enough to seriously injure or kill someone. Without a proper DC isolator switch, you have no safe way to disconnect that power for maintenance, emergencies, or…
Stop Oversizing Your Off-Grid Inverter (Here’s What… by Charlesnoble December 24, 2025 Calculate your total daily energy consumption in watt-hours by listing every appliance you plan to run off-grid, from your refrigerator drawing 150 watts for 8 hours to your laptop charging at 65 watts for 3 hours. Multiply each appliance’s wattage by its daily runtime, then add everything together. This number…
Why Grid Code Compliance Matters (Even When You’re… by Charlesnoble January 16, 2026 Check your local utility’s interconnection requirements before assuming your off-grid system is exempt from grid codes—many jurisdictions now require compliance even for systems with no planned grid connection, especially if your property remains connected to utility lines. Download your utility’s technical standards document and your state’s electrical code amendments, then…
Why Your Off-Grid Battery System Fails (And How to… by Charlesnoble January 4, 2026 Calculate your daily energy consumption in watt-hours by listing every device you’ll power, its wattage, and hours of daily use—this single number determines whether you need a 5kWh system or a 50kWh system. Most first-time builders overestimate their needs by 40% or underestimate by forgetting phantom loads like WiFi routers…
The Stream Behind Your House Could Power It (Here’s… by Charlesnoble March 26, 2026 Walk down to your nearest stream with a five-gallon bucket and a stopwatch. Fill that bucket and time how long it takes—this simple test reveals whether you have enough flowing water to power your off-grid home. If you can fill it in under 10 seconds from a source that drops…
Subscribe for handpicked DIY projects, exclusive tips, and giveaways.
Walk down to your nearest stream with a five-gallon bucket and a stopwatch. Fill that bucket and time how long it takes—this simple test reveals whether you have enough flowing water to power your off-grid home. If you can fill it in under 10 seconds from a source that drops at least 10 feet in… Read more: The Stream Behind Your House Could Power It (Here’s How Micro Hydro Works)
Brush snow off your panels with a soft-bristled roof rake from ground level, working gently from bottom to top to avoid scratching the glass or damaging your DIY solar setup. Use lukewarm water in a spray bottle for stubborn ice patches, never hot water that could crack cold panels from thermal shock. Install panels at… Read more: Snow on Your Solar Panels? Here’s What Actually Works (And What Wastes Your Time)
Picture this: Last summer, I draped what looked like sparkling fairy lights across my patio pergola, and guests immediately asked where I’d hidden the extension cord. There wasn’t one. These solar powered outdoor curtain lights had transformed my backyard into an enchanting evening retreat without adding a cent to my electric bill or requiring any… Read more: Solar Curtain Lights That Actually Work Outdoors (What I Learned Installing Mine)


")
")
")
")
")
")
")
")
")
")
")
")