Never Worry About Your DIY Solar System Again With These Monitoring Solutions
Updated:
Monitor your DIY solar system’s performance from anywhere using dedicated hardware monitors, smartphone-connected inverters, or cloud-based platforms that track voltage, current, and energy production in real-time. Install a basic Bluetooth-enabled shunt monitor for under $50 to see exactly how many watts your panels generate and how much power your batteries store—no electrician required.
Check your system’s health daily through simple mobile apps that alert you to voltage drops, charging issues, or equipment failures before they damage expensive components. Remote monitoring transforms guesswork into data, showing you whether that cloudy afternoon actually affected production or if your battery bank needs attention.
Choose monitoring solutions based on your system’s complexity: standalone panels need only basic voltage monitoring, while off-grid setups with battery banks benefit from comprehensive monitors tracking state-of-charge, cycle counts, and temperature. Most modern charge controllers and inverters include built-in monitoring capabilities you’re already paying for—you just need to activate them.
The beauty of remote monitoring lies in its simplicity. You’ll spot performance patterns showing peak production hours, identify shading issues reducing output, and catch problems like corroded connections before they escalate. For DIYers managing systems without professional oversight, monitoring serves as your eyes and diagnostic tool, turning raw electricity into understandable metrics that guide maintenance decisions and system optimization. This visibility empowers you to maintain professional-grade system performance while keeping full control of your renewable energy journey.
Why Remote Monitoring Changes Everything for DIY Solar
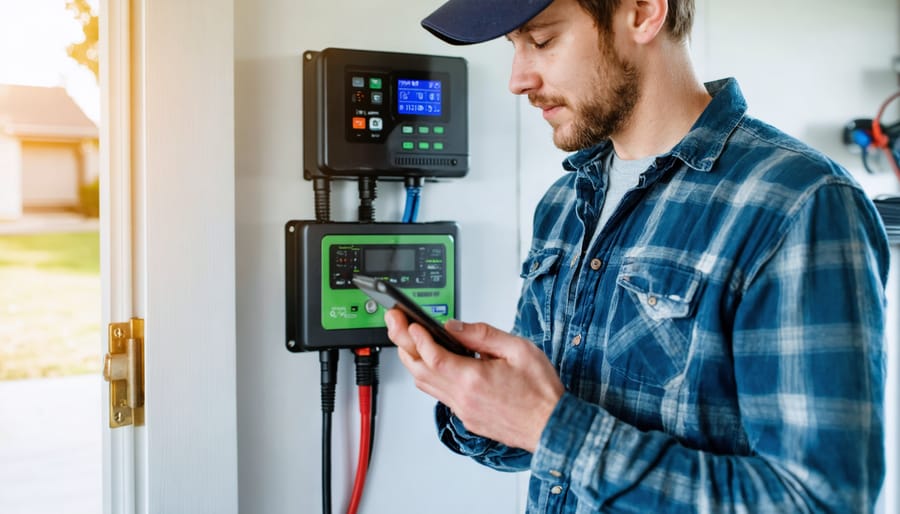
Modern charge controllers with integrated monitoring capabilities allow DIY solar owners to track their system performance directly from their smartphones.
The Real Cost of Not Knowing What’s Happening
I learned this lesson the hard way during my second year with solar. Everything *seemed* fine—my lights worked, my batteries charged during the day—but I had no idea I was slowly cooking my battery bank to death. By the time I noticed the batteries weren’t holding charge like they used to, I’d already shaved years off their lifespan. That mistake cost me nearly $800 in premature replacements.
Without monitoring, you’re essentially flying blind. Battery damage from chronic overcharging or deep discharging happens silently over months. You won’t notice until the damage is done. Similarly, a single underperforming panel in your array might only reduce your total output by 15-20%, which feels “close enough” until you realize you’ve been leaving money on the table for an entire season.
Wiring issues are even sneakier. A corroded connection or undersized wire creates resistance that generates heat and wastes energy. I’ve seen DIYers lose 25% of their system’s potential output to fixable wiring problems they simply didn’t know existed. Regular testing your solar panels helps, but it’s time-consuming and still only gives you snapshots.
The financial impact adds up quickly. A $400 battery that should last seven years but dies in four because of undetected charging issues? That’s an extra $171 in costs you didn’t budget for. Multiply that across multiple batteries, add reduced panel efficiency, and factor in wasted energy—suddenly you’re talking about hundreds or thousands of dollars in avoidable expenses. Monitoring isn’t just convenient; it’s financial protection for your investment.
What You Can Actually Track
Modern remote monitoring solutions give you an impressive window into your solar system’s performance—think of it as having a detailed health report for your setup, available anytime on your phone or computer.
**Voltage and Current:** These are your system’s vital signs. Voltage tells you whether your panels are generating the expected electrical potential, while current shows how much electricity is actually flowing. Together, they help you spot issues early. For instance, when I first set up monitoring, I noticed my voltage dropping unexpectedly on cloudy afternoons—turned out to be a loose connection I could fix immediately.
**Power Output:** This real-time measurement shows exactly how many watts your system is producing at any moment. It’s incredibly satisfying to watch those numbers climb as the sun hits your panels! More importantly, it helps you understand your system’s performance patterns throughout the day.
**Battery State of Charge:** If you have battery storage, this metric is crucial. It shows what percentage of capacity remains, helping you manage energy usage and avoid damaging deep discharges. Think of it like your phone’s battery indicator, but for your home energy system.
**Daily Energy Production:** Your system tracks total kilowatt-hours generated each day, letting you compare performance across weeks and seasons. This data helps you test solar panels effectiveness over time.
**System Efficiency:** Advanced monitors calculate how efficiently your system converts sunlight into usable electricity, accounting for factors like temperature and shading. This percentage helps identify when cleaning or maintenance might boost performance.
Types of Remote Monitoring Solutions That Actually Work
Built-In Charge Controller Monitoring
If you’re shopping for a new charge controller anyway, choosing one with built-in monitoring can be the simplest path to keeping tabs on your system. Brands like Victron, Renogy, and EPEver now offer controllers with Bluetooth or WiFi already baked in, letting you check your system stats right from your smartphone.
I remember when Charles first tried a Victron SmartSolar controller—he was amazed that within five minutes of installation, he could see real-time voltage, current, and charging stats on his phone without any extra wiring. The Victron app is particularly intuitive, showing historical data and even letting you adjust charging parameters remotely.
**The major advantage here is simplicity.** There’s no separate monitoring device to install, no compatibility headaches, and usually just one app to learn. Most of these controllers cost only $20-50 more than their non-connected counterparts, making them incredibly cost-effective if you’re starting fresh.
**The downside?** You’re locked into that manufacturer’s ecosystem. If you have a Renogy controller, you’ll need their app. Add an EPEver later, and you’re juggling multiple apps. Also, the monitoring typically only covers that specific controller—not your batteries, inverter, or overall system consumption.
This option makes the most sense when you’re building a new system or replacing an existing controller. It’s perfect for simple setups where you primarily want to understand how your panels are charging your batteries without the complexity of comprehensive whole-system monitoring.
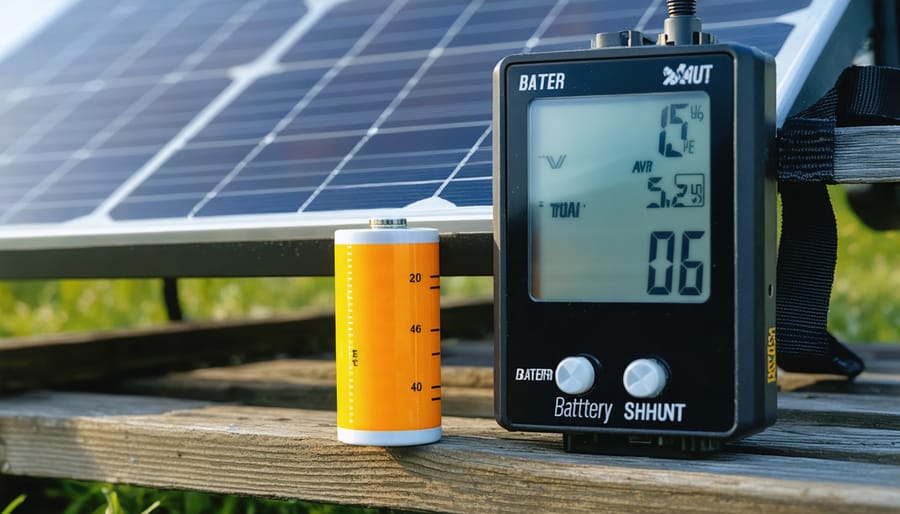
Battery shunt monitors measure actual energy flow in real-time, providing the most accurate picture of your solar system’s battery performance.
Standalone Battery Monitors and Shunts
If you want to know exactly how much energy flows in and out of your battery bank—not just voltage, but actual amp-hours consumed and recharged—you’ll want a dedicated battery monitor with a shunt. Think of it as upgrading from checking your gas gauge to having a detailed trip computer in your car.
A shunt is essentially a precision resistor that sits on the negative cable between your battery and everything else. As current passes through it, the shunt creates a tiny voltage drop that the monitor measures, calculating the exact amps flowing at any moment. Over time, it tracks cumulative energy use, giving you a real-time picture of your battery’s state of charge. Unlike simple solar power meters, these monitors account for all energy—solar charging, loads drawing power, and everything in between.
Popular DIY-friendly options include the Victron BMV series and the Renogy battery monitor. Both connect via Bluetooth to smartphone apps, letting you check battery status from anywhere on your property. I installed a BMV-712 on my workshop system last year, and honestly, it transformed how I understood my energy usage. Suddenly I could see which tools were energy hogs and adjust my habits accordingly.
Installation is straightforward—mount the shunt, connect sensing wires to the monitor display, and calibrate for your specific battery capacity. Most systems include clear instructions, and the insights you gain make the investment worthwhile for any serious DIY solar setup.
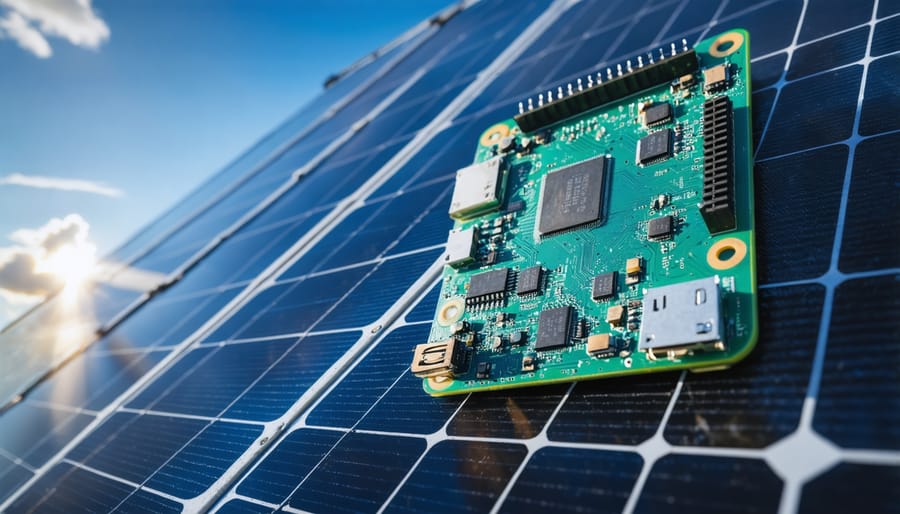
Open-source monitoring solutions using platforms like Raspberry Pi offer budget-friendly options for technically inclined DIY solar enthusiasts.
DIY Monitoring with Open-Source Solutions
If you’re comfortable with a soldering iron and don’t mind getting your hands dirty, building your own monitoring system can be incredibly rewarding—and surprisingly affordable. For under $50, you can create a custom solution using platforms like Raspberry Pi, Arduino, or ESP32 microcontrollers paired with voltage and current sensors.
I’ll be honest with you: this approach isn’t plug-and-play. Charles spent three weekends building his first ESP32-based monitor, debugging code at midnight with a headlamp on. “I probably could’ve bought a commercial system for what I spent in coffee alone,” he jokes, “but I learned so much about how my system actually works.” His setup now tracks voltage, current, and temperature data, sending everything to a free dashboard he can check from anywhere.
The complexity level sits somewhere between “intimidating” and “totally doable.” If you’ve ever assembled IKEA furniture and followed a YouTube tutorial successfully, you have the patience needed. You’ll need basic soldering skills, comfort with uploading code to a microcontroller, and willingness to troubleshoot when things don’t work the first time (they rarely do).
The beauty of DIY monitoring is customization. Want to add a temperature sensor? Track battery state of charge? Log data every 30 seconds instead of every 5 minutes? It’s all possible. Plus, the online community around these platforms is fantastic—forums are full of people who’ve solved the exact problem you’re facing.
Complete System Monitoring Platforms
For those of you managing larger installations or multiple energy sources, complete system monitoring platforms are game-changers. I remember when I upgraded to Victron’s Venus OS—suddenly, everything from my solar panels to battery state-of-charge appeared in one unified dashboard. No more juggling three different apps!
These comprehensive solutions integrate data from multiple components simultaneously. **Victron Venus OS**, for instance, connects various Victron devices and even some third-party equipment, giving you complete visibility through their VRM portal. **SolarAssistant** takes a different approach, working as universal middleware that bridges different brands together—perfect if you’ve mixed components from various manufacturers.
The beauty of these platforms is their flexibility. They handle complex scenarios like hybrid systems, multiple charge controllers, or generator integration without breaking a sweat. Yes, initial setup requires more attention than standalone monitors, but the payoff is remarkable: historical data analysis, customizable alerts, and remote control capabilities that let you adjust settings from anywhere. For serious DIY solar enthusiasts ready to level up their monitoring game, these platforms transform system management from guesswork into precision.
What to Look for When Choosing Your Monitoring Setup
Matching Monitoring to Your System Size
Not every solar system needs the same level of monitoring sophistication, and that’s perfectly okay! Let me share what I’ve learned about matching your monitoring setup to your actual needs.
**For weekend camping setups**, you honestly don’t need much. A simple battery monitor showing voltage and maybe a basic shunt for current tracking does the job beautifully. I started with just a voltmeter on my first portable rig, and it taught me everything I needed to know about my 100-watt panel’s performance. Total investment? Under $30.
**Van life systems** benefit from mid-range monitoring—think Bluetooth-enabled battery monitors or basic cloud-connected charge controllers. These let you check your battery status from inside the van without crawling around, and they typically track historical data so you can spot patterns over your travels. Budget around $100-200 for this sweet spot of functionality.
**Off-grid home systems** justify comprehensive monitoring with multiple sensor points, real-time alerts, and detailed analytics. When your refrigerator, water pump, and lights depend on your system, knowing exactly what’s happening becomes essential rather than nice-to-have. These systems range from $300-800 but provide peace of mind worth every penny.
The key? Match complexity to consequences. Don’t over-monitor a simple setup, but don’t under-monitor a critical one either.
Connectivity Options: WiFi, Bluetooth, or Cellular?
Choosing the right connectivity feels a bit like picking a phone plan—you need to match it to where you actually are. **WiFi** is the go-to option for most backyard solar setups. If your panels are within about 100-150 feet of your router, WiFi-enabled monitors offer easy setup and real-time data access through smartphone apps. I learned this the hard way when my first monitor kept dropping connection—turns out my garage was just outside range!
**Bluetooth** works great for close-range monitoring, typically up to 30 feet. It’s perfect if you want to check your system while standing near your equipment and don’t need constant internet connectivity. Think of it as the “walk-up-and-check” option.
For truly remote locations—like an off-grid cabin or distant array—**cellular monitors** are your best bet. They use SIM cards (similar to your phone) to transmit data anywhere with cell coverage. Yes, there’s usually a small monthly data fee, but we’re talking a few dollars for peace of mind.
No WiFi at all? Consider cellular monitors or invest in a WiFi extender to bridge the gap. Some clever DIYers in our community have even created solar-powered WiFi repeaters to reach distant installations—talk about using solar to monitor solar!
Your Comfort Level with Technology Matters
Here’s the honest truth from my years tinkering with solar setups: your comfort with technology should absolutely guide your monitoring choice, and there’s zero shame in starting simple.
If you’re new to this world, plug-and-play options like basic Bluetooth monitors are your best friend. I remember my neighbor Sarah, who’d never configured anything more complex than her TV remote, successfully set up her first monitoring app in under ten minutes. These beginner-friendly solutions typically involve scanning a QR code and watching your data flow—no programming required.
Feeling more adventurous? Wi-Fi-enabled systems open up remote access from anywhere, though they do require basic home network knowledge. You’ll need to understand concepts like router settings and port forwarding, but countless YouTube tutorials make this totally manageable.
For the tech enthusiasts among us, custom solutions using Raspberry Pi or Arduino boards offer incredible flexibility and learning opportunities. I spent a weekend building mine, and while it involved some trial and error, the satisfaction was immense.
The key is being honest with yourself. Choose something that excites rather than intimidates you—you can always upgrade later as your confidence grows. Your monitoring system should empower you, not stress you out.
Setting Up Your Remote Monitoring (Without Losing Your Mind)
The Basic Installation Process
Installing your remote monitoring system doesn’t require an engineering degree—I promise! When I set up my first monitoring system, I was nervous about working with electrical connections, but following a methodical approach made everything manageable.
Start by **turning off all power sources** to your solar system. Safety isn’t optional here. Most monitoring hardware comes in two parts: a sensor unit that connects to your system and a display or gateway that communicates your data. The sensor typically attaches between your charge controller and battery bank, measuring voltage, current, and power flow.
For the physical installation, mount your monitoring device in a dry, ventilated location away from direct sunlight. Use the manufacturer’s wiring diagram—it’s your best friend. You’ll typically connect red wires to positive terminals and black to negative, but always verify first. Make connections firmly but don’t overtighten, as this can damage terminals.
Once wired, restore power gradually. Most systems have LED indicators showing successful connection. Before considering the job complete, follow proper testing procedures to verify accurate readings. Compare your monitor’s voltage reading with a multimeter—they should match within 0.1 volts.
The initial configuration usually involves connecting to your home WiFi network and downloading the companion app. Take your time here—proper setup means reliable data for years to come. Test the system over a full sunny day to ensure everything’s communicating correctly.
Connecting to Your Phone or Computer
Getting your monitoring system talking to your devices is usually the most exciting part—this is when everything comes together! Most modern monitoring solutions offer both mobile apps and web-based dashboards, giving you flexibility to check your system from anywhere.
Start by downloading the manufacturer’s app from your device’s app store or visiting their web portal. You’ll need to create an account using your email address. Here’s where I learned a valuable lesson: use an email you check regularly! I initially set up my first system with an old email account and missed important system alerts for weeks.
During setup, you’ll typically scan a QR code on your monitoring device or manually enter its serial number to link it to your account. Make sure your phone is connected to the same WiFi network as your monitoring hardware during this initial pairing—this trips up a lot of folks.
Once connected, spend time configuring your notification preferences. I recommend starting with alerts for significant issues like system shutdowns or voltage drops below critical levels. You can always add more notifications later, but getting bombarded with alerts for every minor fluctuation gets overwhelming fast.
**Common Connection Hiccups:**
If your device won’t connect, first check your WiFi signal strength where the monitor is installed. Many garage or rooftop locations have weak signals—a simple WiFi extender usually solves this. Also verify your router isn’t blocking new devices; some have security settings that require manual approval for connections.
Can’t see real-time data? Some systems update every 5-15 minutes rather than instantly, which is perfectly normal and saves bandwidth.
Making Sense of Your Solar Data
The Numbers That Actually Matter
When I first started monitoring my solar setup, I made the classic mistake of checking my dashboard every ten minutes like a nervous parent. Here’s what I’ve learned about which numbers actually deserve your attention—and when.
**Your Daily Check-In**
Each morning, give these metrics a quick glance: total energy produced yesterday, battery state of charge (if you have storage), and any system alerts. Think of it like checking the weather—a thirty-second ritual that keeps you informed. Your production will vary with cloud cover and seasons, but you’ll quickly recognize your system’s personality. My panels typically generate 15-20 kWh on clear summer days, so if I see 8 kWh without obvious weather issues, something needs attention.
**Weekly Patterns to Watch**
Sunday evenings, I review the week’s production trend. Compare it against the previous week and the same period last year if you have the data. This broader view reveals whether your panels need cleaning or if equipment efficiency is declining gradually. Seasonal changes are normal—expect 40-60% less production in winter compared to peak summer months.
**When to Worry (and When Not To)**
A single cloudy day with low production? Totally normal. Three consecutive sunny days with declining output? Time to investigate. Voltage fluctuations of 1-2 volts throughout the day are expected, but sudden 10+ volt drops signal wiring issues. Having accurate solar readings helps you distinguish between normal variance and genuine problems, preventing both unnecessary worry and missed issues.
When Something’s Wrong: Warning Signs to Watch
Your monitoring system is like having a friendly watchdog for your solar setup—it’ll bark when something needs attention. Here are the red flags I’ve learned to watch for over the years:
**Sudden production drops** are your first warning sign. If your panels usually generate 300 watts on sunny afternoons but suddenly show 150 watts, something’s definitely up. Common causes include shading from new tree growth, dirt buildup, or panel damage from storms.
**Voltage irregularities** deserve immediate attention. Battery voltage bouncing around or dropping quickly usually means connection issues or aging batteries needing replacement.
**Temperature spikes** shouldn’t be ignored. If your charge controller or inverter runs hotter than usual, you might have ventilation problems or components working too hard.
**Inconsistent charging patterns** often point to wiring issues. I once spent hours troubleshooting before discovering a corroded connection cutting my charging efficiency by 40%!
**Error codes or warnings** from your equipment are obvious but surprisingly easy to dismiss. Don’t! They’re there for a reason. Write down the exact code and check your manual—most issues have straightforward fixes.
The beauty of remote monitoring is catching these problems before they become expensive repairs or safety hazards.
Remote monitoring provides peace of mind by giving solar system owners instant access to performance data from anywhere.
Real-World Monitoring Examples from the Community
Let me share some real stories from my own monitoring setup and what other community members have discovered using their systems.
Last winter, I noticed something odd in my monitoring data around 2 PM each day—my panels were suddenly dropping to about 60% of their expected output for roughly 30 minutes. Without remote monitoring, I probably wouldn’t have caught this for weeks. Turns out, the neighbor’s new eucalyptus tree was casting shade across my array during that specific window. The monitoring graphs made the pattern crystal clear, and I was able to adjust my panel angle slightly to compensate. That small tweak recovered about 8% of my daily production.
Sarah from our community forum caught an even sneakier issue. Her voltage readings showed gradual degradation over three weeks—nothing dramatic, just a slow downward trend. She pulled up her monitoring app’s historical data and noticed the pattern started right after a windstorm. Upon inspection, she found a corroded MC4 connector that was slowly increasing resistance. Without that data trend, she’d have likely blamed normal seasonal variation until the connector failed completely.
Then there’s Mike’s optimization story. He installed current monitoring on individual panel strings and discovered that his east-facing panels were actually outperforming his south-facing ones during summer mornings when he needed power most. This data completely changed his expansion plans—he added more east-facing capacity instead of following the conventional wisdom of south-only installations.
My favorite example is catching phantom loads. By monitoring my battery discharge overnight, I identified a constant 15-watt draw I couldn’t account for. Turned out my WiFi router was pulling way more power than expected. Swapped it for an efficient model and recovered that power for actual use.
These aren’t theoretical benefits—they’re real improvements that remote monitoring makes possible for everyday DIYers like us.
Here’s the truth I’ve learned after years of tinkering with solar systems: monitoring isn’t about obsessing over every voltage dip or becoming a slave to graphs and data streams. It’s about confidence. It’s about knowing your investment is working as it should, catching small issues before they become expensive problems, and understanding how your energy choices actually impact your daily life.
When I installed my first monitoring setup, I went overboard—checking data every hour, worrying about minor fluctuations that meant absolutely nothing. Eventually, I realized the real value wasn’t in constant surveillance but in having the information available when I needed it. A quick glance confirmed everything was healthy, and occasional deeper dives helped me optimize my system’s performance.
The beauty of remote monitoring today is that you can start incredibly simple. Maybe it’s just a basic Bluetooth shunt to track your battery state, or a single voltage monitor that sends alerts to your phone. You don’t need to implement everything at once. As your comfort grows and your system evolves, you can always expand your monitoring capabilities.
I encourage you to explore the interactive tools and calculators available on this site to help plan which monitoring solutions make sense for your specific setup. And don’t forget to join our community discussions—there’s nothing quite like learning from fellow DIYers who’ve walked the same path and discovered clever solutions you might never have considered.
How useful was this post?
Click on a star to rate it!
Average rating 0 / 5. Vote count: 0
No votes so far! Be the first to rate this post.
We are sorry that this post was not useful for you!
Let us improve this post!
Tell us how we can improve this post?
charlesnoble
Here at Spheral Solar, I’m a hands-on solar power enthusiast, constantly exploring and experimenting with DIY solutions. I’m dedicated to sharing my discoveries, insights, and even the bumps I hit along the way, all in the pursuit of a more sustainable future.
Why Your DIY Solar System Needs 3-Phase Power… by Charlesnoble December 26, 2025 Check your electrical panel right now—if you see three thick cables entering your home or property instead of two, you’re already working with 3-phase power, and standard single-phase monitoring won’t give you the complete picture of your solar system’s performance. This matters more than most DIY solar enthusiasts realize: a…
Your DIY Solar Inverter Might Be Wasting Power… by Charlesnoble March 31, 2026 Measure your inverter’s efficiency by comparing DC input power to AC output power using a simple multimeter—a ratio below 95% signals it’s time to investigate performance issues. Track voltage and current readings at both the solar panel array and your home’s load center during peak sun hours, then multiply volts…
Read Your Solar System Like a Pro: What Every Wire… by Charlesnoble October 31, 2025 Locate the single-line diagram in your solar system documentation—it’s your roadmap to understanding how energy flows from panels through inverters to your home’s electrical panel. This schematic shows every critical component: charge controllers, battery banks, breaker boxes, and safety disconnects, all connected by lines representing wire runs with their corresponding…
Why Your Solar Meter Numbers Don’t Match Your… by Charlesnoble January 20, 2026 Look at your solar meter display right now and locate the kWh reading—this number tells you exactly how much electricity your panels have generated since installation, and if it’s climbing daily, your system is working. Check whether your meter’s digital arrows or symbols are moving forward (you’re using solar power…
Why Your DIY Solar Project Needs a Calibrated… by Charlesnoble February 3, 2026 Point your infrared thermometer at your solar panel surface on a sunny afternoon, and you might get a reading of 145°F—but is that number actually accurate? Without proper calibration, that measurement could be off by 10, 20, or even 30 degrees, leading you to misdiagnose hot spots, overestimate efficiency losses,…
Why Your DIY Solar System Needs Insulation… by Charlesnoble February 15, 2026 Check your solar system’s ground fault protection monthly by verifying the insulation resistance between your DC circuits and ground stays above 500 ohms per volt of system voltage. Install an insulation monitoring device (IMD) on any off-grid system over 48 volts or grid-tied system operating without galvanic isolation to catch…
Subscribe for handpicked DIY projects, exclusive tips, and giveaways.
Grab any 9-volt battery from your drawer and flip it over—you’ll rarely find capacity listed in milliamp-hours (mAh), yet this hidden specification determines whether your smoke detector dies at 2 AM or your guitar pedal cuts out mid-solo. Most alkaline 9V batteries hold between 400-600 mAh, while rechargeable versions typically store 150-300 mAh, numbers that… Read more: Why Your 9 Volt Battery Dies So Fast (And What It Means for Solar)
Picture this: You’ve just landed at Orlando International Airport after a long flight, your electric vehicle waiting in long-term parking with a battery that’s somehow fuller than when you left it. Sound like science fiction? It’s happening right now at MCO, where solar-powered EV charging stations are transforming how travelers think about airport parking. Orlando… Read more: How Orlando Airport’s Solar EV Charging Could Transform Your Road Trip Energy Strategy
Grab a multimeter and test your first solar panel connection right now—even if you’ve never touched electrical wiring before. Solar wiring isn’t the mysterious, dangerous territory most beginners imagine. It’s actually more forgiving than household AC wiring because you’re working with low-voltage DC power, typically 12 to 48 volts, which gives you room to learn… Read more: Wire Your First Solar Panel Without Frying Everything (Or Yourself)

")
")

")
")
")
")
")

")
")
")


