Why Your Solar Panel Connectors Matter More Than You Think
Updated:
Choose MC4 connectors for most residential solar installations—they’ve become the industry standard since 2011, offering waterproof reliability and simple snap-together connections that even first-time DIYers can master in minutes. I learned this the hard way when my first solar setup used mismatched connectors that corroded after one rainy season, costing me hours of troubleshooting and replacement parts.
Match your connector type to your specific panel voltage and amperage ratings, checking manufacturer specifications before purchasing. Anderson Powerpole connectors work excellently for portable systems under 50 volts, while MC4 handles the 600-1000 volt range typical of rooftop arrays. The wrong connector won’t just fail to fit—it creates dangerous resistance points that generate heat and reduce your system’s efficiency by 10-15%.
Verify connector compatibility between your panels, charge controller, and inverter before cutting any wires. Many newcomers assume all solar connectors are interchangeable, but mixing MC3 with MC4, or using adapters excessively, introduces weak points where moisture infiltrates. Each connection point represents a potential failure in your system’s 25-year lifespan.
Invest in a proper crimping tool rather than struggling with pliers or wire strippers. Quality crimps create gas-tight seals that prevent oxidation, while poor connections gradually degrade, causing voltage drops you won’t notice until your batteries undercharge. The 30-dollar investment in the right tool saves hundreds in panel efficiency losses and eliminates middle-of-the-night system failures when you’re running critical loads off-grid.
What Solar Panel Connectors Actually Do (And Why They’re Critical)
Think of solar panel connectors as the unsung heroes of your solar setup—they’re the critical link that keeps electricity flowing safely from your panels to your battery bank or charge controller. Without reliable connectors, all that sunshine you’re harvesting would quite literally have nowhere to go.
Here’s what makes solar connectors special: they need to handle direct current (DC) electricity at relatively high voltages while sitting outside in brutal conditions for 25+ years. When I first started tinkering with solar back in 2012, I made the rookie mistake of using regular electrical wire nuts on an outdoor project. Within six months, corrosion had turned those connections into green, crusty disasters that barely conducted electricity.
Solar connectors face challenges that regular household electrical connectors never encounter. They’re baking in UV radiation daily, enduring temperature swings from below freezing to over 150°F on hot panels, getting pelted by rain and snow, and dealing with DC voltage that behaves differently than the AC power in your walls. DC current can actually create arc faults more easily than AC, making a secure, properly-rated connection absolutely essential for safety.
Quality solar connectors solve these problems through weatherproof sealing, UV-resistant materials, and mechanical designs that maintain constant pressure on the electrical connection. They’re engineered specifically to handle the unique demands of your wiring configuration, whether you’re connecting a single panel or building a complex array.
The bottom line? Using proper solar-rated connectors isn’t optional—it’s the difference between a system that performs reliably for decades and one that becomes a frustrating maintenance headache or, worse, a fire hazard.
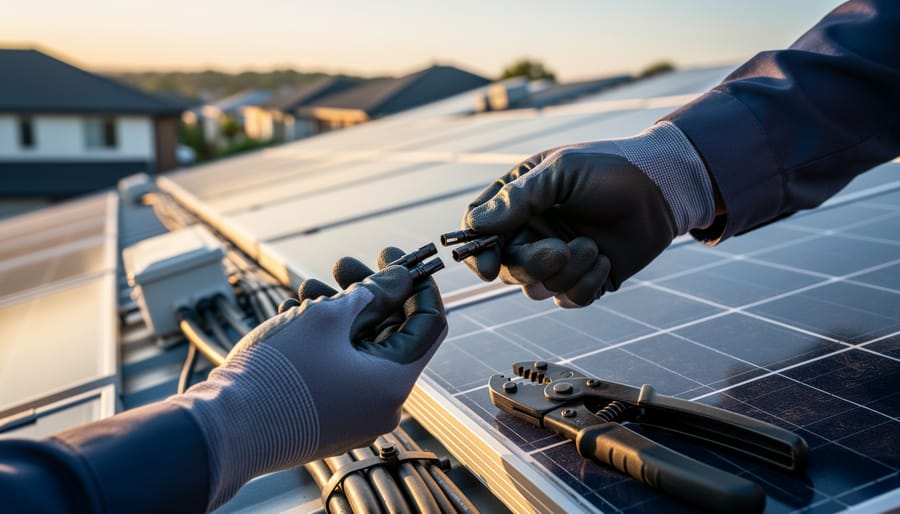
MC4 connectors are the industry standard for solar panel connections, featuring a weatherproof design with secure locking mechanisms.
MC4 Connectors: The Industry Standard You’ll See Everywhere
How to Identify MC4 Connectors
Spotting genuine MC4 connectors is easier than you might think once you know what to look for. I remember helping my neighbor sort through a box of mixed connectors from his old panels—it felt like detective work at first, but we got the hang of it quickly!
Start with the obvious: authentic MC4s have clear manufacturer markings. Look for “MC4” stamped or molded right into the plastic body, usually alongside the brand name like Multi-Contact or Stäubli. The plastic housing should feel solid and have a smooth, professional finish—if it looks cheap or has visible seams that don’t line up, that’s a red flag.
The locking mechanism is your next clue. Real MC4s feature a distinctive snap-lock system with visible clips on the sides. When you push two connectors together, you’ll hear and feel a satisfying click. They shouldn’t wiggle or feel loose once connected. The metal pins inside should be bright, clean, and precisely machined—not dull or rough-looking.
Check the cable entry point too. Quality MC4s include a ribbed strain relief section that grips the cable firmly. Finally, genuine connectors typically come with the small tool needed for disconnection, and they’ll have IP67 ratings clearly marked, indicating they’re waterproof. Trust your instincts—if something feels flimsy or looks questionable, it probably is.
MC4 vs MC4-Compatible: What’s the Real Difference?
Here’s something I learned the hard way during my first big solar installation: not all MC4 connectors are created equal. I grabbed what I thought were standard MC4s at a local supplier, only to discover they didn’t quite fit with my panel’s factory connectors. The tabs were slightly different, and forcing them together felt wrong because, well, it was.
The reality is that MC4 is actually a trademarked connector made by Multi-Contact (now Stäubli). What we often call “MC4” connectors are frequently MC4-compatible versions made by other manufacturers. These knockoffs might look identical, but subtle differences in dimensions, spring tension, or locking mechanisms can create real problems.
Why does this matter? When you mix genuine MC4s with compatible versions, you might get connections that seem secure but don’t provide proper waterproofing or electrical contact. Over time, this can lead to arcing, corrosion, or complete connection failure. I’ve seen systems lose significant power output simply because someone mixed connector brands.
The bigger issue is safety. A loose connection in a solar array can create hot spots that damage equipment or even start fires. That’s not something to gamble on to save a few dollars.
My advice? Stick with one brand throughout your entire system. If your panels came with genuine MC4s, buy genuine MC4s for extensions. If they’re compatible versions, identify the manufacturer and use matching connectors. Check the packaging carefully, test-fit before committing, and when in doubt, replace both ends of a connection rather than mixing types.
When MC4 Connectors Are Your Best Choice
MC4 connectors shine brightest when you’re building permanent outdoor solar installations. I remember when my neighbor Charles tackled his first rooftop array – he initially considered cheaper alternatives but quickly realized MC4s were worth every penny for anything exposed to weather year-round.
They’re your go-to choice for rooftop panels, ground-mounted arrays, and off-grid cabin setups where reliability matters most. The weatherproof seal and positive locking mechanism mean you can install them once and forget about them, even through harsh winters and scorching summers.
For DIY projects, MC4s particularly excel when you’re connecting multiple panels in series or parallel configurations. Their standardization means you can mix panels from different manufacturers without compatibility headaches. Plus, if you ever need to expand your system, those MC4 connectors make adding panels straightforward – just plug and play.
The investment makes sense for any permanent installation over 100 watts where you need confidence in your connections lasting 20-plus years.
Various solar connector types each serve different applications, from permanent installations to portable camping setups.
Other Solar Connector Types You’ll Encounter
MC3 Connectors (The MC4’s Predecessor)
Before MC4 connectors became the industry standard, MC3 connectors were the go-to choice for solar panel installations throughout the 1990s and early 2000s. If you’re working with an older solar setup or purchasing used panels, there’s a good chance you’ll encounter these predecessors.
I remember helping a neighbor expand his 15-year-old solar array, and we had to get creative with the MC3 connectors on his existing panels. The main difference you’ll notice is that MC3s use a single contact design, while MC4s have a double contact system that’s more reliable. MC3 connectors also tend to be slightly bulkier and less weatherproof than their successors.
Here’s the challenge: MC3 and MC4 connectors aren’t directly compatible with each other. If you’re adding new panels to an older system, you’ll need adapter cables that convert MC3 to MC4 connections. These adapters are readily available and inexpensive, but it’s worth noting that each additional connection point is a potential weak spot for weatherproofing.
My advice? If you’re starting fresh, stick with MC4. But if you’re working with existing MC3 equipment that’s still functioning well, those adapter cables make expansion totally doable without replacing everything.
Anderson Powerpole Connectors
If you’re diving into portable solar setups for camping, RV living, or emergency backup systems, Anderson Powerpole connectors deserve your attention. I remember Charles mentioning how he switched all his camping gear to Powerpoles after dealing with one too many proprietary connectors that didn’t play nicely together.
What makes Powerpoles special is their genderless design, meaning any connector can plug into any other without worrying about male or female ends. This might seem like a small detail, but trust me, it’s a game-changer when you’re trying to connect multiple devices in the field. They come in color-coded housings (red and black for polarity) and lock together with a satisfying click that won’t come apart accidentally.
The amateur radio community has used these connectors for decades, which speaks to their reliability. They’re rated for 15, 30, or 45 amps depending on the contacts you choose, making them perfect for smaller DIY systems typically under 600 watts. They’re also incredibly affordable, usually costing just a few dollars per pair.
The best part? They’re easy to assemble yourself with just a crimping tool, making them ideal for customizing cable lengths for your specific setup without needing expensive specialized equipment.
SAE Connectors
If you’ve ever bought a solar battery tender for your car or motorcycle, you’ve probably encountered SAE connectors. These two-pin polarized connectors are the go-to choice for pre-packaged solar kits, especially those designed for vehicle battery maintenance. I remember Charles mentioning how his first solar project was a simple 10-watt panel with SAE connectors to keep his boat battery topped off during winter storage—it worked like a charm without any complicated wiring.
SAE connectors are incredibly user-friendly because they’re designed to prevent reverse polarity mistakes. They click together easily and pull apart when needed, making them perfect for temporary or seasonal setups. You’ll find them most commonly in smaller solar applications, typically under 15 amps, which covers most portable panels and battery maintenance systems.
Use SAE connectors when you’re working with ready-made solar kits, need quick-disconnect capability for portable panels, or want a foolproof connection for battery charging applications. They’re not ideal for permanent rooftop installations or high-power systems, but for hobbyist projects and mobile applications, they’re hard to beat for simplicity and convenience.
XT60 and Other Hobby-Grade Connectors
If you’ve ever worked with RC cars or drones, you’re probably familiar with XT60 and similar hobby-grade connectors. These compact powerhouses have found their way into the solar world, especially for portable setups and small DIY projects.
XT60 connectors are my go-to for projects under 200 watts. I started using them on a portable camping solar rig, and honestly, they’re fantastic for this scale. They handle up to 60 amps continuously, feature solid anti-spark designs, and cost just a few dollars. The yellow plastic housing makes polarity obvious, which prevents those embarrassing backwards-connection moments we’ve all had.
Beyond XT60s, you’ll also find XT90s for higher current needs, and Deans connectors, though those are gradually being phased out by the superior XT series. Anderson Powerpole connectors are another favorite in the amateur radio and emergency preparedness communities, offering a modular design that lets you stack multiple connections side-by-side.
The real advantage here is availability and price. You can grab a 10-pack of XT60 connectors online for under ten bucks, and they’re available everywhere hobby electronics are sold.
Just remember these aren’t weatherproof without additional protection. For outdoor installations, consider adding heat shrink tubing or mounting them inside junction boxes to keep moisture out.
Key Specifications That Actually Matter for Your Project
Voltage and Current Ratings Explained Simply
Think of connector ratings like picking the right garden hose for your watering system. You need one that can handle the water pressure without bursting, right? Solar connectors work the same way.
Most residential panels produce between 8-10 amps of current, so connectors rated for 30 amps give you plenty of breathing room. The voltage rating is equally important—standard connectors handle up to 1000V, which covers typical home systems running anywhere from 12V to 600V.
Here’s my simple matching rule: Check your solar panel specifications for the maximum current (look for “Isc” or short-circuit current) and voltage (marked as “Voc” or open-circuit voltage). Then choose connectors rated at least 25% higher than these numbers. This safety margin protects against power surges and keeps your system running smoothly for years.
Don’t forget that proper wire sizing matters too—undersized wires paired with correctly-rated connectors still create problems. When I upgraded my first setup, I learned this lesson the hard way after ignoring amperage ratings and dealing with overheating connections.
Bottom line: Higher ratings than needed won’t hurt your system, but lower ratings definitely will.
IP Ratings and Weather Resistance
When you’re shopping for solar connectors, you’ll see “IP ratings” everywhere—those mysterious codes like IP67 or IP68. Here’s what they actually mean for your setup: The first number tells you dust protection (on a scale of 0-6), and the second number indicates water resistance (0-9). So IP67 means total dust protection and can survive temporary water immersion up to one meter.
For most roof-mounted installations, IP67 is your minimum. I learned this the hard way on my first garage solar setup when cheaper connectors with lower ratings corroded after just one rainy season. The exposed connections turned green and crusty—not a pretty sight! Roof installations face constant UV exposure, rain, snow, and temperature swings, so weatherproofing isn’t optional.
Portable solar setups have slightly different needs. If you’re setting up panels for camping or occasional outdoor use, IP65 connectors work fine since you’ll likely store everything indoors between trips. However, if your “portable” panels stay semi-permanently on an RV or boat, treat them like roof-mounted systems and go for IP67 or higher.
One practical tip: Even with high IP ratings, moisture can eventually work its way in if connectors aren’t fully clicked together. Always double-check that satisfying “snap” when connecting—it’s your best defense against weather damage.
UV Resistance and Material Quality
I learned this lesson the hard way on my first solar shed project. I grabbed some discount connectors online, and within eight months, they’d become brittle and cracked. The culprit? UV radiation and poor material quality.
Here’s what happens: cheap connectors use substandard plastics that degrade when exposed to constant sunlight. The UV rays break down the molecular bonds in the plastic, making it chalky, brittle, and eventually causing it to crack or crumble. This exposes the metal contacts inside to moisture, leading to corrosion and system failure.
Quality connectors use UV-stabilized plastics, typically polypropylene or nylon compounds with UV inhibitors mixed directly into the material. Look for connectors rated for outdoor use with specifications mentioning UV resistance or a minimum 20-year lifespan. The industry standard MC4 connectors, for example, use high-grade materials specifically engineered to withstand decades of sun exposure.
When shopping, check product descriptions for terms like “UV-resistant,” “outdoor rated,” or certifications like TUV or UL. Yes, premium connectors cost more upfront, but replacing failed connectors later means climbing on your roof again and risking system downtime. Trust me, spending an extra few dollars per connector is absolutely worth it.
Contact Resistance and Connection Quality
Think of your solar panel connections like the wiring in your home—poor connections create resistance, and resistance creates problems. When connectors don’t fit snugly or corrode over time, they generate heat and waste precious electricity before it even reaches your battery or inverter.
I learned this the hard way on my first DIY setup when a loose connection dropped my system’s efficiency by nearly 15%. That lost power was literally heating up the connector instead of charging my batteries! Worse yet, overheated connections can become fire hazards.
Quality connectors with tight, weatherproof seals ensure maximum power transfer and safety. A properly clicked MC4 connector, for example, creates minimal resistance—we’re talking milliohms—which translates to more usable energy from your panels. When shopping for connectors, look for those with copper or tin-plated copper contacts rather than cheaper alternatives. The few extra dollars you spend upfront will pay dividends in efficiency and peace of mind for years to come.
Choosing the Right Connector Type for Your Solar Project
Proper connector installation requires attention to weatherproofing and secure connections to ensure long-term system performance.
Permanent Rooftop Installations
For permanent rooftop installations, MC4 connectors are the clear winner, and here’s why. When I helped my neighbor Charles install his residential system, we learned that MC4s offer the perfect balance of weatherproofing, durability, and ease of use that fixed installations demand. These connectors are designed to withstand decades of UV exposure, temperature swings, and moisture without degrading.
MC4s also play nicely with rooftop mounting systems, since their locking mechanism prevents accidental disconnections during installation or maintenance. Most quality solar panels come pre-wired with MC4 connectors, making system expansion straightforward. While Anderson Powerpole or XT60 connectors work fine for temporary setups, they lack the IP67 waterproof rating that makes MC4s virtually bulletproof for long-term outdoor exposure. The slight extra cost pays dividends in reliability and peace of mind over your system’s 25-plus year lifespan.
RV and Vehicle Solar Setups
Mobile solar installations present unique connector challenges since you’re often combining fixed panels, portable panels, and battery systems from different manufacturers. I learned this firsthand on my cross-country RV trip when I tried connecting my rooftop array to a new portable panel at a campground. Each had different connectors, and I wasn’t prepared.
For RV setups, you’ll typically encounter MC4 connectors on permanent roof panels and Anderson Powerpole or SAE connectors on portable units. The key is planning your system with adapter cables in mind from the start. Keep a small adapter kit onboard with MC4-to-SAE and MC4-to-Anderson adapters, which cost around $10-15 each.
Consider using a common connection point, like a roof-mounted junction box with your preferred connector type, so all panels feed into one standardized system. This approach simplifies troubleshooting on the road. Also, secure all connections with zip ties or cable clips since vibration during travel can loosen connectors over time, creating dangerous arcing or power loss when you need it most.
Portable and Camping Solar Systems
For portable solar setups like camping rigs, RV installations, or emergency backup systems, connector choice shifts from permanent durability to convenience. I learned this the hard way on a weekend camping trip when I couldn’t disconnect my panels quickly enough before a sudden storm rolled in. Anderson Powerpole connectors have become my go-to for these situations because they snap together effortlessly and handle the vibration of travel without loosening. They’re also genderless, meaning any connector mates with any other, which eliminates the frustration of mismatched cables at the campsite. SAE connectors are another popular choice for portable setups, especially if you’re connecting to charge controllers or batteries that already use this standard. The key advantage here is tool-free connection and disconnection. You can set up your solar array in minutes and pack it away just as quickly when it’s time to move.
Small DIY and Experimental Projects
When I first started tinkering with solar, I made the mistake of buying expensive MC4 connectors for a tiny 5W panel project. Lesson learned! For small experiments and learning projects, simple barrel connectors or even alligator clips work perfectly fine. These budget options typically cost under $5 and let you quickly swap components without committing to permanent connections.
For portable solar projects under 50 watts, consider SAE connectors or basic Anderson Powerpole connectors. They’re forgiving for beginners, easy to crimp without special tools, and reliable enough for experimentation. Many hobbyists also use XT60 connectors borrowed from the drone community since they’re widely available and handle up to 60 amps.
Here’s a practical tip: start with screw terminal blocks from your local hardware store. They’re incredibly cheap, let you easily troubleshoot connections, and teach you proper polarity management before moving to more permanent solutions. Save the premium weatherproof connectors for when your prototype becomes a long-term installation.
Common Connector Mistakes That’ll Cost You (I’ve Made Most of Them)
I’ll be honest with you – I’ve learned most of these lessons the hard way, and each mistake cost me either time, money, or both. Let me save you from repeating my blunders.
My biggest facepalm moment came during my first rooftop installation. I was so excited to get everything connected that I mixed MC4 connectors from two different manufacturers. They clicked together just fine, which I thought meant everything was golden. Wrong. Three months later, I noticed my system performance had dropped by about 15%. After climbing back up on the roof, I discovered the mismatched connectors had developed resistance issues because the internal pin designs weren’t quite identical. I ended up replacing every single connection with matched pairs. That “savings” of a few dollars on cheaper connectors cost me hours of labor and lost energy production.
Then there’s the infamous water intrusion incident. I installed connectors on my ground-mounted array without properly checking the o-ring seals. I figured they looked fine from the outside, so why worry? After the first heavy rain, moisture had worked its way into three connections. The corrosion started almost immediately. Pro tip from my expensive education: always inspect those tiny rubber seals before connecting, and add a small amount of dielectric grease. It takes an extra two minutes per connection but prevents months of headaches.
Another rookie mistake? Not leaving enough cable slack before making connections. I pulled everything tight because it looked neater. But when thermal expansion and contraction started doing its thing, those tight cables put stress on the connector joints. One actually pulled apart during a summer heatwave. Now I always leave at least six inches of slack in a gentle service loop.
Here’s something nobody tells you: dropped connectors are compromised connectors. I dropped an MC4 connector from my ladder onto concrete. It looked totally fine, so I used it anyway. Six months later, that specific connection failed. The internal components had micro-fractures I couldn’t see. If you drop a connector, especially from height, replace it. Trust me on this one.
Low-quality connectors can fail prematurely due to UV exposure and weather, leading to system inefficiency and potential safety hazards.
Where to Source Quality Connectors Without Overpaying
Finding quality solar connectors without breaking the bank takes a bit of know-how, but I’ve learned some valuable lessons over the years that can save you both money and headaches.
First, let’s talk about red flags. If a connector feels unusually light or flimsy in your hand, that’s your first warning sign. Quality connectors have substantial plastic housings that won’t crack in extreme temperatures. I once bought a batch of bargain connectors from a random marketplace seller, and within six months, half of them had brittle housings that cracked in the winter cold. Another red flag is if the metal contacts look dull or discolored right out of the package. Good copper or tinned copper contacts should have a clean, shiny appearance.
For trusted sources, I typically recommend starting with established solar equipment suppliers like Renogy, WindyNation, or HQST for individual or small orders. These companies understand the DIY market and offer reasonable prices without sacrificing quality. For bulk purchases, platforms like BougeRV or direct-from-manufacturer options on Amazon (look for brands like MICSIU or VICOL with solid review histories) can offer significant savings if you’re wiring multiple panels.
Here’s my practical tip on bulk versus individual purchasing: if you’re installing more than four panels, buying connector pairs in packs of ten or twenty typically saves 30-40 percent compared to individual pairs. Just make sure you’re buying from a seller with a solid return policy in case you encounter issues.
Local electrical supply houses sometimes carry MC4 connectors too, and building a relationship with them can lead to contractor pricing even for smaller DIY projects. Don’t be shy about asking for bulk discounts or comparing their pricing with online options.
Here’s what I’ve learned from my own solar journey and from chatting with countless DIYers in our community: choosing the right connector isn’t about finding the fanciest or most expensive option. It’s about matching the right tool to your specific situation. That MC4 connector might be perfect for your rooftop array, while those Anderson Powerpoles could be ideal for your portable camping setup. Neither is inherently better, they’re just different tools for different jobs.
Before you place that order for connectors, though, I’d encourage you to spend a few minutes with our solar calculator to properly size your entire system. After all, you’ll want to make sure your connectors match not just each other, but also the wire gauge and amperage your system actually needs. There’s nothing worse than realizing your carefully chosen connectors are rated too low for your panel output.
I’d love to hear about your own experiences. Have you discovered a connector type that works perfectly for your setup? Run into any challenges during installation? Drop your questions and stories in the comments below. This community thrives when we share what we’ve learned, both our successes and our oops moments.
How useful was this post?
Click on a star to rate it!
Average rating 0 / 5. Vote count: 0
No votes so far! Be the first to rate this post.
We are sorry that this post was not useful for you!
Let us improve this post!
Tell us how we can improve this post?
charlesnoble
Here at Spheral Solar, I’m a hands-on solar power enthusiast, constantly exploring and experimenting with DIY solutions. I’m dedicated to sharing my discoveries, insights, and even the bumps I hit along the way, all in the pursuit of a more sustainable future.
Wire Your Solar System Right the First Time (Before… by Charlesnoble March 18, 2026 Sketch your complete solar system on paper before purchasing a single component—mapping the physical distance from your solar panels to the charge controller, then to the battery bank, and finally to your inverter will reveal the exact wire gauges you need and prevent the costly mistake of voltage drop that…
Why Series-Parallel Is the Sweet Spot for Small Solar Setups by Charlesnoble December 2, 2025 Connect two panels in series to double your voltage, then wire two of these series pairs in parallel to maintain higher voltage while increasing your amperage—this series-parallel configuration gives you the sweet spot between performance and practicality for most small-scale solar setups. I learned this the hard way during my…
Why Your Solar Panels Need the Right Mounting System… by Charlesnoble February 7, 2026 Your solar panels are only as reliable as what holds them in place. A solar array mounting system is the structural foundation that secures your panels to rooftops, ground surfaces, RVs, or portable setups, and choosing the wrong one can lead to damage, reduced efficiency, or even safety hazards. Think…
Why 8 AWG Solar Wire Might Be Wrong for Your System… by Charlesnoble December 29, 2025 Calculate your system’s maximum current first—8 AWG solar wire safely handles 40-55 amps depending on installation conditions, making it the sweet spot for mid-sized solar arrays between 1,200 and 3,000 watts at 12-24 volts. If your panels produce more than 40 amps combined, you need thicker wire; less than 30…
How to Test Your DIY Solar System Like a Pro… by Charlesnoble March 19, 2026 Flip the main DC disconnect three times while monitoring voltage drop—this single action reveals whether your connections can handle full load without dangerous resistance buildup. Check every MC4 connector with an infrared thermometer under peak sun; any reading more than 10 degrees above ambient temperature signals a faulty crimp that…
Why Your Solar Setup Needs Both a Charge Controller… by Charlesnoble April 6, 2026 Check the maximum voltage and current ratings first—these determine whether your controller can actually handle your solar panel array without frying itself on the first sunny day. I learned this the hard way when my first DIY system shut down every afternoon because I’d paired 600 watts of panels with…
Subscribe for handpicked DIY projects, exclusive tips, and giveaways.
AGM batteries outperform traditional flooded lead acid batteries in nearly every practical measure that matters for solar installations, but whether that performance justifies their 50-100% higher upfront cost depends entirely on how hands-off you want your system to be and how often you’ll cycle the battery deeply. After running both types through real-world solar setups… Read more: AGM vs. Lead Acid Batteries: Which Is Better for Your Solar Setup?
A portable power station will typically run your camping devices for anywhere from a few hours to several days on a single charge, depending on what you’re powering and the station’s capacity. As for lifespan, most quality units last between 3 to 10 years before the battery degrades enough to need replacement. The distinction matters… Read more: Your Portable Power Station Won’t Last as Long as You Think (Here’s Why)
A J1772 solar charger combines a standard J1772 charging connector (the same Type 1 plug used by most North American EVs and electric bikes) with solar panels and battery components to create an off-grid or grid-supplemented charging system. You’ll need three core elements: solar panels (typically 400-800 watts for practical ebike charging), a battery storage… Read more: How to Choose a J1772 Solar Charger for Your Ebike: A Buying Guide


")

")
")
")
")
")

")
")
")
")


