The Stream Behind Your House Could Power It (Here’s How Micro Hydro Works)
Updated:
Walk down to your nearest stream with a five-gallon bucket and a stopwatch. Fill that bucket and time how long it takes—this simple test reveals whether you have enough flowing water to power your off-grid home. If you can fill it in under 10 seconds from a source that drops at least 10 feet in elevation, you’re looking at roughly 200-400 watts of continuous power, enough to run your refrigerator, lights, and charge devices 24 hours a day.
I learned this the hard way after spending months researching solar panels for my cabin, only to discover the creek behind my property could generate more electricity in a single rainy week than my panels produced all winter. Unlike solar that quits at sunset or wind turbines that sit idle on calm days, micro hydro delivers constant power as long as water flows. That reliability makes it the backbone of any serious off-grid system.
The real magic happens when you combine all three. Your micro hydro handles baseline power day and night, solar picks up the slack during summer when creek flows drop, and a small wind turbine catches those stormy periods when neither performs at peak. This hybrid approach means smaller, cheaper components for each system rather than over-building any single source.
Before you spend a dime on equipment, you need honest answers about your water resource, realistic cost expectations, and a practical plan for connecting everything together. That’s exactly what we’ll cover here.
Why Micro Hydro Beats Solar (Sometimes)
Let me be honest with you: solar panels get all the glory in the off-grid world, but micro hydro has some serious advantages that nobody talks about enough. I learned this the hard way when I visited my friend Sarah’s off-grid cabin in Vermont. She’d invested heavily in solar, and come December, she was rationing her battery power by 4 PM. Meanwhile, her neighbor with a small stream? Lights blazing at midnight.
The game-changer with micro hydro is simple: it runs 24/7. While solar panels take a nap every night and practically hibernate during winter, a decent stream keeps spinning that turbine round the clock. If you’ve got flowing water, you’re generating power at 2 AM on a cloudy Tuesday in February. That’s huge for off-grid living.
Here’s where micro hydro really shines: consistency. Solar production drops by 50-80% during winter in northern climates, right when you need power most for heating and lighting. A stream with good year-round flow doesn’t care about the season. That continuous baseline power means smaller battery banks and less stress about rationing electrons.
But here’s the elephant in the room we need to address: you absolutely must have flowing water. Not a pond, not a sometimes-stream that dries up in August. You need reliable flow with decent elevation drop. Most people don’t have this, which is why solar dominates the off-grid conversation.
The real sweet spot? Using micro hydro and solar together. Solar handles your peak daytime loads when the sun’s out, while micro hydro provides that steady baseline and keeps your batteries topped up overnight. Think of them as partners, not competitors. Solar covers summer abundance, micro hydro ensures winter reliability.
The truth is, if you have a suitable stream, micro hydro often delivers more consistent power per dollar invested than solar, especially in heavily forested or northern locations. But that’s a big “if” that depends entirely on your property’s water resources.
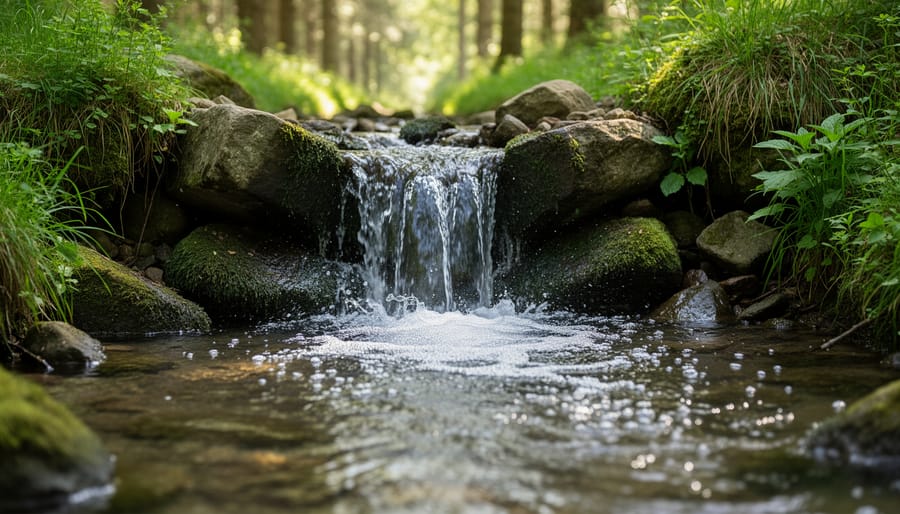
A small stream with consistent flow and vertical drop provides the essential ingredients for micro hydro power generation.
Does Your Property Have Enough Water?
Measuring Your Stream’s Flow Rate
Before you invest in any equipment, you need to know what your stream can actually deliver. I learned this the hard way when I first started exploring micro hydro for my own setup. I was so excited about a stream on my property until I measured it and realized the flow was barely enough to charge a phone!
The good news? Measuring flow rate is surprisingly simple using the bucket test method. Here’s how to do it:
First, find a spot where you can temporarily divert your stream’s full flow into a container. A 5-gallon bucket works perfectly. Use a piece of PVC pipe or a trough to channel all the water into your bucket. Now, time how long it takes to fill the bucket completely. Let’s say it takes 20 seconds to fill your 5-gallon bucket. Your flow rate is 5 gallons divided by 20 seconds, which equals 0.25 gallons per second, or 15 gallons per minute (GPM).
To estimate potential power output, use this simplified formula: kilowatts equals GPM times head (vertical drop in feet) divided by 5,310. For example, 50 GPM with a 20-foot head gives you roughly 0.19 kilowatts or 190 watts.
Generally, you’ll need at least 25 GPM with a 10-foot head to power basic lighting and small electronics. For meaningful household power (1-2 kilowatts), look for 100+ GPM with 20+ feet of head. These are ballpark figures, but they’ll help you determine if micro hydro makes sense for your property before investing further.
Finding and Measuring Head (Vertical Drop)
Measuring head is surprisingly straightforward, and trust me, I learned this the hard way after initially guessing and ending up disappointed with my first micro hydro attempt. Head is simply the vertical distance the water drops from your intake point to your turbine location.
The simplest method uses a transparent garden hose filled with water. Hold one end at your turbine site while a helper walks the other end uphill to your intake. The water inside acts as a level – mark where it settles at both ends, then measure the vertical difference with a tape measure. For longer runs, you’ll need to “leapfrog” this process in sections and add them up.
Smartphone apps with inclinometers can also work well. Walk the pipe route while the app calculates elevation changes based on distance and angle. Free apps like Theodolite or Clinometer get you surprisingly accurate results.
Here’s the exciting part: even modest head generates serious power potential. While flow rate increases power linearly, head does it exponentially. A site with 20 feet of drop produces four times more power than 10 feet with the same flow. That’s why a trickling mountain stream with 100 feet of drop often outperforms a larger creek with only 15 feet of fall. Every foot counts in your power equation.
The Quick Power Calculation
Here’s the good news: calculating your potential micro hydro power is surprisingly straightforward. The basic formula comes down to three things: how much water you have (flow rate in gallons per minute), how far it falls (head in feet), and system efficiency (usually around 50-60% for DIY setups).
Let me give you a real example. Say you have a small stream flowing at 100 gallons per minute with a 20-foot drop. Using the simplified formula, you’re looking at roughly 200 watts of continuous power. That might not sound like much compared to solar panels, but remember—that’s 24/7 production, which equals about 4.8 kWh daily. A comparable solar setup would need significantly more capacity to match that around-the-clock output.
I’ve watched countless folks get excited (or disappointed) based on quick napkin math, and honestly, those initial calculations are often off. That’s why we’ve built an interactive calculator right here on the site—it factors in pipe friction losses, turbine efficiency curves, and seasonal flow variations. Plug in your numbers and get a realistic picture of what your stream can actually deliver before you invest a single dollar in equipment.
The Basic Components You’ll Need
The Turbine (Your Power Generator)
The turbine is where the magic happens – it’s your actual electricity generator. Choosing the right one depends entirely on your head height and flow rate, and here’s where things get pretty straightforward.
For high head sites (above 50 feet) with smaller flows, Pelton wheels are your best friend. Picture a water wheel with little buckets that get hit by focused water jets. They’re efficient, relatively simple, and perfect for mountain streams. I’ve seen folks install these with heads of 100+ feet producing 2-3 kW continuously. Expect to pay $800-$2,500 for a quality unit.
Turgo turbines work similarly but handle medium heads (30-100 feet) better and can manage slightly higher flows. They’re like Pelton’s more versatile cousin, costing roughly $1,000-$3,000.
For lower head situations (10-40 feet) with good flow rates, crossflow turbines shine. These drum-shaped units let water pass through twice, maximizing efficiency even with modest drops. They’re bulkier but forgiving of debris and flow variations. Budget $1,500-$4,500 depending on capacity.
My neighbor Jake went with a crossflow for his 25-foot drop and hasn’t looked back – it powers his entire homestead through winter when solar struggles. The key is matching turbine type to your specific site conditions, not just picking the cheapest option.
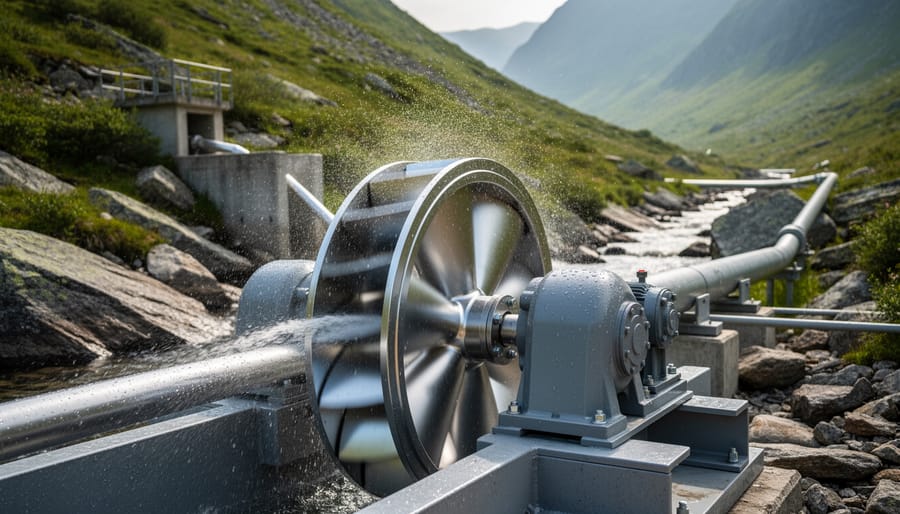
Pelton wheel turbines are ideal for micro hydro systems with higher head and moderate flow rates.
Intake and Penstock Piping
Getting water from your stream to your turbine might seem straightforward, but this is where many first-time micro hydro builders stumble. Let me walk you through the essentials.
Your intake structure sits in the stream and needs a coarse screen to block leaves, sticks, and debris. I learned this the hard way when a soggy branch jammed my friend Charles’s first turbine after just two days of operation. He now swears by a simple angled bar screen with quarter-inch spacing, which lets water through while deflecting debris downstream.
The penstock is your pressure pipe running from intake to turbine. Sizing matters tremendously here. Too narrow and you lose pressure to friction; too wide and you’ve wasted money. A simple rule: for heads under 100 feet, use 3-4 inch diameter pipe. Most DIYers calculate friction losses using free online calculators that factor in your head height and desired flow rate.
PVC versus HDPE is an ongoing debate in the micro hydro community. PVC costs less and handles higher pressures, making it great for steep terrain. However, it becomes brittle in freezing temperatures and UV exposure. HDPE flexes with ground movement and tolerates cold better, perfect if you’re burying pipe in variable terrain. For heads over 200 feet, always choose pressure-rated pipe with appropriate safety margins.
Common mistakes include inadequate anchoring at bends, which creates dangerous pipe whip, and skipping sediment settling tanks that prevent turbine wear.
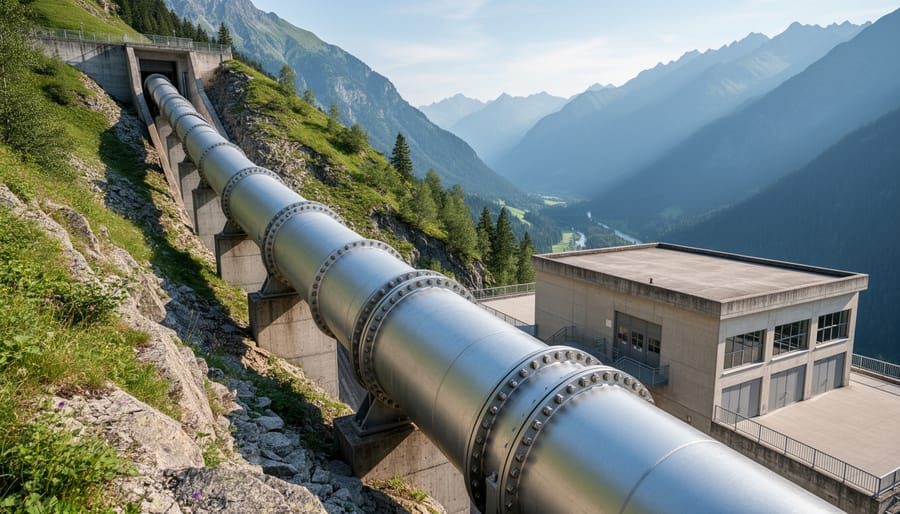
Penstock piping carries water from the intake down to the turbine, converting elevation into pressure and power potential.
Charge Controller and Battery Bank
Unlike solar panels that produce power only during sunny hours, your micro hydro system generates electricity 24/7, which changes how you manage your battery bank. I learned this the hard way when I first connected my stream turbine—batteries were constantly topping off, and I needed somewhere for that extra energy to go.
This is where dump loads become essential. A dump load is simply a resistive heater that diverts excess electricity when your batteries are full. Think of it as an overflow valve—the charge controller automatically redirects power to heat water or warm a workshop rather than overcharging your batteries. Most micro hydro charge controllers have built-in dump load management, unlike typical solar controllers.
If you already have solar panels, integrating micro hydro is straightforward. Both systems can charge the same battery bank through separate charge controllers. The beauty here is complementary generation—hydro runs constantly while solar peaks midday. Together, they keep your batteries healthier by reducing deep discharge cycles.
Choose a charge controller rated for your turbine’s maximum output, typically ranging from 12V to 48V systems. Many off-gridders find that combining even a small 200-watt micro hydro system with existing solar dramatically improves energy reliability, especially during winter months when both sunlight and water flow patterns shift.
Inverter and Electrical Integration
Most micro hydro turbines generate DC power, which you’ll need to convert to standard 120V AC for household use through an inverter. The beauty of off-grid living is that your micro hydro can share the same inverter and battery bank as your solar or wind system, creating a resilient hybrid setup. I learned this firsthand when I added hydro to my existing solar array—it was surprisingly straightforward!
When sizing your inverter, add up the total potential power from all sources. A 3kW inverter typically handles most small off-grid homes combining micro hydro with solar panels. The key is ensuring your charge controller can accept multiple input sources or installing separate controllers that feed into a common battery bank. Modern hybrid charge controllers make this integration much easier than it was just a few years ago.
Your battery bank acts as the buffer between all your power sources and your home’s electrical needs, smoothing out variations in generation. This means your hydro can charge batteries during nighttime hours when solar isn’t producing, while wind picks up the slack during cloudy, breezy days. It’s renewable energy teamwork at its finest!
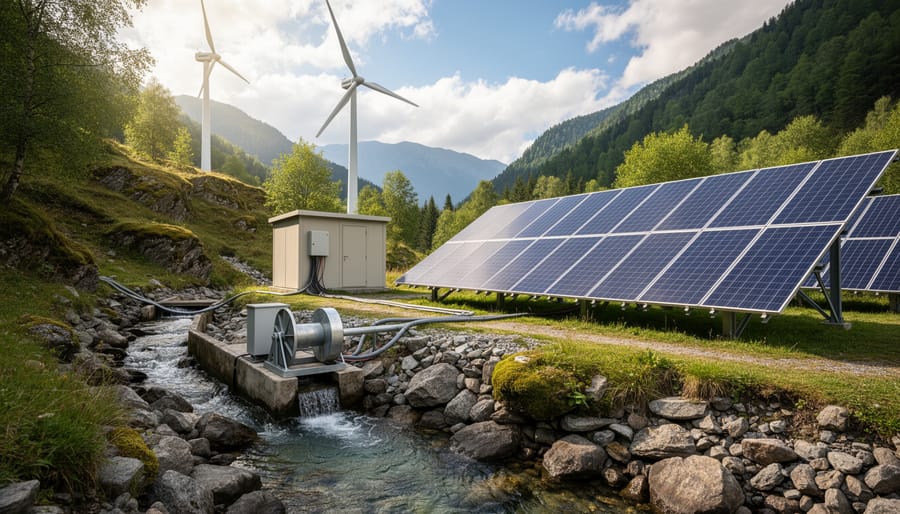
Combining micro hydro with solar and wind creates a resilient off-grid power system that generates electricity year-round.
Combining Micro Hydro with Wind and Solar
When Each Source Shines
Here’s what I’ve learned from my own off-grid setup and talking with folks in the community: each renewable source has its moment to shine, and that’s exactly why they work so beautifully together.
Solar panels are your summer champions. From May through September, my panels crank out power during those long, sunny days. Even on my property in the Pacific Northwest, I can generate more electricity than I need during peak summer months. But come November? Those short, cloudy days tell a different story.
Wind turbines really come alive during storm systems and throughout winter months. I remember last December when we had three days of heavy winds. My solar contribution dropped to nearly nothing, but the wind turbine was spinning like crazy, picking up the slack perfectly. It’s almost like nature designed a tag-team system.
This is where micro hydro becomes your MVP. While solar and wind fluctuate with weather and seasons, your stream keeps flowing. During spring runoff, my micro hydro system produces consistent power around the clock. Even in late summer when flow drops, it still provides that reliable baseline that keeps my refrigerator running and batteries topped off overnight.
A neighbor of mine runs all three sources. His micro hydro handles the base load year-round, solar dominates from April to October, and wind fills the gaps during stormy periods. He rarely dips below 80% battery capacity because when one source slumps, another picks up. That’s the real magic of hybrid systems.
Electrical System Integration Tips
Getting your micro hydro system to play nicely with other power sources isn’t rocket science, but it does require some thoughtful planning. I remember when Charles first integrated his micro hydro setup with his existing solar panels – he learned some valuable lessons about voltage matching that saved him from frying some expensive equipment.
The golden rule is voltage consistency. Your micro hydro output needs to match your battery bank voltage, whether that’s 12V, 24V, or 48V. Most modern charge controllers can handle multiple input sources, but they each need their own dedicated controller. Think of charge controllers as traffic cops – each renewable source gets its own cop directing power safely into your battery bank.
When wiring multiple sources together, never connect them directly to each other. Each system (solar, wind, hydro) connects independently to your battery bank through its own charge controller. This prevents power from one source backfeeding into another, which can damage equipment or create safety hazards.
Load balancing is where things get interesting. Your micro hydro typically provides steady baseload power, while solar and wind fluctuate. Program your charge controllers to prioritize hydro power first since it’s most consistent, then supplement with solar and wind as available. Most quality controllers have adjustable charging stages that prevent overcharging when all sources produce simultaneously.
Watch for ground loops when connecting multiple systems. Use a common grounding point for all equipment, and consider installing surge protection between systems. A simple multimeter becomes your best friend for checking voltage compatibility before making connections. When in doubt, consult the manuals or reach out to manufacturer support – they’ve seen every combination imaginable and can offer system-specific advice.
Installation Reality Check
Permits and Water Rights
Before you start ordering turbines or dreaming about endless free power, let’s talk about something less exciting but absolutely essential: permits and water rights. I learned this the hard way when a neighbor nearly called the authorities on my first micro hydro experiment because I hadn’t checked local creek regulations.
Here’s the reality: water rights are serious business. Even if a stream runs through your property, you don’t automatically have the right to divert it. Different states and countries have vastly different rules. Some places require environmental impact studies, fish passage provisions, or minimum flow requirements to protect downstream ecosystems and other water users.
Start by contacting your local planning department and state environmental agency. Ask specifically about hydroelectric permits, water diversion rights, and any restrictions on modifying waterways. Many areas distinguish between very small systems (under 100 watts) and larger installations, with simpler processes for micro-scale projects.
The Federal Energy Regulatory Commission oversees larger hydro projects in the US, but most residential micro hydro falls below their threshold. Still, check their website for guidance documents.
Don’t skip this step. Getting caught operating without proper permits can mean hefty fines, forced removal of your system, and seriously upset neighbors who depend on that same water source.
The Physical Work Involved
I’ll be honest with you—I massively underestimated the physical work when I installed my first micro hydro system. I thought it would take a weekend. It took three weeks.
The trenching alone consumed most of my initial timeline. You’ll need to dig a channel for your penstock pipe, often hundreds of feet long. Depending on your terrain, expect to spend 2-4 hours per 50 feet with a pick, shovel, and mattock. Rocky soil? Double that estimate. If you’re lucky enough to have equipment access, a small excavator can reduce this to a few hours total, but rental costs add $200-400 per day.
Pipe laying requires careful attention to grade and support. PVC or HDPE pipes need bedding material underneath to prevent settling. Budget a full day for every 200 feet of pipe installation, including securing connections and backfilling. You’ll need pipe wrenches, PVC cement or fusion tools for HDPE, and a level that’s actually accurate.
Mounting the turbine and setting up the intake structure is surprisingly technical. Creating a stable foundation for your turbine might involve concrete work, which means mixing, pouring, and waiting for curing. Plan for 2-3 days here, plus another day for electrical connections and integrating with your battery bank for managing different loads.
My advice? Recruit friends, take your time, and remember that proper installation now means decades of reliable power.
What It Really Costs (And What You’ll Save)
Let me be honest with you—when I first looked into micro hydro for my off-grid setup, the price tags made me gulp. But here’s the thing: the numbers tell a more interesting story when you break them down properly.
For a small 100W system, you’re looking at roughly $500-$1,200 if you go the DIY route. This covers a basic turbine, charge controller, and necessary piping. Commercial pre-packaged systems start around $1,500-$2,500 for similar output. I’ve seen folks in our community build functional systems for under $400 using reclaimed materials and creative problem-solving, though your mileage will vary.
Step up to a 1-3kW system, and we’re talking $3,000-$8,000 for DIY installations, or $8,000-$15,000 for turnkey commercial solutions. That’s a significant chunk of change, but consider this: a comparable 3kW solar array with battery backup typically runs $9,000-$18,000, and you’re dependent on sunny days.
The real magic happens with payback periods. If you’ve got consistent water flow, a micro hydro system can pay for itself in 3-7 years, compared to 8-12 years for solar alone in many climates. Why? Your turbine keeps spinning 24/7, generating power while you sleep—no batteries required for immediate use.
Maintenance costs are refreshingly low. Budget around $100-$200 annually for bearing replacements, screen cleaning, and occasional seal work. Compare that to battery replacement costs in pure solar setups, which can hit $3,000-$5,000 every 7-10 years.
Here’s my biggest insight: micro hydro isn’t about replacing your solar panels—it’s about reducing battery dependency. That 1kW turbine running continuously generates 24kWh daily. A similar solar setup needs massive battery banks to cover nighttime and cloudy periods, driving costs skyward.
Before investing, check local off-grid compliance requirements—some jurisdictions have specific regulations for water diversion that affect your bottom line. The upfront cost stings less when you realize you’re building a power source that could outlast you.
Maintenance and Winterization
Here’s some good news: micro hydro systems are surprisingly low-maintenance compared to what most people expect. I remember chatting with my neighbor Charles, who was amazed that his system required less attention than his solar panels needed for cleaning. Once you’ve got everything properly installed, you’re looking at minimal upkeep to keep the power flowing.
The main maintenance task is debris management. You’ll want to check your intake screen every few weeks during normal conditions, and more frequently during fall when leaves are dropping or after heavy storms. This literally takes five minutes – just remove any sticks, leaves, or sediment buildup. Some folks set a phone reminder for every two weeks and make it part of their weekend routine. If debris accumulates, it restricts flow and reduces power output, but it won’t damage your system.
Seasonal considerations matter, especially in cold climates. Freeze protection is critical if temperatures drop below freezing. The good news is that flowing water resists freezing much better than still water. However, you’ll want to insulate any exposed pipes and consider burying your penstock below the frost line during installation. In extreme cold, some owners run a small amount of water continuously to prevent ice formation.
Winter can actually be your best season for power generation in areas with heavy snowmelt, though you might need to periodically clear ice from intake areas. During summer dry spells, you may see reduced output, which is exactly when solar systems shine brightest in a hybrid setup.
Common troubleshooting is straightforward. If output drops, check the intake screen first. If you’re experiencing irregular power, inspect electrical connections. Most issues resolve within minutes. Annual tasks include checking belt tension on certain turbine types and inspecting the penstock for leaks – tasks that together take maybe an hour.
Real-World Performance: What to Expect
Let me give you a reality check based on what I’ve seen in real installations: micro hydro outputs vary dramatically depending on your site conditions, but the reliability is genuinely impressive when you’ve got the water flow.
A friend of mine runs a small cabin system in the Pacific Northwest with just a 100-watt micro hydro unit. His stream drops about 15 feet with modest flow, and that little setup generates around 2.4 kilowatt-hours daily. That’s enough to keep his LED lights running, charge phones and laptops, and power a small refrigerator. During summer when the stream slows to a trickle, his output drops to about 1 kilowatt-hour daily, but it never stops completely like solar would on cloudy days.
Compare that to a larger homestead installation I helped assess last year. They had a 1-kilowatt turbine with a 50-foot head and consistent flow. Their system produces 20-24 kilowatt-hours daily year-round, enough to run a full household including washing machine, power tools, and even occasional electric heating. The seasonal variation was only about 15 percent between wet and dry seasons, which is remarkable stability.
Here’s the honest truth about reliability: micro hydro runs 24/7, which means it generates three times more energy than an equivalent-wattage solar panel that only produces during daylight hours. However, you’re completely dependent on water flow. Extended droughts or freezing conditions will impact output, sometimes significantly.
Most successful off-grid homes I’ve visited use micro hydro as their baseload power, with solar or wind filling gaps during low-flow periods. Grid power offers more consistent voltage and no seasonal concerns, but micro hydro’s continuous generation often provides better actual energy delivery than intermittent sources, assuming your water resource holds up through dry spells.
If you’re fortunate enough to have a flowing water source on your property, micro hydro deserves serious consideration as part of your off-grid energy strategy. Throughout my years working with renewable energy systems, I’ve seen countless homeowners transform modest streams into reliable power sources that work day and night, complementing their solar panels and wind turbines beautifully.
Here’s what I’ve learned: the most dependable off-grid systems are rarely built on a single energy source. When your solar production drops on cloudy days, your micro hydro system keeps running. When wind speeds are calm, that creek is still flowing. This diversity is what creates true energy independence.
I still remember the first time I helped a neighbor install a small turbine on his property. Watching that water turn mechanical energy into electricity, knowing it would continue doing so around the clock, was genuinely satisfying in a way that’s hard to describe. There’s something deeply rewarding about working with natural forces rather than against them.
So here’s my challenge to you: take a walk around your property with fresh eyes. Do you have water resources you haven’t fully considered? Use our flow calculator to get real numbers on what’s possible. Even if micro hydro isn’t your primary solution, it might be the missing piece that takes your off-grid system from good to exceptional. The water’s already flowing, you just need to decide whether you’re ready to harness it.
How useful was this post?
Click on a star to rate it!
Average rating 0 / 5. Vote count: 0
No votes so far! Be the first to rate this post.
We are sorry that this post was not useful for you!
Let us improve this post!
Tell us how we can improve this post?
charlesnoble
Here at Spheral Solar, I’m a hands-on solar power enthusiast, constantly exploring and experimenting with DIY solutions. I’m dedicated to sharing my discoveries, insights, and even the bumps I hit along the way, all in the pursuit of a more sustainable future.
Stop Oversizing Your Off-Grid Inverter (Here’s What… by Charlesnoble December 24, 2025 Calculate your total daily energy consumption in watt-hours by listing every appliance you plan to run off-grid, from your refrigerator drawing 150 watts for 8 hours to your laptop charging at 65 watts for 3 hours. Multiply each appliance’s wattage by its daily runtime, then add everything together. This number…
Why Your Backup System Needs a Critical Load Panel… by Charlesnoble December 28, 2025 Picture this: It’s 2 AM, the power’s out, and your backup battery system is silently draining itself trying to keep your pool pump, water heater, and every other non-essential appliance running. By morning, you’re out of power—right when you actually need it for your refrigerator and medical equipment. I learned…
This Critical Safety Switch Could Save Your Solar… by Charlesnoble February 22, 2026 Picture this: you’ve just finished mounting your solar panels, the sun is shining, and DC power is flowing through your system at voltages high enough to seriously injure or kill someone. Without a proper DC isolator switch, you have no safe way to disconnect that power for maintenance, emergencies, or…
Why Grid Code Compliance Matters (Even When You’re… by Charlesnoble January 16, 2026 Check your local utility’s interconnection requirements before assuming your off-grid system is exempt from grid codes—many jurisdictions now require compliance even for systems with no planned grid connection, especially if your property remains connected to utility lines. Download your utility’s technical standards document and your state’s electrical code amendments, then…
Why Your Solar Array Needs a Disconnect (And How to… by Charlesnoble January 5, 2026 Picture this: You’ve just finished wiring your solar panels to your charge controller, feeling pretty accomplished, when someone asks, “Where’s your disconnect?” Your confident smile fades. That little switch you skipped to save fifty bucks? It’s actually the difference between a safe solar installation and a potentially dangerous one that…
Solar Lab Reviews: Transparent Testing for Solar… by Charlesnoble May 13, 2026 Solar Lab Reviews: Transparent Testing for Solar Products & Buying Guides Well, if you have ever googled a solar product, then you pretty much know the issue. Each retailer has its own best-selling gadget. Five stars for each sponsored post that you do. And after you’ve read ten “reviews,” you…
Subscribe for handpicked DIY projects, exclusive tips, and giveaways.
AGM batteries outperform traditional flooded lead acid batteries in nearly every practical measure that matters for solar installations, but whether that performance justifies their 50-100% higher upfront cost depends entirely on how hands-off you want your system to be and how often you’ll cycle the battery deeply. After running both types through real-world solar setups… Read more: AGM vs. Lead Acid Batteries: Which Is Better for Your Solar Setup?
A portable power station will typically run your camping devices for anywhere from a few hours to several days on a single charge, depending on what you’re powering and the station’s capacity. As for lifespan, most quality units last between 3 to 10 years before the battery degrades enough to need replacement. The distinction matters… Read more: Your Portable Power Station Won’t Last as Long as You Think (Here’s Why)
A J1772 solar charger combines a standard J1772 charging connector (the same Type 1 plug used by most North American EVs and electric bikes) with solar panels and battery components to create an off-grid or grid-supplemented charging system. You’ll need three core elements: solar panels (typically 400-800 watts for practical ebike charging), a battery storage… Read more: How to Choose a J1772 Solar Charger for Your Ebike: A Buying Guide

")
")
")
")
")

")
")
")
")
")


