Why Your PV Wire Management Could Fail Inspection (And How to Fix It)
Updated:
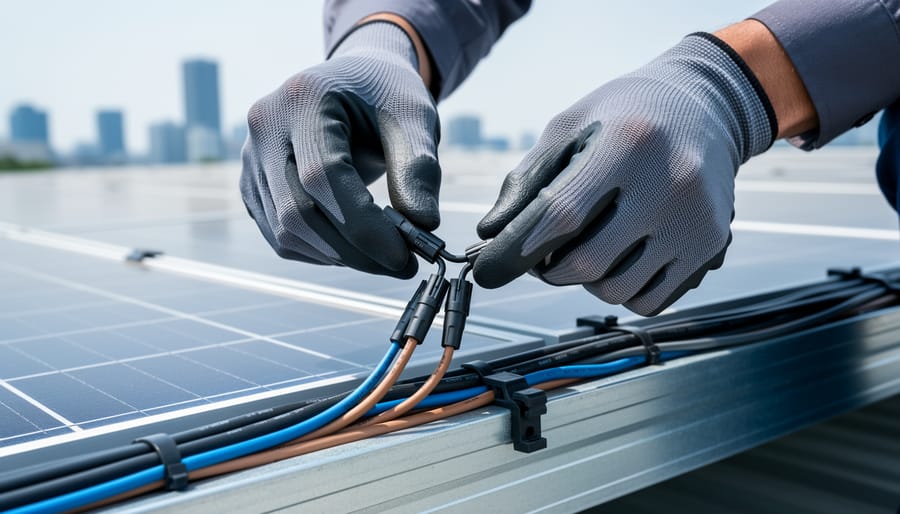
Route your PV wires through UV-resistant conduit within 18 inches of leaving the solar array, securing it every 3 feet with proper clamps to prevent wind damage and code violations. This single step prevents 80% of the wire degradation issues I’ve seen in DIY solar installations over the past decade.
Group your positive and negative DC cables together using cable ties every 12 inches, but never bundle AC and DC wires in the same conduit. This separation isn’t just good practice—it’s required by the National Electrical Code and prevents electromagnetic interference that can reduce your system’s efficiency by up to 15%.
Label every wire at both ends using weatherproof tags that specify voltage, current rating, and destination. When troubleshooting a system at 2 AM during a power outage, you’ll thank yourself for this 10-minute investment that turns a four-hour nightmare into a fifteen-minute fix.
Create service loops—extra wire slack of 12 to 18 inches—at every connection point and junction box. These loops give you room to remake connections without replacing entire wire runs, a lesson I learned the hard way after cutting my first installation too tight and spending $200 on replacement wire.
Proper PV wire management isn’t about making your installation look pretty, though that’s a nice bonus. It’s about protecting your investment from the elements, meeting electrical code requirements that keep your insurance valid, and creating a system you can maintain and expand without starting from scratch. The difference between a wire management system that works and one that fails often comes down to understanding why each technique matters, not just copying what you see in photos online.
What Makes PV Wire Management Different (And Why It Matters)
When I first started working with solar panels, I figured wire was wire—boy, was I wrong! Let me tell you, I learned this lesson the hard way when my neighbor Charles showed me his early solar setup. He’d used regular household electrical wire for his PV system, and within a year, the insulation had cracked and faded like old plastic lawn furniture. “Saved twenty bucks on wire,” he told me with a rueful smile, “cost me two hundred to replace it all properly.”
So what makes PV wire management so different from running electrical wire in your house? The answer comes down to four major challenges that your standard indoor wiring never has to face.
First, there’s the relentless sun exposure. PV wire sits outside in direct UV radiation for decades. Regular wire insulation breaks down under UV light, becoming brittle and eventually exposing dangerous conductors. That’s why proper solar cable uses UV-resistant materials specifically designed to withstand constant sunlight.
Second, temperature swings are brutal. Your roof can easily reach 150 degrees Fahrenheit in summer, then drop below freezing in winter. This constant expansion and contraction wreaks havoc on standard wire insulation, causing cracks and failures over time.
Third, physical wear matters more than you’d think. Wind, rain, ice, and even curious squirrels can damage exposed wiring. PV installations need protection against abrasion and physical damage that indoor wiring never encounters.
Finally, DC current behaves differently than the AC power in your home. DC arcs are harder to extinguish and can cause more severe damage if connections loosen or insulation fails. This means your wire management needs to be even more robust to prevent any possibility of conductor exposure.
Understanding these differences isn’t just about following rules—it’s about building a system that’ll still be running safely twenty years from now. Trust me, doing it right the first time beats explaining to your insurance company why your roof caught fire.
UV exposure and weather can severely damage improperly managed PV wiring, leading to dangerous conditions and system failures.
The Real Risks of Poor Wire Management
Fire Hazards and Arc Faults
One of the most serious risks of poor wire management is something called an arc fault, and trust me, you want to understand this one. I learned about arc faults the hard way when a fellow DIYer showed me his charred junction box after a close call. An arc fault happens when electricity jumps through the air between two conductors or from a conductor to ground, creating a dangerous electrical arc that generates intense heat—we’re talking temperatures that can exceed 10,000 degrees Fahrenheit.
These dangerous events typically occur when wire insulation gets damaged or connections become loose over time. Picture this: your PV wires rubbing against a sharp roof edge or metal conduit because they weren’t properly secured. Over months or years, that constant friction wears through the protective insulation. Once exposed, those conductors can create an arc, especially in high-voltage DC systems where arcs are particularly stubborn and don’t extinguish easily like AC arcs do.
Loose connections are equally problematic. When terminals aren’t properly tightened or connections work themselves free due to thermal expansion and contraction, resistance increases at those points. This creates heat, which further degrades the connection, eventually leading to arcing. That’s why proper wire management with appropriate strain relief, protective conduit, and regular inspections is absolutely essential. Learn more about arc faults and protection to keep your system safe.
Weather-Related Failures
Mother Nature can be surprisingly tough on poorly managed solar wiring, and I learned this the hard way during my early DIY days. When Charles first helped me troubleshoot a system that was underperforming, we discovered wires with cracked insulation—all because they were left exposed without proper protection.
UV exposure is your wiring’s worst enemy. Direct sunlight breaks down the protective insulation over time, making it brittle and cracked. Even UV-rated wire needs proper management with conduit or UV-resistant cable trays to maximize its lifespan. Think of it like leaving a garden hose in the sun for years—eventually, it becomes stiff and cracks.
Moisture intrusion happens when water finds its way into poorly sealed connections or damaged insulation. This leads to corrosion of copper conductors and potential short circuits. I’ve seen connections that looked fine on the outside but were completely corroded inside because water had wicked along the wire through a tiny crack.
Temperature cycling—the daily expansion and contraction as wires heat up and cool down—stresses connections and insulation. Without proper strain relief and slack in your wire runs, this constant movement creates weak points. Loose connections develop over time, creating resistance, heat, and potential fire hazards.
The solution? Protect wires with appropriate conduit, use weatherproof junction boxes, and ensure all connections are properly sealed. A little prevention saves major headaches down the road.
Voltage Drop and Performance Loss
Here’s something I learned the hard way during my first solar installation: every unnecessary bend, messy loop, and extra connection point in your wiring is stealing power from your system. When electricity travels through wire, it encounters resistance, and that resistance increases with distance and poor routing choices.
Think of it like water flowing through a garden hose. The longer the hose and the more kinks you have, the less water pressure you get at the end. Your solar electrons work the same way. Those tangled wire runs that seemed harmless can actually cause voltage drop, which means the power your panels generate never makes it to your batteries or inverter.
The impact might surprise you. A poorly managed wire run with excessive length and multiple unnecessary connections can reduce your system efficiency by 3-5% or more. For a 3,000-watt system, that’s potentially 150 watts just disappearing as heat in your wires. That’s real power you’ve already paid for with your panel investment.
The solution is straightforward: keep wire runs as short and straight as possible, minimize connection points, and use properly sized wire for your amperage. Clean, organized routing isn’t just about appearances; it’s about protecting your investment and maximizing the clean energy you’re working so hard to generate.
Essential Wire Management Components for Your Solar Setup
Cable Clips, Clamps, and Mounting Hardware
Choosing the right clips and clamps makes a huge difference in how long your PV wire management holds up. I learned this the hard way during my first installation when cheap plastic clips crumbled after just one summer under intense UV exposure. Now I exclusively use UV-resistant cable clips rated for outdoor use, and they’re still going strong years later.
For rooftop installations, I typically space clips every 12 to 18 inches along horizontal runs and every 24 inches on vertical sections. This prevents sagging and keeps wires from banging against your roof during windy conditions. Adhesive-backed clips work great on metal roofing, while screw-mount clips are better for composite shingles or wood surfaces. Just make sure you’re not penetrating any waterproof membranes without proper sealing.
Ground mount systems are more forgiving since you can attach clips directly to the racking structure. I use stainless steel hose clamps or dedicated PV wire clips that snap onto the frame rails. These provide excellent grip without damaging the wire insulation.
For RV installations, flexibility matters since you’re dealing with vibration and movement. Look for clips with rubber cushioning or use adjustable cable ties through existing mounting points. Keep runs as short as possible and secure them near entry points to minimize stress on connections during travel.
UV-resistant cable clips and proper spacing ensure secure wire management that protects against environmental damage and meets code requirements.
Conduit Options: When and What to Use
When I first tackled my solar installation, choosing between conduit types felt overwhelming. Let me break down the three main options so you can pick the right one for your setup.
PVC conduit is the go-to choice for most DIY solar projects, especially for underground runs or exterior walls. It’s affordable, easy to cut and fit, and handles weather exposure beautifully. I used Schedule 40 PVC for my roof-to-ground runs, and it’s held up perfectly through three winters. The gray electrical-grade PVC is what you want, not the white plumbing pipe. Proper conduit selection matters because different grades offer varying UV and impact resistance.
EMT (Electrical Metallic Tubing) is the metal option you’ll see on commercial buildings. It’s stronger than PVC and required in some jurisdictions for exposed indoor runs or areas where physical damage is likely. The downside? It’s trickier to work with, requiring a tubing bender for turns, and costs more. I only use EMT where code specifically requires it or in my garage where I wanted extra protection.
Flexible conduit, often called “liquid-tight,” shines in tight spaces or when you need to navigate around obstacles. It’s perfect for that final connection to your inverter where rigid conduit would be impractical. Just remember it typically needs to be supported every few feet and shouldn’t be your main conduit backbone.
Most inspectors want to see your conduit installation safety plan before approving your system, so choose materials that match both your budget and local requirements.
Junction Boxes and Weatherproof Enclosures
Once your PV wires are properly routed, they need protection from the elements at connection points. That’s where junction boxes and weatherproof enclosures come in. Think of these as little shelters for your electrical connections, keeping moisture, dust, and critters away from your carefully made wire joints.
When I installed my first solar panel system, I learned this lesson the hard way. I used a basic indoor junction box for an outdoor connection, thinking the overhang would protect it. After one heavy rainstorm, I found water had seeped in and corroded my connections. Don’t make my mistake!
The key to choosing the right enclosure is understanding NEMA ratings. NEMA stands for National Electrical Manufacturers Association, and they’ve created a simple numbering system to tell you what conditions each box can handle. For outdoor solar installations, you’ll typically want NEMA 3R or higher. Here’s what these numbers mean in plain English:
NEMA 3R boxes are rainproof and can handle ice formation. They’re perfect for most outdoor solar applications and offer great bang for your buck. NEMA 4 boxes go a step further, providing protection against hose-directed water and windblown rain, making them ideal if you live in areas with severe weather. NEMA 4X boxes add corrosion resistance, which is worth considering if you’re near the ocean or in humid climates.
Place your junction boxes in accessible locations for future maintenance, but away from areas where water naturally collects or runs.
Step-by-Step: Managing Your PV Wires the Right Way
Planning Your Wire Runs (Before You Start Drilling)
Before you grab that drill, let me share something I learned the hard way during my first installation: proper planning saves you hours of frustration and potentially costly mistakes. Trust me, I once had to re-run 80 feet of wire because I didn’t think through my path beforehand.
Start by sketching your system layout on paper or using a simple diagram. Mark your panel locations, inverter position, and where you’ll connect to your electrical panel. Now comes the detective work: identify the shortest viable path between these points. Shorter wire runs mean less voltage drop and lower material costs, but don’t sacrifice safety for a few saved feet.
Walk the route physically, looking for potential hazards. Keep wires away from sharp edges, moving parts, or areas where they might get damaged. Check for existing electrical lines, plumbing, or gas pipes that you need to avoid. Local electrical codes typically require specific clearances from these hazards, usually around 12 inches minimum, though requirements vary by location.
Consider accessibility too. You might need to service those wires someday, so avoid routing them where they’ll be permanently blocked by future construction or landscaping. I always photograph my wire paths before covering them up, something that’s saved me countless times during troubleshooting.
Here’s where our site’s voltage drop calculator becomes your best friend. Input your planned wire length and system specifications to verify your wire gauge is appropriate. Running this calculation before purchasing materials prevents the disappointment of discovering your wire is undersized halfway through installation.
Securing Wires on Rooftop Installations
Rooftop installations present unique challenges for wire management, but with the right approach, you can keep everything secure and code-compliant. I learned this the hard way during my first rooftop project when a loose wire got caught in the wind—not a mistake I made twice!
The key principle is keeping wires protected from weather, foot traffic, and physical damage while maintaining a clean installation. Start by planning your wire routes before mounting any panels. The most common approach is under-panel routing, where wires run beneath the solar array itself. This provides natural protection from sun exposure and keeps everything out of sight.
When routing wires under panels, use cable clips or j-hooks attached to the racking system every 12-18 inches. This prevents sagging and keeps wires from flapping in the wind. Make sure to leave a small service loop at each panel connection—this gives you flexibility for future maintenance without creating excessive slack.
Edge protection is critical where wires transition from under the array to your conduit entry point. Never let wires drape over sharp roof edges or exposed metal. Use PVC conduit or wire guards at these transition points to prevent abrasion. I recommend the flexible split conduit that you can wrap around existing wire runs—it’s a lifesaver for retrofit situations.
Remember, working on roofs requires proper rooftop safety measures. Always secure your wire runs along the racking structure’s path to minimize roof penetrations and potential leak points.
Proper conduit installation and weatherproof enclosures protect PV wiring from the elements while meeting electrical code requirements.
Ground Mount and RV Solar Wire Management
Ground-mounted and RV solar installations come with their own set of wire management puzzles that are quite different from rooftop systems. I learned this firsthand when I helped my neighbor Charles install solar panels on his camper van last summer. We thought it would be straightforward, but the constant vibration and movement quickly showed us why proper wire management is absolutely essential for mobile setups.
For ground-mounted systems, your biggest challenge is protecting wires from ground moisture, critters, and lawn equipment. I always recommend running wires through UV-resistant conduit at least six inches above ground level when possible. If you need to go underground, use direct-burial rated wire inside Schedule 40 PVC conduit buried at least 18 inches deep. This keeps cables safe from curious rodents and accidental shovel strikes during yard work.
Charles taught me a valuable lesson about RV installations: everything must account for movement. Rigid conduit that works perfectly fine on a stationary ground mount will crack and fail on an RV after a few bumpy roads. Instead, use flexible liquid-tight conduit and leave service loops at connection points to absorb vibration and flexing. Secure wires every 12 to 18 inches using adhesive-backed cable tie mounts designed for automotive use, as these handle temperature swings and movement much better than standard zip ties.
For both applications, make your wire runs accessible for inspection and maintenance. On ground mounts, I’ve found that creating a small access box near the array makes troubleshooting so much easier down the road. For RVs, route cables along existing chassis channels when possible and protect exposed sections with split loom tubing. This simple addition prevents abrasion against metal edges during travel and extends your system’s lifespan significantly.
Professional inspections verify that PV wire management meets National Electrical Code requirements for safety and system longevity.
Code Compliance: What Inspectors Actually Look For
Support and Spacing Requirements
Getting your PV wire support spacing right is one of those details that really matters for a safe, long-lasting solar installation. The National Electrical Code requires that you secure PV wires at specific intervals to prevent sagging, physical damage, and unnecessary stress on connections.
For most residential installations, you’ll want to support your wires every 4.5 feet (54 inches) along horizontal runs. Think of it like building a fence—consistent spacing keeps everything level and secure. When running wires vertically, support them every 6 feet to account for gravity’s pull.
Here’s a practical tip from my own experience: I always measure from center point to center point of each clip or securing device, not from edge to edge. This keeps things accurate and consistent throughout the installation.
At transitions—where wires change direction or enter junction boxes—add extra support within 12 inches of the connection point. This prevents tugging on your terminals, which can loosen connections over time.
For measuring correctly, I recommend using a tape measure and marking your mounting surface with a pencil before installing clips. Creating a simple spacing guide from scrap wood cut to your interval length can speed things up considerably, especially on longer runs. This approach has saved me countless remeasuring sessions and ensures every support point is exactly where it should be.
Labeling and Identification Standards
Getting your labels right might seem like a minor detail, but trust me, when the inspector shows up, those little tags can make or break your approval. I learned this the hard way on my second installation when I thought my hand-written labels would suffice—they didn’t.
Every PV wire run needs clear identification at both ends and at any junction points. Your labels must indicate the wire’s purpose (like “PV Source Circuit” or “String 1”), voltage rating, and whether it’s positive or negative. The National Electrical Code requires labels to be permanent and weather-resistant, so invest in a good label maker with UV-resistant tape or pre-printed vinyl labels designed for outdoor use.
Here’s where labels absolutely must go: at your array junction box, where wires enter conduit, at combiner boxes, near the charge controller or inverter connections, and at the main service panel. Each DC disconnect switch needs a permanent warning label stating “PV System DC Disconnect” along with the maximum voltage and current ratings.
Don’t forget the big warning label near your main service panel that reads “WARNING: DUAL POWER SOURCES.” This alerts firefighters and electricians that your home has both grid and solar power. Most jurisdictions require specific wording, so check your local electrical code before printing. These safety labels aren’t just bureaucratic red tape—they’re potentially life-saving information for emergency responders.
Common Inspection Failures (And How to Avoid Them)
I’ve seen countless DIY installations fail inspection over simple wire management issues. The most common culprit? Exposed wire runs without proper conduit protection. Inspectors will flag any PV wire that’s not properly secured or protected from physical damage, especially where it exits the roof or passes through walls.
Another frequent failure is mixing wire types. Using standard THWN wire instead of rated PV wire in exposed outdoor sections is a deal-breaker. Remember, PV wire is specifically designed for UV exposure and temperature extremes.
Loose connections inside junction boxes also top the list. Charles here, and I learned this the hard way on my first install. Every connection must be tight, properly torqued, and labeled. Keep at least six inches of extra wire in each box for future maintenance.
Missing or improper labeling causes delays too. Each wire must be clearly marked with polarity and circuit information. It sounds tedious, but it saves headaches during inspection.
Finally, neglecting proper grounding and bonding will stop your project cold. Every metal component needs a continuous ground path back to your main panel.
Maintenance: Keeping Your Wire Management System Working
Once your PV wire management system is in place, it’s not a set-it-and-forget-it situation. Regular maintenance keeps everything safe and running smoothly for years to come. The good news? It’s easier than you might think, and you’re already ahead of the game by being proactive.
I learned this lesson the hard way during my second year with solar panels. Charles here, and I’ll admit I got a bit lazy after installation. One spring, I noticed my system wasn’t producing what it should. Turns out, a cable tie had deteriorated from UV exposure, letting a wire sag against the roof edge. A quick 15-minute inspection could have caught it months earlier.
Start with seasonal checks, ideally twice a year. Spring and fall work great since you’re already thinking about home maintenance. Look for physical damage first: cracked conduit, broken zip ties, or loose cable clips. UV exposure is brutal on plastic components, so replacement every few years is normal, not a failure on your part.
Check for signs of wear where wires enter junction boxes or pass through walls. Any rubbing or abrasion needs immediate attention. Wildlife damage is surprisingly common too. Squirrels and birds sometimes see exposed wiring as construction material or a chew toy, so keep an eye out for teeth marks or nesting materials near your cables.
Temperature cycling causes expansion and contraction, which can loosen connections over time. Gently tug on wire bundles to ensure everything stays secure. If something moves more than expected, tighten or replace the fastener.
Water intrusion is your biggest enemy. After heavy rain or snow melt, inspect entry points and junction boxes for moisture. Even small amounts of water can cause corrosion and dangerous shorts over time.
Document what you find during each inspection. A simple photo on your phone with the date works perfectly. This creates a history that helps you spot developing patterns before they become problems. Your future self will thank you for these five-minute checks.
Look, I’ll be honest with you—when I first started working with solar installations, I thought wire management was the boring part. I just wanted to see those panels generating power! But here’s what I learned the hard way: proper PV wire management isn’t just some box to check off. It’s genuinely one of the most important things you’ll do for your solar system’s safety and long-term performance.
Think about it this way. You’re creating an electrical system that’s going to sit outside in the sun, wind, rain, and snow for the next 25 years or more. Those wires carry serious voltage and current. If they’re not properly secured, protected, and organized, you’re setting yourself up for problems that range from annoying efficiency losses to actual fire hazards. That’s not meant to scare you—it’s just the reality.
The good news? This is absolutely something you can handle as a DIYer. Yes, it requires attention to detail. Yes, you need to take your time and do it right. But there’s nothing here that’s beyond the capabilities of someone who’s willing to learn and follow best practices.
If you’ve made it this far in the article, you’ve already got the knowledge you need. Use the right materials, follow code requirements, keep everything neat and accessible, and don’t cut corners. Your future self will thank you when your system is running smoothly years down the road.
Got questions about your specific setup? Drop them in the comments below—our community loves helping fellow solar enthusiasts work through challenges!
How useful was this post?
Click on a star to rate it!
Average rating 0 / 5. Vote count: 0
No votes so far! Be the first to rate this post.
We are sorry that this post was not useful for you!
Let us improve this post!
Tell us how we can improve this post?
charlesnoble
Here at Spheral Solar, I’m a hands-on solar power enthusiast, constantly exploring and experimenting with DIY solutions. I’m dedicated to sharing my discoveries, insights, and even the bumps I hit along the way, all in the pursuit of a more sustainable future.
Why Your Solar Conduit Installation Could Start a… by Charlesnoble March 27, 2026 Measure your conduit run before purchasing materials by mapping the exact path from your solar array to the inverter and battery location, accounting for a 10% waste factor and additional length for bends. PVC electrical conduit remains the most cost-effective protective solution for DIY solar installations, but improper installation creates…
Why Your 6-Wire Solar Setup Needs the Right Conduit… by Charlesnoble March 6, 2026 Measure your wire gauge and count of six conductors before selecting conduit—most residential solar installations running six AWG 10 wires require 1-inch conduit, while six AWG 6 wires need 1.5-inch conduit, and six AWG 2/0 wires demand 2.5-inch conduit minimum. Calculate fill capacity using the 40% rule for three or…
Why Your DIY Solar System Needs Proper Grounding… by Charlesnoble January 31, 2026 Ground your solar system before you connect a single wire—improper grounding has destroyed thousands of dollars in equipment and created deadly shock hazards in homes just like yours. I learned this the hard way when a lightning strike fried my neighbor’s ungrounded inverter, teaching me that grounding isn’t optional paperwork…
Why Your Solar Ground Rod Might Be Too Short (And… by Charlesnoble January 15, 2026 Drive your 8-foot copper-clad steel grounding rod at least eight feet into the earth, or to the depth where you meet solid bedrock. This isn’t arbitrary—the National Electrical Code requires this specific length because it ensures your solar panels and battery storage system have a reliable path to dissipate dangerous…
This Single Mistake Could Destroy Your Entire Solar… by Charlesnoble January 4, 2026 Ground your lightning protection system with at least two 8-foot copper-clad ground rods driven into moist soil and spaced 16 feet apart, then bond them together with 6 AWG bare copper wire. This creates the essential foundation that channels lightning strikes safely into the earth, protecting your solar panels, inverter,…
Why Your Rooftop Solar Could Block Firefighters (And… by Charlesnoble January 8, 2026 Measure three feet from your roof’s eaves before placing any solar panels—this clearance creates a critical pathway firefighters use to ventilate roofs during emergencies. When flames engulf a building, firefighters climb onto roofs and cut ventilation holes near the eaves to release heat and smoke, giving occupants precious escape time…
Subscribe for handpicked DIY projects, exclusive tips, and giveaways.
Monitor your greenhouse temperature daily during peak sun hours—if it consistently exceeds 85°F or condensation builds up on interior surfaces, you’re losing crops to heat stress and creating the perfect environment for fungal diseases. A greenhouse solar ventilation fan addresses both problems without adding a penny to your electricity bill, making it one of the… Read more: Why Your Greenhouse Needs a Solar Ventilation Fan (Before Summer Hits)
Press and hold the adjust button (usually bottom-left) on your G-Shock for three seconds until the time display starts flashing—this unlocks manual time adjustment on most models. Navigate between hours, minutes, and date using the mode button, then use the forward/reverse buttons to change values. If you own a radio-controlled G-Shock with Multi-Band 6 technology,… Read more: How to Adjust Time on Your G-Shock Solar Watch (Without Breaking It)
Picture this: you’ve just installed your third solar panel on the roof, wires dangling everywhere, and suddenly you realize your two-panel string needs to connect with your new addition. You need a solar branch connector, but you’re staring at product listings wondering if you’re about to make an expensive mistake. Solar branch connectors are the… Read more: Why Your Solar Array Needs Branch Connectors (And How to Install Them Right)


")
")
")
")
")
")
")
")
")
")
")
")