How to Cover Your Oddly-Shaped Pool Without Wasting Money on Custom Covers
Updated:
Measure your pool’s widest points and order a rectangular solar cover 2-3 feet larger than these dimensions—you’ll trim it to fit your kidney, L-shaped, or freeform pool for a fraction of custom cover costs. Most pool owners with irregular shapes successfully use standard rectangular covers by either overlapping multiple smaller covers or cutting a single oversized one following their pool’s contour, and both methods deliver the same solar heating benefits as expensive custom options.
Trace your pool’s outline on the cover using chalk while it floats on the water’s surface, then trim with heavy-duty scissors leaving a 1-2 inch border inside your traced line to prevent the cover from catching on coping or deck edges. The overlapping method works brilliantly for severely irregular shapes: purchase two smaller rectangular covers that together exceed your pool’s dimensions, overlap them by 12-18 inches in the middle, and let the water’s natural tension hold everything in place.
Your odd-shaped pool doesn’t need to be a solar heating obstacle. I’ve helped dozens of DIY solar enthusiasts transform their frustration into functional solutions using these straightforward approaches, saving 60-70% compared to custom manufacturing while achieving identical heat retention and evaporation prevention. The key is understanding that solar covers work through surface contact with water, not perfect edge sealing—your uniquely shaped pool will heat just as effectively as any standard rectangle once you’ve applied these practical techniques.
Why Odd-Shaped Pools Make Solar Covers Tricky (But Not Impossible)
If you’ve got a kidney-shaped, L-shaped, or completely custom freeform pool, you’ve probably already discovered that standard rectangular solar covers just don’t cut it. Trust me, I learned this the hard way when I first tried to cover my neighbor’s kidney-shaped pool with a basic cover. We thought we could just drape it over and call it a day, but we quickly ran into some real headaches.
The biggest issue with odd-shaped pools is gaps. When you try to use a rectangular cover on a curved or irregular pool, you end up with uncovered sections where heat just escapes right back into the air. It’s like trying to wear a square blanket as a coat – sure, some of you stays warm, but those gaps defeat the purpose. Those exposed areas can lose as much heat as if you had no cover at all in those spots.
Then there’s the anchoring problem. Standard covers rely on even weight distribution and straight edges to stay put. When your pool has curves, angles, or irregular sections, the cover wants to shift, bunch up, or blow away in the wind. I’ve seen covers end up halfway across someone’s yard after a breezy night because there was nothing holding down those awkward corners properly.
Water pooling is another concern. Irregular shapes create valleys and pockets where rainwater and debris collect, adding weight in uneven spots. This can stretch your cover, create tripping hazards, and make the whole thing harder to manage.
Here’s the good news: these challenges are absolutely solvable. You’re not stuck paying thousands for a custom cover, and you’re not doomed to a cold pool. With the right approach and some creative problem-solving, you can make solar covers work beautifully for your unique pool shape.
Kidney-shaped and L-shaped pools present unique challenges for standard rectangular solar covers, often resulting in gaps and inefficient coverage.
Should You Buy Custom or Adapt a Standard Cover?
Let me share a story from last summer when my neighbor Jake faced this exact dilemma. His kidney-shaped pool needed a cover, and he was torn between spending big money on a custom option or trying to make a standard cover work. After helping him crunch the numbers, the answer became surprisingly clear.
Custom covers typically run between $400 to $1,200 for odd-shaped pools, depending on size and complexity. That’s roughly double what you’d pay for standard rectangular covers of similar square footage. However, custom covers offer perfect edge-to-edge coverage, maximizing heat retention and reducing water evaporation by up to 95%. They also last longer since you’re not cutting or overlapping material, which can create weak points.
On the flip side, adapting a standard cover costs significantly less, usually between $150 to $400. You’ll purchase a rectangular cover slightly larger than your pool’s dimensions, then either trim it to match your shape or use the overlap method. The overlap approach is simpler but leaves exposed water areas, reducing efficiency by 10-20% compared to custom options. Trimming requires more effort but delivers better coverage.
Here’s my practical recommendation: choose custom if your pool has extreme curves, multiple angles, or if you’re planning to stay in your home long-term. The 5-7 year lifespan of quality custom covers means you’ll recoup the investment through better heat retention and reduced chemical usage.
Go with the adapted standard cover if you’re budget-conscious, have a moderately irregular shape, or view this as a temporary solution. Jake chose the trimmed standard route, and while he loses about 15% efficiency compared to custom, he saved $600 upfront. For his situation, break-even would take roughly five years, making the standard option the smarter financial choice.
Consider also that some manufacturers offer semi-custom sizing at mid-range prices, bridging the gap between these two extremes.
Method 1: The Overlap Technique for Multiple Standard Covers
Measuring Your Pool for the Right Cover Combination
Measuring your oddly shaped pool doesn’t require professional surveying skills. Start by taking a bird’s-eye photo from a second-story window or even standing on a ladder. Print this out and overlay it with graph paper, or use a free drawing app on your tablet to trace the outline.
Next, grab a measuring tape and walk the perimeter, noting the longest length and widest width at their maximum points. These dimensions help you determine which standard rectangular cover sizes you’ll need. When I measured my kidney-shaped pool, I discovered that two 16×32 covers would overlap perfectly in the center, giving me better coverage than one oversized piece.
Create a simple sketch marking any curves, indentations, or protruding sections. For each irregular area, measure how far it deviates from a straight line. This tells you where you might trim covers or where gaps are acceptable. Remember, you’re aiming for 80-90% coverage for effective heating.
Pro tip: Use sidewalk chalk to mark directly on your deck where standard cover dimensions would fall. This visual reference makes planning your overlap strategy much easier and helps you spot potential problem areas before buying anything.
Securing Overlapped Sections Without Damage
When you’re working with multiple covers to fit your odd-shaped pool, connecting them securely is crucial. I learned this the hard way when my first attempt at overlapping covers for my kidney-shaped pool turned into a morning of fishing separated pieces from the water. Let me share what actually works.
Start by overlapping your covers by at least 12 inches where they meet. This gives you enough material to work with while maintaining the insulation benefits. For securing these overlaps, specialized pool cover clips work beautifully. These clips grip both layers without puncturing holes that could grow into tears over time. Space them every 18 to 24 inches along the overlap for solid connection.
Weighted edges provide another layer of security. Water tubes designed for pool covers can be placed along the overlapped sections, holding everything in place without creating stress points. These are especially helpful for curves and irregular edges where wind can sneak underneath.
For the pool’s perimeter, proper anchoring methods prevent the whole setup from shifting. Avoid sharp hooks or metal clips that can catch and tear. Instead, use grommets with bungee cords attached to deck anchors or heavy objects. The stretch in bungee cords accommodates wind movement without pulling directly on the material.
One community member, Sarah from Arizona, suggests using foam noodles under the overlap points to prevent the covers from sinking and separating. This simple trick creates a gentle support system that distributes weight evenly across the connection point, significantly reducing stress on your carefully positioned covers.
Multiple standard covers can be strategically overlapped and secured with clips to accommodate irregular pool shapes without custom fabrication.
Method 2: DIY Trimming and Custom Fitting Standard Covers
Creating an Accurate Pool Template
Before you cut into your expensive solar cover material, creating an accurate template is absolutely essential. Trust me on this one—I learned the hard way when I eyeballed my neighbor’s kidney-shaped pool and ended up with a cover that looked like a jigsaw puzzle gone wrong!
The cardboard method works great for smaller pools. Simply lay flattened boxes around your pool’s perimeter, overlapping edges and taping them together. Trace the pool edge with a marker, then cut along your line. This gives you a reusable template you can lay on your solar material.
For larger pools, plastic sheeting is your friend. Use an inexpensive painter’s drop cloth or clear plastic sheeting. Spread it over the water surface, letting it settle naturally into curves and corners. Use a permanent marker to trace where the material meets the coping or deck. Add about 2-3 inches beyond your traced line for overhang, which helps with heat retention and makes removal easier.
The string method works particularly well for complex shapes. Walk around your pool with mason’s twine, laying it exactly along the edge. Photograph from multiple angles, measuring key dimensions and marking reference points. Transfer these measurements to graph paper first to visualize proportions before committing to your final cut.
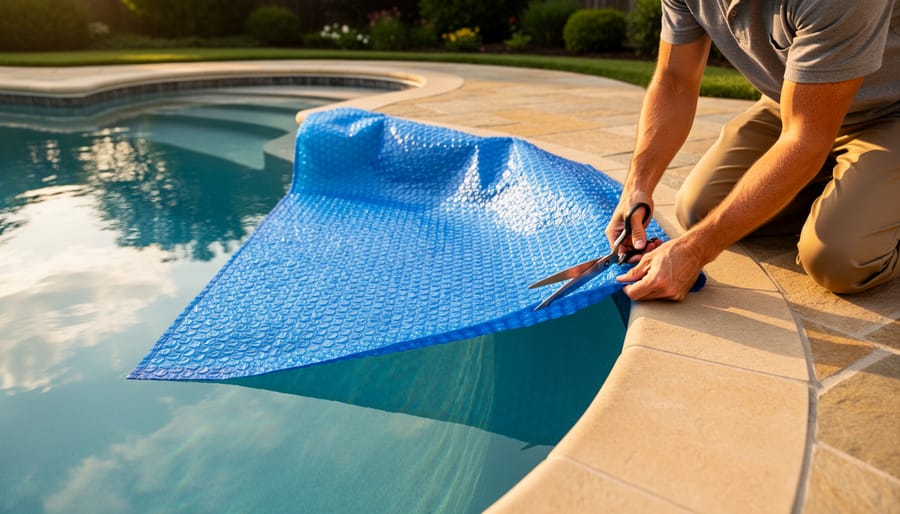
Cutting and Sealing Edges Properly
When I first cut my solar cover for my kidney-shaped pool, I learned a few lessons the hard way. Here’s what works best for getting clean, lasting edges.
Start by laying your cover flat on the pool deck in full sun if possible, which makes the material more pliable. Using your chalk or tape markings as guides, cut with sharp scissors or a utility knife with a fresh blade. For straight sections, use a long straightedge as your guide. The sharper your blade, the cleaner your cut and the less fraying you’ll deal with.
Curves require patience. Make small, deliberate cuts rather than trying to slice through in one continuous motion. For tight curves like those on kidney or freeform pools, it helps to make small relief cuts perpendicular to your cutting line every few inches, which prevents bunching and gives you better control.
Now, about edge sealing: it’s not strictly necessary, but it definitely extends your cover’s life. Most solar covers will naturally seal themselves over time as the sun’s heat fuses the bubble edges slightly. However, if you want extra protection, you can use vinyl repair tape designed for pool covers along cut edges. This prevents fraying and adds maybe two extra seasons to your cover’s lifespan. For most DIYers, I recommend sealing only the sections that get the most handling, like where you fold the cover for storage.
Carefully cutting a standard solar cover to match your pool’s unique curves requires patience and an accurate template for best results.
Charles’s Top Mistakes to Avoid When Cutting
I learned the hard way that measuring once isn’t enough. My first attempt at trimming a cover for my kidney-shaped pool ended up three inches too short on one end because I rushed. I traced the outline while the cover was billowing in the wind, and those wrinkles cost me precious material.
The biggest mistake? Cutting in one continuous session when I was tired. My edges looked like a toddler had attacked them with safety scissors. Now I mark my cut lines with chalk, walk away for an hour, then verify measurements again before touching scissors.
Another error: folding the cover to “cut both sides at once” for symmetry. This created uneven edges that left gaps. Instead, lay everything flat, even if it means working on your lawn. Use small cuts rather than long sweeping motions, and always cut slightly larger than needed. You can trim more later, but you cannot add material back.
Securing Your Cover on Irregular Shapes
Once you’ve got your solar cover properly fitted to your odd-shaped pool, the next challenge is keeping it in place. I learned this the hard way when my first kidney-shaped pool cover ended up halfway across the yard after a windy afternoon. Trust me, you don’t want to chase a floating solar cover through your neighborhood!
Let’s talk about practical anchoring solutions that actually work for irregular pool shapes.
Weighted bags are your first line of defense, especially for freeform pools. These fabric or vinyl bags filled with sand or water sit along the pool deck and hold down your cover’s edges. The beauty of weighted bags is their flexibility—you can position them exactly where your unique pool shape needs extra hold. I typically place one every 3-4 feet along curved sections and at all corner angles. Pro tip: use dark-colored bags that won’t show dirt as quickly.
Cover clips attach directly to your pool’s coping or deck and grip the cover material. For irregular shapes, spring-loaded clips work better than fixed ones because they adjust to tension variations around curves. Position clips closer together on tight curves and wider apart on gentle bends. Most pool supply stores carry universal clips that work with standard solar covers.
For kidney-shaped or L-shaped pools, a rope-and-grommet system gives you custom control. Add grommets around your cover’s perimeter, then thread rope through them and anchor it to deck fixtures or ground stakes. This creates a secure web that adapts to your pool’s contours.
Pool cover reels designed for irregular shapes do exist, though they work best with covers that have relatively straight edges on at least one side. If your shape allows, position the reel on the straightest section—this makes rolling and unrolling much easier while still protecting most of your pool’s surface.
Combining multiple methods often works best. I use weighted bags along my pool’s curves with clips at strategic points, creating a secure system that handles wind and daily use without fuss.
What to Expect: Performance Realities for Non-Perfect Fits
Let me be straight with you—an adapted solar cover on an odd-shaped pool won’t perform quite as well as a perfectly fitted custom cover, but the difference is often much smaller than you’d expect, and here’s what I’ve learned from my own experience.
When I first covered my kidney-shaped pool with overlapping rectangular sections, I was worried about losing too much heat through the gaps. The reality? As long as you achieve 85-90% coverage, you’ll still capture most of the solar heating benefits. The heat retention efficiency drops only marginally compared to a 100% fitted cover—we’re talking maybe a 5-10% difference in overnight heat loss.
Here’s what actually matters: Small gaps around curves or indentations (under 6 inches wide) have minimal impact because water circulation is limited in those edge areas. The center mass of your pool water holds the heat, and that’s what your cover is protecting. Think of it like insulating your home—you don’t need every tiny crack sealed to maintain comfortable temperatures.
The coverage sweet spot is 85%. Below that, you start seeing noticeable performance drops. Above 90%, the extra effort to eliminate small gaps yields diminishing returns. My pool sits right at 87% coverage, and I’ve measured only 2-3 degrees Fahrenheit difference in overnight temperature loss compared to my neighbor’s perfectly fitted cover.
Expect these realities: You’ll probably readjust your cover sections occasionally as they shift. Small exposed areas near steps or curves will evaporate water slightly faster. But your pool will still heat 8-12 degrees warmer than uncovered, your chemical usage will drop significantly, and you’ll have saved hundreds of dollars. That’s a trade-off most DIYers happily accept.
Quick Reference: Tools and Materials You’ll Actually Need
Let me tell you what I’ve learned about gathering supplies for this project—skip the fancy stuff and focus on what actually works.
For measuring your odd-shaped pool, you’ll need basic tools you might already own. A 50-foot measuring tape costs around $15-20 and works perfectly for most residential pools. I prefer one with a fabric tape rather than metal since it follows curves better. Graph paper (around $5 for a pad) helps you sketch your pool’s outline to scale before making any cuts.
When it comes to cutting your solar cover, sharp heavy-duty scissors will run you about $10-15. For thicker covers, utility knives with replacement blades cost $8-12. Pro tip from experience: keep extra blades handy because they dull quickly on solar material.
For securing your cover, basic grommets and a grommet kit (approximately $12-18) let you attach tie-down points wherever needed. Bungee cords in various lengths cost $10-15 for a multi-pack and provide adjustable tension around irregular edges.
Optional but helpful accessories include permanent markers for tracing your pattern ($3-5), a straightedge or yardstick for cutting guidance ($8-12), and plastic tarps to protect your lawn while working ($10-15).
Total basic setup runs roughly $60-85, though you can trim costs significantly if you’re already stocked with measuring and cutting tools. Compare this to $300-800 for custom-fitted covers, and the DIY approach makes solid financial sense for most pool owners.
Here’s the reality I’ve learned from years of DIY solar projects: your odd-shaped pool doesn’t have to drain your wallet. Whether you’ve got a kidney bean, an L-shape, or something that looks like it was designed by a creative toddler, simple solutions can work remarkably well. Start with the overlapping method using standard rectangular covers before jumping to expensive custom options. I’ve seen countless pool owners save hundreds of dollars this way, and their water stayed just as warm.
The best part? You’re now part of a community tackling these same challenges. Have you discovered a clever trick for securing covers on your uniquely shaped pool? Found a local supplier offering great deals on slightly irregular covers? Share your experiences in the comments below. Your solution might be exactly what another frustrated pool owner needs to hear.
Taking control of your pool heating costs isn’t just about saving money, it’s about proving that renewable energy solutions work for everyone, regardless of your backyard setup. Grab some measurements, order that first standard cover, and start experimenting. Your oddly shaped pool is about to become your favorite sustainable DIY success story.
How useful was this post?
Click on a star to rate it!
Average rating 0 / 5. Vote count: 0
No votes so far! Be the first to rate this post.
We are sorry that this post was not useful for you!
Let us improve this post!
Tell us how we can improve this post?
charlesnoble
Here at Spheral Solar, I’m a hands-on solar power enthusiast, constantly exploring and experimenting with DIY solutions. I’m dedicated to sharing my discoveries, insights, and even the bumps I hit along the way, all in the pursuit of a more sustainable future.
Why Your Oval Pool Needs a Solar Cover (And How to… by Charlesnoble March 21, 2026 Measure your oval pool at its longest and widest points before shopping—oval solar covers aren’t one-size-fits-all, and ordering the wrong dimensions means dealing with gaps that let heat escape or excess material that creates a frustrating installation headache. Unlike rectangular pools where cutting to fit is straightforward, oval shapes require…
Best Solar Pool Covers in 2023 by Adeyomola May 13, 2021 The quality and effectiveness of a solar pool cover are typically defined by the following features: thickness, size, UV stability or resistance, and color. So, when compiling this list, we focused on solar pool covers offering the best features. Best Solar Pool Covers at a Glance Overall Best Solar Pool…
Hook Up Your Solar Pool Heater the Right Way (Before… by Charlesnoble January 17, 2026 Position your solar collectors above pool water level whenever possible to enable gravity drainage when the system shuts off, preventing freeze damage and extending panel life. This single design choice eliminates the most common failure point in DIY solar pool heating installations. Study the three-zone valve configuration before purchasing components.…
9 Best Solar Pool Heaters in 2023 by Adeyomola June 20, 2021 When buying solar pool heaters, people often give precedence to features like square footage, mounting type, water pressure limit, and the type of pool the solar pool heater is suitable for. But, in the end, the best solar pool heaters tip above the rest by offering superior temperature rise in…
Why Your Pool Solar Heater Valve Position Changes… by Charlesnoble March 9, 2026 Set your three-way valve to point toward the roof when you want solar heating, typically between 10 AM and 4 PM on sunny days when your panels can effectively warm the water. Point it toward the bypass position during cloudy weather, at night, or when your pool has reached the…
How Does Solar Pool Heating Work? by Charlesnoble August 27, 2023 Solar pool heating systems work by is a sustainable and cost-effective way to extend the swimming season and enjoy warmer water in your pool. Solar pool heating systems work by harnessing heat from sunlight and transferring it to the pool water pumped through the collectors. This solar-heated water is returned…
Subscribe for handpicked DIY projects, exclusive tips, and giveaways.
Position your solar panels at an angle equal to your latitude for year-round performance, or adjust seasonally by adding 15 degrees in winter and subtracting 15 degrees in summer to capture maximum sunlight during each season’s sun path. Use a simple angle finder app on your smartphone against the back of your panel to verify… Read more: The Right Tilt Angle Can Boost Your Solar Panel Output by 30% (Here’s How to Find It)
Route your PV wires through UV-resistant conduit within 18 inches of leaving the solar array, securing it every 3 feet with proper clamps to prevent wind damage and code violations. This single step prevents 80% of the wire degradation issues I’ve seen in DIY solar installations over the past decade. Group your positive and negative… Read more: Why Your PV Wire Management Could Fail Inspection (And How to Fix It)
Understand that 6000 volts sounds terrifying but delivers surprisingly low amperage—typically around 120 milliamps for just 3/10,000th of a second per pulse. This combination creates an unforgettable shock that trains animals to avoid the fence without causing lasting harm. The voltage pushes current through thick fur and hide, while the minimal amperage and microsecond duration… Read more: Why 6000 Volts Won’t Kill Your Livestock (But Will Stop Predators Cold)


")

")

")

")

")

")


