Size Your Off-Grid Solar Inverter Right the First Time (Before You Waste Money)
Updated:
Calculate your total daily energy consumption by listing every device you’ll power, multiplying each device’s wattage by hours of daily use, then adding 20% for system losses. This single number becomes your foundation—underestimate it, and you’ll face frustrating power shortages; overestimate significantly, and you’ll waste thousands on oversized equipment.
Identify your highest power draw moment by determining which appliances might run simultaneously. Your inverter must handle this peak load, not just your daily average. A household running a well pump, refrigerator, and microwave at once needs an inverter rated for their combined wattage plus 25-30% surge capacity, even if this scenario only happens twice daily.
Choose between pure sine wave and modified sine wave inverters based on your specific devices. Pure sine wave inverters cost more but protect sensitive electronics like laptops, medical equipment, and modern appliances with digital controls. Modified sine wave inverters work fine for simple resistive loads like incandescent lights and basic power tools, potentially saving you 40-50% on inverter costs if your needs are straightforward.
Size your battery bank to store 2-3 days of energy consumption for reliable backup during cloudy weather. Multiply your daily watt-hours by your desired autonomy days, then divide by your battery voltage and maximum safe discharge depth (typically 50% for lead-acid, 80% for lithium). This calculation prevents the common mistake of pairing an adequately sized inverter with an undersized battery bank that depletes within hours.
When I started designing off-grid systems fifteen years ago, I learned these principles through expensive trial and error—burning through an undersized inverter during my first winter because I forgot to account for my space heater’s startup surge. You don’t need to repeat those mistakes.
What Makes Off-Grid Inverters Different (And Why It Matters)
Here’s the thing about off-grid inverters that catches a lot of folks by surprise: they’re fundamentally different animals compared to their grid-connected cousins. When I first started designing off-grid systems, I made the rookie mistake of thinking an inverter was just an inverter. Boy, was I wrong.
Grid-tied inverters have it easy, honestly. They’re like musicians playing alongside a full orchestra—the electrical grid is always there as backup, handling the heavy notes and smoothing out any rough patches. If your solar panels aren’t producing enough power at any given moment, the grid instantly fills the gap. Grid-tied systems never have to worry about starting your air conditioner or handling that surge when your well pump kicks on.
Off-grid inverters, on the other hand, are solo performers. They handle everything without a safety net. Every single watt of power your home needs has to come from your battery bank through that inverter. No backup grid to catch you when demand spikes. No utility company to lean on when your coffee maker, toaster, and microwave all fire up during breakfast.
This is why off-grid inverters need much beefier surge capacity. When your refrigerator compressor starts, it can draw three to five times its running wattage for a few seconds. Your off-grid inverter has to handle that surge entirely on its own, pulling from your batteries to deliver that momentary burst of power.
Think of it this way: a grid-tied inverter is like a translator, simply converting your solar DC power to AC and feeding it into an existing system. An off-grid inverter is more like a power plant manager—it’s creating your entire electrical supply from scratch, managing battery charging, handling varying loads, and keeping your voltage stable through every fluctuation.
This is exactly why sizing matters so much more than just matching wattage numbers. You’re not just powering continuous loads; you’re building a system that can handle real-world power demands without the grid’s cushion. Getting this right from the start means the difference between a system that works flawlessly and one that trips offline every time you start a power tool.
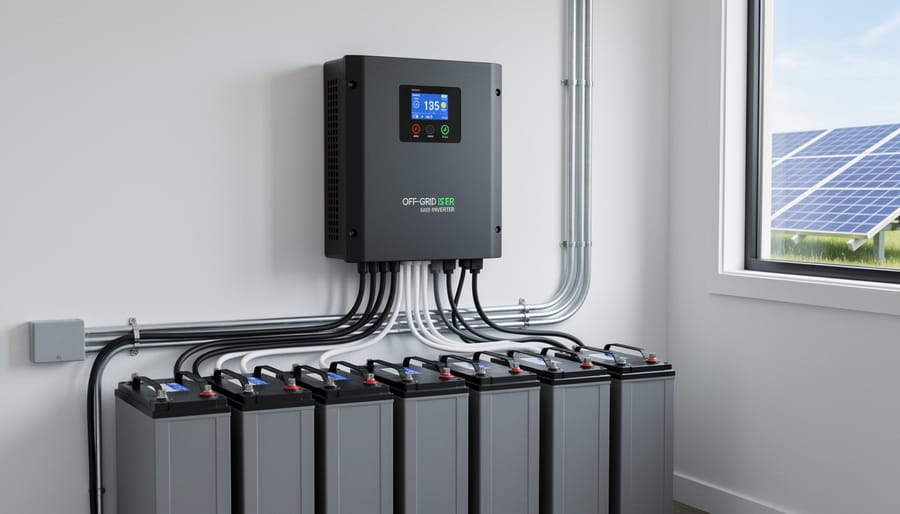
A properly sized off-grid inverter serves as the heart of your solar power system, converting DC battery power to usable AC electricity.
Understanding Your Power Needs: The Foundation of Inverter Sizing
Calculating Continuous Power Load
Understanding your power needs is the foundation of any successful off-grid solar system, and honestly, this is where I see most DIYers get tripped up. When I first designed my cabin’s solar setup, I quickly learned that guessing your energy consumption leads to either an oversized (expensive!) system or constant power shortages. Let’s walk through this together.
Start by making a complete list of every device you plan to run off-grid. Grab a notebook and walk through your space, room by room. Don’t forget the little things like phone chargers, Wi-Fi routers, and that coffee maker you absolutely need each morning.
Next, find the wattage rating for each appliance. This information is usually on a label stuck to the back or bottom of the device. If you see “amps” instead of watts, no worries. Just multiply amps by voltage (typically 120V in North America) to get watts. For example, a device pulling 2 amps at 120V uses 240 watts.
Here’s a simple example to illustrate daily energy calculation:
LED bulbs (4 x 10W): 40W x 5 hours = 200 watt-hours
Refrigerator (150W): 150W x 24 hours x 0.33 duty cycle = 1,200 watt-hours
Laptop (65W): 65W x 6 hours = 390 watt-hours
Water pump (400W): 400W x 0.5 hours = 200 watt-hours
Daily total: 1,990 watt-hours or roughly 2 kilowatt-hours (kWh)
Be realistic about usage hours. That laptop might be plugged in for eight hours, but it’s not constantly drawing full power. Refrigerators cycle on and off, typically running about one-third of the time.
Add a 20-25% safety margin to your final calculation to account for inefficiencies and unexpected usage. This cushion has saved me countless times when friends visit or weather changes my routine.
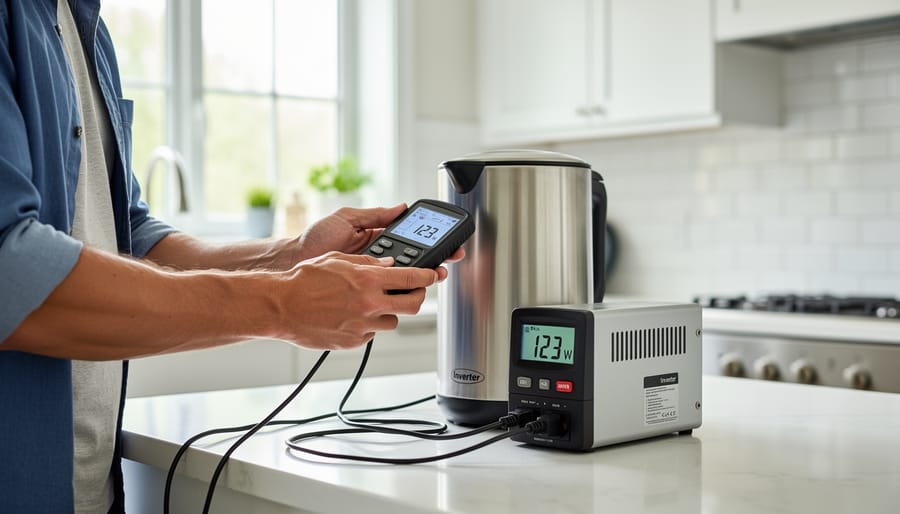
Measuring the actual power consumption of your appliances is the critical first step in sizing your inverter correctly.
The Surge Power Trap (Don’t Get Caught)
Here’s something most folks don’t realize until it’s too late: that 500-watt well pump doesn’t actually draw 500 watts when it kicks on. For a split second, it might pull 2,500 watts or more. This is what we call surge power, and ignoring it is one of the fastest ways to blow your off-grid dreams (and possibly your inverter).
Charles learned this the hard way during his first off-grid setup. “I had everything calculated perfectly,” he recalls. “My inverter was rated for my continuous loads with room to spare. Then one morning, I heard this awful grinding sound from the equipment shed. The well pump tried to start, the inverter shut down to protect itself, and there I was with no running water. I’d completely forgotten about startup surge.”
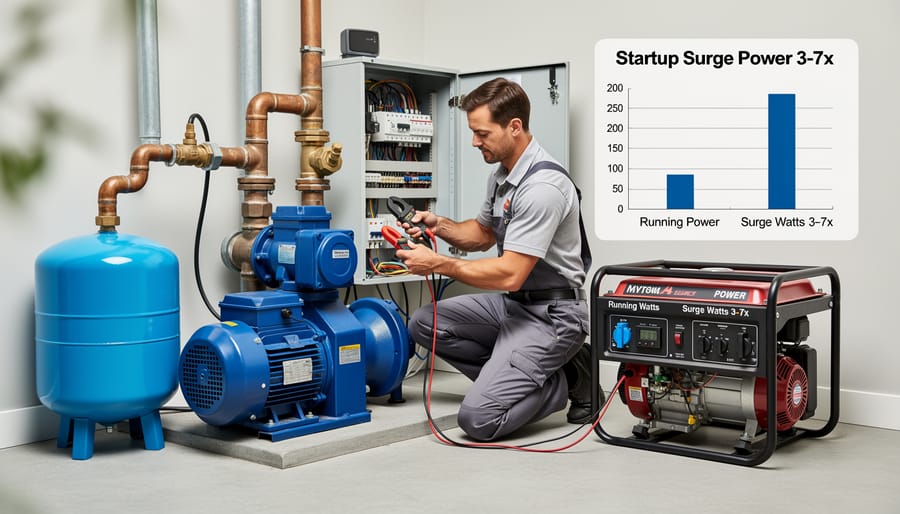
Motors, pumps, compressors, and anything with an electric motor needs a massive jolt of power to overcome inertia and get moving. Think of it like pushing a stalled car. Getting it rolling takes way more effort than keeping it rolling. Once these devices are running, they settle into their normal wattage, but that initial startup can demand three to seven times the continuous rating.
Your inverter needs to handle these brief power spikes without shutting down. When you’re sizing your system, check your inverter’s surge rating, sometimes called peak power. A 3,000-watt continuous inverter might handle 6,000 or even 9,000 watts of surge for a few seconds.
Look at the nameplate on your motor-driven appliances. They usually list both running watts and starting watts. If starting watts aren’t listed, multiply the running watts by five as a safe estimate for most motors. Well pumps, air conditioners, and refrigerators are the usual culprits.
Don’t let surge power catch you off guard. Factor it into your inverter selection from day one, and you’ll save yourself from some seriously frustrating mornings.
Motor-driven appliances like well pumps require surge power capacity 3-7 times their running wattage during startup.
Key Inverter Specifications You Actually Need to Know
Continuous Power Rating vs. Peak Power
When I first started shopping for inverters, I kept seeing two power numbers on spec sheets and honestly felt confused about which one actually mattered. Let me break this down in a way that finally made sense to me.
Continuous power rating is the amount of power your inverter can deliver steadily, hour after hour, day after day. Think of it as your inverter’s marathon capability. If your calculated load shows you need 2,000 watts running continuously during peak usage, your inverter needs at least that continuous rating to handle it without overheating or shutting down.
Peak power rating, sometimes called surge power, is what your inverter can handle for short bursts, typically just a few seconds. This matters because many appliances draw much more power when starting up than during normal operation. Your refrigerator compressor might run on 150 watts but need 600 watts for those first few seconds when it kicks on. Power tools, well pumps, and air conditioners are notorious surge hogs.
Here’s the crucial part: you need headroom above your calculated needs. I learned this the hard way when my perfectly calculated system kept tripping because I didn’t account for real-world variables. Aim for at least 20-25% extra continuous capacity beyond your calculated load. This buffer handles unexpected simultaneous usage, accounts for efficiency losses, and gives your inverter breathing room to operate without constant stress.
That extra margin isn’t wasted capacity, it’s insurance that keeps your system running smoothly when life doesn’t follow your spreadsheet perfectly.
Pure Sine Wave vs. Modified Sine Wave
Your inverter produces AC power from your batteries, but not all AC power is created equal. The pure sine wave vs modified debate boils down to how closely the inverter mimics the smooth, consistent power from the grid.
Pure sine wave inverters create a smooth, rolling wave of electricity—exactly what comes from your utility company. Modified sine wave inverters produce a choppy, stair-step approximation that works fine for simple devices but causes problems with sensitive electronics.
Here’s what won’t work properly with modified sine wave: medical equipment like CPAP machines, variable-speed power tools, microwave ovens (they’ll run louder and less efficiently), laser printers, audio equipment, and some laptop chargers. I learned this the hard way when my friend’s modified sine wave inverter made his coffee grinder sound like an angry wasp and eventually burned out the motor.
Many modern appliances with digital displays, timers, or sensitive circuits simply perform better with pure sine wave power. Yes, quality pure sine wave inverters cost 20-30% more upfront, but they protect your investments and provide peace of mind. For off-grid living, where you depend entirely on your system, pure sine wave is absolutely worth the extra cost.
Efficiency Ratings and Why They Drain Your Battery
Here’s something I learned the hard way during my first off-grid setup: inverter efficiency isn’t just a spec sheet number—it’s literally money leaving your battery bank every single day.
Let’s break down the math in a way that really hits home. Say you’re running a 1000-watt load for one hour. With an 85% efficient inverter, you’re actually pulling about 1,176 watt-hours from your batteries (1000 divided by 0.85). Compare that to a 95% efficient inverter, which only draws 1,053 watt-hours for the same job. That’s a 123 watt-hour difference every single hour.
Over a typical day with moderate use, that seemingly small gap adds up fast. If you’re running 5,000 watt-hours of loads daily, the less efficient inverter wastes an extra 615 watt-hours—that’s like running a modern refrigerator for free but choosing not to.
This ripple effect means you’ll need a larger battery bank to cover those losses and more solar panels to recharge them. A 10% efficiency difference can easily translate to needing 15-20% more batteries and panels. When you’re spending thousands on your system, choosing a quality high-efficiency inverter suddenly becomes the smartest money you’ll spend.
The Step-by-Step Sizing Process
Alright, let’s walk through the actual sizing process together! I remember when I first attempted this for my friend’s small hunting cabin—I was intimidated by all the numbers and formulas. But once I broke it down step-by-step, it became surprisingly straightforward. Let me guide you through the same process.
Step 1: Calculate Your Daily Energy Consumption
Start by listing every device you’ll run off-grid. Grab a notebook and write down each appliance’s wattage (usually found on a label or in the manual) and how many hours per day you’ll use it.
For our example, let’s size a system for a small RV setup. Here’s what our fictional user needs:
Remember that no system is 100 percent efficient. Between inverter losses, battery charging inefficiency, and wiring resistance, you’ll typically lose about 20-25 percent of your power. I learned this the hard way during my first installation when everything seemed undersized!
Take your daily consumption and multiply by 1.25:
1,820 Wh × 1.25 = 2,275 Wh per day
Step 3: Determine Your Battery Bank Size
Decide how many days of autonomy you need—basically, how long you want to run without sunlight. For most weekend setups, 2-3 days works well. Our RV owner chooses 2 days.
2,275 Wh × 2 days = 4,550 Wh
Now factor in your battery’s depth of discharge. For lithium batteries, you can safely use 80-90 percent of capacity. For lead-acid, stick to 50 percent to extend battery life.
Using lithium at 80 percent depth of discharge:
4,550 Wh ÷ 0.80 = 5,688 Wh needed battery capacity
For a 12V system: 5,688 Wh ÷ 12V = 474 Ah
So our RV needs approximately a 12V, 500Ah lithium battery bank (rounding up for safety).
Step 4: Size Your Solar Array
Calculate how much solar capacity you need to recharge those batteries. This depends heavily on your location’s sun-hours. Let’s assume our RV travels through areas with an average of 5 peak sun-hours daily.
Daily energy needed: 2,275 Wh
Available sun-hours: 5 hours
2,275 Wh ÷ 5 hours = 455W solar array minimum
I always recommend adding 20-30 percent extra to account for cloudy days, panel degradation, and less-than-optimal mounting angles. So aim for about 600W of solar panels—perhaps three 200W panels.
Step 5: Select Your Inverter Size
This is crucial! Look back at your appliance list and identify which devices might run simultaneously. In our RV example, the fridge runs constantly, so we need to account for that plus whatever else might be on.
Now add that surge factor we discussed earlier. The water pump and refrigerator compressor both have startup surges. A safe inverter size would be 1,000W continuous with 2,000W surge capacity.
Step 6: Double-Check Everything
Before making any purchases, verify your calculations. This is where tools like the Spheral Solar calculator become incredibly helpful—they can quickly validate your math and catch potential oversights. When I’m designing systems now, I always run my hand calculations through a calculator tool as a sanity check.
Also consider future expansion. Maybe you’ll want to add more appliances later? Building in 10-20 percent extra capacity now saves money compared to upgrading everything later.
One final personal tip: start small if you’re uncertain. You can always add more solar panels or battery capacity later, but you can’t easily downsize an oversized inverter without losing money. Take it from someone who’s bought the wrong equipment more than once—measure twice, buy once!
Matching Your Inverter to Your Battery Bank and Solar Array
Here’s the thing I learned the hard way during my first solar installation: getting your inverter, batteries, and panels to play nicely together is like assembling a band where everyone needs to jam in the same key. Miss that harmony, and you’ll either blow fuses, waste energy, or end up with a system that barely runs your coffee maker.
The inverter acts as the conductor in this relationship. It needs to match your battery bank’s voltage and handle the power demands you’ll place on it, while your solar array needs to keep those batteries charged. Let me walk you through how these pieces fit together.
First, voltage matters more than most beginners realize. You’ll choose between 12V, 24V, or 48V systems, and this decision impacts everything. Think of voltage like water pressure in a pipe. For small setups powering just a few lights and phone chargers, 12V works fine. But as your power needs grow, stepping up to 24V or 48V becomes essential for efficiency.
Here’s why: higher voltage systems move the same amount of power with less current. Less current means thinner wires, fewer losses to heat, and components that don’t work as hard. I upgraded from 12V to 24V on my cabin setup, and the difference was night and day. My inverter ran cooler, my wire costs dropped, and I could power more appliances simultaneously.
Your battery bank configuration determines your system voltage. Wire batteries in series to increase voltage, in parallel to increase capacity. Your inverter must match this voltage exactly. A 24V inverter won’t work with a 12V battery bank, period.
For sizing, add up the wattage of everything you’ll run simultaneously. That’s your continuous load. Your inverter’s continuous rating should exceed this by 20-25 percent as a safety buffer. Don’t forget surge capacity for items like refrigerators and power tools that need extra juice on startup.
Your solar array completes the triangle. It needs to generate enough daily power to replenish what you use, plus account for cloudy days and charging inefficiencies. Generally, your solar array’s wattage should be 1.2 to 1.5 times your average daily consumption divided by your peak sun hours.
The sweet spot? Most off-grid homes find 48V systems offer the best balance once you’re running full-size appliances. They’re efficient, use readily available components, and scale beautifully as your needs grow.
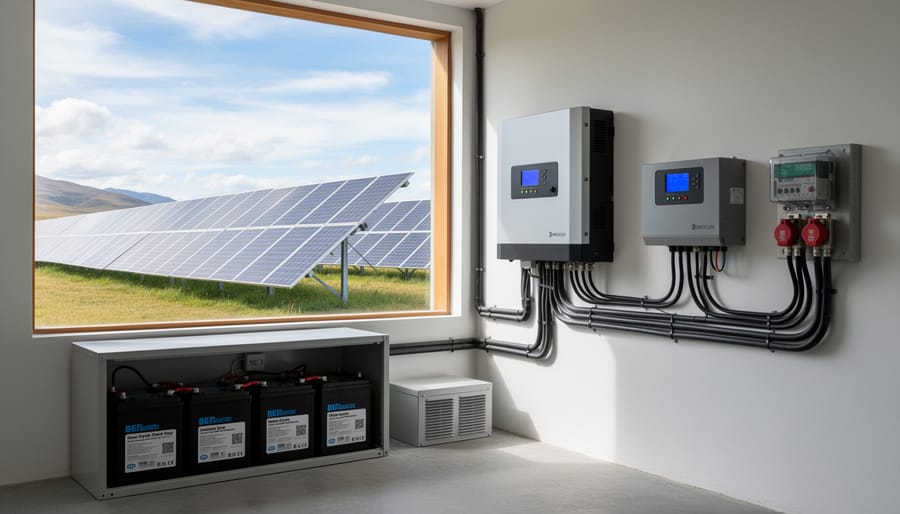
A properly matched system with correctly sized inverter, battery bank, and solar array working together ensures reliable off-grid power.
Common Sizing Mistakes That Cost DIYers Money
Over the years, I’ve seen DIYers make the same sizing mistakes again and again—and honestly, I’ve made a few of them myself when I was starting out. Let me share the most common pitfalls so you can skip the expensive lessons I learned the hard way.
The biggest mistake? Oversizing your system. I get it—bigger seems safer, right? But when you buy a 5000-watt inverter for a system that only needs 2000 watts, you’re throwing money away upfront and losing efficiency during operation. Inverters run most efficiently at 40-80% of their rated capacity. Running them way under capacity means they’re constantly drawing more power than necessary just to stay on. I once helped a neighbor who’d bought an oversized inverter “just to be safe” and couldn’t figure out why his batteries drained so quickly overnight. The inverter’s idle consumption was the culprit.
On the flip side, undersizing is equally problematic and potentially dangerous. When your inverter can’t handle your actual power needs, you’ll experience frequent inverter overload issues that shut down your system at the worst possible times. Worse, repeatedly overloading an inverter shortens its lifespan dramatically and can even damage your expensive batteries.
Another mistake I see constantly is ignoring surge requirements. Remember, many appliances need 2-3 times their running wattage just to start up. Your refrigerator might run on 600 watts but need 1800 watts for those first few seconds. If you size your inverter for running watts only, you’ll be resetting it constantly when anything with a motor tries to start.
Here’s my final warning: don’t cheap out on modified sine wave inverters for sensitive electronics. I learned this one the hard way when a modified sine wave inverter fried my laptop charger and caused my LED lights to buzz annoyingly. Modern electronics, variable-speed tools, medical equipment, and anything with a microprocessor needs pure sine wave power. Yes, pure sine wave inverters cost more, but replacing damaged electronics costs even more. Trust me on this one—it’s worth the investment.
Real-World Examples: Three System Sizes
Weekend Camping Setup
Weekend camping trips are perfect for testing the waters with off-grid solar, and you don’t need a massive system to stay comfortable. A modest 300-500W inverter paired with a single 100-200W solar panel and one or two 100Ah batteries will keep your essentials running without breaking the bank or your back hauling equipment.
I remember my first camping setup—just a 400W inverter, one panel, and a marine battery. It powered LED lanterns, charged our phones and a laptop for evening entertainment, and even ran a 12V cooler to keep drinks cold. The key is understanding your actual needs versus wants. Skip the hair dryer and coffee maker for now, and focus on efficient 12V devices whenever possible since they bypass the inverter entirely.
Calculate your daily consumption by listing each device: LED lights might draw 10W for 4 hours (40Wh), phone charging uses about 10Wh per full charge, a laptop needs 50W for 3 hours (150Wh), and a small 12V fridge runs at 45W for 8 hours (360Wh). That’s roughly 560Wh daily, meaning your 200Ah battery at 12V (2,400Wh capacity) provides several days of backup.
The inverter installation process for camping setups is straightforward—mount it securely, connect directly to your battery with appropriate gauge wire, and you’re ready for adventure.
Off-Grid Cabin or Tiny Home
This is where off-grid living gets really comfortable. I remember visiting my friend Charles’s tiny home in Oregon, and I was amazed at how normal everything felt—he was running a refrigerator, charging laptops, powering LED lights, even making coffee with a small drip machine. His secret? A well-designed medium system with a 2000-3000W inverter.
For a cabin or tiny home, you’ll typically need around 2000-2500 watts of inverter capacity. This handles most modern conveniences: a standard refrigerator (around 600W startup), LED lighting throughout your space, phone and laptop chargers, a TV, fans, and even a microwave for quick meals. What you won’t be running are heavy-duty items like electric water heaters, air conditioners, or power tools—those require stepping up to larger systems.
Charles taught me a valuable lesson: calculate your actual simultaneous loads, not just what you own. Just because you have ten devices doesn’t mean they’ll all run at once. Make a realistic list of what you’d use during your peak power times, usually early morning and evening.
For battery storage, plan for 5-10 kWh to cover nighttime usage and cloudy days. Pair this with 1200-2000 watts of solar panels depending on your location’s sun hours. This balanced approach gives you genuine comfort without the sticker shock of oversizing everything.
Full Off-Grid Homestead
Now we’re talking about a serious commitment to off-grid living! I remember visiting my buddy Charles’s full homestead setup last year, and honestly, it was eye-opening to see a complete household running on solar power—from his kitchen appliances to his woodworking shop.
For a full off-grid homestead, you’re looking at a minimum 5000W inverter, though many folks go with 6000-8000W systems. This gives you the headroom to run multiple heavy loads simultaneously. Think about your well pump cycling on while you’re running the washing machine and someone fires up the table saw in the workshop. These surge demands add up fast.
Your battery bank becomes absolutely crucial here. Most successful homestead systems include 20-40kWh of storage capacity, which provides 2-3 days of autonomy during cloudy weather. This isn’t where you want to cut corners—under-sizing your battery bank means constant anxiety about power rationing.
The solar array typically ranges from 10-20kW to keep those batteries topped off, especially during winter months when production drops. Charles runs a 15kW array with a 48V, 8000W split-phase inverter, giving him both 120V and 240V capability for his larger appliances.
Budget reality check: expect $25,000-$45,000 for a complete system. Yes, it’s substantial, but you’re building energy independence that can last decades with proper maintenance.
Here’s the thing I’ve learned from years of helping folks like you design their off-grid systems: sizing your solar inverter doesn’t have to feel like solving a quantum physics equation. Sure, there are numbers involved and a few calculations to work through, but you’ve already taken the hardest step by diving into this article and educating yourself.
Think of it this way—every successful off-grid system started exactly where you are right now: with someone asking the right questions and taking the time to understand what they actually need. You’re not just buying equipment; you’re building the foundation for energy independence, and that’s something worth getting right from the start.
If your head is still spinning with load calculations and surge ratings, take a deep breath. Our interactive solar calculator tool is designed specifically to walk you through the process step by step, doing the heavy lifting on those tricky multiplications and safety margins. It’s like having a knowledgeable friend looking over your shoulder, making sure you don’t miss anything important.
And remember, you’re not alone in this journey. The solar DIY community is filled with people who’ve been exactly where you are—some who’ve made the mistakes so you don’t have to, and others who are working through their first system right alongside you. Don’t hesitate to reach out, ask questions, and share your own experiences as you go.
Starting your off-grid journey with a properly sized inverter means you’re building on solid ground. You’ll avoid the frustration of undersized equipment that can’t handle your loads or the expense of oversized components you’ll never fully utilize. Take what you’ve learned here, run those calculations, double-check your numbers, and move forward with confidence. Your energy-independent future is closer than you think.
How useful was this post?
Click on a star to rate it!
Average rating 0 / 5. Vote count: 0
No votes so far! Be the first to rate this post.
We are sorry that this post was not useful for you!
Let us improve this post!
Tell us how we can improve this post?
charlesnoble
Here at Spheral Solar, I’m a hands-on solar power enthusiast, constantly exploring and experimenting with DIY solutions. I’m dedicated to sharing my discoveries, insights, and even the bumps I hit along the way, all in the pursuit of a more sustainable future.
Why Your Home Solar System Fails During Power… by Charlesnoble March 8, 2026 Picture this: It’s 2 AM, a storm knocks out power in your neighborhood, and while your neighbors scramble for flashlights, your home stays lit, your refrigerator keeps running, and your family sleeps soundly. That’s the peace of mind a solar battery backup system delivers, and honestly, it’s one of the…
Why Your RV Inverter Keeps Failing (And How to Fix It Fast) by Charlesnoble January 11, 2026 Check your battery connections first—loose or corroded terminals account for nearly 60% of inverter issues I’ve seen in my years working with RV solar systems. Remove both positive and negative cables, clean them with a wire brush and baking soda solution, then reconnect tightly. While you’re at it, use a…
Why Most RV Solar Setups Fail (And How to Build Yours Right) by Charlesnoble December 21, 2025 Calculate your daily power consumption by listing every device you’ll run in your RV—from the refrigerator drawing 40-60 amp-hours daily to your phone charger using just 5 amp-hours—then multiply by 1.3 to account for system losses and cloudy days. This single step prevents the most common mistake I see fellow…
Why 3-Phase Solar Inverters Are Game-Changers for… by Charlesnoble January 29, 2026 Check your main electrical panel right now—if you see three thick power cables entering your home instead of two, you already have 3-phase power and might benefit from a 3-phase solar inverter. Most residential homes run on single-phase power, making 3-phase systems unnecessary for typical DIY solar setups, so understanding…
This Device Lets Your Solar System Talk to the Grid… by Charlesnoble February 2, 2026 Verify your utility’s specific anti-islanding requirements before purchasing any equipment—most power companies mandate IEEE 1547-compliant devices that automatically disconnect your solar system when the grid goes down, protecting line workers from unexpected backfeed. Contact your local utility interconnection department directly and request their technical specifications document, which lists approved devices…
Why 6-Volt RV Batteries Beat 12-Volt for Your Solar Setup by Charlesnoble November 11, 2025 Choose 6-volt golf cart batteries when building your RV solar system if you prioritize longevity and consistent deep-cycle performance over initial simplicity. Wire two 6-volt batteries in series to create 12 volts with roughly double the amp-hour capacity of comparable single 12-volt batteries, giving you more usable power before reaching…
Subscribe for handpicked DIY projects, exclusive tips, and giveaways.
Match your solar panels to microinverters or power optimizers based on your roof’s shading patterns—even partial shade from a chimney or tree during morning hours means module-level power electronics will recover 15-25% more energy than string inverters lose to the weakest panel. Install power optimizers when you’re working with mixed panel orientations across multiple roof… Read more: Why Smart Solar Modules Could Save Your DIY Array (Before It’s Too Late)
Measure your conduit run before purchasing materials by mapping the exact path from your solar array to the inverter and battery location, accounting for a 10% waste factor and additional length for bends. PVC electrical conduit remains the most cost-effective protective solution for DIY solar installations, but improper installation creates fire hazards, code violations, and… Read more: Why Your Solar Conduit Installation Could Start a Fire (And How to Do It Right)
Walk down to your nearest stream with a five-gallon bucket and a stopwatch. Fill that bucket and time how long it takes—this simple test reveals whether you have enough flowing water to power your off-grid home. If you can fill it in under 10 seconds from a source that drops at least 10 feet in… Read more: The Stream Behind Your House Could Power It (Here’s How Micro Hydro Works)

")
")
")
")
")

")
")
")
")
")


