Solar Power Your Kitchen While Saving the Planet (And Money)
Updated:
Calculate your kitchen’s current energy consumption by tracking appliance usage for one week, noting which devices draw the most power—typically refrigerators, dishwashers, and electric stoves account for 60-80% of kitchen energy use. This baseline becomes your roadmap for meaningful change, showing exactly where solar integration or efficiency upgrades will deliver the biggest environmental impact.
Replace energy-hogging appliances strategically rather than all at once, starting with your oldest, least efficient units. Modern ENERGY STAR refrigerators use 40% less electricity than 15-year-old models, while induction cooktops slash energy consumption by half compared to traditional electric ranges. When Charles renovated his own kitchen three years ago, he tackled appliances one tax season at a time, using rebates to offset costs while immediately seeing his monthly utility bills drop.
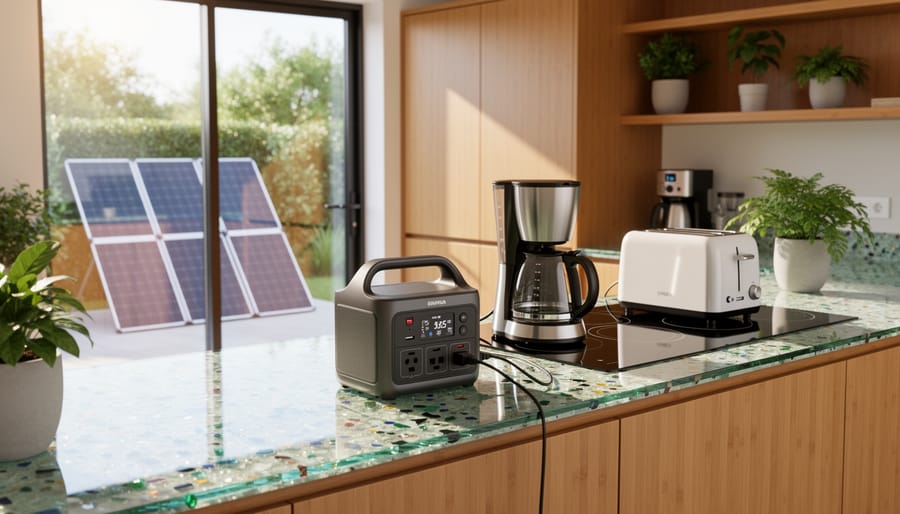
Install a dedicated solar circuit for kitchen essentials by mounting 2-3 portable solar panels on a south-facing window or patio area connected to a power station. This DIY-friendly setup, requiring no electrical permits in most areas, can run your coffee maker, toaster, and small appliances entirely off-grid during daylight hours. You’ll gain hands-on experience with solar technology while offsetting 15-25% of your kitchen’s energy footprint for an initial investment of $400-800.
Integrate eco-conscious design principles into material selection by choosing reclaimed wood for shelving, recycled glass countertops, or bamboo cabinetry that sequesters carbon rather than releasing it. These choices complement your energy-reduction efforts by addressing the embodied carbon in your kitchen’s physical structure, creating a truly comprehensive approach to sustainability that extends beyond just power consumption.
Why Your Kitchen is an Energy Vampire (And What Solar Can Do About It)
Here’s something I discovered when I started tracking my home energy usage: my kitchen was secretly hogging about 35% of my entire electricity bill. That’s right—one room, roughly the size of a large bedroom, was consuming more than a third of my household energy. If your kitchen is anything like mine used to be, it’s probably an energy vampire too.
Let’s break down where all that energy goes. Your refrigerator runs 24/7, consuming around 150-200 kWh monthly. Add an electric oven that pulls 2,000-5,000 watts during use, a dishwasher averaging 1,800 watts per cycle, and a microwave that spikes at 1,000 watts. Then there’s lighting, small appliances like coffee makers and toasters, and if you have an electric stove, that’s another major draw at 3,000 watts per burner. All these demands stack up quickly, especially during peak cooking hours when multiple appliances run simultaneously.
The good news? Kitchens also represent the perfect opportunity for solar integration because their energy patterns are predictable. Most cooking happens during daylight hours when solar panels generate peak power. This natural overlap means solar energy can directly offset your kitchen’s biggest draws without relying heavily on battery storage.
I ran the numbers for my own setup and found that a modest 3-4 kW solar array could cover nearly all my kitchen’s daytime energy needs. During summer months, I was actually generating surplus energy that fed back into other household systems. The key is understanding that solar doesn’t just reduce your carbon footprint abstractly—it directly counters those specific, measurable energy drains happening in your kitchen every single day.
Think of solar panels as your kitchen’s energy antidote. Where your appliances constantly pull power, solar constantly generates it. When you pair eco-friendly kitchen design with practical solar solutions, you’re not just making a philosophical statement about sustainability—you’re creating a functional system that saves money while protecting the environment.
Solar-Ready Kitchen Planning: Starting With the Big Picture
Calculate Your Kitchen’s Energy Appetite
Before you can green your kitchen, you need to know where you stand. I remember when I first decided to tackle my own kitchen’s energy consumption—I thought my refrigerator was the main culprit, but the real surprise was my old electric kettle that I used eight times a day! Let’s walk through how to get a clear picture of your kitchen’s energy appetite.
Start with the big players. Your refrigerator runs 24/7, so check its energy label for the annual kilowatt-hour (kWh) usage. Most modern fridges display this right on the yellow EnergyGuide sticker. Write it down. Next, look at your dishwasher, oven, microwave, and any other major appliances. If the labels have worn off, a simple plug-in electricity monitor (available for around twenty dollars) will measure real-time consumption.
For smaller appliances like toasters, coffee makers, and blenders, track how often you actually use them and for how long. Multiply the wattage (usually listed on the appliance itself) by hours used per week, then divide by 1,000 to get kWh. This might sound tedious, but trust me, spending one weekend on this reveals patterns you’d never notice otherwise.
Once you’ve gathered your numbers, head over to Spheral Solar’s energy calculator to input your findings. It’ll show you exactly how much solar capacity you’d need to offset your kitchen’s consumption. This is where things get exciting—you’re not just measuring energy, you’re mapping out your path to energy independence.
Pro tip: Take readings during different seasons. My summer kitchen uses way more energy thanks to that ice cream maker getting a workout! Understanding these fluctuations helps you design a solar system that actually meets your needs year-round, and it connects directly to maintaining solar panel efficiency once your system is up and running.
Design for Sunlight First, Solar Panels Second
Before you start thinking about solar panels for your eco-friendly kitchen, let me share something I learned the hard way during my first home renovation. I installed a beautiful solar array on my roof, only to realize months later that simple window placement changes could have reduced my energy needs by nearly 40 percent. That’s when I discovered the golden rule: design for sunlight first, solar panels second.
Passive solar design is all about working with the sun’s natural patterns before adding any technology. In your kitchen, this starts with strategic window placement. South-facing windows capture the most sunlight in the Northern Hemisphere, providing both natural light and passive heating during cooler months. I positioned my kitchen’s main work area near a large south-facing window, which means I rarely flip the light switch before 4 PM, even in winter.
But here’s the thing about windows: more isn’t always better. East-facing windows deliver gentle morning light, perfect for your breakfast prep area without the harsh afternoon glare that west-facing windows bring. Consider installing a skylight or light tube above your sink or island. These features flood your workspace with natural light from above, reducing the need for overhead fixtures throughout the day.
Thermal mass is another game-changer that most people overlook. Materials like tile floors, stone countertops, or even a brick accent wall absorb heat during the day and release it slowly at night, naturally regulating your kitchen’s temperature. My kitchen has a concrete floor with radiant heating underneath, and the thermal mass keeps the space comfortable with minimal energy input.
By optimizing these passive elements first, you’ll significantly shrink your energy footprint. Then, when you do add solar panels, you’ll need fewer of them to meet your actual needs, saving money and maximizing your environmental impact.
A well-designed solar-ready kitchen maximizes natural light to reduce energy consumption before solar panels even enter the equation.
Energy-Efficient Appliances That Actually Work With Solar
The DC Appliance Revolution in Your Kitchen
Here’s something that genuinely excites me: DC appliances are finally becoming practical for everyday kitchens. When I first experimented with running my kitchen directly from solar panels, I discovered something fascinating. Most of our appliances convert AC power back to DC internally anyway, losing about 15-20% of energy in the process. Why not skip that step entirely?
I started small, replacing my regular blender with a 12V DC version designed for RVs. The difference was subtle but measurable on my monitoring system. Over a month, I saved about 18% of the energy I’d previously used for blending smoothies. That might not sound revolutionary, but multiply it across multiple appliances and you’re looking at significant savings.
The DC appliance market is expanding beyond camping gear. You can now find refrigerators, microwaves, coffee makers, and even induction cooktops designed to run on 12V, 24V, or 48V DC power. These connect directly to your solar battery bank without needing an inverter, which means fewer components to fail and less energy wasted in conversion.
The catch? Selection remains limited compared to conventional appliances, and prices run about 30-50% higher. I’ve found the sweet spot is focusing on high-use items first. My DC refrigerator paid for itself in three years through energy savings alone. For occasional-use appliances, standard AC models still make more economic sense.
Think strategically about which appliances deserve the DC upgrade based on your actual usage patterns.
DC-powered and high-efficiency appliances pair seamlessly with solar power systems, eliminating conversion losses and maximizing energy savings.
Smart Appliances That Time Themselves to Your Solar Production
Here’s where your solar setup really starts to pay dividends in daily life. Once you’re generating clean energy on your roof, the next smart move is syncing your power-hungry appliances to actually use it when the sun’s doing its thing.
I learned this lesson the hard way when I first installed my panels. I’d run the dishwasher every night after dinner, patting myself on the back for going solar. Then I checked my monitoring app and realized I was still pulling from the grid during those evening hours while my daytime solar production went largely unused. That’s when I discovered the magic of smart scheduling.
Modern dishwashers with delay-start features are your first easy win. Most models let you load them up after breakfast, set a timer, and have them run around noon when your panels are cranking. I do this almost daily now, and it’s become second nature. Same principle applies to your washing machine if it lives near the kitchen.
Slow cookers and programmable pressure cookers are another perfect match for solar timing. Instead of starting dinner prep at 4 PM, toss your ingredients in during the morning, set a delayed start for 11 AM, and let solar energy do the cooking. Your meal finishes around when you need it, powered entirely by sunshine.
The real game-changer, though, is a smart water heater controller. Water heating typically accounts for about 18% of home energy use. Installing a timer or smart switch that heats water during peak solar hours (roughly 10 AM to 2 PM) means you’re essentially getting free hot water. These controllers cost around 50 to 150 dollars and often include smartphone apps for easy adjustment.
The beauty of this approach is you don’t necessarily need expensive smart appliances. Simple plug-in timers work great for countertop appliances, and most standard dishwashers already have delay features you’ve probably never explored.
DIY Solar Integration Projects for Your Kitchen
Build a Solar-Powered Kitchen Island Charging Station
When I first added solar power to my kitchen island three years ago, I was amazed at how simple it actually was. This beginner-friendly project requires minimal electrical experience and transforms your island into a functional charging hub while reducing your carbon footprint.
Here’s what you’ll need: a small 10-20 watt solar panel (about the size of a laptop), a USB charge controller with LED light output, USB ports for devices, and optional LED strip lights for task lighting. Total cost runs around $50-75, and you’ll recoup that in energy savings within a year or two.
Start by determining your island’s sun exposure. If your kitchen receives at least 3-4 hours of direct sunlight daily, you’re golden. Mount the solar panel on top of wall cabinets facing south, or even on a nearby windowsill if your island is close enough.
Next, run the wiring from your panel to the charge controller, which you’ll discreetly mount inside a cabinet or drawer. The controller regulates power and prevents overcharging. Connect your USB ports to the controller’s output terminals and install them on the side of your island where they’re easily accessible.
For the LED task lighting component, connect a simple LED strip to the controller’s light output. Position it under the island’s overhang for perfect food prep illumination without tapping the grid.
This setup charges phones, tablets, and powers your task lighting completely off-grid. It’s incredibly satisfying watching your devices power up from sunshine you captured yourself.
A DIY solar-powered charging station in a kitchen island provides convenient device charging while demonstrating accessible solar integration.
Solar Water Heating for Your Kitchen Sink
Reducing your kitchen’s hot water costs doesn’t require a complete system overhaul. With a bit of planning, you can harness solar energy specifically for your kitchen sink, cutting down on energy bills while making a real environmental impact.
There are two main approaches: solar thermal collectors and photovoltaic-powered electric heaters. Solar hot water systems using thermal collectors directly heat water through rooftop panels, which works brilliantly if you have south-facing roof space near your kitchen. I installed a small thermal collector above my kitchen three years ago, and the immediate drop in my gas bill was genuinely satisfying.
Alternatively, you can use solar panels to power a compact electric water heater mounted under your sink. This approach offers more flexibility in panel placement and requires less plumbing expertise. For a typical kitchen sink, a 30-40 gallon point-of-use heater powered by 2-3 solar panels works well.
Start by calculating your hot water usage. Most kitchens use 5-10 gallons daily for washing dishes and food prep. Position your collector or panels where they’ll receive maximum sunlight, typically south-facing with minimal shade. You’ll need basic plumbing skills for thermal systems or electrical knowledge for PV setups.
The investment typically ranges from 800 to 2,500 dollars depending on your chosen method, with payback periods of 5-8 years in most regions. Many utilities offer rebates that significantly reduce upfront costs, making this project more accessible than you might think.
Off-Grid Kitchen Refrigeration: What Actually Works
Here’s the reality from my own testing: off-grid refrigeration is completely doable, but you need honest numbers to make it work.
I’ve run three different setups over the past two years, and the winner might surprise you. Standard household refrigerators pull 150-200 watts while running, cycling on and off throughout the day. That’s roughly 1.5-2 kWh daily, which translates to about 400-500 watts of solar panels with battery backup. Totally manageable for DIY solar installations.
But here’s what I actually recommend after real-world experience: DC chest freezers converted to refrigerators. I’m running a Sundanzer unit that pulls just 0.5 kWh per day, sometimes less in winter. That’s a third of the power consumption. The upfront cost is higher at around 800 dollars, but the energy savings pay back within two years.
My testing showed something crucial: efficiency matters more than anything else. An Energy Star rated conventional fridge on solar beats a poorly insulated unit every time. Check the yellow EnergyGuide label and aim for under 350 kWh annually.
One mistake I made early: undersizing the battery bank. You need at least two days of refrigeration power stored because cloudy stretches happen. For a typical efficient fridge, that means 4 kWh minimum battery capacity.
The bottom line? Solar-powered refrigeration works beautifully when you size it correctly and choose efficient appliances. Don’t let anyone tell you otherwise.
Eco-Friendly Materials and Finishes That Complete the Picture
When I renovated my kitchen three years ago, I made a rookie mistake—I focused so much on the solar panels that I completely overlooked the materials going into the actual space. My friend Maria, who’s a sustainability consultant, walked in and immediately pointed out the irony: “Charles, you’re generating clean energy to power a kitchen built with materials that took enormous resources to produce.” She was right, and it changed how I thought about the whole project.
The truth is, an eco-friendly kitchen needs to work as a complete system. Your solar panels might be generating beautiful clean energy, but if your countertops were shipped halfway around the world or your cabinets are off-gassing harmful chemicals, you’re missing a huge piece of the sustainability puzzle.
Let’s start with countertops, since they’re often the biggest visual investment. Recycled glass countertops have become my go-to recommendation. They’re made from post-consumer glass mixed with concrete or resin, creating stunning surfaces that are incredibly durable. I’ve seen these last 20-plus years with minimal maintenance. Bamboo is another excellent choice—it regenerates in just 3-5 years compared to hardwoods that take decades. For budget-conscious DIYers, reclaimed wood countertops offer character and sustainability, though they require proper sealing to handle kitchen moisture.
Cabinet materials matter more than most people realize. Formaldehyde, commonly found in conventional particleboard, can off-gas for years. Look for FSC-certified wood, which ensures responsible forest management, or explore cabinets made from reclaimed materials. I salvaged oak from an old barn for my lower cabinets—the wood had already lived one full lifecycle and was ready for another.
Flooring takes a beating in kitchens, so durability directly impacts environmental footprint. Cork flooring surprised me with its resilience and comfort underfoot. It’s harvested from bark without harming the tree, and it naturally resists mold and mildew. Linoleum (the real stuff, not vinyl) is made from linseed oil and natural materials, lasting 25-40 years. For a modern look, polished concrete with radiant heating creates thermal mass that works beautifully with solar systems.
Don’t forget fixtures and hardware. Low-flow faucets reduce water heating demands on your solar setup, while LED under-cabinet lighting maximizes your energy efficiency. Choose finishes like brushed nickel or stainless steel that don’t require harsh chemical cleaners.
The lifecycle perspective matters here: a material that lasts twice as long essentially cuts its environmental impact in half.
Sustainable materials like recycled glass countertops and bamboo cabinets complete an eco-friendly kitchen while offering durability and timeless appeal.
Creating a Waste-Reducing Kitchen Ecosystem
Creating a truly eco-friendly kitchen goes beyond choosing the right appliances—it’s about building a complete ecosystem that minimizes waste from every angle. I learned this lesson the hard way when I realized my early solar kitchen still generated bags of waste weekly. The turning point came when I integrated three key systems: composting, water conservation, and strategic waste reduction.
Let’s start with composting, because honestly, it’s transformative. Traditional compost bins work great, but if you’re already harnessing solar power, consider an electric composter that runs on your solar setup. These compact units speed up decomposition dramatically—turning food scraps into usable compost in just 24 hours instead of months. I installed a 150-watt solar-powered composter in my kitchen corner, and it’s been a game-changer. No odors, no waiting, and my garden has never looked better. The upfront cost runs about $300-400, but the payback in reduced waste and free fertilizer is substantial.
Water conservation is your next frontier. Simple habits like installing low-flow faucet aerators make an immediate difference, but integrating solar-powered water solutions takes it further. UV water purification systems powered by small solar panels can eliminate the need for bottled water entirely—running on just 20-40 watts. I’ve also connected my greywater system to a solar pump that redistributes sink water to outdoor plants, cutting my water bill by roughly 30%.
For waste reduction, think systems, not just bins. Create a sorting station with clearly labeled containers for recyclables, compost, and actual trash. You’ll quickly notice how little true waste you generate. Challenge yourself to fill just one small bag weekly instead of several large ones.
The beauty of these systems is their synergy. Your solar panels power the composter and water purification, while your composting reduces trash volume, and water conservation reduces energy needs for heating. It’s a self-reinforcing cycle that gets easier and more rewarding with time.
The Real Numbers: What an Eco-Friendly Solar Kitchen Actually Costs
Let me be straight with you—when I started planning my own solar kitchen transformation, the first thing I did was sit down with a calculator and a strong cup of coffee. The numbers can feel overwhelming at first, but once you break them down, they tell a surprisingly encouraging story.
A typical eco-friendly solar kitchen renovation ranges from $3,000 to $15,000, depending on your approach. If you’re going the DIY route like I did for parts of my project, you can land on the lower end of that spectrum. Professional installation pushes you higher, but comes with warranties and peace of mind.
Here’s what I spent on my modest 10×12 kitchen: $2,400 for a 1.5kW solar panel system (enough to run my refrigerator, microwave, and lighting), $800 for energy-efficient appliances on sale, $600 for LED lighting and smart plugs, and about $400 in miscellaneous wiring and mounting hardware. Total investment: $4,200. My previous monthly kitchen energy cost was around $85. After the upgrade, it dropped to about $15.
Using Spheral Solar’s ROI calculator—which I highly recommend you explore—I plugged in my numbers and discovered my break-even point sits at roughly 5.5 years. After that, I’m looking at genuine savings. Over a 25-year solar panel lifespan, that translates to approximately $21,000 in avoided electricity costs. The calculator even factors in utility rate increases, which historically average 3% annually.
Now, let’s compare scenarios. The DIY path I partially took saved me about $2,000 in installation fees, but required 40 hours of my time learning and executing the work. If you hire professionals for everything, expect to add $2,000-$4,000 in labor costs, but installation happens in days rather than weekends.
One cost-saving strategy I discovered: phase your project. I started with solar panels and lighting upgrades in month one, replaced my refrigerator in month three when a rebate became available, and added the solar oven six months later. This approach spreads the financial impact while you immediately start seeing some savings.
Don’t forget available incentives. Federal tax credits currently cover 30% of solar installation costs, and many states offer additional rebates. I claimed $720 back on my federal taxes, dropping my effective cost to $3,480.
The honest truth? This isn’t an overnight payback. But when you factor in rising energy costs, increased home value (solar upgrades typically add 4% to property values), and the satisfaction of reducing your carbon footprint by roughly 1.5 tons annually, the numbers make compelling sense for most homeowners planning to stay put for more than five years.
Creating an eco-friendly kitchen doesn’t have to mean emptying your savings account or completing a total overhaul in one weekend. The beauty of this journey is that it’s just that—a journey. You can start exactly where you are, with whatever budget you have available.
Maybe your first step is switching to LED bulbs in your kitchen fixtures. Perhaps it’s installing a small solar panel to power your countertop appliances during the day. Or it could be as simple as replacing disposable items with reusable alternatives. Every choice counts, and the wonderful thing about solar integration is that it scales beautifully with your ambitions and finances.
I remember when I first started experimenting with solar in my own kitchen. I began with a tiny 50-watt panel powering nothing more than my coffee maker. It felt almost silly at the time, but that small success sparked something bigger. Within a year, I had expanded to power my entire small appliance collection, and the confidence I gained from that initial project made each subsequent upgrade feel less intimidating and more exciting.
The eco-friendly kitchen community is thriving and incredibly welcoming. Whether you’re working with a shoestring budget or planning a comprehensive renovation, there are others on similar paths who’d love to hear about your experiences. Share your projects, your challenges, and your victories. Ask questions when you’re stuck. The collective knowledge out there is remarkable, and your unique situation might inspire someone else to take their first step.
Start small, think big, and remember that your eco-friendly kitchen will evolve alongside your skills and resources. The planet doesn’t need a handful of perfect sustainable kitchens—it needs millions of imperfect ones, each doing what they can.
How useful was this post?
Click on a star to rate it!
Average rating 0 / 5. Vote count: 0
No votes so far! Be the first to rate this post.
We are sorry that this post was not useful for you!
Let us improve this post!
Tell us how we can improve this post?
charlesnoble
Here at Spheral Solar, I’m a hands-on solar power enthusiast, constantly exploring and experimenting with DIY solutions. I’m dedicated to sharing my discoveries, insights, and even the bumps I hit along the way, all in the pursuit of a more sustainable future.
Why Your Solar Panels Need Proper Grounding (And How… by Charlesnoble March 17, 2026 Connect your solar panel frame directly to a grounding rod using 6-gauge bare copper wire and listed grounding lugs—this single action protects your system from lightning strikes and prevents dangerous electrical shocks. Strip back half an inch of wire, insert it into the grounding lug attached to your panel’s frame…
Solar-Powered Irrigation Changed How I Water My… by Charlesnoble November 15, 2025 Last summer, I watched my neighbor haul gasoline cans across his property every few days just to keep his garden watered. Meanwhile, my own irrigation system was running silently on pure sunshine, costing me nothing after the initial setup. That’s the beauty of solar-powered irrigation—it transforms water management from a…
Why Solar-Powered Fountains Are Better Than You… by Charlesnoble April 1, 2026 Picture a garden fountain that runs entirely on sunlight, requiring no electrical outlets, trenching, or monthly power bills. Solar-powered fountains harness photovoltaic technology to circulate water through decorative displays, creating peaceful ambiance while operating completely off-grid. These self-contained systems typically feature a small solar panel connected to a submersible pump,…
Why Your DIY Solar System Needs Rapid Shutdown… by Charlesnoble January 13, 2026 Picture this: You’ve just installed your dream solar array, the panels are gleaming in the sun, and you’re ready to flip the switch—then your inspector mentions something about rapid shutdown compliance. If you’re scratching your head wondering what that means and why it matters for your system, you’re not alone.…
Why Your Solar Watch Needs Different Care Than… by Charlesnoble November 27, 2025 Protect your solar watch investment by exposing the dial to bright light for at least 8 hours monthly, even when fully charged. This prevents the lithium battery from deep discharge, which permanently reduces its lifespan. Position your watch near a window during work hours or wear it outdoors regularly to…
Why Your Solar Panels Are Losing 25% Efficiency (And… by Charlesnoble February 4, 2026 Inspect your solar panels monthly for dust, pollen, bird droppings, and mineral deposits that can reduce energy production by 15-25%. A proper cleaning kit eliminates this performance loss without the $150-300 cost of professional cleaning services, paying for itself after just two uses. Choose a kit with three essential components:…
Subscribe for handpicked DIY projects, exclusive tips, and giveaways.
Check the maximum voltage and current ratings first—these determine whether your controller can actually handle your solar panel array without frying itself on the first sunny day. I learned this the hard way when my first DIY system shut down every afternoon because I’d paired 600 watts of panels with a controller rated for only… Read more: Why Your Solar Setup Needs Both a Charge Controller and Inverter (And How to Pick the Right Ones)
Grab a 9-volt solar panel from your local electronics supplier and test it with a multimeter in direct sunlight—if it produces 9-12 volts under load, you’ve got a working unit ready for small-scale projects. These compact panels excel at trickle-charging rechargeable 9V batteries, powering LED lighting systems for camping, or running low-draw electronics like portable… Read more: Why 9 Volt Solar Panels Are Perfect for Your First Portable Power Setup
Gather a small solar panel (1.5-6 volts), a lightweight toy car chassis or four bottle caps for wheels, a small DC motor, connecting wires, and a hot glue gun to create your science fair winner in an afternoon. Position the solar panel where it catches maximum sunlight—angled slightly toward the sky works best—and wire it… Read more: Build a Solar-Powered Car That Actually Wins Your Science Fair


")
")
")
")

")
")
")
")
")

")


