Why Your RV Battery Dies Overnight (And How a 55 Amp Converter Fixes It)
Updated:
Your RV’s lights are flickering, the refrigerator isn’t keeping food cold, and your phone charger barely works. Sound familiar? That frustrating power struggle often points to an undersized or failing power converter, and upgrading to a 55 amp RV power converter might be exactly what you need.
Here’s what’s happening: Your RV’s converter transforms 120-volt AC power from shore hookups or generators into 12-volt DC power that runs your interior lights, water pump, and charges your house batteries. When that converter can’t keep up with demand, everything suffers. I remember camping with friends whose 30-amp converter couldn’t handle their basic needs once they added a few modern devices. They upgraded to a 55-amp unit, and suddenly their battery charged faster, their lights stopped dimming, and they could actually use multiple accessories simultaneously.
A 55 amp converter delivers enough power for most small to mid-sized RVs, providing approximately 660 watts of continuous 12-volt power. That’s sufficient for LED lighting, a water pump, fans, USB charging ports, and keeping your house batteries topped off, even when you’re running several systems at once.
Whether you’re troubleshooting existing problems, planning a full electrical upgrade, or preparing to add solar panels to your setup, understanding how these converters work will save you headaches and money. Let’s break down everything you need to know to choose, install, and maximize your 55 amp RV power converter.
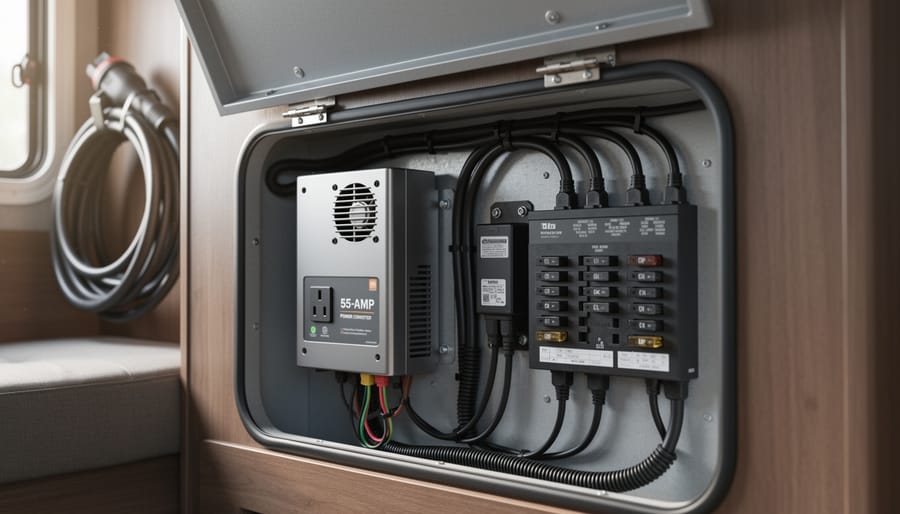
What Actually Is a 55 Amp RV Power Converter?
A 55 amp power converter serves as the heart of your RV’s electrical system, converting shore power to charge batteries and run 12V devices.
The Job Your Converter Does While You’re Plugged In
Here’s something I learned during my first extended RV trip that completely changed how I understood my electrical system: your 55 amp converter is actually working two jobs at once when you’re hooked up to shore power or running a generator.
Think of it like a traffic controller managing power flow to two different destinations. First, it’s continuously supplying 12-volt DC power to all those devices that need it right now, like your LED lights, water pump, furnace fan, and slide-out motors. Everything that needs 12 volts gets it directly from the converter without touching your batteries.
At the same time, your converter is charging your house batteries. This is where that 55 amp rating really matters. It tells you how much current the converter can push out total. If your lights and water pump are using 10 amps combined, you’ve still got 45 amps available for charging your batteries. The more devices you’re running, the less power remains for charging.
This is completely different from inverters, which work in the opposite direction by converting battery power to run AC appliances.
The beauty of this dual function is that your batteries stay topped off while you’re using your RV normally. You’re not draining them when plugged in, which means they’re ready to go the moment you disconnect and head down the road. It’s like having your phone plugged in while you’re using it, keeping everything powered and charging simultaneously.
Why 55 Amps Matters for Your Setup
Think of your RV’s power converter like a water pump for your electrical system. A 55-amp converter can push 55 amps of charging current into your house batteries every hour, which makes a real difference in how quickly you recover from a night of boondocking or how well you handle heavy loads.
Let me put this in perspective with a story from my own experience. Last summer, I upgraded from a 45-amp converter to a 55-amp unit in my 28-foot travel trailer. The difference was immediately noticeable. My four 6-volt golf cart batteries (which together give me about 450 amp-hours of capacity) would recharge in roughly 6-7 hours instead of the 8-9 hours my old converter needed. That extra charging speed meant I could run my refrigerator, water pump, and lights without worrying about draining my batteries faster than they could recharge.
Here’s the practical breakdown: A 55-amp converter is ideal for RVs with 400-600 amp-hours of battery capacity. That typically covers most medium to large trailers (25-35 feet) and smaller motorhomes. If you’ve got a compact travel trailer with just two batteries, a 30-amp converter might suffice. But if you’re running multiple appliances, have upgraded to lithium batteries, or spend extended time off-grid, those extra 10 amps over a 45-amp unit become genuinely valuable.
The real advantage shows up during recovery time. After running your furnace all night in cold weather, which can drain 50-60 amp-hours, a 55-amp converter replenishes that power in about an hour of generator time. Compare that to nearly two hours with a 30-amp unit, and you’re saving fuel, generator wear, and campground neighbor relations.
Signs You Need to Upgrade to a 55 Amp Converter
Your Batteries Never Seem Fully Charged
I learned this lesson the hard way during a summer trip to Yellowstone. Every morning, I’d wake up expecting my RV batteries to be fully topped off from overnight charging, but my battery monitor consistently showed only 80-85% capacity. Sound familiar?
This frustrating scenario often points to an undersized power converter struggling to keep up with your electrical demands. Here’s what’s happening: while you’re using lights, the water pump, and maybe charging phones during the evening, your converter is working overtime just to maintain current power needs. When everything finally shuts down for the night, there simply aren’t enough amps left to fully recharge your battery bank before morning.
A 55 amp converter provides adequate charging current for many RVs, but if you’ve added batteries or increased your power consumption since your RV rolled off the lot, you might need more capacity. Think of it like trying to fill a swimming pool with a garden hose – it’ll work eventually, but a larger hose gets the job done much faster.
The math is straightforward: quality converters should deliver about 10-20% of your total battery capacity in amps for efficient charging. If your battery bank exceeds 275 amp-hours, a 55 amp converter may leave you perpetually playing catch-up, never quite reaching that satisfying 100% charge.
You’ve Added Solar or Extra Batteries
Here’s what I’ve learned from helping RV friends upgrade their systems: when you add solar panels or expand your battery bank, your original converter often becomes the bottleneck. It’s like trying to fill a swimming pool through a garden hose.
Let me give you a real example. My neighbor Jake added 400 watts of solar and upgraded from two 6-volt golf cart batteries to four, giving him 440 amp-hours of capacity. His old 30-amp converter couldn’t keep up when cloudy weather depleted his batteries. He needed shore power to recharge, but it took forever. Upgrading to a 55-amp converter cut his recharge time nearly in half.
Here’s a helpful guideline: if you have a battery bank between 300-550 amp-hours, a 55-amp converter hits the sweet spot. It’s enough charging power to replenish your batteries efficiently without overshooting your system’s capabilities.
The same applies if you’re running significant solar. When your panels can’t produce enough power during cloudy stretches or winter camping, your converter needs to pick up the slack. A 55-amp unit ensures you’re not stuck waiting days for a full charge when you plug into shore power at the campground. It’s about creating a balanced system where every component works together harmoniously.
A properly sized converter ensures your battery bank stays fully charged and ready for off-grid adventures.
You’re Running More 12V Devices Than Before
I remember when I first upgraded my RV with what I thought were simple improvements – swapping to LED light strips, adding a second water pump, installing a roof fan. Within a week, I noticed my old converter struggling to keep up. Here’s the thing: modern RVers are running significantly more 12V devices than ever before.
Think about your current setup. Beyond the basics like interior lights and water pump, you might now have USB charging stations, upgraded entertainment systems, additional fans for better air circulation, and maybe even a diesel heater for those chilly nights. Each LED upgrade, while more energy-efficient than old bulbs, often means adding more lights because they’re so affordable. That fancy Bluetooth stereo system? It’s drawing power constantly.
The real eye-opener comes when you tally everything running simultaneously. During a typical evening, you might have lights in three rooms, the water pump cycling, two phones charging, a TV running, and fans circulating air. Suddenly, that 45-amp converter that seemed adequate doesn’t provide the headroom you need. A 55-amp converter gives you breathing room for these modern conveniences without constantly worrying about maxing out your system or draining your battery bank faster than it can recharge.
How 55 Amp Converters Work With Solar Systems
Solar panels and power converters work together to create a robust hybrid charging system for extended boondocking.
Shore Power and Solar: The Dynamic Duo
Here’s the thing about RV power systems: they’re actually pretty flexible once you understand how the pieces work together. Your 55 amp converter and solar setup don’t have to compete with each other. In fact, they make excellent partners.
When you’re plugged into shore power at a campground, your converter does the heavy lifting, charging your batteries and powering your DC systems. But here’s where it gets interesting. If you’ve also got solar panels installed, your solar charge controllers will typically detect that the batteries are already being charged by the converter and back off automatically. Most modern charge controllers are smart enough to avoid overcharging this way.
I remember chatting with a fellow RVer named Charles at a campground in Utah who’d been worried his systems would clash. He’d installed a nice solar array but was nervous about plugging into shore power. Turns out, his converter and solar controller played nice together without any special setup.
The real magic happens when you’re boondocking. Your solar panels keep working during the day, and if you need a quick charge boost before sunset, you can fire up your generator and let the converter kick in. Think of it as having two charging pathways: one from the sun (free and quiet) and one from AC power (faster when you need it). Each system handles different scenarios, giving you flexibility and redundancy. That’s the kind of setup that lets you camp comfortably anywhere.
When Your Solar Can’t Keep Up
Let’s be honest about solar power – it’s fantastic, but it’s not magic. I learned this the hard way during a winter camping trip in Oregon when three days of heavy clouds left my batteries struggling. Even the best solar panels can’t collect much energy when Mother Nature isn’t cooperating.
If you’re parked under dense tree cover at a beautiful forest campsite, your solar production might drop to just 10-20% of its rated capacity. Winter camping presents similar challenges with shorter days and lower sun angles. Bad weather stretches can last days or even weeks in some regions, and your batteries will steadily drain from everyday use like lights, water pumps, and refrigerators.
This is where your 55 amp converter becomes essential insurance. When plugged into shore power at a campground or running your generator, it instantly takes over, rapidly recharging your battery bank while powering your RV systems. Think of it as your reliable backup plan that lets you enjoy camping year-round without constantly worrying about battery levels or waiting for perfect weather.
Choosing the Right 55 Amp Converter for Your RV
Smart Multi-Stage Charging vs. Basic Converters
When I first upgraded my RV converter, I couldn’t believe the difference between smart multi-stage charging and the basic converter I’d been using. Let me break down why this matters for your battery health and wallet.
Basic or single-stage converters do one thing: they pump out a constant voltage, typically around 13.6 volts. Think of it like watering your plants with a firehose that never turns off. Sure, they get water, but it’s not exactly gentle or efficient. These older units were simple and cheap, but they could actually harm your batteries over time through undercharging or, in some cases, slow overcharging.
Smart multi-stage converters are game-changers. They adjust their charging approach based on what your batteries actually need at any given moment. Here’s how the three-stage process works:
The bulk stage delivers maximum amperage (in this case, up to 55 amps) to quickly bring deeply discharged batteries up to about 80-90 percent capacity. Then it switches to absorption mode, holding a higher voltage around 14.4 volts to safely top off the remaining charge without overheating. Finally, it drops into float mode at around 13.6 volts, maintaining a full charge without overworking your batteries.
I’ve seen friends replace their RV batteries every two years with basic converters, while my batteries using a smart converter are going strong after five years. That’s real money saved, and it means more time enjoying the outdoors instead of shopping for replacements. The upfront cost difference is usually only fifty to a hundred dollars, but the long-term benefits absolutely justify the upgrade.
Features Worth Paying Extra For
When I upgraded my own RV’s electrical system last year, I learned quickly that not all 55 amp converters are created equal. Some premium features truly make a difference in daily use and long-term reliability.
A built-in cooling fan is worth every penny. Converters generate heat, especially when charging depleted batteries, and active cooling prevents thermal shutdowns during those critical recharge moments after a long day off-grid. I’ve seen budget units without fans struggle on hot summer afternoons.
Battery temperature sensors are another game-changer. These smart sensors adjust charging voltage based on ambient temperature, preventing overcharging in summer heat or undercharging in winter cold. Your batteries will thank you with longer lifespans.
Adjustable voltage settings give you flexibility as your needs evolve. Instead of being locked into one charging profile, you can fine-tune the output for your specific battery bank.
Finally, lithium battery compatibility is increasingly essential. If you’re considering upgrading to lithium batteries down the road, choosing a converter with lithium-compatible charging profiles now saves you from buying twice. Many modern converters offer selectable battery types, making them future-proof investments that grow with your system.
Sizing Your Converter to Your Battery Bank
Here’s a simple rule I learned from my RV mentor years ago: your converter should replace what you use in about 4-6 hours. Let’s break that down with a quick calculation.
First, add up your battery capacity in amp-hours. Got a typical dual 6-volt golf cart setup? That’s usually around 220 amp-hours. For 12-volt batteries, two 100Ah batteries give you 200 amp-hours total.
Now, divide your total amp-hours by 5. That’s your ideal converter size. So 220 amp-hours divided by 5 equals 44 amps – meaning a 55 amp converter fits perfectly. This formula ensures you’re recharging at a healthy rate without overwhelming your batteries.
If your number comes out lower, like 30 amps, you’re fine going bigger. A 55 amp unit just means faster charging. But if your calculation shows you need 70+ amps, consider upgrading your converter or adding solar panels to share the charging workload. I’ve found this approach keeps batteries happy and extends their lifespan significantly.
Installing Your 55 Amp Converter: What to Expect
Can You DIY This Project?
Replacing a 55 amp RV power converter falls into that middle ground between simple and complex DIY territory. If you’re comfortable working around electrical systems and have basic tools like screwdrivers, wire strippers, and a multimeter, this is definitely manageable. The actual installation typically involves disconnecting your old unit, mounting the new converter in the same space, and reconnecting the wiring following a clear diagram.
That said, Charles always emphasizes one crucial point from his years helping RVers: “If you’ve never worked with 120-volt AC power before, this isn’t the project to learn on.” The DC side (12-volt) is forgiving, but the AC input side demands respect and proper safety protocols. You’ll need to disconnect shore power completely and verify it’s off before touching anything.
Safety considerations include working in tight spaces, proper wire sizing, and ensuring all connections are secure to prevent arcing or fire hazards. You’ll also want to confirm your new converter’s mounting dimensions match your existing setup.
Charles recommends calling a professional if you’re uncertain about identifying hot wires, if your RV has modified wiring from previous owners, or if you’re upgrading to a significantly larger system that might need additional circuit protection. Most experienced DIYers can handle a direct replacement in 2-3 hours, but rushing electrical work never pays off.
Testing your RV’s electrical system helps determine if your current converter is meeting your power needs.
The Basic Installation Steps
Replacing a 55 amp RV power converter is more straightforward than you might think, though it does require careful attention to safety. I remember helping my neighbor tackle this project last summer, and seeing his confidence grow with each step was rewarding.
Start by completely disconnecting shore power and turning off your battery disconnect switch. Safety always comes first when working with your RV electrical system. Next, you’ll remove the old converter by disconnecting the AC input wires, DC output wires, and any battery charging leads. Take clear photos before disconnecting anything, trust me on this one.
Mount your new 55 amp converter in the same location, ensuring it has adequate ventilation. Most units come with mounting brackets that make this step simple. Then comes the rewiring: connect your shore power lines to the AC input, your distribution panel wires to the DC output, and finally your battery charging cables.
Before closing everything up, test the system by plugging into shore power and checking that your 12-volt appliances work properly. Use a multimeter to verify you’re getting the correct charging voltage at your batteries, typically around 13.6 to 14.4 volts depending on the charging stage.
Common Installation Gotchas
I learned this lesson the hard way during my first converter upgrade – I crammed a 55 amp unit into a cabinet without checking clearance, and within hours it was overheating like crazy. These converters need at least 2-3 inches of breathing room on all sides. The cooling fans can’t do their job otherwise, and you’ll shorten the unit’s lifespan significantly.
Wire gauge is another sneaky issue. Your existing wiring might’ve worked fine for a smaller converter, but a 55 amp unit demands proper sizing. Anything thinner than 6 AWG wire creates resistance, heat buildup, and potential fire hazards. When in doubt, check the manufacturer’s specifications – they’re not just suggestions.
Breaker compatibility catches people off guard too. Your 55 amp converter typically needs a 60-70 amp breaker to handle startup surges. Using an undersized breaker means frustrating trips every time you turn on multiple appliances. Double-check your panel’s capacity before installation, and consider whether your shore power connection can actually support the upgrade. Sometimes the weakest link isn’t the converter at all.
Getting the Most From Your New 55 Amp Converter
Setting Up Multi-Stage Charging Correctly
Getting the right charging profile set up is like giving your batteries a personalized care routine—it makes all the difference in how long they’ll last. I learned this the hard way during my first RV restoration when I treated all batteries the same and ended up replacing them way too soon.
Your 55 amp converter should have adjustable charging stages, typically bulk, absorption, and float. For flooded lead-acid batteries, you’ll want absorption voltage around 14.4-14.8 volts and float at 13.2-13.6 volts. AGM batteries prefer slightly lower settings, usually 14.2-14.6 volts for absorption and 13.2-13.4 volts for float. This prevents overcharging while ensuring complete charging cycles.
If you’re running lithium batteries, things change considerably. Most lithium batteries need 14.2-14.6 volts for charging and should be held there without a traditional float stage. Many newer converters have a lithium-specific profile you can select with a simple switch or button combination.
Check your battery manufacturer’s specifications sheet—it’s your best friend here. Most converters include dip switches or digital settings to adjust these profiles. Take five minutes to configure it correctly now, and you’ll add years to your battery bank’s life. Trust me, it’s worth reading that manual.
Maintenance That Takes Five Minutes
Here’s the good news: keeping your 55 amp converter running smoothly doesn’t require a mechanic’s skill set or an entire weekend. I learned this lesson after my first converter started acting up during a camping trip – turns out, I’d been ignoring some super simple maintenance steps that would’ve taken less time than brewing my morning coffee.
Start by checking your electrical connections every few months. Make sure terminals are tight and corrosion-free. If you spot any green or white buildup, disconnect the power (always disconnect first!) and clean it with a wire brush or baking soda solution.
Next, grab a vacuum or compressed air and clean the cooling vents. Dust buildup is the silent killer of converters because it blocks airflow and causes overheating. Just run your vacuum along the vents or give them a quick blast with canned air.
Finally, monitor your performance indicators. Check that your batteries are charging fully and that lights aren’t dimming unexpectedly. Most converters have an LED indicator – if it’s showing red or blinking oddly, consult your manual.
That’s it. Five minutes every couple of months will extend your converter’s lifespan by years and prevent those frustrating power problems that always seem to happen at the worst possible moment.
I remember when I first upgraded my RV’s power converter – the difference was like night and day. No more wondering if my batteries would make it through the night, no more voltage anxiety every time I turned on the microwave. That peace of mind is priceless when you’re parked off-grid watching the sunset, knowing your power system has your back.
A properly sized 55 amp converter becomes even more powerful when you pair it with solar panels. I’ve watched countless RVers in our community transform their boondocking experience by combining a quality converter with even a modest solar setup. The converter handles the heavy lifting when you’re plugged in, while your solar panels keep things topped off during the day. Together, they create a system that’s genuinely liberating.
Here’s my challenge to you: take an honest look at your current power setup. Are you constantly managing your battery levels? Do you avoid using certain appliances because you’re worried about draining your batteries? Does your converter run hot or struggle to keep up? If you answered yes to any of these, an upgrade might solve those frustrations once and for all.
We’ve built some handy calculators on this site to help you figure out exactly what your RV needs. Pop your numbers in and see where you stand. And if you’ve got questions or want to share your own converter experiences, jump into our community discussion. We’re all learning together, and your insights might be exactly what another RVer needs to hear.
How useful was this post?
Click on a star to rate it!
Average rating 0 / 5. Vote count: 0
No votes so far! Be the first to rate this post.
We are sorry that this post was not useful for you!
Let us improve this post!
Tell us how we can improve this post?
charlesnoble
Here at Spheral Solar, I’m a hands-on solar power enthusiast, constantly exploring and experimenting with DIY solutions. I’m dedicated to sharing my discoveries, insights, and even the bumps I hit along the way, all in the pursuit of a more sustainable future.
Why Your Motorhome Electrical System Keeps Failing… by Charlesnoble November 18, 2025 Picture this: You’re three days into a dream cross-country trip when your lights flicker, the refrigerator stops cooling, and you’re left wondering whether to call for expensive roadside assistance or figure it out yourself. I’ve been there, and here’s what I wish someone had told me before my first electrical…
Why Your RV Appliances Keep Tripping the Breaker… by Charlesnoble November 17, 2025 Turn off shore power and disconnect your battery bank before touching any wire in your RV—this single step prevents the most common DIY electrical accidents. Check your circuit breaker panel ratings against your actual appliance loads, because that microwave drawing 1500 watts on a 15-amp circuit is exactly why you’re…
Should an RV Inverter Be Left on When Plugged In? by Charlesnoble October 31, 2023 Generally, RV inverters should be turned off when not in use to avoid unnecessary battery drain. However, whether an RV inverter should be left on or off when plugged in depends on several factors, primarily the type of inverter and the manufacturer’s recommendations. In this comprehensive guide, we’ll look in-depth…
Why Your RV Solar Panels Aren’t Charging (And How to… by Charlesnoble November 30, 2025 Check your multimeter readings at each connection point along your solar charging path—from panels to charge controller to battery—to pinpoint exactly where voltage disappears. Most RV solar systems lose 10-30% of their potential power to voltage drop, but this invisible thief often goes undetected until you systematically measure and compare…
Why Your Camper Van Power System Keeps Failing (And… by Charlesnoble January 24, 2026 Picture this: You’re parked along a stunning coastline, laptop open, fridge humming, and lights glowing as the sun sets—all powered by the system you built yourself. A well-designed camper van power system transforms your vehicle from basic transportation into true freedom on wheels, letting you work remotely, cook meals, and…
Solar Power Brought My Garden Fountain to Life… by Charlesnoble March 14, 2026 Picture this: I’m sitting by my campsite last summer, watching a small solar fountain I’d just installed bubble away in a portable basin, powered entirely by the sun overhead. No extension cords snaking through the wilderness, no battery changes at midnight, just pure, peaceful water movement that attracted birds and…
Subscribe for handpicked DIY projects, exclusive tips, and giveaways.
Position your solar panels at an angle equal to your latitude for year-round performance, or adjust seasonally by adding 15 degrees in winter and subtracting 15 degrees in summer to capture maximum sunlight during each season’s sun path. Use a simple angle finder app on your smartphone against the back of your panel to verify… Read more: The Right Tilt Angle Can Boost Your Solar Panel Output by 30% (Here’s How to Find It)
Route your PV wires through UV-resistant conduit within 18 inches of leaving the solar array, securing it every 3 feet with proper clamps to prevent wind damage and code violations. This single step prevents 80% of the wire degradation issues I’ve seen in DIY solar installations over the past decade. Group your positive and negative… Read more: Why Your PV Wire Management Could Fail Inspection (And How to Fix It)
Understand that 6000 volts sounds terrifying but delivers surprisingly low amperage—typically around 120 milliamps for just 3/10,000th of a second per pulse. This combination creates an unforgettable shock that trains animals to avoid the fence without causing lasting harm. The voltage pushes current through thick fur and hide, while the minimal amperage and microsecond duration… Read more: Why 6000 Volts Won’t Kill Your Livestock (But Will Stop Predators Cold)


")
")

")
")
")
")
")

")
")
")


