Why Your Off-Grid Battery System Fails (And How to Design One That Actually Works)
Updated:
Calculate your daily energy consumption in watt-hours by listing every device you’ll power, its wattage, and hours of daily use—this single number determines whether you need a 5kWh system or a 50kWh system. Most first-time builders overestimate their needs by 40% or underestimate by forgetting phantom loads like WiFi routers and refrigerator startup surges.
Size your battery bank to store 2-3 days of energy usage as backup, accounting for depth of discharge limits. A lithium battery safely discharges to 80-90% capacity, while lead-acid should only go to 50%, meaning you need twice the capacity with older technology. I learned this the hard way during my first build when I ran out of power on day two of cloudy weather because I calculated for perfect conditions instead of real-world scenarios.
Match your battery voltage to your inverter requirements, typically 12V, 24V, or 48V systems. Higher voltages reduce current flow and allow thinner, cheaper wiring—a 48V system running 2400W only pulls 50 amps compared to 200 amps at 12V. This isn’t just about cost; it’s about safety and efficiency losses that can waste 15-20% of your stored energy.
Verify your Battery Management System handles your specific cell chemistry and count. A mismatched BMS is the leading cause of premature battery failure in DIY systems, either overcharging cells to dangerous levels or cutting power unexpectedly. The right BMS balances cells, monitors temperature, and prevents the catastrophic failures that turn battery projects into expensive mistakes.
What Makes an Off-Grid Battery System Different
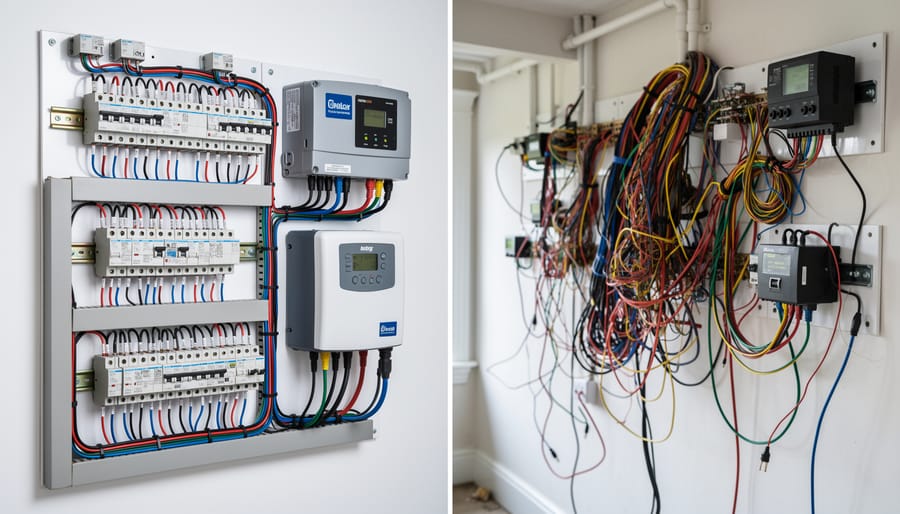
A properly designed off-grid battery bank with organized wiring and mounting demonstrates the difference between professional installations and common DIY mistakes.
The Three Critical Jobs Your Battery Must Handle
Your battery isn’t just a box that stores power. It’s actually juggling three distinct jobs simultaneously, and understanding each one helps you avoid the most common off-grid mistakes.
First up is energy storage, the obvious one. Think of this like packing a cooler for a weekend camping trip. You need enough food to last until you can restock. Your battery does the same thing with electricity, storing what your solar panels produce during sunny hours so you can watch TV after sunset. But here’s where people get tripped up: they only think about how much energy they use per day without considering the next two jobs.
The second job is load management, which is all about delivering power at the right speed. I learned this the hard way during my first off-grid build when my lights dimmed every time the well pump kicked on. Your battery needs enough capacity to handle sudden power surges, just like your car needs enough engine power to accelerate uphill. This ties directly into properly sizing your inverter and understanding peak demands versus average consumption.
The third critical job is backup capacity, your safety buffer. In my camping trailer setup, I keep an extra day’s worth of capacity because mountain weather is unpredictable. Same principle applies to home systems. Cloudy days happen, and managing critical loads means ensuring your refrigerator keeps running even when conditions aren’t ideal.
When you understand these three jobs separately, sizing your battery system becomes far less mysterious. You’re not just buying storage; you’re buying reliability, power delivery, and peace of mind.
Why Grid-Tied Battery Advice Will Wreck Your Off-Grid Setup
I learned this lesson the hard way during my second solar project. I followed advice from a grid-tied installer who assured me his battery recommendations would work great. Six months later, my battery bank was toast. The problem? Grid-tied systems and off-grid systems are fundamentally different animals, and treating them the same is a recipe for disaster.
Here’s what catches most people: Grid-tied batteries act as backup power, cycling maybe once or twice a week during outages. Your off-grid batteries? They’re working every single day, cycling deeply through nights, cloudy days, and high-demand periods. That’s the difference between casual jogging and running ultramarathons.
Grid-tied advice typically focuses on cheap capacity per dollar because those batteries rarely get used. They recommend automotive-style batteries or basic flooded lead-acid because, honestly, they’ll last years with minimal cycling. But put those same batteries in an off-grid setup where they discharge 50-80% daily, and you’re looking at failure within months, not years.
The discharge depth assumptions are completely wrong too. Grid-tied systems might discharge to 80% capacity occasionally. Off-grid? You’re regularly hitting 50% or lower, especially during winter months. Batteries rated for shallow cycling simply weren’t designed for this punishment.
Temperature management is another overlooked factor. Grid-tied systems in climate-controlled garages don’t face the temperature swings that off-grid battery banks often endure in sheds or outbuildings, dramatically affecting performance and lifespan.
Sizing Your Battery Bank (Without the Confusing Math)
The Days-of-Autonomy Method That Actually Works
When I first built my off-grid system in Oregon, I made the classic mistake of calculating battery backup based on what felt like “enough.” Three cloudy December days later, I was rationing power like a contestant on a survival show. Let me show you the method that actually works for determining your days of autonomy.
Start by examining your local weather data. Visit your regional climate center website and look up typical cloudy day stretches during your darkest season. In Seattle, you might see five to seven consecutive sunless days in winter. Phoenix? Maybe two to three days maximum. This becomes your baseline multiplier.
Next, understand the relationship between your critical load panel and full household consumption. Calculate your essential daily power needs in kilowatt-hours. Include refrigeration, well pumps, heating controls, and lighting. Non-essentials like electric dryers and hot tubs don’t count here.
Here’s the practical formula: Take your daily essential consumption and multiply it by your climate’s typical cloudy stretch, then add one extra day as a safety buffer. A Pacific Northwest homeowner using 10 kWh daily would need 60 kWh of usable battery capacity (10 kWh times six days). A southwestern homeowner with the same consumption might need only 30 kWh (10 kWh times three days).
Consider seasonal variations too. Your calculation should be based on winter conditions even if summer looks great. I’ve seen too many DIYers size batteries for July sunshine, then struggle come January.
One insider tip: If you’re in an area with reliable backup generator access and don’t mind occasional noise, you can reduce your days of autonomy and use the generator as your safety net. This approach cuts battery costs significantly while maintaining reliability. Just factor in fuel storage and maintenance schedules.
Remember, larger battery banks offer flexibility but cost more upfront and require careful management. Smaller systems with generator backup often make more economic sense for weekend warriors and part-time off-gridders.
Common Sizing Mistakes I See All the Time
I’ve been doing this long enough to see the same mistakes over and over again, and honestly, it breaks my heart because these folks invest their hard-earned money only to end up frustrated. Let me share some real situations I’ve encountered so you can avoid them.
The most common mistake? People drastically undersize their battery banks. Just last month, a reader contacted me after his system kept shutting down every evening. He’d calculated his daily usage at about 3 kWh but only installed a single 100Ah 12V battery. That’s roughly 1.2 kWh of capacity, and if you’re following the 50% discharge rule for battery longevity, he only had 0.6 kWh available. He needed at least triple that capacity, but nobody wants to hear they need to spend three times what they budgeted.
Another classic error is being wildly optimistic about solar production. I worked with a family in Oregon who designed their system based on California solar data because that’s what the online calculator defaulted to. They assumed six peak sun hours daily year-round, but their actual winter average was closer to two hours. Their batteries never fully recharged from November through February, slowly degrading from chronic undercharging.
Then there’s ignoring seasonal variations entirely. One gentleman built a beautiful system that worked perfectly in summer, running his workshop tools and lighting without issues. Come December, he was stunned when everything fell apart. He’d sized for average daily usage but never considered that winter days are shorter, cloudier, and colder, while his heating needs doubled his electrical consumption. His summer surplus became a winter deficit, and his batteries suffered permanent damage from repeated deep discharges during those cold months.
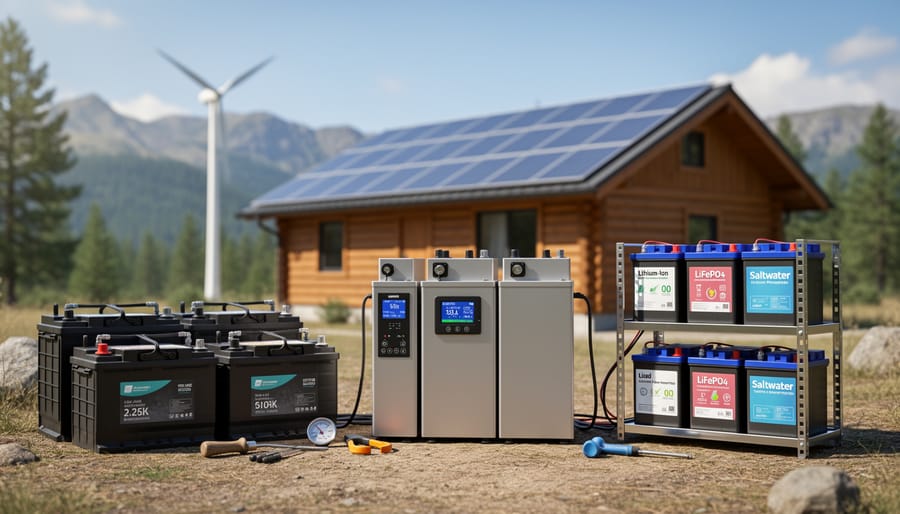
Regular monitoring of battery voltage and state of charge helps catch problems before they lead to system failure.Different battery chemistries each have distinct advantages for off-grid applications depending on budget, climate, and usage patterns.
Choosing Your Battery Chemistry: The Decision That Changes Everything
When Lead-Acid Actually Makes More Sense
Look, I’ll be honest with you—lithium batteries get all the hype these days, but lead-acid still has its place in off-grid systems. I learned this the hard way during a project in rural Montana where the budget was tight and winter temperatures regularly dropped below zero.
If you’re working with serious budget constraints, lead-acid batteries can get you up and running for roughly half the upfront cost of lithium. Sure, they won’t last as long, but when you’re trying to get off-grid power to a hunting cabin or workshop that you only use seasonally, spending $2,000 instead of $5,000 makes a real difference. You can always upgrade later once you’ve proven the concept and saved some money.
Temperature extremes are where lead-acid truly shines. In areas where you can’t provide climate control for your battery bank, flooded lead-acid batteries handle cold much better than lithium. I’ve seen lithium systems shut down completely at 20°F, while lead-acid just keeps chugging along, albeit at reduced capacity.
Rural and remote locations present another practical advantage. When something goes wrong with lead-acid batteries, most local mechanics or handymen can troubleshoot them. Finding someone who understands lithium battery management systems in the middle of nowhere? That’s a different story entirely. Plus, replacement parts are available at nearly any auto parts store.
The key is matching your battery choice to your actual situation, not just following the latest trends.
Lithium Batteries: Worth the Price Tag or Marketing Hype?
Let’s talk money, because LiFePO4 batteries cost roughly double what traditional lead-acid batteries do upfront. The question I hear most: are they actually worth it?
Here’s my honest take after making the switch three years ago. I started with flooded lead-acid batteries because my budget was tight. They worked fine, but I spent every Saturday morning checking water levels, cleaning terminals, and worrying about proper ventilation in my battery shed. The real eye-opener came when I did the math on replacement cycles.
LiFePO4 batteries genuinely deliver 3,000 to 5,000 charge cycles compared to 500 to 1,000 for lead-acid. When I calculated cost per cycle, the lithium option actually came out cheaper over ten years. Plus, you can safely discharge them to 80% or even 90% of capacity without damage, while lead-acid batteries suffer if you go below 50%. That means a 200Ah lithium battery gives you the same usable power as a 400Ah lead-acid bank.
The premium makes sense if you’re building a system you’ll rely on daily, have limited space, or simply value your weekend mornings. For occasional cabin use or temporary setups, lead-acid still has its place.
My recommendation? If your budget allows and you’re committed to off-grid living, bite the bullet on lithium. If you’re experimenting or need to spread costs over time, start with quality lead-acid and upgrade later. Both paths work, just know what you’re signing up for.
Understanding BMS: Your Battery’s Bodyguard
The Five Protection Features You Can’t Live Without
Your battery management system needs five fundamental protections working 24/7. I learned this the hard way when a friend’s supposedly “protected” setup failed during a cold snap, destroying eight expensive lithium cells. Let me walk you through what actually keeps your investment safe.
Over-voltage protection stops your batteries from overcharging beyond their safe limit, typically 4.2 volts per lithium cell. Without it, cells can overheat, swell, and in extreme cases, catch fire. I’ve seen a battery pack balloon to twice its normal size after someone bypassed this protection to “charge faster.” The replacement cost? $800 plus the charger that melted in the process.
Under-voltage protection prevents deep discharge that permanently damages cells. Lithium batteries shouldn’t drop below 2.5-3.0 volts per cell. Skip this feature and you’ll watch your battery capacity diminish with each cycle. One community member lost 40% of their capacity in just three months because their cheap BMS allowed excessive discharge during winter.
Over-current protection acts like a circuit breaker, cutting power when current exceeds safe levels. This protects against short circuits and prevents wires from becoming fire hazards. Without it, you’re gambling every time you power on an appliance. The protection should trigger within milliseconds, not seconds.
Temperature monitoring shuts down charging or discharging when conditions get dangerous. Lithium batteries hate extreme temperatures. Below freezing, charging can cause permanent internal damage called lithium plating. Above 140°F, thermal runaway becomes a real risk. Your BMS needs sensors on the cells themselves, not just the enclosure.
Cell balancing keeps individual cells at equal charge levels. Cells naturally drift apart over time, and imbalanced packs age faster and perform worse. Quality BMS units balance continuously, transferring tiny amounts of energy between cells. Without this, your weakest cell determines your entire pack’s usable capacity, wasting the potential of healthier cells.
These five features aren’t optional extras. They’re the difference between a reliable power system and an expensive paperweight.
Built-In vs. External BMS: What’s Right for Your Setup
When I built my first off-grid system, I made the classic rookie mistake of buying cheap lithium cells without realizing some came with built-in BMS protection while others needed external management. Let me save you from that headache.
Built-in BMS units are exactly what they sound like: the battery management circuitry is integrated directly into the battery pack or individual cells. You’ll find these in pre-assembled lithium battery banks and some quality prismatic cells. The advantage? Everything works right out of the box. No wiring headaches, no configuration menus to navigate. For beginners or anyone who wants plug-and-play simplicity, this is your friend.
External BMS systems sit separately from your batteries and connect via wiring harnesses. They’re the go-to choice for DIY builders assembling battery banks from individual cells. Yes, they require more setup work, but here’s why many experienced builders prefer them: you get granular control over every parameter, easy troubleshooting when something goes wrong, and the ability to upgrade without replacing your entire battery investment.
For off-grid applications specifically, consider these features essential: cell-level voltage monitoring (not just pack voltage), temperature sensors for each battery section, and programmable low-voltage cutoffs that you can adjust seasonally. I learned this the hard way during an unexpectedly cold winter when my fixed cutoff settings were too conservative, leaving usable capacity on the table.
My recommendation? Start with built-in if you’re buying pre-made battery banks under 5kWh. Go external if you’re building from scratch with individual cells or planning a system larger than 10kWh. The sweet spot between those sizes? Either works, so choose based on your comfort level with wiring and configuration.
Wiring Your System: Where Most DIYers Go Wrong
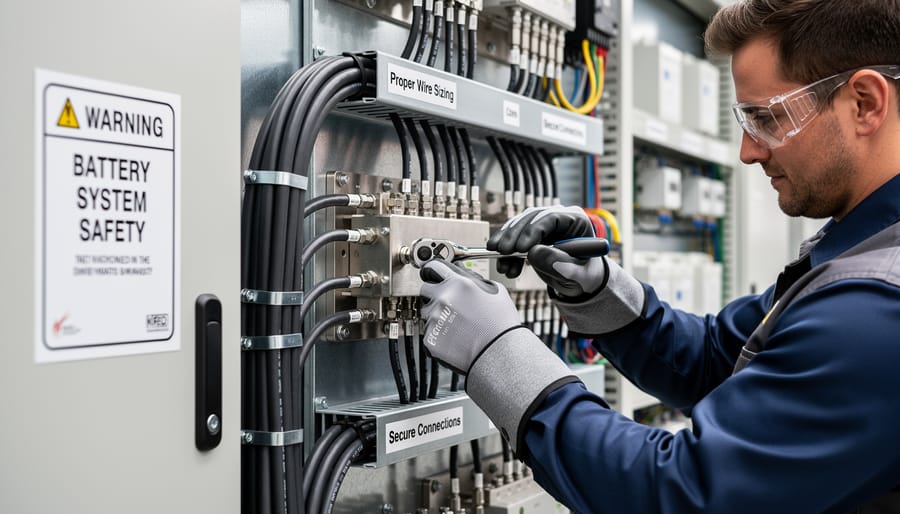
Proper wire sizing and secure connections are critical safety features that prevent overheating and potential fire hazards in battery systems.
The Wire Gauge Chart Nobody Explains Properly
I’ll be honest with you – I stared at wire gauge charts for embarrassingly long before one finally made sense. The problem isn’t you; it’s that most charts assume you already know what you’re looking for. Let me fix that.
Here’s the thing nobody tells you upfront: wire gauge selection depends on two factors – how much current (amperage) you’re pushing through the wire, and how far that wire needs to travel. Miss either one, and you’ll end up with voltage drops that steal your power or, worse, dangerously hot wires.
I learned this the hard way when my first battery bank sat 15 feet from my inverter. I used 6 AWG wire because “it looked thick enough.” My voltage dropped so much that the inverter kept shutting down under load. Turns out, distance matters more than most people realize.
Here’s my simplified reference table that actually makes sense:
For 12V systems running 50 amps over 10 feet: use 6 AWG
For 12V systems running 50 amps over 20 feet: use 4 AWG
For 12V systems running 100 amps over 10 feet: use 2 AWG
For 24V systems, you can go one size smaller because lower amperage at higher voltage gives you the same power.
The math behind this targets keeping voltage drop under 3%, which maintains system efficiency without breaking your budget on massive cables.
Real-world example: When sizing cables between your batteries and inverter, match the wire gauge to your inverter’s maximum draw. If you’ve already worked through inverter sizing and know you’ll pull 150 amps at 24V during peak loads over a 6-foot run, you’d want 2/0 AWG wire.
Always round up, never down. Undersized wire creates resistance, resistance creates heat, and heat creates problems. Your wire should barely feel warm to the touch during operation.
Fusing and Breakers: Your Last Line of Defense
I learned this lesson the hard way during my second off-grid project. I’d carefully selected batteries, a quality inverter, and proper wiring, but I skimped on fusing because “it’s just adding extra cost, right?” Wrong. A loose connection created an arc that welded my wrench to the battery terminal. The tool glowed red-hot in seconds. Without proper fusing, that incident could have meant fire instead of just a destroyed wrench and a serious wake-up call.
Fuses and breakers are your emergency stop button. They’re designed to sacrifice themselves before your expensive components—or worse, your home—go up in smoke. Every conductor carrying current needs overcurrent protection sized correctly for that specific wire gauge and load.
Here’s where to place them: immediately after your battery bank’s positive terminal (within 7 inches is the standard recommendation), between your charge controller and batteries, and before your inverter. Each location protects a different part of your system. A 12V system pulling 100 amps needs at minimum a 150-amp fuse rated for DC voltage. Yes, DC-rated matters—AC fuses won’t extinguish DC arcs properly.
I’ve heard too many stories from fellow DIYers who thought they could install fuses “later” or used automotive fuses for household battery banks. One friend lost his entire garage workshop to fire from an undersized fuse that didn’t blow fast enough. Another melted through his battery cables because he installed no fusing at all.
The investment is minimal—quality fuses and holders run maybe fifty dollars—but the protection is priceless. Don’t skip this step.
Monitoring and Maintenance That Actually Gets Done
The Three Numbers You Should Check Weekly
I learned this monitoring routine the hard way after nearly cooking a battery bank one summer. Now I check these three numbers every Sunday morning with my coffee, and it takes about five minutes.
First up is voltage. For a 12V system, your resting voltage (after the batteries have sat for an hour with no charging or discharging) should be between 12.6V and 12.8V when fully charged. If you’re consistently seeing below 12.2V, you’re draining too deep and risking long-term damage. Below 11.8V? Stop what you’re doing and recharge immediately.
Next is your state of charge, which most battery monitors display as a percentage. Think of this like your phone battery indicator. You want to stay above 50% for lead-acid batteries and above 20% for lithium. If you’re regularly dropping below these thresholds, your system is undersized for your needs. I spent months wondering why my batteries weren’t lasting until I realized I was hitting 30% every night.
Finally, check temperature. Your batteries should feel room temperature to slightly warm. If they’re hot to the touch (above 100°F or 38°C), something’s wrong with your charging settings or there’s an internal problem. Cold batteries (below 32°F or 0°C) can’t charge safely and deliver less power.
These three numbers tell you almost everything about your system’s health. Write them down in a simple notebook, and patterns will emerge within weeks.
Budget-Friendly Monitoring Solutions That Work
When I first started monitoring my off-grid system, I made the mistake of buying the cheapest Amazon battery monitor I could find. It died within three months. Since then, I’ve tested several budget options that actually hold up, and I want to share what’s worked for me without breaking the bank.
The Victron SmartShunt remains my top recommendation in the $130-150 range. Yes, it’s pricier than some alternatives, but the Bluetooth connectivity and accuracy make it worth every penny. I installed one on my workshop battery bank two years ago, and it’s still giving me reliable readings within 1% accuracy. The VictronConnect app is intuitive enough that my neighbor (who’s not tech-savvy) figured it out in minutes. The only downside? You need to keep your phone charged to check it, which sounds obvious but becomes annoying when you’re working outside all day.
For true budget warriors, the DC 100A Hall Effect Current Sensor paired with a basic volt meter ($25-30 total) gives you the essentials. I use this setup on my chicken coop battery. It won’t calculate state of charge automatically, but you can track voltage and current draw. The accuracy isn’t perfect, maybe 3-5% off, but it’s good enough to prevent over-discharge.
One monitor I don’t recommend despite its popularity is the generic “500A shunt with LED display” that floods marketplace sites. I’ve burned through two of them. They drift significantly after a few months and the calibration process is frustrating.
Putting It All Together: A Real-World Design Example
Let me walk you through a real-world example that ties everything together. We’ll design a complete off-grid battery system for a weekend cabin that draws about 3,000 watt-hours daily, mostly for lights, a small refrigerator, and charging devices.
First, we calculated our energy needs. That 3,000Wh daily load means we need at least 6,000Wh of battery capacity for two days of autonomy on cloudy days. We chose four 12V, 100Ah lithium iron phosphate batteries wired in series for a 48V system, giving us 4,800Wh of usable capacity. Close enough for our needs with some safety margin.
For solar input, we determined we need about 600 watts of panels to replenish that daily draw, accounting for winter sun angles and typical efficiency losses. We selected three 200W panels wired in series, providing roughly 36V output to our charge controller.
Here’s where Charles had his aha moment during his own cabin build: “I initially bought my charge controller based on wattage alone, but I didn’t match the voltage properly. Had to return it and get an MPPT controller rated for my panel string voltage. Learn from my mistake and do the voltage math first.”
The charge controller connects our solar array to the battery bank, managing the charging process. We chose a 40A MPPT controller rated for 48V battery systems and up to 150V solar input, giving us room to add panels later.
The batteries connect to a Battery Management System that monitors each cell’s voltage and temperature. This BMS sits between our batteries and the inverter, acting as the safety guardian. It’ll disconnect everything if cells drift too far apart or temperatures spike.
Next comes off-grid inverter selection. Our peak load is about 800W when everything runs simultaneously, so a 1,500W pure sine wave inverter handles our needs with comfortable headroom. It converts the 48V DC from our batteries into 120V AC for standard household devices.
Finally, we added basic monitoring through a battery monitor shunt that tracks amps flowing in and out, giving us a fuel gauge for our system.
The physical layout flows logically: panels on the roof, wires down to the charge controller, then to the BMS and batteries, and finally to the inverter feeding our cabin’s electrical panel. Include proper fusing at each major connection point and keep DC wire runs as short as possible to minimize voltage drop.
This same approach scales up or down depending on your specific energy needs and budget.
Here’s the truth I’ve learned after years of helping folks build their off-grid systems: perfection is the enemy of progress. Your first battery system doesn’t need to power your entire life forever. It needs to reliably meet your current needs with a comfortable safety margin.
I’ve seen people paralyze themselves researching every detail for months, while others dive in with a small setup, learn from real-world experience, and expand confidently. The second group almost always ends up happier and more knowledgeable.
Start with your actual usage data, not theoretical maximums. Build in a 25-30% safety buffer for capacity and discharge rates. Choose quality components from reputable manufacturers, even if it means starting smaller. A well-designed 5kWh system will serve you better than a sketchy 10kWh one that leaves you stranded.
Remember, every expert started as a beginner who asked questions and made a few mistakes. That’s exactly why I created the calculators on this site and why our community exists. Use the battery sizing calculator to validate your math, ask questions in the forums, and share what you learn along the way.
Your off-grid journey doesn’t end with flipping the switch on your first system. It evolves as you understand your patterns, refine your setup, and maybe add capacity. The beautiful part? Each expansion builds on knowledge you’ve already gained. You’ve got this, and we’re here to help.
How useful was this post?
Click on a star to rate it!
Average rating 0 / 5. Vote count: 0
No votes so far! Be the first to rate this post.
We are sorry that this post was not useful for you!
Let us improve this post!
Tell us how we can improve this post?
charlesnoble
Here at Spheral Solar, I’m a hands-on solar power enthusiast, constantly exploring and experimenting with DIY solutions. I’m dedicated to sharing my discoveries, insights, and even the bumps I hit along the way, all in the pursuit of a more sustainable future.
How Much Battery Backup Do You Really Need? (Sizing… by Charlesnoble March 6, 2026 Calculate your actual power needs before committing to a 5kW battery backup system by listing every device you want to run during an outage and adding up their wattages. A 5kW system means you can draw 5,000 watts of power at any given moment, but the real question is for…
Why Your Backup System Needs a Critical Load Panel… by Charlesnoble December 28, 2025 Picture this: It’s 2 AM, the power’s out, and your backup battery system is silently draining itself trying to keep your pool pump, water heater, and every other non-essential appliance running. By morning, you’re out of power—right when you actually need it for your refrigerator and medical equipment. I learned…
Stop Oversizing Your Off-Grid Inverter (Here’s What… by Charlesnoble December 24, 2025 Calculate your total daily energy consumption in watt-hours by listing every appliance you plan to run off-grid, from your refrigerator drawing 150 watts for 8 hours to your laptop charging at 65 watts for 3 hours. Multiply each appliance’s wattage by its daily runtime, then add everything together. This number…
This Critical Safety Switch Could Save Your Solar… by Charlesnoble February 22, 2026 Picture this: you’ve just finished mounting your solar panels, the sun is shining, and DC power is flowing through your system at voltages high enough to seriously injure or kill someone. Without a proper DC isolator switch, you have no safe way to disconnect that power for maintenance, emergencies, or…
The Stream Behind Your House Could Power It (Here’s… by Charlesnoble March 26, 2026 Walk down to your nearest stream with a five-gallon bucket and a stopwatch. Fill that bucket and time how long it takes—this simple test reveals whether you have enough flowing water to power your off-grid home. If you can fill it in under 10 seconds from a source that drops…
Why Grid Code Compliance Matters (Even When You’re… by Charlesnoble January 16, 2026 Check your local utility’s interconnection requirements before assuming your off-grid system is exempt from grid codes—many jurisdictions now require compliance even for systems with no planned grid connection, especially if your property remains connected to utility lines. Download your utility’s technical standards document and your state’s electrical code amendments, then…
Subscribe for handpicked DIY projects, exclusive tips, and giveaways.
Check your existing solar lights before buying new batteries by removing the old NiCd cells and testing them with a multimeter—most failures stem from corroded battery contacts, not dead batteries. Clean the terminals with white vinegar and a wire brush, and you’ll likely resurrect 60% of “dead” lights without spending a dime. Replace NiCd batteries… Read more: Why NiCd Batteries Keep Your Solar Lights Alive (When Others Fail)
Picture this: You’ve just finished wiring your DIY solar panel array to your main electrical panel, feeling pretty accomplished, when a fellow solar enthusiast asks, “Did you install surge protection?” You pause. You know your system needs breakers, but surge protector breakers? That’s when you realize there’s a gap in your solar safety knowledge. If… Read more: Why Your Solar System Needs a QO Surge Protector Breaker (Before It’s Too Late)
Mount your solar area lights where they’ll receive at least 6-8 hours of direct sunlight daily, avoiding shade from trees, buildings, or eaves that can cut charging efficiency by 70% or more. I learned this the hard way when my driveway lights barely lasted two hours each night until I repositioned them just three feet… Read more: Why Your Solar Area Lights Keep Failing (And How to Fix Them for Good)


")
")
")
")
")
")
")
")
")
")
")
")


