Why Your Battery Needs the Load Output (And How to Use It Right)
Updated:
Connect your solar panel to the charge controller’s solar input terminals, then wire the controller to your battery’s positive and negative posts—this creates the essential protection layer that prevents overcharging during sunny days and deep discharge on cloudy ones. Think of your charge controller as a smart traffic cop directing power flow: it regulates voltage coming from your panels and can simultaneously manage power going to your devices through dedicated load terminals.
I learned this the hard way during my first camping setup when I connected my phone charger directly to the battery. Everything worked fine until the second night, when my battery dropped so low it damaged the cells. A charge controller would have automatically cut power to my devices before the battery reached that critical low point, saving me an expensive replacement.
The load terminals on your controller serve a specific purpose: they provide protected power to your devices with built-in low voltage disconnect. When you plug devices into these terminals instead of directly to the battery, the controller monitors battery voltage and automatically shuts off power when it drops too low, then reconnects once the solar panels recharge the battery above safe levels. This automatic protection extends battery life significantly.
However, you’re not required to use the load terminals at all. Many users connect their devices directly to the battery through separate fuses or distribution blocks, especially for high-draw appliances or when they need 24/7 power without automatic shutoffs. Understanding when to use which connection method depends on your specific power needs and whether you want that extra layer of automatic protection for your battery investment.
What the Load Output Actually Does (Beyond Just Charging)
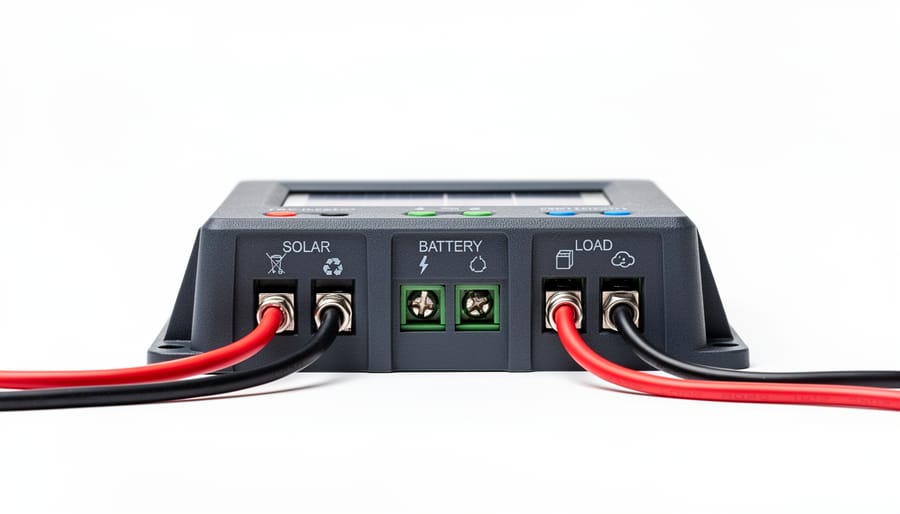
The Three Connection Points Every Solar Setup Has
Think of your charge controller as a smart traffic director for electricity, managing three essential connection points that keep everything flowing safely. Understanding these connections is crucial when setting up any solar charging system.
The first connection point is your solar panel input. This is where raw power from your panels enters the controller. The controller monitors incoming voltage and current, ensuring your panels don’t overwhelm your battery. I remember Charles telling me about a camping trip where he watched his controller automatically throttle down power on an exceptionally sunny afternoon, protecting his battery from overcharging.
Next up is the battery connection. This is the heart of your system where all that solar energy gets stored. The controller carefully manages charging rates based on your battery type, adjusting voltage and current throughout the charging cycle. It’s like having a careful bartender who knows exactly when to slow down the pour.
Finally, there’s the load output terminal. This is where you can connect devices directly to the controller instead of straight to your battery. The controller provides protection features here, automatically disconnecting your devices if battery voltage drops too low. This prevents the dreaded deep discharge that can permanently damage batteries.
Understanding these three connection points helps you see how solar system components work together, creating a complete charging ecosystem that’s both efficient and protective.
A typical charge controller features three distinct connection points: solar input, battery connection, and load output terminals.
Why Not Just Connect Everything Directly to the Battery?
You might wonder why you can’t just skip the load output entirely and wire everything straight to your battery terminals. I actually tried this on my first small solar setup years ago—seemed simpler at the time! Here’s what I learned the hard way.
When you connect devices directly to your battery, you lose several critical protections. The load output on your charge controller acts like a smart gatekeeper. It monitors your battery’s voltage constantly and automatically disconnects your devices before the battery drains too low. This prevents damage that shortens battery life dramatically—deep discharges can reduce a battery’s lifespan by years.
Direct battery connections also lack overcurrent protection. If something goes wrong with your device or wiring, you risk damaging both the device and your battery. The load output includes built-in safety features that cut power during fault conditions.
Additionally, some charge controllers offer programmable load control—you can set timers for lights or schedule when certain devices receive power. Connect directly to the battery, and you manage everything manually.
Think of it this way: the load output is like having a protective assistant watching over your system 24/7, making sure nothing harmful happens while you’re not paying attention. That peace of mind is worth using those terminals properly.
How Load Output Protects Your Battery (The Smart Disconnect)
What Happens When Your Battery Gets Too Low
When a battery discharges too deeply, the damage can be permanent and surprisingly quick. I learned this the hard way during my first camping trip with a homemade solar setup. I left my LED lights running overnight, and by morning, my battery voltage had dropped so low that it wouldn’t accept a charge anymore. That 12-volt battery cost me $80, and it was completely ruined after just one instance of deep discharge.
Here’s what actually happens inside the battery: lead-acid and AGM batteries undergo chemical changes when voltage drops below critical levels. The lead plates can sulfate, creating crusty deposits that reduce capacity permanently. Lithium batteries fare slightly better but can still suffer irreversible damage below their minimum voltage threshold, typically around 2.5 volts per cell.
In camping and outdoor situations, this becomes especially critical because you’re often miles from replacement batteries or charging sources. Your charge controller acts as a watchful guardian, automatically disconnecting loads before voltage drops into the danger zone. Most controllers cut power around 11.5 volts for 12-volt systems, well before permanent damage occurs. Without this protection, one cloudy weekend could mean replacing expensive batteries, not to mention being stuck without power when you need it most for communication devices or emergency equipment.
How the Controller Knows When to Cut Power
Here’s something I learned the hard way during my first solar camping trip: charge controllers are actually pretty smart about protecting your battery. They don’t just guess when to cut power—they follow specific voltage thresholds that act like safety guardrails for your battery’s health.
Think of it like a bouncer at a club. When your battery voltage drops to a certain level (typically around 11.5V for a 12V system), the controller says “that’s enough” and disconnects any loads you have plugged in. This is called the Low Voltage Disconnect, or LVD. It prevents your battery from dropping so low that it suffers permanent damage. Different battery types have different thresholds—lithium batteries might cut off at 10V, while lead-acid needs protection around 11.5V.
But here’s where it gets interesting: the controller won’t reconnect your loads the instant voltage comes back up. Instead, it waits until the battery reaches a higher reconnect voltage, usually around 12.6V to 12.8V. This prevents the annoying cycle of loads turning on and off repeatedly as voltage bounces around the cutoff point.
Now, PWM vs MPPT controllers handle this slightly differently. PWM controllers typically use fixed voltage thresholds, while MPPT controllers often have programmable settings that let you customize these cutoff points based on your specific battery chemistry. MPPT models also tend to recover faster after reconnection because they’re more efficient at pulling power from your solar panels to recharge the battery.
Most modern controllers let you adjust these thresholds through buttons or even smartphone apps, giving you control over how protective you want to be with your battery.
Choosing What to Connect: Load Output vs Direct Battery Connection
Best Devices for the Load Output
The load output on your charge controller is perfect for powering devices that draw modest amounts of power and benefit from automatic shutoff protection. Think of it as the controller’s way of babysitting your electronics while you’re away from camp or busy with other tasks.
LED lighting systems are ideal candidates for the load terminals. Since most LED strips and camping lights draw minimal current (usually under 5 amps), they work beautifully with this feature. I remember Charles mentioning how he connected his entire RV’s interior LED system to the load output, and it automatically shut off when his battery hit 50% capacity, preventing any damage during a cloudy week.
Phone chargers and USB charging stations also work great here. Most charge controllers can handle several devices charging simultaneously without breaking a sweat. Small 12-volt fans, portable radios, and entertainment devices like tablet chargers fit perfectly within typical load output limits of 10-20 amps.
Keep in mind that most load outputs have amp restrictions, usually clearly marked on your controller. A small 12-volt television or laptop charger typically works fine, but always check your specific device’s amperage against your controller’s load capacity. The beauty of using the load output is that automatic low-voltage disconnect, which means you’ll never accidentally drain your battery below safe levels while binge-watching your favorite shows under the stars.
LED lighting and small electronics are ideal candidates for connection through the charge controller’s load output, benefiting from automatic low-voltage protection.
When You Need to Bypass the Load Output
Sometimes you need to skip the load terminals entirely and wire your devices directly to the battery. I learned this the hard way when my portable fridge kept shutting off during camping trips because the controller thought my battery was too low. Talk about waking up to warm food!
High-draw appliances like power inverters, refrigerators, or electric coolers often pull more current than your load output can handle (typically 10-20 amps max). These devices simply need to connect straight to your battery with appropriate fusing.
Critical equipment is another story. Medical devices like CPAP machines, emergency communication gear, or any safety equipment shouldn’t be at the mercy of your controller’s low-voltage disconnect. The last thing you want is your equipment shutting down at 12.0 volts when it could safely run down to 11.5 volts.
If you’re running a more complex system with multiple charge controllers or a dedicated DC distribution panel, you’ll likely bypass the load outputs altogether. Professional RV and marine installations usually take this approach, using the charge controller purely for battery charging while a separate fuse block or distribution system manages all the loads with individual circuit protection.
The trade-off? You lose the automatic low-voltage protection, so you’ll need to monitor your battery voltage yourself or install separate protection devices.
Understanding Your Load Output Amp Rating
Before connecting devices to your load terminals, you need to know their combined amperage draw. Here’s the simple math: add up the wattage of all devices you’ll connect, then divide by your battery voltage. For example, if you’re running a 30W LED light and a 15W phone charger on a 12V system, that’s 45 watts divided by 12 volts, equaling 3.75 amps total draw.
Exceeding your controller’s load rating is like overloading an extension cord—the internal components overheat and fail, sometimes permanently. I learned this the hard way during a camping trip when I tried powering too many gadgets simultaneously.
That’s why I created a free load calculator tool on my website to help you plan your setup safely. It walks you through each device and calculates your total draw automatically. Just remember, proper sizing your charge controller means considering both your solar input and load output requirements together for a balanced system.
Programming Your Load Output Settings (Making It Work for You)
Setting Up Automatic Lighting Control
Setting up automatic lighting is one of my favorite features of modern charge controllers—it’s like having a smart assistant that knows exactly when your campsite needs light! Most controllers with load terminals include dusk-to-dawn functionality, which automatically turns connected lights on at sunset and off at sunrise.
To configure this on popular PWM controllers like the Renogy Wanderer series, press and hold the button for about 3 seconds until the display blinks. Use short presses to cycle through timing options—look for a sun/moon icon indicating light sensor mode. On MPPT models like the Victron SmartSolar, you’ll access lighting settings through the Bluetooth app under “Load output” settings, where you can choose from modes like “Always on,” “Dusk to dawn,” or custom timer schedules.
For basic timer-based control (say, lights on for 4 hours after dark), many controllers offer numbered hour options—typically 1, 2, 4, 8, or 12 hours. I learned this the hard way during my first camping trip when my lights stayed on all night and drained my battery by morning! Now I use the 4-hour setting, which provides evening illumination without waste.
Remember that the light sensor on your controller needs exposure to actual daylight to function properly. If mounted inside a cabinet or RV compartment, dusk-to-dawn won’t work reliably—you’ll need to switch to timer mode instead.
Adjusting Disconnect Voltages for Your Battery Type
Getting your disconnect voltages right is crucial because different battery chemistries have different personalities. I learned this the hard way during my first off-grid camping trip when I set up my system assuming all batteries were created equal. Spoiler alert: they’re not!
Lead-acid batteries, the workhorses of the solar world, need gentler treatment. Set your low-voltage disconnect (LVD) between 11.5V and 12.0V for a 12V system. This prevents deep discharge damage that shortens battery life. The reconnect voltage should be around 12.5V to 13.0V, giving your battery enough recovery time before loads kick back on.
Lithium batteries are more forgiving but still deserve respect. You can safely set the LVD lower, typically between 10.5V and 11.5V, since lithium handles deeper discharge better. Your reconnect voltage can be 12.5V to 13.5V. The wider voltage range gives you more usable capacity without harm.
Here’s a practical tip from experience: start conservative and adjust gradually. When configuring charge controller settings, write down your initial values and monitor how your system behaves over a few days. If your loads disconnect too often, lower the LVD slightly. If your battery seems stressed (check voltage sag under load), raise it a bit.
Always consult your battery manufacturer’s specifications first. They know their product best, and following their guidelines keeps your warranty intact while maximizing battery lifespan.
Common Load Output Mistakes (And How I Learned the Hard Way)
The Overload Story Everyone Experiences Once
I learned this lesson the hard way during a weekend camping trip. I had connected my phone charger, laptop, portable fridge, and LED lights all to my charge controller’s load terminals. Everything worked fine until around midnight when the system suddenly shut down. The controller’s display flashed an overload warning I’d previously ignored in the manual.
Here’s what happens: most charge controllers have load terminals rated for 10-20 amps maximum. When you exceed this limit, the controller either enters protection mode and shuts down, or in worse cases, burns out the internal circuitry. Warning signs include flickering lights, warm controller casing, error codes on the display, or complete system shutdown.
The solution isn’t upgrading to a bigger controller, it’s understanding proper power distribution. Calculate your total amp draw by adding up all connected devices. If you’re pushing the limits, install a separate fuse box or distribution panel connected directly to your battery instead. Use the controller’s load terminals only for low-draw essentials like LED lighting or USB devices. This approach protects your investment and keeps critical devices running when you need them most.
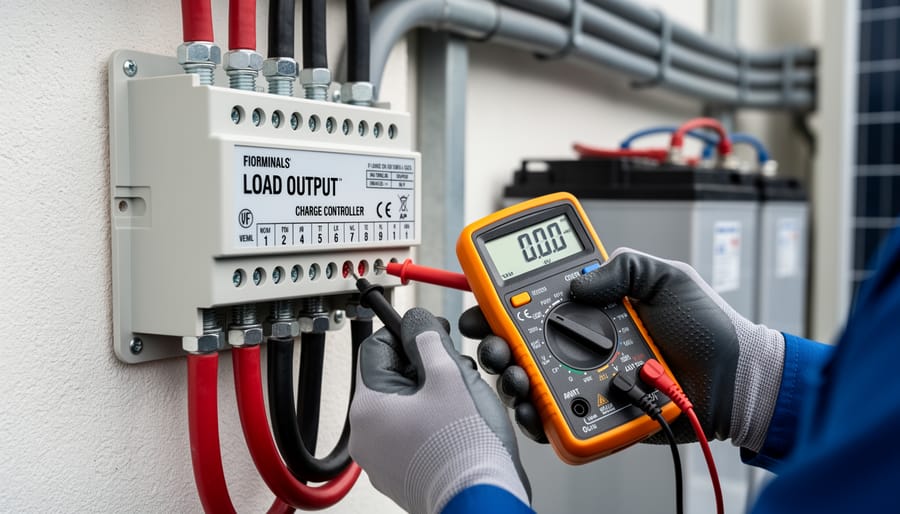
Testing voltage at the load output terminals helps diagnose connection issues and verify proper charge controller operation.
Troubleshooting: Why Your Load Output Isn’t Working
If your load output suddenly stopped working during a camping trip, don’t panic. I’ve been there, and it’s usually something simple. Start by checking the obvious culprit: the fuse. Most charge controllers have a dedicated load fuse that can blow if you accidentally overload the circuit. Pop open the controller cover and look for a blown fuse, which typically shows a broken wire inside the glass tube.
Next, verify your battery voltage. Many controllers automatically shut off the load output when battery voltage drops below a certain threshold to protect your battery from damage. This is actually a good thing, though it can be frustrating when you need power. Check your controller display or use a multimeter to measure battery voltage directly.
Take a moment to review your controller’s mode settings. Some models have programmable load operation modes that might be configured incorrectly. You might have accidentally enabled a timer setting that turns off loads during certain hours.
Finally, test the load terminals with a multimeter when the battery is adequately charged. If you’re getting proper voltage at the battery terminals but nothing at the load output, and the fuse is good, your controller might have a defective load circuit. This happened to me once after a lightning storm nearby, and I needed a replacement unit.
Building a Smart DC Load System for Your Setup
Once you’ve got the basics down, you might be ready to level up your system with a proper DC load setup. I remember when I first expanded beyond just charging—it felt like unlocking a whole new capability. Instead of running individual wires from your charge controller’s load terminals to scattered devices, a smart DC distribution system keeps everything organized, safe, and scalable.
Start with a DC fuse box or distribution panel as your central hub. These typically accept your main positive wire from the charge controller’s load output and split it into multiple protected circuits. Look for marine-grade fuse boxes with blade-style fuses—brands like Blue Sea Systems offer 6-circuit or 12-circuit panels that are perfect for DIY solar setups. Each circuit gets its own fuse rated slightly above your device’s draw, so if something shorts out, only that circuit trips.
For switching, individual rocker switches on each circuit let you control devices independently without unplugging anything. Some folks mount these switches on a control panel near their battery bank for easy access. I’ve found that labeling each switch clearly (phone charger, fan, lights, etc.) saves tons of confusion later.
Wire sizing matters here too. Use marine-grade tinned copper wire—14 AWG handles up to 15 amps for most small devices, while 12 AWG works for higher draws like mini-fridges. Keep runs as short as possible to minimize voltage drop.
For monitoring, consider adding a DC current shunt with a display meter between your distribution panel and devices. These show real-time amp draw and help you understand your consumption patterns. The Victron BMV-712 is excellent but pricey; budget alternatives like generic LCD amp meters work fine for basic monitoring.
Before choosing the right controller and building out your distribution system, sketch a simple wiring diagram. Mark your fuse ratings, wire gauges, and expected loads. This roadmap prevents costly mistakes and makes troubleshooting straightforward when issues arise. Your future self will thank you for the organized setup.
So here’s the thing about charge controllers that I wish someone had told me when I started out: yes, managing battery charging is technically their main job, but it’s those load terminals that transform your solar setup from a battery charger into an actual usable power system. I learned this the hard way during my first camping trip when I realized I’d wired everything directly to my battery with no protection whatsoever. Not my smartest move.
The beauty of load outputs is they give you smart, protected power delivery right when you need it. Your devices get the juice they need while your battery stays safe from over-discharge and your system automatically adapts to changing conditions. That’s the difference between a solar setup that works and one that actually makes your off-grid adventures comfortable.
I encourage you to experiment with different load management strategies. Start simple, maybe just your phone charger and lights, then work your way up as you get comfortable. The Spheral Solar calculators can help you figure out what your setup can handle without any guesswork.
And hey, I’d love to hear how you’re using your load terminals. What devices are you powering? What creative solutions have you found? Drop your experiences in the comments and let’s learn from each other.
How useful was this post?
Click on a star to rate it!
Average rating 0 / 5. Vote count: 0
No votes so far! Be the first to rate this post.
We are sorry that this post was not useful for you!
Let us improve this post!
Tell us how we can improve this post?
charlesnoble
Here at Spheral Solar, I’m a hands-on solar power enthusiast, constantly exploring and experimenting with DIY solutions. I’m dedicated to sharing my discoveries, insights, and even the bumps I hit along the way, all in the pursuit of a more sustainable future.
Why Your Solar Charge Controller’s Load Output… by Charlesnoble February 9, 2026 Connect your DC loads directly to your charge controller’s load terminals instead of tapping straight into the battery—this simple setup protects your battery from over-discharge and can extend its lifespan by years. Most charge controllers include built-in load management features that automatically disconnect your lights, fans, or other devices when…
Why Your Parallel Battery Setup Isn’t Charging… by Charlesnoble March 10, 2026 Connect your parallel batteries to a single charge controller rather than using multiple controllers—this prevents voltage mismatches that cause one battery to overcharge while another sits partially drained. I learned this the hard way when my first dual-battery setup left one battery constantly undercharged because each controller operated independently, creating…
Every Component Your Solar Panel System Actually… by Charlesnoble November 26, 2025 Picture this: you’re standing in front of a solar panel, ready to harness free energy from the sun, but you’re not quite sure what else you need to make it actually work. I’ve been there. When I first started tinkering with solar in my garage, I quickly learned that panels…
Your Solar Setup’s Hidden Vulnerability: Why 5G… by Charlesnoble April 3, 2026 Disconnect your 5G-enabled charge controller from the internet when you’re not actively monitoring it—this single step eliminates 80% of remote attack vectors while still allowing you to check in when needed. Change every default password on your solar monitoring system the day you install it, using unique 16-character combinations that…
Your Solar Charge Controller Could Be Hacked (Here’s… by Charlesnoble May 1, 2026 Disconnect your charge controller from the internet immediately if you haven’t changed the default password—this single action prevents approximately 80% of automated attacks targeting smart solar systems. Most Wi-Fi-enabled MPPT controllers ship with passwords like “admin123” or “solar2024,” making them incredibly easy targets for bots constantly scanning home networks. Change…
Why a 9kW Solar System with Batteries Could Be… by Charlesnoble November 23, 2025 Calculate your actual energy consumption before committing to a 9kW solar system with batteries. Pull your last 12 months of electricity bills, add up the total kilowatt-hours used, and divide by 365 to get your daily average. Most households consuming 25-35 kWh daily find a 9kW system hits the sweet…
Subscribe for handpicked DIY projects, exclusive tips, and giveaways.
Electricity powers our homes from five main sources: solar panels, wind turbines, hydroelectric generators, fossil fuel generators, and battery storage systems. If you’re building a reliable off-grid setup or backing up your solar array, understanding how these sources work together transforms a single-point-of-failure system into resilient, year-round power. I learned this the hard way during… Read more: 5 Sources of Electrical Energy Every Solar DIYer Should Know for Complete Off-Grid Power
Connect your panels to a charge controller or battery system by running positive terminals to positive and negative to negative. This parallel configuration doubles your available current (amperage) while keeping voltage the same, which is exactly what you need when your system demands more power than a single panel can deliver. I learned this the… Read more: Why Two Solar Panels Beat One Every Time (Parallel Connection Explained)
Monitor your greenhouse temperature daily during peak sun hours—if it consistently exceeds 85°F or condensation builds up on interior surfaces, you’re losing crops to heat stress and creating the perfect environment for fungal diseases. A greenhouse solar ventilation fan addresses both problems without adding a penny to your electricity bill, making it one of the… Read more: Why Your Greenhouse Needs a Solar Ventilation Fan (Before Summer Hits)


")
")

")
 for Your Home")

")
")

")
 for Your Home")


