Attic Solar Wiring That Won’t Fail Your Inspection
Updated:
Verify your attic wiring meets National Electrical Code (NEC) Article 334 requirements before connecting any solar equipment. This means checking that all NM cable (Romex) running through your attic maintains proper support every 4.5 feet, stays at least 1.25 inches from roof decking edges where penetration could occur, and uses protective plates wherever wires pass through framing members. I learned this the hard way during my first DIY solar attic installation when the inspector flagged three violations that cost me two extra weeks.
Ensure any junction boxes in your attic remain accessible and never buried under insulation. NEC Section 314.29 requires permanent access to all electrical connections, which means you’ll need to create pathways through blown-insulation or mark junction box locations clearly. Many DIYers miss this detail and face reinspection delays when inspectors can’t locate critical connections.
Install proper overcurrent protection sized to your wire gauge before routing any new circuits. A 20-amp breaker requires minimum 12-gauge wire, while 15-amp circuits need at least 14-gauge, per NEC Table 310.15(B)(16). Running undersized wire creates fire hazards and guarantees inspection failure.
Check local amendments to national code that govern attic temperatures and wire insulation ratings. Most attics exceed 140°F during summer months, requiring 90°C rated wire in many jurisdictions rather than standard 60°C cable. Your local building department maintains specific requirements that supersede general NEC guidelines.
Document everything with photos showing wire routing, support methods, and connection points. Inspectors appreciate thorough documentation, and you’ll need these references if troubleshooting issues months later. This preparation transforms a potentially stressful inspection into a straightforward approval process while ensuring your solar system operates safely for decades.
Why Attic Wiring Code Exists (And Why You Should Care)
When I first started exploring solar installations, I’ll admit—electrical codes seemed like bureaucratic red tape. But after speaking with a fire inspector friend over coffee one morning, my perspective changed completely. He showed me photos of attic fires caused by improper wiring, and suddenly those regulations made perfect sense. They’re not there to make your life difficult; they exist to keep your home and family safe.
The National Electrical Code, or NEC, is the foundation for electrical safety standards across the United States. Think of it as a comprehensive playbook developed over decades of real-world experience, accidents, and engineering advances. When it comes to solar installations in attics, these codes become especially critical because you’re working in one of the most challenging environments in your home.
Attics present a perfect storm of electrical hazards. The heat up there during summer months can be intense—often exceeding 150 degrees Fahrenheit—which affects how wires perform and how much current they can safely carry. Unlike your basement or garage, attics have limited access, meaning if something goes wrong, it’s harder to identify and fix. Plus, they’re typically filled with combustible materials like wooden beams, insulation, and stored items. Understanding how attic systems work helps you appreciate why proper wiring is non-negotiable in this space.
Beyond safety, there’s a practical reason to care about code compliance: your insurance and home value. Most insurance policies require electrical work to meet code standards. If an inspector finds violations or—worse—a fire occurs due to non-compliant wiring, your claim could be denied. Similarly, when selling your home, unpermitted electrical work can derail the entire sale or significantly reduce your home’s value.
The good news? Once you understand the reasoning behind these codes, following them becomes less about jumping through hoops and more about making smart, safe choices for your solar project.
Attic spaces present unique challenges for solar wiring due to extreme temperatures, confined spaces, and proximity to combustible materials.
Understanding Your Attic’s Electrical Environment
Temperature Derating: The Heat Factor Nobody Talks About
Here’s something I learned the hard way during my first solar attic installation: that wire I carefully sized for my system? It was actually undersized because I forgot about heat. Attics can reach 150°F or more in summer, and that changes everything about how wires handle electrical current.
Think of wire ampacity like a highway. In normal 86°F conditions, your wire can safely carry its rated current, like a highway handling its designed traffic load. But crank up the heat to 140°F, and that same wire needs to carry less current to stay safe. This is temperature derating, and it’s required by the National Electrical Code.
Here’s the practical reality: if you’re running 10 AWG wire rated for 30 amps in a cool basement, that same wire might only safely handle 21 amps in a scorching attic. The NEC provides correction factors in Table 310.15(B)(2)(a) based on ambient temperature.
The calculation is straightforward. Take your wire’s base ampacity and multiply it by the correction factor for your attic’s maximum temperature. For example, at 140°F, you’d multiply by 0.71. So a 30-amp wire becomes 30 x 0.71 = 21.3 amps actual capacity.
The solution? Size up your wire. If you need 30 amps in a hot attic, you might need 8 AWG instead of 10 AWG. Some installers also focus on managing attic temperatures through ventilation improvements, which helps your entire system perform better while meeting code requirements.
Accessibility Requirements for Future Maintenance
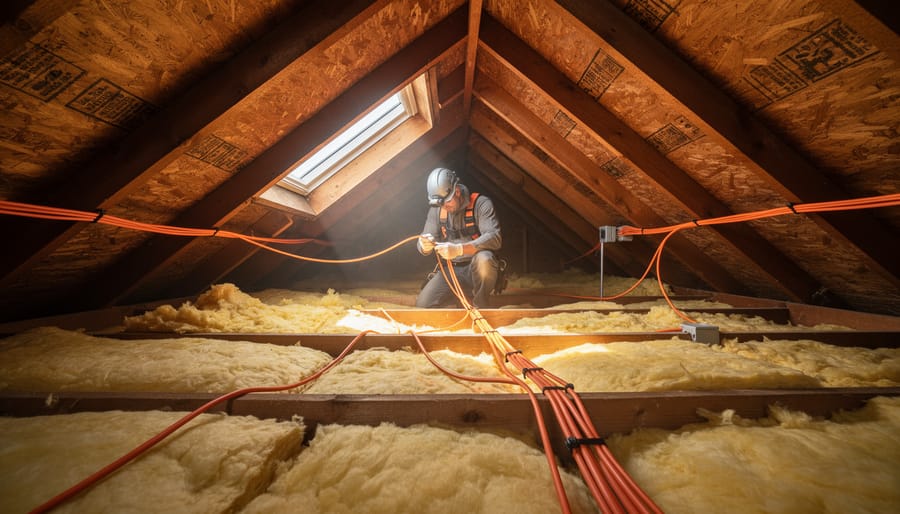
Here’s something I learned the hard way during my first attic solar installation: I buried a junction box behind insulation to make things look neat, only to have the inspector fail me on the spot. The National Electrical Code is crystal clear on this – every junction box, disconnect, and splice point must remain accessible without removing permanent building components.
Think of accessibility as your future self’s best friend. You need at least 30 inches of working space in front of electrical panels and disconnects, with 36 inches width. Junction boxes can’t be hidden behind drywall, buried under insulation, or placed where you’d need a contortionist’s flexibility to reach them. I now use brightly colored zip ties to mark junction box locations along my wire runs, making them easy to spot during future maintenance.
When planning your conduit routes, stick to easily reachable areas like along attic joists or rafters. Avoid running wires through tight crawl spaces or areas where storage might accumulate. I always snap photos of my wire paths before adding insulation – it’s saved me countless hours during troubleshooting.
Pro tip: Install pull boxes every 100 feet on long runs and at sharp bends. This makes future wire replacement possible without tearing apart your entire installation. Label everything clearly with weather-resistant tags, including wire gauge, circuit purpose, and installation date. Your inspector will appreciate it, and so will you when something needs attention years down the road.
Clearance and Protection Zones
When running wiring through your attic, giving it proper breathing room isn’t just good practice, it’s required by code. Think of clearance zones as safety buffers that protect your wiring from heat, moisture, and physical damage.
The National Electrical Code requires at least 1.25 inches of clearance between cables and the edge of any framing member where insulation will be installed. This prevents insulation from compressing against your wiring, which can trap heat and create fire hazards. I learned this the hard way during my first solar project when an inspector flagged my cables running too close to roof rafters.
For thermal insulation contact, maintain at least 3 inches of separation from recessed lighting fixtures unless they’re rated for insulation contact. Your solar inverter wiring generates heat during operation, so adequate airflow around cables is essential for longevity.
Physical protection requirements kick in when cables run across accessible areas. Any Romex or non-metallic sheathed cable within 6 feet of attic access points needs protection from physical damage. Use guard strips, conduit, or running boards to shield cables in these high-traffic zones. In areas where you might step or place storage items, route cables along joists rather than across them, or install protective boards overhead.
Remember, these clearances aren’t suggestions. Inspectors specifically check these measurements, and proper spacing prevents your system from becoming a safety hazard down the road.
Code-Compliant Wire Types and Materials for Attic Solar
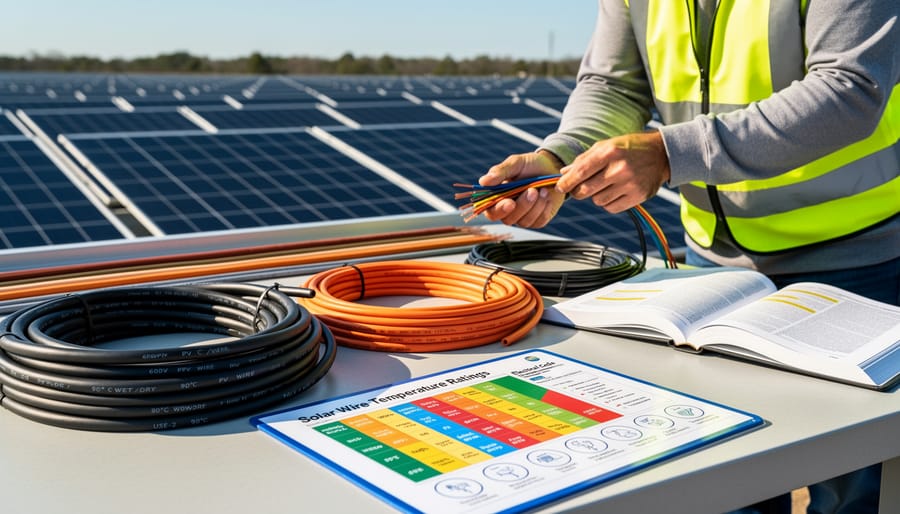
PV Wire vs. THWN vs. USE-2: Choosing the Right Cable
When I first started running solar wiring through attics, I was completely confused by all the cable types at the electrical supply store. PV Wire, THWN, USE-2—they all looked pretty similar to me! But here’s what I learned the hard way: choosing the wrong wire for your attic installation can fail inspection or, worse, create a fire hazard.
Let’s break down these three common wire types so you know exactly what belongs where in your attic solar setup.
PV Wire is specifically designed for photovoltaic systems. It’s built to handle direct sunlight exposure and extreme temperature swings, with a typical rating of 90°C (194°F) in wet conditions and up to 150°C in dry conditions. The key feature is its exceptional UV resistance and durability in harsh outdoor environments. In your attic, PV wire is perfect for the exposed sections where your wiring connects to roof-mounted panels or runs through uninsulated spaces that get seriously hot during summer.
THWN (Thermoplastic Heat and Water-resistant Nylon-coated) wire is your general-purpose electrical wire, rated for 75°C in wet locations and 90°C in dry locations. It’s more affordable than PV wire but lacks the UV resistance needed for outdoor exposure. THWN works great inside conduit running through your attic to your inverter or combiner box, where it’s protected from direct sunlight.
USE-2 (Underground Service Entrance) wire can handle 90°C and has excellent moisture resistance with moderate UV protection. It’s commonly used for long runs between the roof and ground-level equipment.
Here’s a quick comparison:
PV Wire: Best UV resistance, highest temperature rating, outdoor-rated, most expensive
THWN: Good in conduit, indoor/protected use, budget-friendly
USE-2: Moisture-resistant, moderate UV protection, underground or protected outdoor use
Choose based on your specific routing and exposure conditions for a code-compliant, safe installation.
Different wire types have specific temperature ratings and applications for solar installations, with proper selection critical for code compliance.
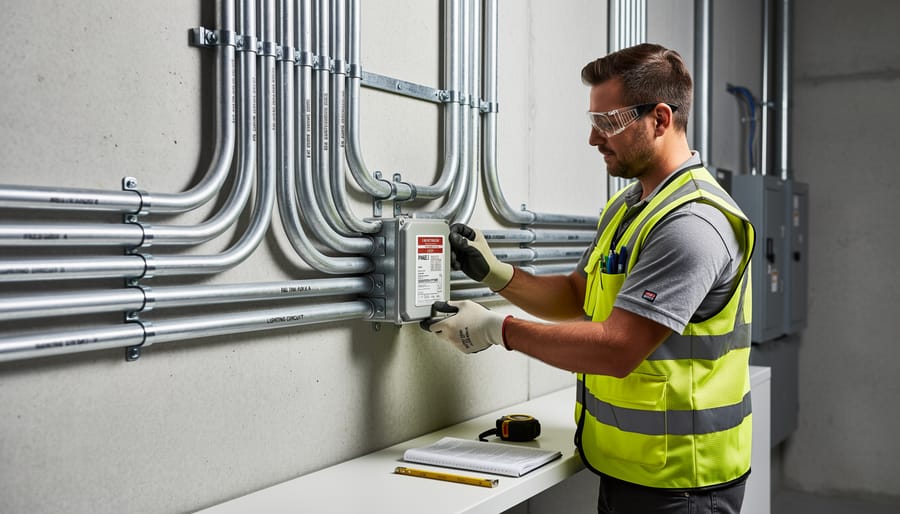
Conduit Requirements: When Metal Beats Plastic
Understanding when you need conduit versus when you can use exposed cable in your attic comes down to three main factors: cable type, location, and accessibility.
In most attics, you can run standard Romex (NM cable) along joists or through drilled holes without conduit, provided the cable is secured properly every 4.5 feet. However, conduit becomes necessary when cables cross open spaces where someone might step, when running along wall surfaces within six feet of an access opening, or when local codes require additional protection.
Let me share what I learned during my first attic solar install. I initially planned to skip conduit entirely, thinking Romex was always acceptable in attics. My inspector quickly corrected me, pointing out that any cable within reach of the attic entrance needed protection.
Here are your main conduit options:
EMT (Electrical Metallic Tubing) offers excellent protection and looks professional, but it’s rigid and challenging to navigate around attic obstacles. Cutting and bending requires special tools.
Rigid conduit provides maximum durability but is overkill for most residential attics and difficult for DIYers to work with.
Flexible metal conduit, my personal recommendation, combines protection with maneuverability. It’s forgiving for beginners and easily snakes around obstacles. The tradeoff? It costs more per foot and takes longer to pull wires through.
For most DIY solar attic installations, flexible conduit offers the best balance of code compliance and ease of installation.
Connectors, Junction Boxes, and Strain Relief
When connecting your solar wiring in the attic, proper junction boxes and connectors aren’t just good practice—they’re code requirements that protect your home. I learned this the hard way on my first solar project when an inspector flagged my undersized junction box. Let me save you that headache.
Every wire splice or connection must happen inside an approved junction box. The National Electrical Code requires boxes to be permanently accessible (meaning you can’t bury them under insulation) and properly sized based on the number and gauge of wires inside. A handy rule: for most residential solar applications with 10 AWG wire, a standard 4×4 metal junction box works great, but always calculate the fill capacity using the tables in NEC Article 314.16.
Choose boxes rated for at least 75°C, since attics get hot. Metal boxes are preferable for their durability and grounding properties. Make sure every box has a cover—open boxes are immediate code violations.
Strain relief matters more than most DIYers realize. Cables entering boxes need proper connectors or clamps to prevent pulling force from reaching wire terminals. I use snap-in cable connectors for Romex and proper strain relief bushings for conduit entries. Secure cables within 12 inches of every box and then every 4.5 feet along their run using appropriate staples or straps. This prevents sagging that could stress connections over time.
Planning Your Attic Solar Wire Route Like a Pro
The Shortest Path Isn’t Always Code-Compliant
When I first started wiring solar components in attics, I made what seemed like a logical choice: running cable straight across the space to reach my inverter. Shortest distance, right? Wrong. That direct route crossed perpendicular to floor joists, creating multiple code violations I didn’t discover until my inspection failed.
Here’s what trips up most DIYers: attic wiring needs to follow specific pathways regardless of convenience. When running cable perpendicular to joists, you must drill holes at least 1.25 inches from the joist edges, or install protective running boards if you’re laying cable on top. I learned this the hard way when an inspector pointed out my cable was just resting on joists, vulnerable to damage from anyone walking through the attic.
Running parallel to joists is generally easier, but you still need to maintain proper clearances. Your cable should be secured every 4.5 feet and within 12 inches of any junction box. Think of it like creating a highway system for your electrical current, with designated lanes that keep everything safe.
The clearance rule that catches many people off guard: maintain at least 6 feet of headroom in accessible attic areas, and keep wiring away from areas where people might step. If your attic has walkways or storage platforms, route cables along the sides, not across traffic paths.
One trick I’ve adopted is mapping my wire route on paper before drilling a single hole. This planning stage helps identify potential code conflicts before they become expensive mistakes. Your inspector will appreciate the thoughtful approach too.
Proper conduit installation and securing methods ensure wiring remains protected and accessible for future maintenance while meeting code requirements.
Labeling and Documentation Requirements
When you’re running solar wiring through your attic, clear labeling isn’t just good practice—it’s code-required and could save your life or someone else’s down the road. The National Electrical Code requires that all DC circuits from your solar panels be clearly labeled at every accessible location. This means marking each conduit, junction box, and wire bundle with weather-resistant labels that say “WARNING: SOLAR PHOTOVOLTAIC POWER SOURCE” at minimum.
Your disconnect switches need proper signage too. I learned this the hard way during my first installation when the inspector pointed out my handwritten label wasn’t acceptable. Use permanent, UV-resistant markers or printed labels that won’t fade. The disconnect must clearly indicate which circuits it controls and be visible from the location where someone would operate it.
Here’s something Charles always emphasizes: document everything with photos before you close up walls or insulation. Take pictures of your wire routing, connection points, and label placements. Create a simple wiring diagram showing circuit paths and breaker locations. When inspection day comes, this documentation demonstrates your attention to detail and professionalism. More importantly, five years from now when you need to troubleshoot or expand your system, you’ll thank yourself for leaving that clear roadmap. Keep copies in a waterproof folder near your main electrical panel where future homeowners or electricians can easily find them.
Creating an Inspector-Friendly Installation
When it’s time for inspection, presentation matters just as much as the actual work. Charles learned this firsthand when his first attic solar installation took three visits to pass because he hadn’t clearly labeled his disconnects or left the inspector a clear path to view everything.
Start by creating a simple one-page diagram showing your wire routing, disconnect locations, and equipment ratings. Inspectors appreciate having a visual reference without needing to crawl through your entire attic. Keep all your product spec sheets and code calculations in a folder right at the inspection site.
Common inspector concerns with attic solar include wire sizing for temperature derating, proper support intervals, and accessible disconnects. Address these proactively by using visible zip-ties at proper intervals, adding small labels to your conduit showing wire gauge and purpose, and ensuring your disconnect is clearly marked and easy to reach.
Leave adequate working space around all equipment and junction boxes. Charles recommends placing a small flashlight near your main junction box so inspectors can easily see your wire terminations. Clean up wire scraps and leave the area neat. These small touches show professionalism and often lead to smoother inspections and fewer follow-up questions.
Critical Safety Disconnects and Rapid Shutdown
Accessible safety disconnects must be properly located and clearly visible to meet code requirements for solar installations.
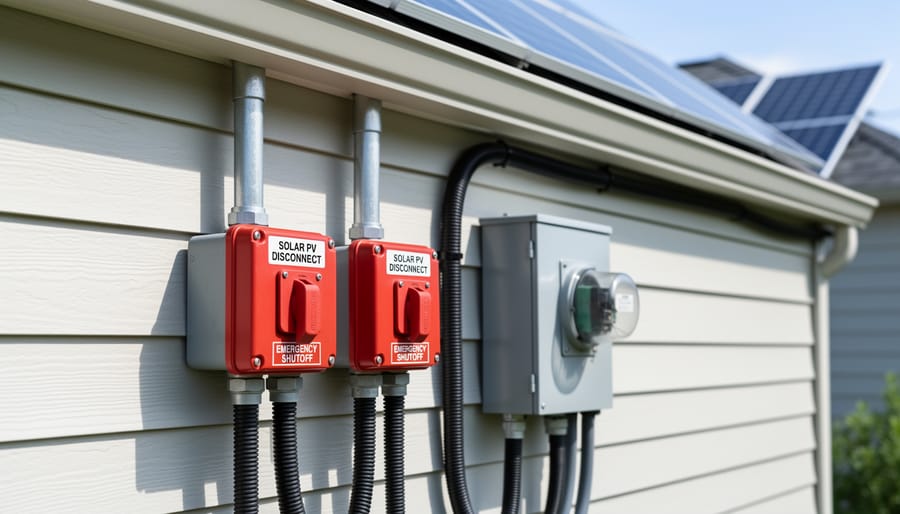
Where Disconnects Must Be Located
When I first installed my solar setup, I learned the hard way that knowing where to place your disconnect switch isn’t just about convenience—it’s a code requirement that inspectors take seriously. The National Electrical Code requires that disconnects be installed in readily accessible locations, which means you or emergency personnel can reach them quickly without climbing over obstacles or using ladders.
For attic solar installations, your disconnect must be located either at the point where your solar wiring enters the building or within sight of your inverter. The key phrase here is “readily accessible”—this means a clear path to the switch, no stored boxes blocking it, and definitely not tucked behind insulation or equipment. Think of it this way: if a firefighter needed to shut down your system in an emergency, could they find and operate the disconnect in under 30 seconds?
Proper labeling is equally critical. Your disconnect must have a permanent label identifying it as “Solar Disconnect” or “PV System Disconnect” in letters at least three-eighths of an inch high. I use weather-resistant engraved labels rather than handwritten ones—they last longer and look more professional during inspections.
One common mistake is placing the disconnect at the top of attic stairs where there’s insufficient headroom. Code requires adequate working space: at least 30 inches wide, 36 inches deep, and enough height to stand comfortably.
Rapid Shutdown: What DIYers Need to Know
If you’re installing solar in your attic, you’ve probably heard the term “rapid shutdown” thrown around. When I first encountered this requirement, I’ll admit I was confused. It sounded like some complicated emergency system, but it’s actually a straightforward safety feature that’s easier to implement than you might think.
Here’s the deal: Since 2017, the National Electrical Code (NEC) requires rapid shutdown systems on most residential solar installations. The purpose is simple—if there’s a fire or emergency, firefighters need a way to quickly de-energize the solar panels so they can safely work on your roof. Without this, your panels would continue generating potentially dangerous voltage even during an emergency.
Does your DIY system need rapid shutdown? If your solar array was installed after 2017 and has conductors running more than a foot from the array or entering your building, then yes, you need it. This applies to nearly all attic installations since your wiring travels through your attic space and into your home.
The good news is that modern DIY-friendly solutions exist. Module-level power electronics, commonly called MLPEs, are your best bet. These include microinverters or DC optimizers that attach directly to each panel. They automatically shut down voltage at the module level when you flip a clearly labeled switch or when the system loses grid connection. Many popular DIY solar kits now include these components, and they actually simplify installation while providing rapid shutdown compliance. Just make sure your chosen equipment is clearly labeled as NEC 2017 or 2020 compliant.
Common Attic Wiring Mistakes That Fail Inspection
Over the years, I’ve seen quite a few attic wiring projects that didn’t quite make it past the inspection stage, and honestly, most of them were totally avoidable issues. Let me share some of the most common slip-ups so you can sidestep them in your own project.
The biggest one I encounter is improper wire protection. I remember helping my neighbor Sarah with her solar attic setup, and we discovered her previous electrician had run standard romex cable directly across exposed joists where someone could step on it. That’s a no-go. Any wiring that crosses joists in walkable areas needs to be at least 6 feet above the attic floor, or you’ll need to install running boards to protect it. It seems like extra work, but inspectors catch this every single time.
Another frequent mistake is using the wrong wire type for high temperatures. Attics can get brutally hot in summer, and standard NM cable is only rated for 60 degrees Celsius. If you’re running wire near your roof deck or in areas that trap heat, you’ll want to use wire rated for 90 degrees Celsius instead. I learned this the hard way when an inspector made me re-pull about 50 feet of cable because it was too close to my roof sheathing.
Junction boxes without proper access are another classic violation. Every connection point needs to remain accessible, which means you can’t bury a junction box under insulation or behind ductwork. Mark your boxes clearly and maintain a clear path to them. Trust me, future-you will appreciate this thoughtful planning.
Finally, inadequate support spacing trips up many DIYers. Cable needs to be secured within 12 inches of every box and at least every 4.5 feet along its run. Loose, sagging cables look unprofessional and won’t pass inspection. Take your time with proper stapling, and you’ll breeze right through.
Working with Your Local Authority Having Jurisdiction (AHJ)
Before you start drilling holes or pulling wire through your attic, there’s one essential step that can save you tremendous headaches: getting on the same page with your local Authority Having Jurisdiction (AHJ). I learned this the hard way on my first solar project when I assumed the National Electrical Code was the only rulebook I needed. Turns out, my municipality had additional requirements that nearly derailed my inspection.
Your AHJ is typically your local building department, and they’re the ones who ultimately approve or reject your work. Start by visiting their website or office to request information about electrical permit requirements for attic installations. Many jurisdictions now have helpful online resources that outline exactly what you need to submit. Don’t just focus on the NEC—ask specifically about local amendments, which can include stricter wire protection requirements, different conduit specifications, or additional fire-rated materials in attics.
Pulling a permit might seem like an inconvenience, but it’s actually your friend. It ensures your work gets reviewed by someone who knows local conditions and potential issues you might miss. When you submit your permit application, include clear diagrams of your planned wire routing, junction box locations, and any penetrations through fire-rated assemblies. This shows you’re taking the work seriously.
Here’s something I wish someone had told me earlier: inspectors are generally helpful people who want you to succeed. They’ve seen countless installations and can offer practical insights you won’t find in any manual. When the inspector arrives, be present, ask questions, and take notes. If they point out an issue, listen carefully and ask for clarification if needed. Many inspectors appreciate DIYers who are genuinely trying to learn and do quality work.
Remember that permit fees and inspection scheduling should factor into your project timeline and installation costs. Building these relationships with your local AHJ transforms them from gatekeepers into valuable partners in your solar journey.
Getting your attic solar wiring up to code might seem daunting at first, but here’s the truth: thousands of DIYers just like you have successfully completed compliant installations. The key takeaway from everything we’ve covered is that code compliance isn’t about jumping through hoops. It’s about protecting your home, your family, and the investment you’re making in clean energy.
I remember talking to Charles about his first attic installation, and he told me something that stuck with me: “The codes exist because someone, somewhere, learned a hard lesson so we don’t have to.” That perspective shift changes everything. When you follow proper wire sizing, maintain correct clearances, and secure everything according to code, you’re not just checking boxes. You’re building a system that will safely power your home for decades.
The good news? With proper planning and attention to detail, this is absolutely within your reach. Start by taking accurate measurements of your space, calculating your system’s electrical requirements, and mapping out a clear plan before you begin. Use Spheral Solar’s calculators to help size your system correctly and ensure all your components work together safely.
Before you climb into that attic with your tools, double-check your local requirements and consider having your plan reviewed by your local building department. They’re often more helpful than you’d expect.
We’d love to hear about your attic wiring journey. Share your experiences, questions, or photos in our community. Your story might be exactly what inspires or helps the next DIYer taking on their first solar project.
How useful was this post?
Click on a star to rate it!
Average rating 0 / 5. Vote count: 0
No votes so far! Be the first to rate this post.
We are sorry that this post was not useful for you!
Let us improve this post!
Tell us how we can improve this post?
charlesnoble
Here at Spheral Solar, I’m a hands-on solar power enthusiast, constantly exploring and experimenting with DIY solutions. I’m dedicated to sharing my discoveries, insights, and even the bumps I hit along the way, all in the pursuit of a more sustainable future.
Keep Your Attic Cool Without Touching Your Electric Bill by Charlesnoble December 27, 2025 Look up at your gable vent on a summer afternoon, and you’ll understand why a solar-powered attic fan mounted there makes perfect sense. That triangle-shaped opening at the peak of your home sits exactly where hot air naturally accumulates, and it’s already positioned to catch direct sunlight for most of…
Why Your Attic Needs a Solar Roof Vent (Before Summer Hits) by Charlesnoble February 21, 2026 Your attic is probably hotter than you think. On a summer day, temperatures up there can soar past 150°F, turning your top floor into an oven and forcing your air conditioner to work overtime. A solar ventilation fan for your roof tackles this problem head-on by pulling hot air out…
Solar-Powered Ventilation That Slashes Your Energy… by Charlesnoble March 11, 2026 Calculate your home’s air exchange rate by dividing your square footage by 60—most homes need complete air replacement every 1-3 hours to prevent moisture buildup, stale air, and indoor pollutants that trigger allergies and respiratory issues. A 1,500 square foot home requires roughly 25-50 cubic feet per minute of continuous…
Why Your Attic Needs Exactly This Much Ventilation… by Charlesnoble November 22, 2025 Calculate your attic’s square footage by multiplying length times width, then divide by 150 to determine the minimum net free ventilation area (NFVA) required in square inches. For example, a 30-foot by 40-foot attic (1,200 square feet) needs at least 8 square inches of ventilation. Split this requirement evenly between…
Solar-Powered Attic Fans That Actually Pay for Themselves by Charlesnoble January 21, 2026 Install solar-powered attic fans on south-facing roof sections where they’ll capture 6-8 hours of direct sunlight daily, positioning them between rafters near the roof peak for maximum hot air extraction. These systems work without touching your electrical panel, pulling superheated air out before it radiates down into your living space…
How Do Attic Fans Work? by Adeyomola June 21, 2021 Attic fans work primarily by augmenting the movement of hot air rising out of the attic. They do this by transmitting the mechanical energy (kinetic energy) from their rotation to the molecules of the air around them, thus increasing the rate of convection. As attic fans promote the escape of…
Subscribe for handpicked DIY projects, exclusive tips, and giveaways.
Walk down to your nearest stream with a five-gallon bucket and a stopwatch. Fill that bucket and time how long it takes—this simple test reveals whether you have enough flowing water to power your off-grid home. If you can fill it in under 10 seconds from a source that drops at least 10 feet in… Read more: The Stream Behind Your House Could Power It (Here’s How Micro Hydro Works)
Brush snow off your panels with a soft-bristled roof rake from ground level, working gently from bottom to top to avoid scratching the glass or damaging your DIY solar setup. Use lukewarm water in a spray bottle for stubborn ice patches, never hot water that could crack cold panels from thermal shock. Install panels at… Read more: Snow on Your Solar Panels? Here’s What Actually Works (And What Wastes Your Time)
Picture this: Last summer, I draped what looked like sparkling fairy lights across my patio pergola, and guests immediately asked where I’d hidden the extension cord. There wasn’t one. These solar powered outdoor curtain lights had transformed my backyard into an enchanting evening retreat without adding a cent to my electric bill or requiring any… Read more: Solar Curtain Lights That Actually Work Outdoors (What I Learned Installing Mine)


")

")


")

")