Solar Charge Controller Settings 101: All You Need to Know
Updated:

To optimize the performance of your solar power system and safeguard the battery bank, it’s crucial to configure the charge controller with the correct settings.
While the specific steps vary across different controllers, understanding the fundamental parameters is the key to optimizing any solar charge controller.
This article reviews the core concepts you need to know and walks through general setup steps. We also provide model-specific instructions for popular controllers.
By the end, you’ll know to configure your controller like a pro, maximizing the effectiveness and longevity of your solar energy system.
Important Solar Charge Controller Parameters
Let’s start by understanding the key parameters related to solar charge controllers.
This is the first step towards optimizing your solar charge controller settings. This knowledge will empower you to make informed decisions, ultimately maximizing the effectiveness and efficiency of your solar system.
System Voltage
Think of the system voltage as the operating energy level of your solar power system. In most cases, this is the same as your battery voltage. Common system voltage levels are 12V, 24V, or 48V.
Maximum System Current
This is the peak output current your solar panels or array can produce. Essentially, it’s the maximum power your system can provide during the most effective solar energy periods.
Charge Controller Capacity
This is the highest current level that your solar charge controller can safely manage.
This capacity typically dictates the rating of your solar charge controller and ranges from 10A up to 100A.
Charge Controller Settings for Different Battery Types
Knowing how to configure the solar charger controller settings according to your specific solar battery type for an effective solar energy system can significantly enhance the charging efficiency.
Different solar batteries possess unique characteristics, so we must discuss the optimum settings for the most commonly used types: AGM (Absorbent Glass Mat), LiFePO4 (Lithium Iron Phosphate), and lead-acid batteries.
Solar Charge Controller Settings for AGM Batteries
AGM batteries stand apart due to their fiber-boron-silicate glass separator replacing the traditional liquid electrolyte, resulting in a spill-proof design. This makes them a versatile choice, compatible with an array of vehicles, and even suitable for jump-starting a vehicle running low on power, given the suitable solar charge controller.
To get the best out of your AGM battery, it’s essential to adjust your solar charge controller settings following the manufacturer’s recommendations.
The controller settings will determine the maximum output voltage and current, designed to optimize charging efficiency.
Solar Controller Settings for LiFePO4 Lithium Batteries
LiFePO4 batteries come with their unique requirements. Unlike other battery types, they do not need voltage or temperature compensation.
To get the best performance from your LiFePO4 battery, it’s recommended to use an MPPT solar charge controller with a “user” or “custom configuration” mode. These controllers are designed to regulate voltage from a high panel to a low voltage, which is obviously ideal for heavy-duty applications.
Do not forget to install a charge controller with low-voltage protection to safeguard your battery.
Solar Controller Settings for Lead Acid Batteries
Regarding lead-acid batteries, most solar charge controllers are pre-set with parameters suitable for this traditional and widely-used battery type.
In many cases, it’s simply a matter of plug-and-play, but always check the manufacturer’s instructions for any specific recommendations or settings.
Optimum Charging Parameters for Different Battery Types
Here’s a summary of charge controller settings for each battery type considering a 12V system voltage:

The table above shows many new technical parameters related to battery charging and dischLet’sg. Let’s understand these next.
Battery Type
First things first, identify the type of your battery. This could be a Sealed Battery, Gel Battery, Open Lead Acid Battery, Lithium Battery, or Custom Battery.
Over Voltage Disconnect Voltage
This parameter tells the controller when to cut off the power to the battery, preventing any damage from overcharging. Each battery type has a unique voltage level for disconnecting the controller.
Equalization Voltage
The Equalization Voltage setting instructs the controller to periodically charge the battery to a specific voltage, ensuring all cells are balanced. Again, each type of battery has a specific voltage for this.
Boost Voltage
The Boost Voltage is the voltage level to which the controller charges your battery during the bulk chargingIt’sge. It’s another parameter that must be adjusted based on your battery type.
Float Charge Voltage
The Float Charge Voltage is what the controller uses to maintain the battery once it is fully charged. This prevents self-discharge and keeps your battery ready for use.
Each battery type has its own ideal Float Charge Voltage.
Boost Recovery Voltage
After the battery is discharged following the float stage, it must return to work.
The Boost Recovery Voltage tells the controller when to kick back into the bulk charging stage.
Each type of battery has its own unique Boost Recovery Voltage.
Equalization Duration
How long should the equalization process take? The Maximum Equalization Duration sets the length of time for the equalization process. This duration depends on the type of battery.
Equalization Charging Interval
The Equalization Charging Interval sets how often the equalization process is carried out. The frequency of this process varies depending on the battery type.
Equilibrium Charging Interval
Finally, the Equilibrium Charging Interval tells the controller how often to carry out the equilibrium charging process. This also depends on the type of battery.
Steps for Solar Charge Controller Settings
Getting your solar charge controller settings right is vital for your solar power system’s optimal performance and longevity. The settings cater to the specific needs of your battery and system setup.
Here’s a general outline of how to set up your solar charge controller:
- Begin with Proper Wiring: Kickstart your setup process by connecting the charge controller to your battery bank and solar panels. Make sure to folmanufacturer’scturer’s instructions to wire everything correctly. When the controller detects power, its screen will illuminate, signaling you’re ready for the next step.
- Navigate to the Settings Menu: Access the controller’s settings menu by pressing and holding the menu button for a few seconds or using a mobile app if your controller has one. This will open up various settings options to fine-tune your charge controller.
- Display Charge Current: Check out the charge current from the photovoltaic (PV) system to the battery. It’s typically displayed on the settings menu, giving you an insight into the power flowing into your battery.
- Select Battery Type: Next, go to the Battery Type Selection setting. You can specify your type here, as different batteries require different charge parameters.
- Let the Controller Detect Battery Voltage: Your charge controller should automatically recognize the voltage of your battery. This automatic detection feature takes the guesswork out of setting your charge controller.
- Adjust Charging Voltages and Cutoff Values: Now comes the part where you personalize your controller settings. Set the absorption charge voltage, low voltage cutoff value, and float charge voltage according to your battery’s user manual. Adjusting these settings helps prevent battery damage and promotes efficient charging.
- Start Charging: Your solar charge controller is ready to go once all these settings are adjusted! It will commence the charging process, supplying your battery with power from your solar panels.
While the steps above cover all major aspects of solar charge controller settings, each model has a slightly different way of carrying out the setting.
Next, let’s see how to set up four popular charge controller models.
Renogy Rego MPPT Solar Charge Controller Settings: Step-by-step Guide
The Renogy MPPT Solar Charge Controller is an advanced solar charge controller that uses Maximum Power Point Tracking (MPPT) technology to maximize energy harvest from solar panels to charge batteries.
Following are the steps to set up the controller settings:
Step 1: Selecting the Battery Type

- Identify the type of your battery. It could be an AGM battery, gel battery, flooded lead acid battery, Lithium battery, or a type that requires custom settings (User).
- Locate the knob with 5 gears on your Renogy MPPT solar charge controller.
- Turn the knob to the setting that corresponds to your battery type. For example, turn the knob to ‘AGM‘ if you have an AGM battery. If you have a Lithium battery, turn the knob to ‘LI‘.
- If your battery type requires custom settings, turn the ‘nob’ to ‘USER‘. This will allow you to enter the user mode and set the parameters yourself.
Step 2: Using Default Preset Values
If you’ve selected a specific battery type (not ‘USER’), the controller will automatically use the default preset values for that battery type.
You don’t need to do anything else. The controller will manage the charging parameters based on the selected battery type.

Step 3: Setting the Controller in User Mode
If you’ve selected ‘USER‘ because your battery type requires custom settings, you must use the DC Home app to program the battery parameters.
Here’s how to do it:
- Make sure Bluetooth is turned on on on your mobile device.
- Download the DC Home app. You can find the download link by scanning the QR Code on the last page of the user manual.
- Open the DC Home app ‘n’ tap ‘+‘ to search for new devices.
- Tap ‘Confirm‘ to add the newly found device (your solar charge controller) to the device list.
- Tap the charge controller area to enter the device information interface.
- Tap ‘•••’ in the upper right corner, then tap ‘Settings’ to enter the mode selection interface.
In this interface, you can customize multiple parameters of the battery. When you’ve modified the parameters, ‘Setting Success’ will appear on the interface, indicating that the parameter setting is completed.
Before modifying battery parameters in user mode, check the settings table above and consult the battery manufacturer to ensure that modification is allowed. Incorrect parameter settings can damage the device and void the warranty.
Renogy Rover MPPT Solar Charge Controller Settings: Step-by-step Guide
The Renogy Rover charge controller can be set up in two ways:
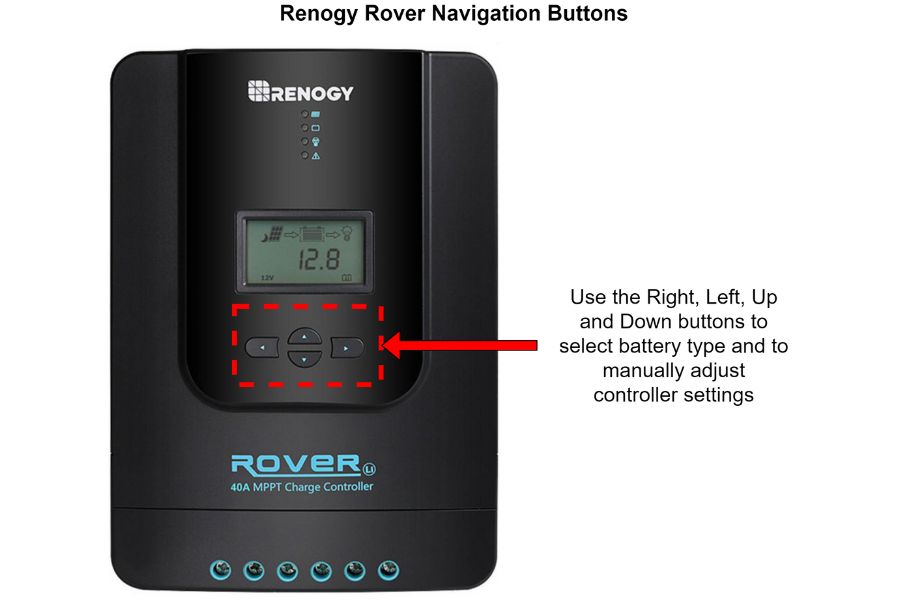
Setting the Battery Type
- Connect the solar panel, battery, and load to the charge controller.
- The controller will automatically detect the system voltage.
- On the main screen, hold the Right arrow button to enter settings.
- Press the Right arrow button again until the battery type screen appears.
- Use the Up/Down buttons to select the following battery type:
- Sealed lead acid
- Gel
- Flooded
- User
- Press the enter button to save the selection.
Custom Settings in User Mode
- Follow steps 1-4 above to enter the settings menu.
- Press the right arrow button to cycle through the settings until reaching the desired voltage screen:
- Equalizing voltage
- Boost voltage
- Float voltage
- Over-discharge return voltage
- Over-discharge voltage
- Use the Up/Down buttons to set the custom voltage.
- Press and hold the Left button to save the setting.
- Repeat for other parameters.
- Press the Left arrow button to exit programming.
The controller will charge the batteries according to the selected type or custom parameters. The load terminal can also be programmed for different control modes.
Victron MMPT Solar Charge Controller Settings: Step-by-step Guide
Victron MPPT charge controllers are excellent for charging both lithium and lead-acid batteries. These controllers offer versatility by allowing manual settings for charging various battery chemistries.
Let’s show you how to program Victron MPPT charger controller settings:
Step 1: Download the VictronConnect App
Download the VictronConnect App from the App Store or Google Play Store and create an account.
Step 2: Access the Device List
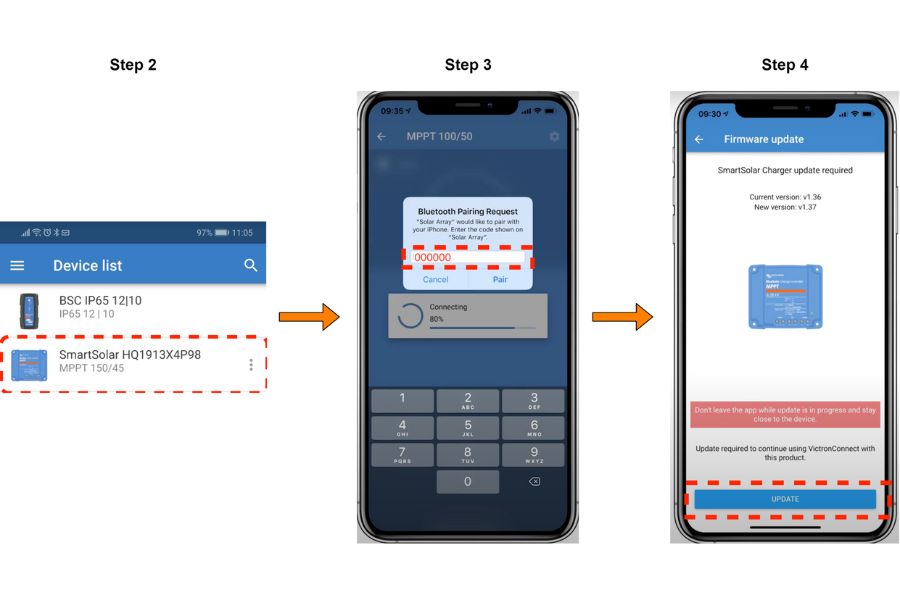
In the “Device List”, look for the charge controller. It should say “SmartSolar”. Click on the device image.
Step 3: Enter the PIN Code
A Bluetooth pop-up window should appear, prompting you to enter the pin code. The default pin is 000000 (six zeros with no spaces in between).
Step 4: Update the Firmware
If a firmware update is available, click the ‘Update’ button below. Refrain from touching your phone while the update is in progress.
Step 5: Access the Battery Settings
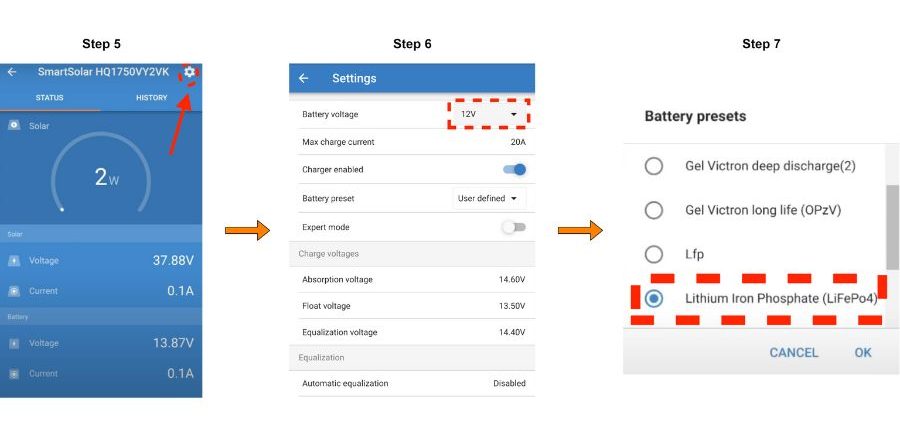
After reaching the main screen, click on the gear symbol in the top right corner, followed by the battery menu.
Step 6: Select Battery Voltage
After opening the battery setting page, select the appropriate battery voltage (12, 24, or 48V).
Step 7: Choose the Battery Preset
Select the appropriate battery type or chemistry from the battery preset menu.
Custom Settings
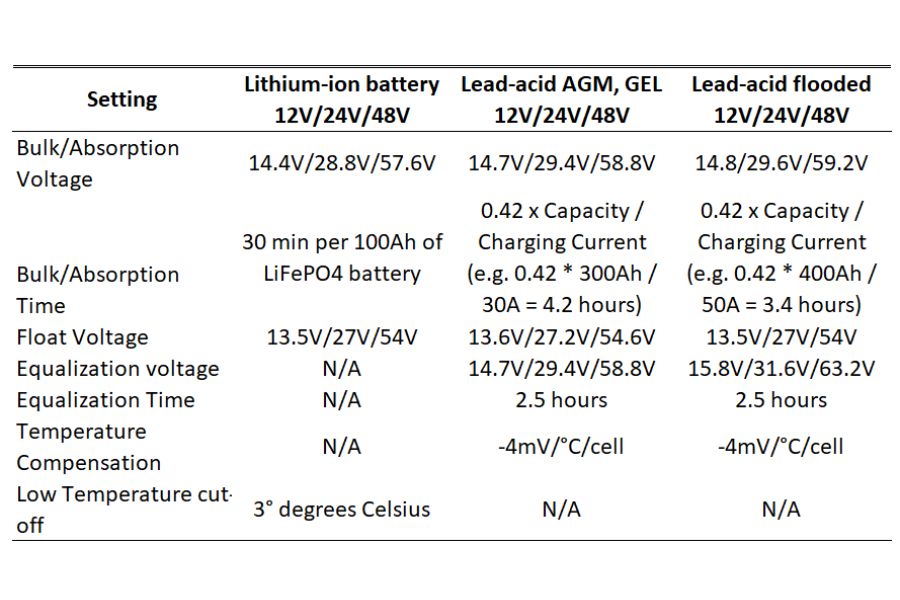
If you want to manually set up the charging settings, refer to the table below.
But please consult the battery manufacturer before modifying battery parameters manually. Incorrect parameter settings can damage the device and void the warranty.
AllPowers PWM Solar Charge Controller Settings: Step-by-step Guide
The AllPowers PWM Solar Charge Controller is an advanced solar energy management tool that offers customizable settings for various battery types.

Follow these steps to set up the controller settings:
Step 1: Selecting the Battery Type
- Identify your battery type. The controller automatically recognizes lead-acid batteries, but for other batteries, you must select the type manually.
- Access the battery type setting on the controller by pressing the menu button until you reach the battery type setting. Following are the settings you should use:
- B01 for lead-acid 12V
- B02 for lithium-ion 3s (3×3.7V=11.1V)
- B03 for LiFePO4 4s (4×3.2V=12.8V)
Step 2: Using Default Preset Values
If you’ve selected a specific battery type, the controller will automatically use the default preset values for that battery type. The controller will then manage the charging parameters based on the selected battery type.
Step 3: Setting the Controller in User Mode
If your battery type requires custom settings, you will need to enter the user mode and set the parameters manually:
- Press and hold the Menu button until the value you want to change begins to flash.
- Use the UP/DOWN buttons to adjust the value.
- You can adjust the following parameters:
- Charging voltage value
- Low voltage recovery value
- Low voltage disconnect value
- Load working mode
- Press and hold the Menu button again to save the changes and exit the settings.


