Solar-Powered Irrigation Changed How I Water My Garden (And It Can Change Yours Too)
Updated:
Last summer, I watched my neighbor haul gasoline cans across his property every few days just to keep his garden watered. Meanwhile, my own irrigation system was running silently on pure sunshine, costing me nothing after the initial setup. That’s the beauty of solar-powered irrigation—it transforms water management from a daily chore into a set-it-and-forget-it system that actually saves money while helping the environment.
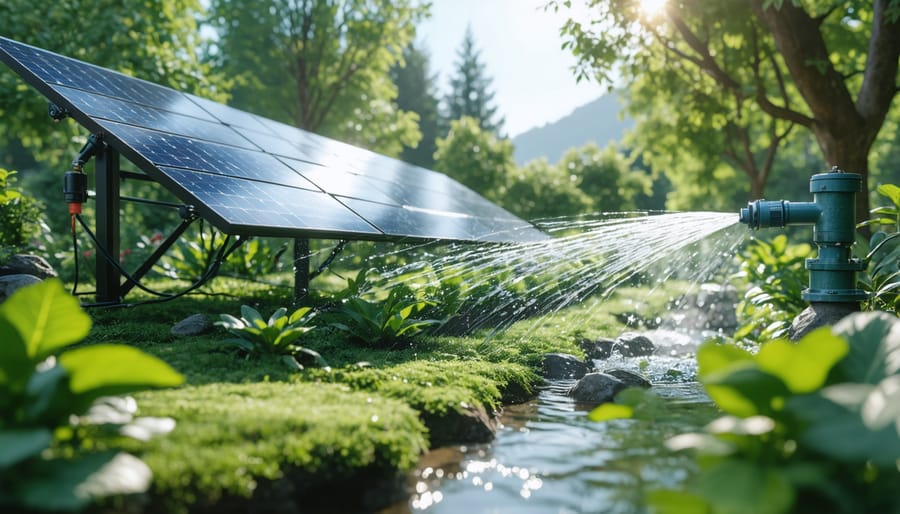
Solar irrigation systems use photovoltaic panels to power water pumps, eliminating the need for grid electricity or fuel-powered generators. Whether you’re watering a backyard vegetable garden, maintaining a small orchard, or keeping livestock hydrated in remote pastures, these systems offer a practical solution that pays for itself over time. I’ve installed three different solar pumping setups over the years, from a simple 50-watt panel powering drip irrigation for raised beds to a more robust system handling a quarter-acre farm plot.
The technology has become remarkably accessible for DIY enthusiasts. You don’t need an engineering degree or thousands of dollars to get started. A basic system can run on a single solar panel paired with a DC pump, storing water in elevated tanks during sunny hours for gravity-fed distribution throughout the day and night.
This guide walks you through everything I’ve learned from real-world experience: understanding the core components, calculating your water needs, selecting the right equipment for your specific situation, and installing a system that actually works.
Why Solar-Powered Irrigation Makes Sense (Especially for Off-Grid Situations)
A complete solar irrigation system combines solar panels with water pumps to provide independent, eco-friendly garden watering without grid power.
When Grid Power Just Isn’t an Option
Let me tell you about something I discovered during a camping trip last summer. I’d set up what I thought was the perfect remote garden plot, only to realize there wasn’t an electrical outlet for miles. Sound familiar?
Traditional electric irrigation hits a wall in several real-world scenarios. Remote gardens and allotments often sit far from power infrastructure, making trenching and wiring prohibitively expensive. I’ve talked with homesteaders who faced quotes of $15,000 or more just to extend grid power to their vegetable patches. That’s where solar becomes not just practical, but essential.
Off-grid homesteads present another perfect use case. Whether you’re building a sustainable lifestyle by choice or necessity, solar irrigation lets you maintain food production without generator noise or fuel costs. Your garden keeps growing while you live independently.
Then there’s emergency preparedness. When storms knock out power, solar-powered systems keep running. One community gardener in my area maintained her entire plot through a three-day outage while her neighbors watched crops wilt.
Even temporary setups benefit. Camping sites, community gardens in transitional spaces, and seasonal growing locations all share the same challenge: no permanent power infrastructure. Solar pumps offer the flexibility to water anywhere the sun shines, which turns out to be exactly where plants grow best anyway.
The Real Cost Comparison
Let’s talk real numbers, because when I first considered making the switch to solar irrigation, the upfront cost nearly scared me off. A basic solar-powered pump setup typically runs between $300-$800, depending on your needs. Compare that to a conventional electric pump at $150-$400, and I get why people hesitate.
But here’s where the math gets interesting. My neighbor runs a gas-powered pump that guzzles about $60 monthly in fuel during irrigation season. Over five years, that’s $3,600. My electric-pumping friend pays roughly $40 monthly in electricity costs, totaling $2,400 over the same period. Meanwhile, my solar setup? After that initial $600 investment, my monthly operating cost is essentially zero.
When you factor in solar-powered water systems requiring minimal maintenance compared to gas engines needing oil changes and tune-ups, the break-even point typically hits around year two or three. By year five, I’m ahead by thousands of dollars.
Here’s my simple calculation: Initial cost divided by monthly savings equals break-even months. For most DIYers, that means your solar irrigation system pays for itself faster than you’d expect, then keeps delivering free water pressure for 20-plus years.
How Solar Irrigation Systems Actually Work
The Four Key Components You Need to Know
Getting your solar irrigation system up and running is simpler than you might think. It all comes down to four essential components working together like a well-oiled machine. Let me break down each piece so you’ll know exactly what you’re working with.
First up are the solar panels, your system’s powerhouse. These convert sunlight into electricity that runs everything. Think of them as your free, silent generator that never needs refueling. The size and number of panels you’ll need depends on your pump’s power requirements and how much sun your location gets.
Next is the pump controller and battery system. The controller acts like a traffic cop, managing power flow between your panels, battery, and pump. It protects your equipment from voltage spikes and keeps everything running smoothly. The battery stores excess solar energy for cloudy days or early morning watering sessions. Some systems skip the battery entirely and only pump when the sun shines, which works great if you have flexible watering schedules.
Your water pump is the heart of the operation, pulling water from your source and pushing it where you need it. Solar pumps come in two main types: submersible pumps that sit underwater in wells or tanks, and surface pumps that stay above ground. Choose based on your water source depth and flow needs.
Finally, the distribution system delivers water to your plants through pipes, hoses, drip lines, or sprinklers. This is where you customize everything for your specific garden layout and watering preferences.
Direct vs. Battery-Backed Systems
When I first explored solar irrigation options, I faced a crucial choice: should I go with a direct solar system or invest in battery backup? Let me break down what I learned so you can make the right decision for your garden.
Direct solar systems are beautifully simple. Your pump runs only when the sun shines, making them less expensive and easier to maintain since there are fewer components to worry about. They’re perfect if you’re watering crops that do well with daytime irrigation or if you have a storage tank that can hold water pumped during sunny hours for later use. The downside? No sun means no pumping, which can be limiting during cloudy stretches or if you need evening watering sessions.
Battery-backed systems, similar to other solar water systems, give you flexibility to water anytime. This independence from the sun’s schedule is fantastic for heat-sensitive plants that prefer evening watering or if you want consistent operation regardless of weather. However, batteries add significant upfront cost and require replacement every few years, plus they introduce maintenance considerations.
My recommendation? Start with direct solar if you’re new to this. You can always add batteries later once you understand your watering patterns and needs.
Choosing the Right Solar Pump for Your Needs
Understanding GPH, Head Height, and What They Mean for You
When I first started looking at solar water pumps, I felt completely lost seeing terms like “GPH” and “head height” thrown around. Let me break these down in simple terms that actually matter for your projects.
GPH (gallons per hour) tells you how much water your pump can move in an hour. For a typical 20×20 foot vegetable garden, you’ll need about 250-400 gallons per week during growing season. A pump rated at 100 GPH running for just 4 hours gives you that coverage comfortably. Compare that to filling a 50-gallon livestock trough, which would take about 30 minutes with the same pump.
Head height is the vertical distance your pump needs to push water upward. Think of it like this: pumping water from a pond up to a garden bed that’s 10 feet higher requires a pump rated for at least 10 feet of head. Here’s the catch I learned the hard way – pumps lose flow capacity as head height increases. A pump rated for 200 GPH at ground level might only deliver 120 GPH when pushing water up 15 feet.
My advice? Calculate your actual needs first, then add 20 percent as a buffer. It’s easier to throttle down a slightly oversized pump than struggle with an underpowered one that can’t keep up with your watering schedule.
Surface Pumps vs. Submersible Pumps
Choosing between surface and submersible pumps boils down to where your water source sits. Surface pumps work great when water is less than 20 feet deep, like shallow wells, ponds, or storage tanks. They stay above ground, making maintenance super straightforward since you can access everything easily. I remember installing my first surface pump next to a rainwater collection barrel – took me about an hour, and I could check on it whenever I walked by.
Submersible pumps, on the other hand, live underwater and excel at deeper wells, sometimes reaching 200 feet or more. They’re quieter and protected from weather, but checking them means pulling the whole unit up, which isn’t fun. For most backyard gardeners with accessible water sources, surface pumps make the most sense. They’re cheaper upfront and easier to troubleshoot when something goes sideways.
Installation-wise, surface pumps need priming (filling the line with water before starting) and protection from freezing temperatures. Mount them on a stable platform and keep them shaded to extend their life. Submersible pumps skip the priming hassle but require proper electrical sealing and suspension systems. Consider your water depth first, then factor in your comfort level with maintenance accessibility.
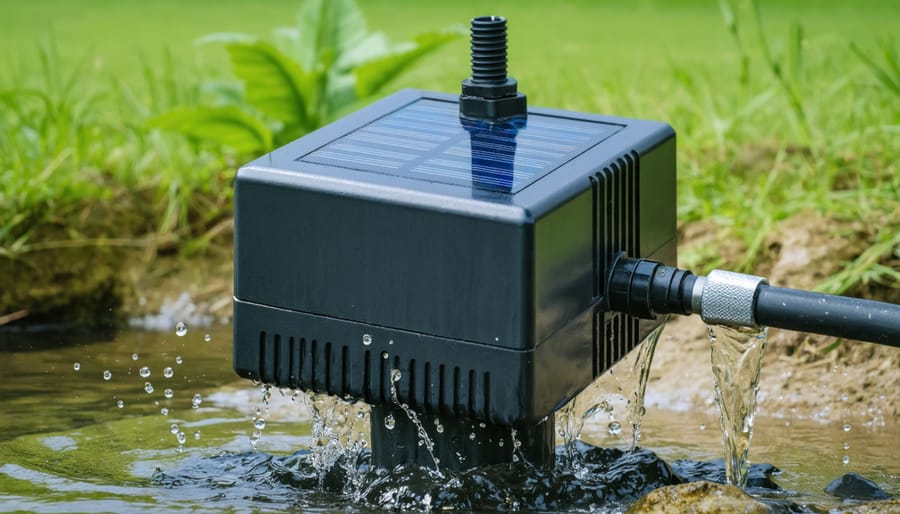
Submersible solar pumps sit directly in water sources like wells, ponds, or cisterns to deliver water efficiently to irrigation systems.
Sizing Your Solar Panel to Match Your Pump
Getting the sizing right is crucial for a system that actually works. I learned this the hard way when my first attempt left me with a pump that barely dribbled water by mid-afternoon. Here’s the straightforward approach that’s worked reliably.
Start by checking your pump’s wattage rating, usually found on the label or in the manual. A typical small irrigation pump runs between 50-200 watts. Now here’s the key: your solar panel needs to produce about 20-30% more wattage than your pump requires. This accounts for energy losses and less-than-perfect sun conditions. So if you have a 100-watt pump, aim for a 120-150 watt solar panel.
The math sounds simple, but real-world factors like your location’s average sunlight hours and seasonal variations matter tremendously. Rather than wrestling with complex calculations, I highly recommend using Spheral Solar’s solar calculator tools. Just plug in your pump’s wattage, your zip code, and it’ll show you exactly what panel size you need, accounting for your specific sunshine conditions.
One tip from experience: slightly oversizing your panel (within that 20-30% range) gives you better performance on cloudy days and ensures consistent water flow throughout the growing season. It’s a small upfront investment that pays dividends in reliability.
My Step-by-Step Solar Irrigation Setup
What I Bought and Why
I’ll be honest—I didn’t break the bank on this project, and that was intentional. My quarter-acre vegetable garden needed consistent watering, but I wanted to start small and scale up as I learned.
I picked up a 100-watt polycrystalline solar panel for about $85. Why polycrystalline instead of monocrystalline? Simple: it was cheaper, and for my backyard setup, the slightly lower efficiency wasn’t a dealbreaker. I paired it with a 12-volt submersible water pump rated at 200 gallons per hour, which cost around $45. This wasn’t the most powerful pump available, but it matched my modest 50-gallon rain barrel system perfectly.
For the battery, I went with a basic 35-amp-hour deep-cycle marine battery at $120. Could I have gone lithium? Sure, but I wanted to keep costs reasonable for my first attempt. A simple 10-amp charge controller ran me $25—nothing fancy, just PWM technology that gets the job done.
I also grabbed 50 feet of half-inch drip irrigation tubing with emitters for $30, plus basic electrical connectors and waterproof junction boxes for another $20. Total investment: roughly $325. Not pocket change, but considering my monthly water bill dropped significantly, I figured I’d recoup costs within two summers.
The Installation Process (Easier Than You Think)
Here’s the good news: setting up a solar-powered irrigation system isn’t as intimidating as it sounds. I remember standing in my garage, staring at all the components spread out on the floor, wondering if I’d bitten off more than I could chew. But honestly? The whole thing came together in about an afternoon.
Start by positioning your solar panel where it’ll catch maximum sun throughout the day. This is where beginners often stumble – they pick a spot that looks sunny in the morning but gets shaded by 2 PM. Take a full day to observe your space before mounting anything permanently. Southern exposure works best in the northern hemisphere.
Next, connect your charge controller to the battery. Think of the charge controller as a traffic cop directing power safely into storage. The positive terminal connects first, then negative – this simple sequence prevents sparks and protects your equipment.
Now mount your pump near the water source. I’ve seen folks try to place pumps too far from their water barrel or pond, which just makes the system work harder than necessary. Keep distances minimal.
The wiring part sounds scary, but most kits come with color-coded connections that basically snap together. Red to red, black to black. Just make sure every connection is tight and weatherproofed with electrical tape or heat-shrink tubing.
The biggest pitfall? Rushing through the testing phase. Turn everything on gradually, checking each component before moving to the next. When that first stream of water starts flowing purely from sunshine, you’ll understand why this hobby is so addictive.
The One Mistake That Cost Me a Week
I learned this lesson the hard way: never assume your pump controller is waterproof just because it looks industrial. I mounted mine directly above my raised garden beds, thinking the overhang would protect it. After three days of perfect operation, a sudden rainstorm hit while I was at work. When I got home, the controller was fried, and water had pooled inside the housing.
The fix cost me $85 for a new controller and a full weekend rebuilding the setup. This time, I housed everything in a proper weatherproof enclosure with a rubber gasket seal, mounted under my shed’s eave. I also added a simple drip loop to all cables entering the box, which prevents water from running down wires into the housing. The lesson? Spend the extra twenty minutes and few dollars protecting your electronics properly from day one. Trust me, it beats starting over.
Smart Water Distribution Options
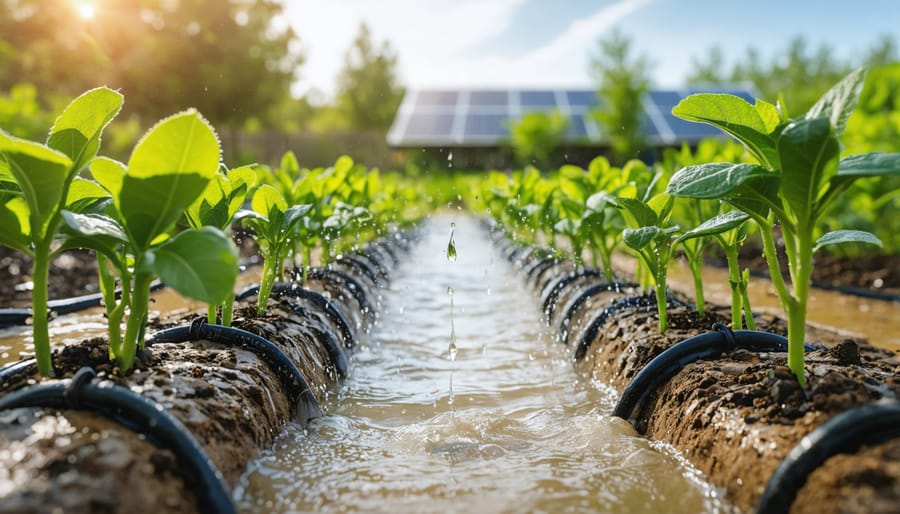
Drip irrigation paired with solar pumps maximizes water efficiency by delivering moisture directly to plant roots with minimal waste.
Drip Irrigation: The Set-It-and-Forget-It Option
Drip irrigation and solar power are a match made in sustainable gardening heaven. When I first set up my solar-powered drip system three years ago, I was amazed at how little maintenance it required compared to my old setup. The beauty of drip irrigation is that it delivers water directly to plant roots through a network of tubes and emitters, which means you’re not wasting energy pumping water that just evaporates into the air.
Here’s why drip systems work so well with solar: they operate at low pressure, typically between 15-30 PSI, which means your solar pump doesn’t need to work as hard. This translates to fewer solar panels and a smaller battery bank, saving you money upfront. The slow, steady water delivery also matches perfectly with the consistent but moderate output of most solar pump systems.
Setting up is straightforward. You’ll run a mainline from your solar pump to your garden, then branch off with smaller tubing to each plant row. Add drip emitters every 12-18 inches, and you’re basically done. Many systems include timers that run on small solar batteries, letting you truly set it and forget it. The water savings are impressive too – typically 30-50% less than overhead sprinklers – which means your solar system pumps less water overall, extending its lifespan.
Sprinklers, Soaker Hoses, and Other Alternatives
Solar-powered irrigation opens up exciting possibilities beyond traditional drip systems. Sprinklers work beautifully with solar pumps, especially for larger garden areas or lawns. They’re perfect for overhead watering and can cover significant ground quickly. The main consideration is matching your pump capacity to the sprinkler’s flow requirements—you’ll need a slightly more powerful pump than drip systems demand.
Soaker hoses are my personal favorite for vegetable gardens. I’ve been using them for three seasons now, and they’re incredibly forgiving with solar setups. Since they operate at lower pressures than sprinklers, even modest solar pumps handle them well. They deliver water directly to root zones, minimizing evaporation—a huge plus when your power source depends on sunshine.
Micro-sprinklers split the difference, offering targeted watering with slightly more coverage than drip emitters. They’re excellent for container gardens or small orchards where you need flexibility.
The real advantage? Most solar pumps can accommodate multiple distribution methods using simple valve systems, letting you customize watering zones throughout your property.
Adding Timers and Automation (Without Getting Complicated)
Budget-Friendly Timer Options That Actually Work
You don’t need to break the bank to add reliable timing control to your solar irrigation setup. When I first started experimenting with automated watering, I was amazed at how affordable some options have become.
Digital hose timers are your best friend here, typically running between $20-40. Look for models with dual-valve outputs so you can control two zones independently. The Orbit B-hyve works beautifully with solar systems and includes rain delay features. I’ve had one running for three seasons without issues.
For truly budget-conscious builders, mechanical twist timers cost under $15 and require zero electricity. They’re perfect for simple setups where you just need the water to shut off after an hour or two. Sure, they’re not fancy, but they’re practically indestructible.
Battery-powered digital timers offer the sweet spot, usually around $25-35. Choose ones with low battery indicators and look for AA battery compatibility rather than proprietary batteries. The Raindrip R675CT has been rock-solid in my garden setup.
One insider tip: buy timers rated for higher pressure than you’ll actually use. They last significantly longer. And always keep a backup timer on hand. Nothing’s worse than losing your tomatoes to a failed timer during vacation season.
When to Consider a Smart Controller
Once you’ve got the basics down, you might start wondering if there’s a smarter way to handle your watering schedule. I reached that point last summer when I realized I was wasting water during rainy days simply because my timer didn’t know to skip a cycle.
That’s where smart controllers come in. These devices connect to weather data services and automatically adjust your watering based on actual conditions. If rain is forecasted or the soil is already moist, the system skips unnecessary watering. Some models even let you control everything from your smartphone, which is incredibly handy when you’re away from home.
The beauty of pairing a smart controller with your solar setup is that you’re maximizing both water and energy efficiency. You’re not just using free solar power, you’re also applying water only when your plants truly need it.
These controllers do cost more upfront, typically ranging from $100 to $300, but they’re worth considering if you have a larger garden or live in an area with unpredictable weather patterns. The water savings alone can offset the investment within a season or two. Plus, there’s something satisfying about having your garden practically take care of itself while you’re at work or on vacation.
Real-World Applications Beyond the Garden
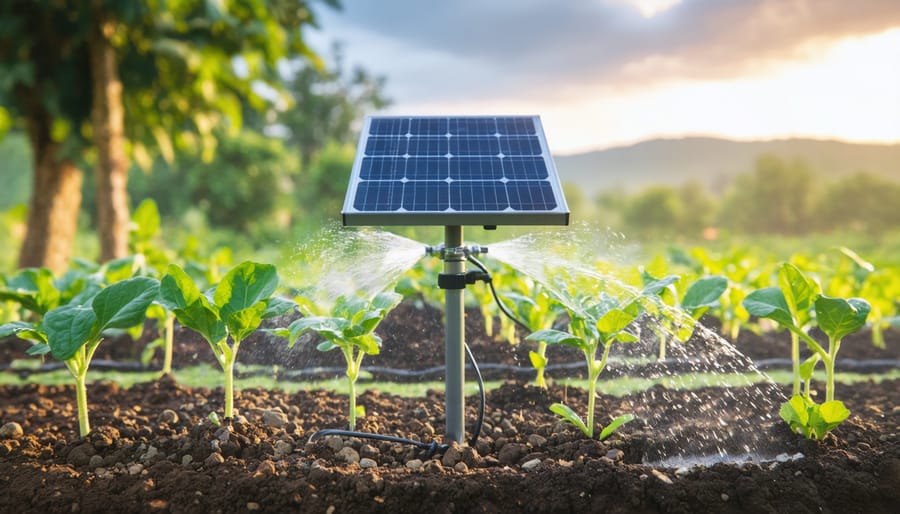
Solar-powered irrigation enables productive gardening and small-scale farming in remote locations without access to grid electricity.
Camping and Outdoor Adventures
When I took my RV camping through Utah’s backcountry last summer, I discovered that portable solar water pumps are absolute game-changers for outdoor adventures. These compact systems let you access water from streams, lakes, or wells without lugging heavy containers or relying on manual pumps that leave your arms aching.
For camping and RVing, look for lightweight submersible pumps rated between 12-24 volts that pair with foldable solar panels. Most units weigh under five pounds and fit easily in a backpack. I’ve found that a 20-watt panel paired with a small pump can fill a 5-gallon container in about 15 minutes from a nearby creek, perfect for washing dishes or showering at remote campsites.
The real beauty is the flexibility. You can use these pumps for everything from filling RV water tanks to creating makeshift outdoor showers or irrigating a small camp garden if you’re staying put for a while. Just remember to check local regulations about water collection, and always filter water intended for drinking through proper purification systems regardless of how clean it looks.
Small-Scale Farming and Livestock Watering
For small-scale farming operations, solar irrigation becomes incredibly practical and cost-effective. I’ve helped several neighbors set up systems that handle everything from quarter-acre vegetable plots to watering stations for backyard chicken coops and small livestock herds.
The beauty of scaling up is that you’re essentially multiplying the basic setup we’ve discussed. A typical small farm might need a 100-watt to 400-watt solar panel system paired with a larger capacity pump, depending on your water demands and how far you need to move it. For livestock watering, a 50-100 watt panel can easily fill troughs throughout the day, ensuring your animals always have fresh water without running electrical lines across pastures.
One farmer I know installed a solar pump at his pond that fills a 300-gallon holding tank on a hill. Gravity then distributes water to his chicken coops and goat pens through simple piping. The initial investment paid for itself in two years compared to his previous fuel costs for a generator.
Consider your daily water needs carefully. Most chickens need about half a gallon per day, while larger livestock like cattle require 10-20 gallons each. Calculate your total daily demand, then size your system accordingly, adding 25 percent capacity as a buffer.
Emergency Preparedness and Backup Water
When the power grid goes down, your conventional irrigation system stops working—but your garden’s needs don’t pause for emergencies. Solar-powered irrigation systems offer a critical advantage: complete independence from grid power. During storms, natural disasters, or unexpected outages, your plants continue receiving water without interruption.
I learned this firsthand during a three-day power outage last summer. While neighbors scrambled with buckets and hoses, my solar setup kept my vegetable garden thriving. The battery bank stored enough energy to maintain consistent watering schedules, protecting weeks of growth from heat stress.
For emergency preparedness, consider oversizing your battery storage slightly. This provides a cushion during consecutive cloudy days when you need backup most. Pair your system with sustainable water solutions like rainwater collection to create a truly resilient water supply. Many DIYers report their solar irrigation systems as their most valuable emergency asset—providing peace of mind alongside practical benefits.
Troubleshooting Common Issues
When Your Pump Won’t Start (Or Stops Mid-Day)
Nothing’s more frustrating than heading out to your garden only to find your irrigation pump sitting silent. Let’s walk through the most common culprits together.
First, check your solar panel positioning. I learned this the hard way when a growing tree branch cast shade across my panels, cutting output by 60%. Even partial shading can dramatically reduce power. Make sure panels face true south (in the Northern Hemisphere) and aren’t blocked by debris, leaves, or new growth.
Next, inspect all wire connections. Corrosion and loose terminals are silent killers of solar systems. Wiggle each connection gently and look for green oxidation or blackened wires. These basic solar panel troubleshooting steps solve most startup issues.
Weather matters more than you might think. If clouds roll in mid-day, your pump may slow or stop entirely. This is normal behavior, not a malfunction. Consider adding a small battery buffer if consistent flow is critical, or plan irrigation for predictably sunny morning hours.
Finally, test your pump independently using a multimeter. Disconnect it from the solar system and check if it runs on direct power. This confirms whether you’re dealing with a power supply issue or pump failure.
Low Pressure and Flow Problems
When your solar irrigation system isn’t delivering enough water, don’t panic—most flow issues have simple fixes. I learned this the hard way when my first system barely trickled water during peak afternoon sun, when it should have been pumping strongest!
Start by checking for air locks, which happen when air gets trapped in the line. Open the highest valve in your system and let it run until water flows smoothly without sputtering. Next, inspect intake filters and screen for debris—even a small leaf can dramatically reduce flow. I once spent hours troubleshooting only to find a clump of algae blocking my foot valve.
System sizing mismatches are another common culprit. If your pump is rated for 10 feet of head but you’re actually lifting water 20 feet, you’ll get disappointing results. Double-check your vertical lift and horizontal distance calculations against your pump specifications.
Also verify your solar panels are producing adequate power. Dirty panels or partial shading can cut output significantly, leaving your pump underpowered. Clean those panels and ensure nothing casts shadows during peak pumping hours. Sometimes the solution is as simple as repositioning a single panel.
Maintaining Your System for Years of Reliable Use
The beauty of solar-powered irrigation is that once you’ve got it set up, maintenance is refreshingly minimal compared to traditional gas-powered pumps. I learned this firsthand after my neighbor spent a weekend cursing at his gas pump’s carburetor while my solar system just kept quietly doing its thing.
Your monthly checklist should include inspecting panel surfaces for dust, leaves, or bird droppings. A simple rinse with a garden hose usually does the trick, though stubborn grime might need a soft brush and soapy water. Clean panels can make a 15-20% difference in efficiency, which directly impacts your water output.
Every few months, check all electrical connections for corrosion, especially if you’re in humid climates. A light coating of dielectric grease on terminals prevents oxidation. Inspect wiring for any damage from critters or weather exposure. Trust me, a squirrel once cost me three days of watering by chewing through an exposed wire.
Battery maintenance depends on your type. Sealed batteries need minimal attention beyond keeping terminals clean, while flooded lead-acid batteries require monthly water level checks using distilled water only. Keep a simple log of battery voltage readings to catch degradation early.
Winter preparation in freezing climates means draining pipes and storing pumps indoors. In milder regions, you might just tilt panels to optimize for lower winter sun angles.
Set calendar reminders for these tasks. Fifteen minutes monthly prevents the headaches of system failures during peak growing season when your plants need water most.
Solar-powered irrigation isn’t just about watering plants—it’s about reclaiming your independence and making sustainable choices that genuinely work for your lifestyle. Whether you’re managing a backyard garden or a small farm, solar irrigation systems free you from grid dependency while reducing your environmental footprint and long-term costs.
The beauty of this technology is that you don’t need to dive in headfirst. Start with a small system for your raised beds or greenhouse, learn how it performs through different seasons, and expand as your confidence grows. I’ve seen countless people begin with a modest 100-watt setup and gradually scale to comprehensive irrigation systems that handle acres of land.
Ready to take the next step? Head over to our interactive solar calculators to estimate your specific power needs and system sizing. The numbers might surprise you—solar irrigation is more accessible than most people think.
And remember, you’re not alone in this journey. Join our community forum where fellow DIYers share their successes, troubleshoot challenges, and swap practical advice. There’s something powerful about connecting with others who understand both the technical details and the satisfaction of harvesting vegetables watered entirely by sunshine. Your solar irrigation adventure starts now.
How useful was this post?
Click on a star to rate it!
Average rating 0 / 5. Vote count: 0
No votes so far! Be the first to rate this post.
We are sorry that this post was not useful for you!
Let us improve this post!
Tell us how we can improve this post?
charlesnoble
Here at Spheral Solar, I’m a hands-on solar power enthusiast, constantly exploring and experimenting with DIY solutions. I’m dedicated to sharing my discoveries, insights, and even the bumps I hit along the way, all in the pursuit of a more sustainable future.
Why Solar-Powered Fountains Are Better Than You… by Charlesnoble April 1, 2026 Picture a garden fountain that runs entirely on sunlight, requiring no electrical outlets, trenching, or monthly power bills. Solar-powered fountains harness photovoltaic technology to circulate water through decorative displays, creating peaceful ambiance while operating completely off-grid. These self-contained systems typically feature a small solar panel connected to a submersible pump,…
Why Your Solar Panels Are Losing 25% Efficiency (And… by Charlesnoble February 4, 2026 Inspect your solar panels monthly for dust, pollen, bird droppings, and mineral deposits that can reduce energy production by 15-25%. A proper cleaning kit eliminates this performance loss without the $150-300 cost of professional cleaning services, paying for itself after just two uses. Choose a kit with three essential components:…
Why Your DIY Solar System Needs Rapid Shutdown… by Charlesnoble January 13, 2026 Picture this: You’ve just installed your dream solar array, the panels are gleaming in the sun, and you’re ready to flip the switch—then your inspector mentions something about rapid shutdown compliance. If you’re scratching your head wondering what that means and why it matters for your system, you’re not alone.…
Why Your Solar Panels Need Proper Grounding (And How… by Charlesnoble March 17, 2026 Connect your solar panel frame directly to a grounding rod using 6-gauge bare copper wire and listed grounding lugs—this single action protects your system from lightning strikes and prevents dangerous electrical shocks. Strip back half an inch of wire, insert it into the grounding lug attached to your panel’s frame…
Solar Power Your Kitchen While Saving the Planet (And Money) by Charlesnoble February 21, 2026 Calculate your kitchen’s current energy consumption by tracking appliance usage for one week, noting which devices draw the most power—typically refrigerators, dishwashers, and electric stoves account for 60-80% of kitchen energy use. This baseline becomes your roadmap for meaningful change, showing exactly where solar integration or efficiency upgrades will deliver…
Why Your Solar Watch Needs Different Care Than… by Charlesnoble November 27, 2025 Protect your solar watch investment by exposing the dial to bright light for at least 8 hours monthly, even when fully charged. This prevents the lithium battery from deep discharge, which permanently reduces its lifespan. Position your watch near a window during work hours or wear it outdoors regularly to…
Subscribe for handpicked DIY projects, exclusive tips, and giveaways.
Position your solar panels at an angle equal to your latitude for year-round performance, or adjust seasonally by adding 15 degrees in winter and subtracting 15 degrees in summer to capture maximum sunlight during each season’s sun path. Use a simple angle finder app on your smartphone against the back of your panel to verify… Read more: The Right Tilt Angle Can Boost Your Solar Panel Output by 30% (Here’s How to Find It)
Route your PV wires through UV-resistant conduit within 18 inches of leaving the solar array, securing it every 3 feet with proper clamps to prevent wind damage and code violations. This single step prevents 80% of the wire degradation issues I’ve seen in DIY solar installations over the past decade. Group your positive and negative… Read more: Why Your PV Wire Management Could Fail Inspection (And How to Fix It)
Understand that 6000 volts sounds terrifying but delivers surprisingly low amperage—typically around 120 milliamps for just 3/10,000th of a second per pulse. This combination creates an unforgettable shock that trains animals to avoid the fence without causing lasting harm. The voltage pushes current through thick fur and hide, while the minimal amperage and microsecond duration… Read more: Why 6000 Volts Won’t Kill Your Livestock (But Will Stop Predators Cold)

")
")
")
")
")

")
")
")
")
")


