Why Your RV Appliances Keep Tripping the Breaker (And How to Wire Them Right)
Updated:
Turn off shore power and disconnect your battery bank before touching any wire in your RV—this single step prevents the most common DIY electrical accidents. Check your circuit breaker panel ratings against your actual appliance loads, because that microwave drawing 1500 watts on a 15-amp circuit is exactly why you’re tripping breakers every morning. Strip wire ends to precisely half an inch of exposed copper, no more and no less, since loose connections from too-short strips cause 60% of RV electrical fires while too-long strips create dangerous short circuits.
I learned this the hard way during my first RV renovation in 2019. I confidently rewired an entire kitchen circuit without properly calculating my loads, and within three days, I’d melted a wire connector behind my refrigerator. That smell of burning plastic taught me more about respecting electrical systems than any manual ever could.
Your RV runs on two completely separate electrical systems—120-volt AC for household appliances and 12-volt DC for lights and fans—and mixing up these systems during repairs can destroy expensive equipment instantly. Most RV owners feel intimidated by electrical work, but once you understand the basic principles of circuit protection, wire gauge selection, and proper grounding, you’ll handle common issues like adding outlets, upgrading to solar power integration, or troubleshooting dead circuits with genuine confidence.
This guide walks you through every practical scenario you’ll encounter, from diagnosing why your air conditioner won’t start to safely installing that new induction cooktop you’ve been eyeing. Whether you’re fixing immediate problems or planning a complete electrical upgrade for off-grid living, you’ll find step-by-step instructions that assume zero prior electrical experience while still giving you professional-grade results.
Understanding Your RV’s Electrical System Basics
AC vs DC: Which Powers What?
Understanding which appliances run on which power system is like learning two different languages in your RV – both essential, but used for completely different conversations.
Your RV operates on two electrical systems, and here’s the simple breakdown: 120V AC (alternating current) powers the heavy-duty appliances you’d find in a regular house, while 12V DC (direct current) runs the specialized RV equipment designed for efficiency.
The 120V AC system kicks in when you’re plugged into shore power or running your generator. This powers your air conditioner, microwave, refrigerator (when not on propane mode), wall outlets, and that precious coffee maker. These appliances need the higher voltage because they draw significant power – your AC unit alone can pull 13-15 amps. When I first started RVing, I made the rookie mistake of running the microwave and AC simultaneously on a 30-amp connection. Let’s just say I quickly learned about load management!
Your 12V DC system, on the other hand, is the quiet workhorse. It powers LED interior lights, the water pump, ceiling fans, furnace blower, and slide-out motors. These components run on DC because they’re designed to work directly off your house batteries without needing an inverter. This makes them incredibly efficient when you’re boondocking off-grid.
Here’s the key: DC systems are battery-friendly and energy-efficient for smaller loads, while AC systems handle the power-hungry appliances that make RV life comfortable. Most modern RVs include a converter that transforms shore power AC into DC to charge your batteries and run DC appliances simultaneously.
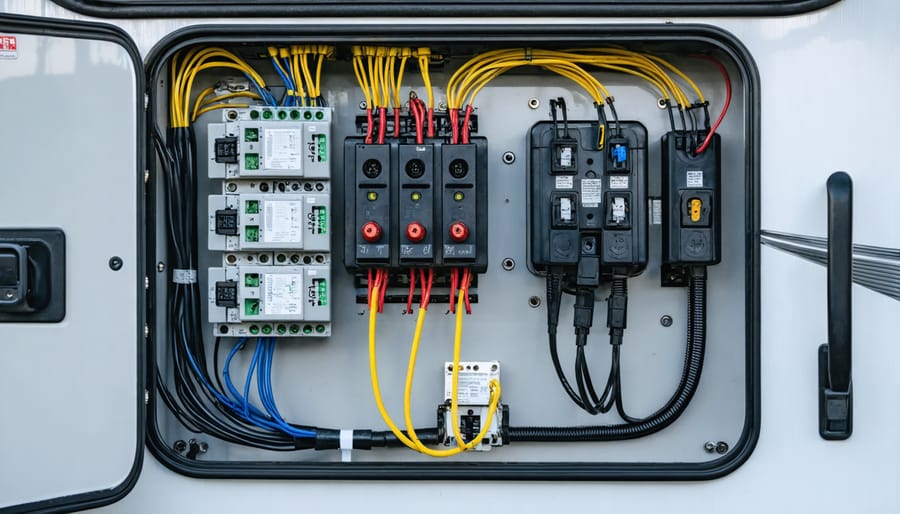
Your RV’s Power Distribution Panel Explained
Think of your RV’s power distribution panel as mission control for your electrical system. This is where incoming power, whether from shore power, a generator, or your inverter, gets divided up and sent to different circuits throughout your RV. Understanding this panel is like having a roadmap to your entire electrical system.
When you open that panel door, you’ll typically see rows of circuit breakers (in newer RVs) or fuses (in older models). Each one protects a specific circuit. I remember the first time Charles opened his panel and was completely overwhelmed by the jumble of unlabeled switches. Don’t worry, we’ve all been there.
Start by creating a simple circuit map. Grab a notepad and systematically flip each breaker off one at a time, then walk through your RV to see what stops working. Label everything: “kitchen outlets,” “bedroom AC,” “water heater,” etc. Use a label maker or even masking tape to mark each breaker directly on the panel. This 30-minute investment will save you hours of frustration later.
Most RV panels separate 120-volt AC circuits (your household-style power) from 12-volt DC circuits (battery-powered systems). The AC side handles air conditioners, microwaves, and standard outlets. The DC side powers lights, water pumps, and furnace fans. Some panels also include your converter, which transforms AC power into DC to charge your batteries.
When you’re ready to upgrade your system, understanding these circuits becomes essential, especially when wiring inverters to breaker boxes. Take clear photos of your panel before making any changes, and always turn off the main breaker before working inside.
Understanding your RV’s power distribution panel is essential for safe appliance wiring and troubleshooting electrical issues.
Essential Wire Sizing for RV Appliances
Reading Appliance Power Requirements
Before you can safely wire any appliance in your RV, you need to understand what it actually requires. I learned this the hard way when I first tried adding a microwave to my setup and kept tripping the breaker. Turns out, I hadn’t properly checked the power draw.
Every appliance has a label, usually on the back or bottom, that lists its electrical requirements. Look for three key numbers: voltage (V), amperage (A), and wattage (W). Voltage tells you whether it’s a 120V AC appliance or a 12V DC device. Amperage shows how much current it draws, and wattage indicates total power consumption.
Here are some typical RV appliance examples. A residential-style refrigerator might show “120V AC, 8A, 960W” on its nameplate. Your water heater could list “120V, 12A” (multiply these to get 1,440 watts). LED lights typically run on “12V DC, 0.5A” (just 6 watts). An air conditioner is a power hog, often requiring “120V, 15A, 1,800W.”
If you only see two of the three values, you can calculate the missing one using this simple formula: Watts equals Volts times Amps (W = V x A). So a device showing “12V, 3A” consumes 36 watts.
Keep the appliance documentation handy too. Manuals often provide startup surge requirements, which can be double the running wattage for motor-driven appliances like air conditioners and refrigerators.
The Wire Gauge Chart Every RV Owner Needs
Choosing the right wire gauge can feel overwhelming at first, but I’ll let you in on a secret Charles shared with me: most RV applications fall into just a few common categories. Once you know these basics, you’ll be making confident wire selections in no time.
The American Wire Gauge (AWG) system works backward from what you might expect—smaller numbers mean thicker wires. Think of it like this: a 10 AWG wire is much thicker than a 16 AWG wire. Thicker wires carry more current safely over longer distances.
For typical RV applications, here’s your quick reference guide. Air conditioners and electric water heaters need 10 AWG wire. Microwaves and larger power tools work well with 12 AWG. For general outlets and lighting, 14 AWG is your go-to. On the DC side, solar panel connections typically use 10 AWG, while LED lighting circuits run happily on 16 or 18 AWG wire.
The real trick is understanding voltage drop—the electrical “loss” that happens over distance. Running undersized wire over long distances means your appliances get less power than they need, leading to poor performance or even damage. A general rule: keep voltage drop under three percent for optimal performance.
Rather than wrestling with complex calculations, try Spheral Solar’s wire sizing calculator. Just plug in your appliance wattage, run length, and voltage, and it’ll tell you exactly what wire gauge you need. I’ve used it dozens of times for both solar installations and general RV wiring projects, and it takes the guesswork out completely.
Selecting the correct wire gauge for your RV appliances prevents voltage drop and ensures safe, reliable operation.
When Distance Matters: Voltage Drop in Long Runs
Here’s something I learned the hard way during my first RV solar install: distance is the enemy of efficiency. When electricity travels through wire, it encounters resistance, and over long runs, this creates voltage drop—basically, your appliances at the end of the line receive less power than what’s leaving your battery or panel.
In an RV, you might need to run wire 20 or 30 feet from your solar charge controller to your battery bank, or from your inverter to a rear bedroom outlet. That’s when voltage drop becomes a real problem. Your fridge might struggle, lights dim, and devices charge slowly.
The fix is surprisingly straightforward: use thicker wire for longer distances. While 12-gauge might work perfectly for a 6-foot run, that same 20-foot run might need 10-gauge or even 8-gauge wire to maintain proper voltage. Think of it like a water hose—a longer, narrower hose delivers less pressure at the end.
I always recommend using an online voltage drop calculator before buying wire. Input your wire length, amperage, and acceptable voltage loss (typically 3% for most applications), and it’ll tell you exactly what gauge you need. This small investment in thicker wire saves you from frustrating troubleshooting sessions down the road.
Wiring Your AC Appliances Safely
Circuit Breaker Sizing and Installation
Choosing the right circuit breaker is like picking the perfect guardian for your RV’s electrical system. I learned this the hard way during my first solar installation when I confidently installed a 30-amp breaker for a circuit that really needed 20 amps. The oversized breaker couldn’t properly protect the wiring, creating a serious fire hazard.
Here’s the golden rule: your breaker should match your wire gauge, not necessarily your appliance load. For example, 14-gauge wire requires a maximum 15-amp breaker, while 12-gauge wire can handle up to 20 amps. Never upsize your breaker without upgrading the wire first, even if an appliance keeps tripping it. That tripping is actually your safety system working correctly.
When sizing breakers, calculate your appliance’s amperage by dividing watts by volts. A 1,500-watt microwave on 120 volts draws 12.5 amps, so a 15-amp breaker works perfectly. Always add a 20 percent safety margin for continuous loads like refrigerators or air conditioners.
Installation is straightforward but demands attention to detail. Turn off your main power completely and verify it’s off with a voltage tester. Snap the breaker into the bus bar firmly until you hear a click, then tighten terminal screws snugly but not overtight, which can crack the terminals.
Common mistakes include mixing breaker brands with your panel (never do this), forgetting to label circuits clearly, and installing GFCI breakers where standard ones suffice. When working near water sources like sinks or exterior outlets, GFCI protection isn’t optional, it’s required by code and could save your life.
GFCI Protection: Where You Need It and Why
GFCI (Ground Fault Circuit Interrupter) outlets are your first line of defense against electrical shocks in your RV, and they’re absolutely essential in areas where water and electricity might meet. Think of a GFCI as a super-sensitive bodyguard that constantly monitors the flow of electricity. If it detects even a tiny imbalance, meaning current might be leaking where it shouldn’t, it cuts power in a fraction of a second.
According to RV safety codes, you need GFCI protection in three key areas: your bathroom, kitchen countertop outlets, and all exterior receptacles. I learned this the hard way during my first RV renovation when I skipped adding one in the outdoor outlet. One rainy morning while plugging in a power tool, I got a tingle that made my hair stand up. Lesson learned.
Installing GFCI outlets is straightforward for most DIYers. You can either replace individual outlets with GFCI versions or install a GFCI breaker in your panel to protect entire circuits. The outlet option is usually easier and more affordable. When wiring, connect the incoming power to the LINE terminals (usually marked clearly) and any downstream outlets to the LOAD terminals. Test your GFCIs monthly using the built-in test button to ensure they’re still working properly.
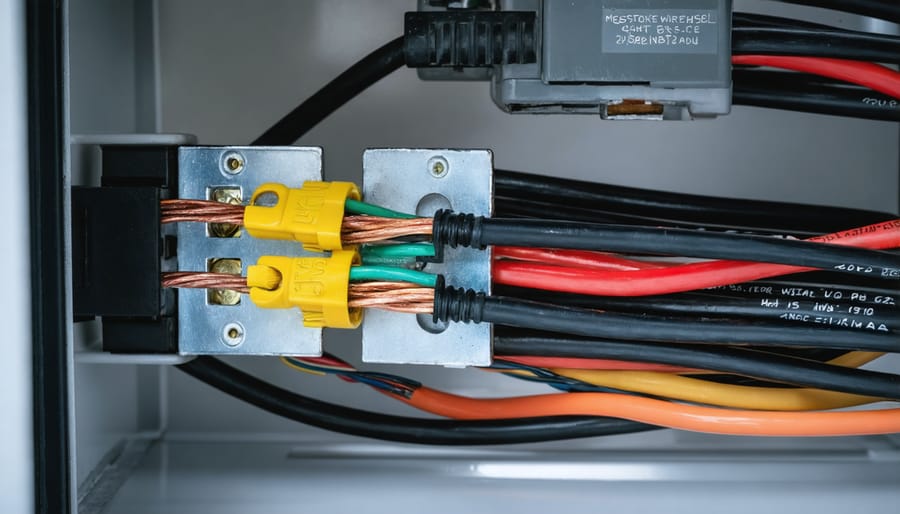
Grounding Your RV Appliances Correctly
Proper grounding is your safety net when working with RV electrical systems, and I learned this lesson the hard way during my first RV renovation. I once felt a tingle when touching my microwave door, which was a wake-up call that something wasn’t right with the grounding.
Grounding creates a safe path for electricity to flow into the earth if something goes wrong, preventing shocks and potential fires. In RVs, this is especially critical because you’re living in a metal box that can become energized if grounding fails.
To ensure your appliances are properly grounded, start by checking that your shore power connection includes a working ground wire. You can verify this with a simple outlet tester, available at any hardware store for under ten dollars. Every appliance with a three-prong plug relies on that third round pin for grounding.
Common grounding mistakes include using two-prong adapters to bypass the ground connection, running ground wires to plumbing instead of your RV’s chassis, and failing to bond your AC and DC systems properly. Another frequent error is assuming your RV is grounded simply because it’s plugged in, but corroded connections or damaged shore power pedestals can interrupt that critical ground path.
Always connect your chassis ground to the shore power ground, and never cut off the ground prong from a three-prong plug, no matter how tempting it might be to make something fit.
DC Appliance Wiring for Solar and Battery Systems
Fusing Your DC Circuits Properly
Here’s the thing about DC circuits in your RV: they carry serious current, and without proper fusing, you’re basically setting up a fire hazard. I learned this the hard way when I helped a friend troubleshoot a melted wire behind his refrigerator. Turns out, no fuse between the battery and the appliance. Don’t be that person.
Fuses are your first line of defense against electrical fires. When a short circuit happens or something draws too much current, the fuse sacrifices itself to break the circuit. Think of it as a safety valve that costs a few dollars instead of your entire RV.
The golden rule is simple: place a fuse as close to your power source as possible, ideally within 7 inches of the battery terminal. This protects the entire wire run. If that wire gets pinched or damaged anywhere along its length, the fuse will blow before the wire turns into a heating element.
Sizing fuses correctly requires some basic math. Calculate the maximum current your appliance will draw, then choose a fuse rated about 25 percent higher. For example, a 10-amp device needs a 12.5-amp fuse (round up to 15 amps). Never oversize dramatically, thinking you’re being clever by avoiding blown fuses. You’re just bypassing the safety system.
Circuit breakers offer a resettable alternative to fuses and work great for frequently-used circuits. They cost more upfront but save money long-term. For solar installations feeding your RV batteries, I always recommend breakers because they’re easier to troubleshoot and reset during system testing.
Proper fusing of DC circuits protects your RV’s battery system and prevents dangerous electrical fires.
Connecting to Your Battery Bank
When adding new appliances to your RV, connecting properly to your battery bank is crucial for both safety and performance. I learned this the hard way years ago when I tried to run multiple devices off a single battery terminal and ended up with corroded connections and voltage drops that left me frustrated in the middle of a camping trip.
The cleanest approach is using a bus bar system. Think of a bus bar as a central meeting point where multiple connections can share power without creating a tangled mess of wires. Mount a positive and negative bus bar near your battery bank, then connect your batteries to these bars using appropriately sized cables. From there, run individual circuits to each appliance. This prevents you from stacking multiple wire terminals on single battery posts, which can loosen over time and create dangerous hot spots.
Always match your wire gauge to the amperage draw and distance. A handy rule: for every 10 feet of wire run at 12 volts, you’ll want heavier gauge wire to prevent voltage drop. Use 10-gauge for circuits drawing up to 30 amps, and go heavier for larger loads.
Install an inline fuse or circuit breaker within 18 inches of the battery connection for every new circuit. This protects against shorts and potential fires. Label everything clearly so future troubleshooting becomes a breeze instead of a guessing game.
Integrating Solar-Powered Appliances
One of my favorite RV upgrades was connecting DC appliances directly to my solar charge controller’s load output. Here’s what I learned that’ll save you some headaches.
Most modern charge controllers have dedicated load terminals specifically designed for powering DC devices. This is perfect for lights, fans, USB charging ports, and small 12V appliances. The beauty is that these outputs often include low-voltage disconnect protection, automatically shutting off when your batteries get too low to prevent damage.
Before connecting anything, check your charge controller’s maximum load rating. I made the rookie mistake of assuming mine could handle everything at once. It couldn’t. Add up the amp draw of all devices you plan to connect and leave some headroom—I recommend staying under 80% of the controller’s capacity.
Compatibility matters too. Make sure your DC appliances match your system voltage, whether that’s 12V or 24V. I once accidentally connected a 24V fan to my 12V system. It ran pathetically slow before I realized my error.
For larger appliances like refrigerators or inverters, wire them directly to your battery bank instead of the charge controller’s load output. This prevents overloading and gives those power-hungry devices the clean, steady current they need to run efficiently.
Common RV Appliance Wiring Projects
Adding a Residential Refrigerator
Upgrading to a residential refrigerator in your RV is a game-changer for food storage, but it requires some serious electrical planning. I learned this the hard way on my first attempt when I underestimated the power draw and ended up tripping breakers constantly!
Residential fridges run on 120V AC power and typically consume between 3-7 amps during operation. You’ll need a dedicated 15 or 20-amp circuit to prevent overloading your existing electrical system. The correct breaker size for refrigerators depends on your specific model’s power requirements, so always check the manufacturer’s specifications.
Here’s where it gets interesting for off-grid camping: since residential fridges need continuous AC power, you’ll need an inverter system to convert your battery bank’s DC power to usable AC. Understanding your inverter requirements is essential because you’ll need at least a 2000-watt pure sine wave inverter to handle the startup surge.
Consider your battery capacity too. A typical residential fridge will draw around 50-100 amp-hours from your battery bank daily. Pairing this upgrade with a robust solar charging system makes off-grid living much more practical and keeps your ice cream frozen where it belongs!
Installing a Second Air Conditioner
Adding a second air conditioner to your RV can be a game-changer for comfort, but it definitely changes your electrical landscape. Here’s what you need to know before diving in.
Most RVs with two AC units require 50-amp service instead of the standard 30-amp setup. This isn’t just about plugging into a different outlet—it means upgrading your shore power cord, inlet, and potentially your main breaker panel. I learned this the hard way during a particularly hot summer when my family decided we absolutely needed that second unit. We initially tried running both units on 30-amp service, and let’s just say the breaker wasn’t having it.
The math is straightforward: each air conditioner draws roughly 12-15 amps on startup and 8-10 amps while running. Two units can easily exceed 30 amps, especially during startup surge.
This is where soft start devices become your best friend. These clever gadgets reduce the initial power surge by 50-70 percent, potentially allowing you to run two AC units on 30-amp service in milder conditions. They’re especially valuable if you’re combining AC loads with solar and battery systems. Speaking of which, proper generator sizing for air conditioners becomes crucial if you’re boondocking with dual units—typically you’ll need at least a 4,000-watt generator with soft starts installed.
Setting Up an Induction Cooktop
Induction cooktops are game-changers for RV cooking, but they demand serious electrical planning. Most units pull between 1,500 to 1,800 watts, which means you need a dedicated 15 or 20-amp circuit that’s properly protected. I learned this the hard way during a camping trip when my first induction setup kept tripping the breaker because I’d underestimated the power draw.
When wiring for induction, start by checking your power source. If you’re running on shore power, ensure your circuit can handle the sustained load. For inverter setups, you’ll need a pure sine wave inverter rated at least 2,000 watts with sufficient surge capacity, since induction cooktops spike during startup. Generator users should verify their unit produces clean power to avoid damaging sensitive electronics inside the cooktop.
Always install a dedicated circuit breaker and consider adding a surge protector between your power source and the cooktop. This protects your investment from voltage spikes common in campground electrical systems. Wire sizing matters too: use 12-gauge wire minimum for 20-amp circuits to prevent voltage drop and overheating.
One practical tip: test your complete setup at home before hitting the road. Run the cooktop at full power for 15 minutes while monitoring for heat buildup at connections and checking that nothing’s struggling.
Troubleshooting RV Electrical Problems
Why Your Breakers Keep Tripping
I’ve spent enough time troubleshooting tripped breakers in RVs to know how frustrating it can be when you’re trying to enjoy a weekend getaway. The most common culprit is simple overload—you’re asking too much of a single circuit. This happens when you run your air conditioner, microwave, and coffee maker simultaneously, and suddenly everything goes dark.
To identify an overloaded circuit, add up the wattage of everything plugged into that circuit. Your typical RV circuit breaker handles 15 or 20 amps at 120 volts, which means roughly 1,800 to 2,400 watts. If you’re exceeding that, you’ll trip the breaker every time.
Load management is your first line of defense. Stagger your appliance use—run the microwave before turning on the hair dryer, not at the same time. When boondocking, sizing your RV generator properly becomes crucial for preventing these issues.
Sometimes the problem isn’t overload but a faulty appliance or loose connection creating a short circuit. Check for damaged cords and ensure all connections are tight. If load management doesn’t solve your tripping issues, you might need a circuit upgrade or additional dedicated circuits for high-draw appliances. This is where understanding your RV’s electrical capacity becomes essential for long-term reliability.
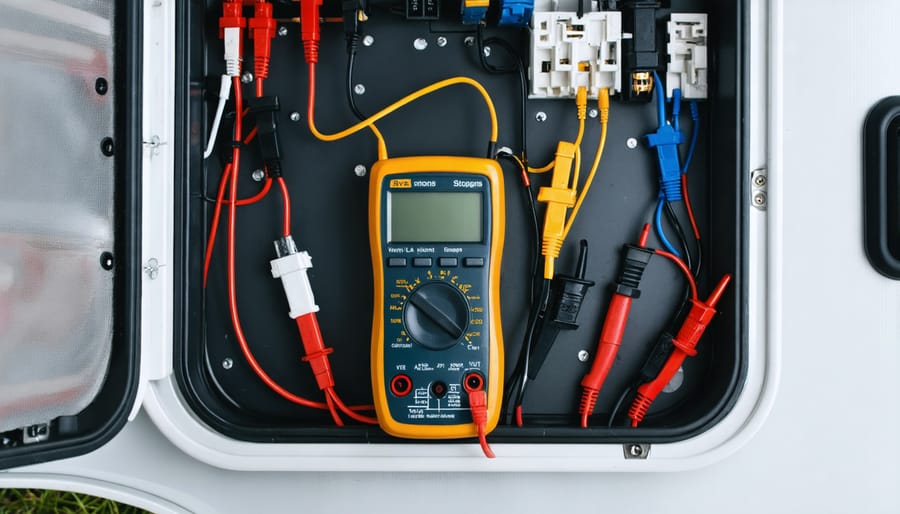
Using a multimeter to diagnose voltage issues helps identify wiring problems before they damage your RV appliances.
Diagnosing Low Voltage Issues
When your RV lights are dimming or appliances aren’t running at full power, you’re likely dealing with voltage drop, and a multimeter is your best friend for tracking down the culprit. I remember Charles telling me about a camping trip where his water pump was barely trickling. Turned out, a corroded connection was robbing 2 volts before power even reached the pump.
Start by setting your multimeter to DC voltage (usually 20V range for 12V systems). First, check the voltage directly at your battery terminals with everything off. You should see around 12.6 to 12.8 volts for a healthy, fully charged battery. Now turn on the problematic appliance and check the voltage at the battery again. A small drop of 0.2 to 0.5 volts is normal, but anything more suggests trouble.
Next, check the voltage right at the appliance’s connection point while it’s running. If there’s more than a 0.5-volt difference between what you measured at the battery and what you’re seeing at the appliance, you’ve got voltage drop somewhere in between. This usually means corroded connections, loose terminals, or undersized wiring.
Walk the circuit, checking voltage at each connection point. The spot where you see the biggest voltage difference is your problem area. Clean corroded connections with a wire brush and apply dielectric grease. Tighten loose terminals firmly. If the wiring itself feels warm to the touch when the appliance runs, it’s undersized and needs upgrading to a thicker gauge wire to handle the current safely.
Tools and Materials You’ll Actually Need
Let me be honest with you—when I first started working on RV electrical systems, I bought way too many tools I didn’t need and skimped on the ones that actually mattered. After helping countless RVers through similar projects, I’ve learned exactly where to invest and where you can save some cash.
For basic diagnostic work and most wiring tasks, you’ll need a quality multimeter. This is not the place to go bargain hunting. Spend around $50-80 on a reliable digital multimeter that can test both AC and DC voltage, continuity, and resistance. I still use the same Fluke meter I bought eight years ago—it’s paid for itself a hundred times over by preventing costly mistakes.
Your wire strippers and crimpers should be decent quality too. A good ratcheting wire crimper (around $30-40) creates secure connections that won’t fail when you’re bouncing down the highway. Cheap crimpers often don’t fully compress the terminal, leading to intermittent connections and frustrating troubleshooting sessions down the road.
Here’s where you can save money: basic hand tools. Your regular screwdriver set, needle-nose pliers, and wire cutters will work just fine. No need for specialized versions.
For materials, you’ll want marine-grade wire—not automotive wire. RV environments experience more vibration and temperature swings, so the extra flexibility and insulation matter. Keep various gauges on hand: 14-gauge for most 120V circuits, 12-gauge for higher-draw appliances, and 10-gauge or larger for DC solar installations.
Stock up on heat-shrink connectors instead of twist-on wire nuts for RV applications. They handle vibration better and create weather-resistant connections. A heat gun (even a basic $20 model) makes these connections professional-grade.
Finally, grab a non-contact voltage tester for quick safety checks. These pen-sized tools (under $20) help you verify circuits are dead before touching anything. It’s cheap insurance against accidentally grabbing a live wire.
Safety Considerations and When to Call a Pro
I’ll be straight with you—I’ve learned some of my most valuable lessons from mistakes. Like the time I confidently dove into rewiring a friend’s RV converter without double-checking if shore power was actually disconnected. The resulting spark wasn’t dangerous, but it sure got my attention and taught me to respect the process.
Working with RV electrical systems is absolutely within reach for DIYers, but safety must come first. Always disconnect from shore power and turn off your battery disconnect before touching any wiring. Use a multimeter to verify circuits are dead—don’t just trust the switch position. When working with 120V AC systems, the same rules that apply in your house apply in your RV, only with the added complexity of a mobile environment.
Here’s when you should definitely call a professional: any work involving your main breaker panel or converter modifications, installing new 120V circuits if you’re not confident with residential electrical work, or diagnosing intermittent problems that could indicate damage inside walls. If you’re experiencing repeated breaker trips or smell burning plastic, stop using that circuit immediately and get professional help.
That said, many tasks are absolutely DIY-friendly once you understand the fundamentals covered in our complete electrical system guide. Running new 12V DC circuits, replacing outlets and switches, and adding simple appliances are all manageable with proper preparation and respect for safety protocols.
Know your limits, and remember that there’s no shame in calling a certified RV technician or electrician. The goal isn’t to do everything yourself—it’s to understand your system well enough to make informed decisions about what you can safely tackle and when professional expertise is worth the investment.
You’ve made it through the technical details, the wire gauges, the circuit breakers, and the connection methods. Here’s what I want you to remember: proper RV appliance wiring is completely achievable for someone like you. When I first started working on my own RV electrical system years ago, I felt overwhelmed too. But I quickly learned that breaking things down into manageable steps made all the difference.
My advice? Start small. Don’t tackle a complete electrical overhaul on day one. Maybe begin by upgrading a single light fixture or installing a USB charging port. Build your confidence with these smaller projects before moving on to more complex appliance installations. Each successful project teaches you something new and prepares you for the next challenge.
Remember that safety always comes first. Double-check your connections, test your work before energizing circuits, and never hesitate to consult a professional if something feels beyond your current skill level. There’s no shame in knowing your limits, and the learning process is part of the journey.
I encourage you to explore the calculators and resources available here at Spheral Solar. They’re designed specifically to help DIYers like you make informed decisions about wire sizing, power requirements, and system design. And don’t forget about our community of fellow RV enthusiasts who are always ready to share their experiences and answer questions.
There’s something deeply satisfying about being self-reliant in your RV. Knowing you can troubleshoot problems, make improvements, and truly understand the systems keeping you comfortable on the road brings a level of confidence that enhances every adventure. Safe travels and happy wiring.
How useful was this post?
Click on a star to rate it!
Average rating 0 / 5. Vote count: 0
No votes so far! Be the first to rate this post.
We are sorry that this post was not useful for you!
Let us improve this post!
Tell us how we can improve this post?
charlesnoble
Here at Spheral Solar, I’m a hands-on solar power enthusiast, constantly exploring and experimenting with DIY solutions. I’m dedicated to sharing my discoveries, insights, and even the bumps I hit along the way, all in the pursuit of a more sustainable future.
Why Your Motorhome Electrical System Keeps Failing… by Charlesnoble November 18, 2025 Picture this: You’re three days into a dream cross-country trip when your lights flicker, the refrigerator stops cooling, and you’re left wondering whether to call for expensive roadside assistance or figure it out yourself. I’ve been there, and here’s what I wish someone had told me before my first electrical…
Why Your RV Battery Dies Overnight (And How a 55 Amp… by Charlesnoble December 5, 2025 Your RV’s lights are flickering, the refrigerator isn’t keeping food cold, and your phone charger barely works. Sound familiar? That frustrating power struggle often points to an undersized or failing power converter, and upgrading to a 55 amp RV power converter might be exactly what you need. Here’s what’s happening:…
Should an RV Inverter Be Left on When Plugged In? by Charlesnoble October 31, 2023 Generally, RV inverters should be turned off when not in use to avoid unnecessary battery drain. However, whether an RV inverter should be left on or off when plugged in depends on several factors, primarily the type of inverter and the manufacturer’s recommendations. In this comprehensive guide, we’ll look in-depth…
Why Your RV Solar Panels Aren’t Charging (And How to… by Charlesnoble November 30, 2025 Check your multimeter readings at each connection point along your solar charging path—from panels to charge controller to battery—to pinpoint exactly where voltage disappears. Most RV solar systems lose 10-30% of their potential power to voltage drop, but this invisible thief often goes undetected until you systematically measure and compare…
Running Your RV Air Conditioner on Solar: Why Most… by Charlesnoble November 5, 2025 **Calculate your air conditioner’s starting watts before buying any inverter**—most RV AC units need 2,800-3,500 watts to start but only 1,200-2,000 watts to run. This surge requirement catches most first-time solar RV owners off guard, leading to undersized systems that can’t handle the initial power draw. **Match your inverter capacity…
How Much Power Does Your RV Mini Fridge Really Use? by Charlesnoble January 12, 2026 Measure your mini fridge’s actual power draw by plugging a Kill-A-Watt meter between the outlet and your fridge for 24 hours—this $25 tool gives you the exact kWh reading rather than relying on manufacturer estimates that often miss real-world conditions. Most compact mini fridges consume between 0.5-1.5 kWh per day,…
Subscribe for handpicked DIY projects, exclusive tips, and giveaways.
Route your PV wires through UV-resistant conduit within 18 inches of leaving the solar array, securing it every 3 feet with proper clamps to prevent wind damage and code violations. This single step prevents 80% of the wire degradation issues I’ve seen in DIY solar installations over the past decade. Group your positive and negative… Read more: Why Your PV Wire Management Could Fail Inspection (And How to Fix It)
Understand that 6000 volts sounds terrifying but delivers surprisingly low amperage—typically around 120 milliamps for just 3/10,000th of a second per pulse. This combination creates an unforgettable shock that trains animals to avoid the fence without causing lasting harm. The voltage pushes current through thick fur and hide, while the minimal amperage and microsecond duration… Read more: Why 6000 Volts Won’t Kill Your Livestock (But Will Stop Predators Cold)
Check the maximum voltage and current ratings first—these determine whether your controller can actually handle your solar panel array without frying itself on the first sunny day. I learned this the hard way when my first DIY system shut down every afternoon because I’d paired 600 watts of panels with a controller rated for only… Read more: Why Your Solar Setup Needs Both a Charge Controller and Inverter (And How to Pick the Right Ones)

")
")

")
")

")
")

")
")


