Why Your Solar Lights Keep Dying (And How to Fix Them Yourself)
Updated:
Check the rechargeable battery first—it’s the culprit in about 70% of solar light failures. Pop open the panel housing (usually just a screw or two), pull out the battery, and test it with a multimeter. If it reads below 1.2V for a standard NiMH battery, replacement costs just a few dollars and takes five minutes.
Clean the solar panel surface with rubbing alcohol and a microfiber cloth. That cloudy film you’re seeing? It’s blocking up to 50% of the sun’s energy from reaching the photovoltaic cells. I learned this the hard way when my entire row of outdoor solar string lights went dim after one dusty summer—a simple wipe-down brought them back to full brightness overnight.
Inspect the LED connections for corrosion, which appears as white or green crusty buildup around the wiring. Use a pencil eraser to gently clean corroded contacts, or apply a tiny amount of white vinegar on a cotton swab for stubborn oxidation. This simple fix restores conductivity and gets your lights shining again.
Replace cracked or foggy light covers that trap moisture inside the housing. Water infiltration damages circuitry and creates the perfect environment for corrosion. A dab of clear silicone sealant around the edges prevents future water entry and extends your light’s lifespan by years.
Most solar light problems aren’t death sentences—they’re opportunities to develop real repair skills while keeping perfectly good fixtures out of landfills. Let’s diagnose what’s wrong with your lights and get them working again.
The Most Common Reasons Solar Lights Fail
Corroded battery terminals are one of the most common failure points in solar lights, but they’re easily cleaned and repaired.
Battery Degradation
Here’s the truth I’ve learned from fixing dozens of solar lights in my own yard: nine times out of ten, when your solar light stops working, the battery is your culprit. Those rechargeable batteries tucked inside your solar fixtures aren’t immortal—they’re actually working incredibly hard, charging and discharging every single day.
Most solar lights use NiMH or NiCd batteries, which typically last between 1-3 years before they start losing their mojo. Over hundreds of charge cycles, these batteries develop what’s called “memory effect” or simply wear out their chemical capacity. It’s like how your phone battery doesn’t hold a charge as well after a couple years—same principle, different application.
How do you know if your battery has given up? Look for these telltale signs: your light glows dimly even after a sunny day, it illuminates for just an hour or two instead of all night, or it doesn’t light up at all despite the solar panel looking clean and intact.
The good news? Battery replacement is usually the easiest and cheapest fix in your solar lighting toolkit. I’ve swapped out countless batteries in under five minutes, and you can too. Most batteries cost just a few dollars and require nothing more than a screwdriver to access.
Dirty or Damaged Solar Panels
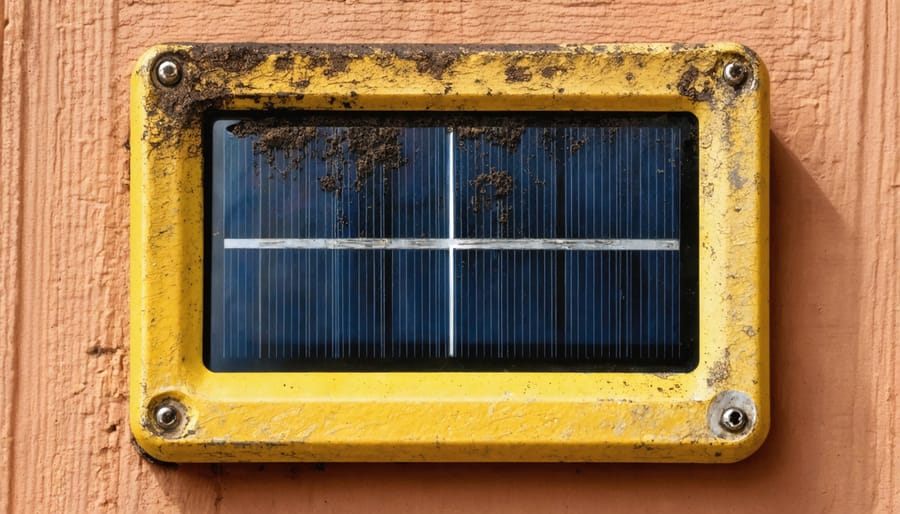
I learned this lesson the hard way when my pathway lights suddenly dimmed to nearly nothing. After checking everything else, I wiped down the panels and—wow—instant improvement! Even a thin layer of dust, pollen, or bird droppings can block up to 25% of sunlight reaching your solar cells, drastically reducing charging capacity.
Start by inspecting your panels in bright sunlight. Look for dirt buildup, leaves, cobwebs, or water spots. Check for physical damage like cracks or yellowing—weathering and UV exposure can degrade the protective coating over time, making panels less efficient.
Clean panels gently with a soft, damp cloth and mild soap. Avoid abrasive materials that might scratch the surface. For stubborn grime, a mixture of water and white vinegar works wonders. If your panels show significant cracking or discoloration, replacement is often the most practical solution. Understanding solar panel basics helps you maintain them properly and maximize their lifespan—regular cleaning every few months keeps your lights shining bright!
Corroded Connections and Water Damage
I’ve learned the hard way that “waterproof” doesn’t always mean waterproof when it comes to budget solar lights. Even those rubber gaskets and sealed cases eventually give way to moisture—whether from rain seeping through tiny cracks, condensation building up inside the housing, or the gasket simply degrading over time in UV light.
When water gets inside, it creates a chain reaction of problems. You’ll often find a white or green crusty buildup around wire connections and battery terminals—that’s corrosion eating away at your electrical pathways. The solar panel connections are particularly vulnerable since they’re constantly exposed to temperature changes that cause expansion and contraction.
To check for water damage, carefully open your light housing (usually a few small screws) and look for any moisture, rust, or that telltale crusty residue. If the connections look corroded, don’t worry—this is totally fixable! Clean the contacts with a bit of white vinegar on a cotton swab, let everything dry completely, then reassemble with a thin bead of silicone sealant around the gasket for extra protection.
LED Burnout
Good news—LEDs rarely burn out! They’re incredibly durable, often lasting 50,000+ hours. When your solar light fails, the LED is usually fine. I’ve found that nine times out of ten, it’s actually the battery, corroded connections, or a faulty sensor causing the problem. That said, LEDs *can* fail from voltage spikes or manufacturing defects. To test, bypass your circuit and connect the LED directly to a working battery with proper resistors. If it lights up, your LED isn’t the culprit—look elsewhere in your system first.
Essential Tools and Materials for Solar Light Repairs
Most solar light repairs require only basic tools that many homeowners already have on hand.
Basic Tool Kit
Before diving into solar light repairs, let’s talk about the tools you’ll actually need. I learned this the hard way after fumbling through my first repair with a butter knife—trust me, proper tools make all the difference!
**Screwdrivers** are your foundation. Get both Phillips head (the cross-shaped tip) and flathead varieties in multiple sizes. Most solar lights use small screws, so precision screwdrivers work best. These help you open casings and access internal components without damaging delicate plastic housings.
**Pliers** give you the grip you need. Needle-nose pliers are perfect for handling tiny wires and components in cramped spaces, while standard pliers help with stubborn battery compartments. I keep both within arm’s reach during every repair.
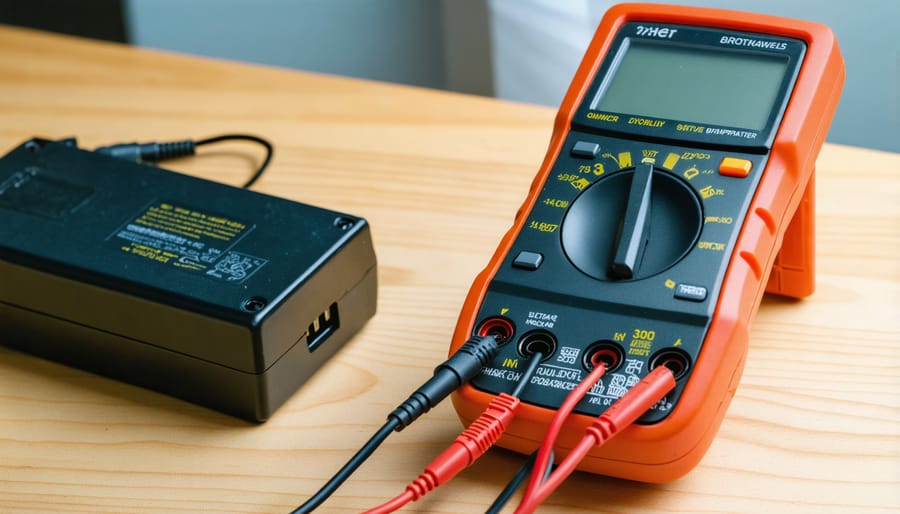
The **multimeter** is your diagnostic hero, and it’s simpler than it looks. This handheld device measures voltage, current, and resistance—basically telling you if electricity is flowing where it should. Set it to “V” for voltage when testing batteries or solar panels. Touch the red probe to positive (+) and black to negative (−). A reading close to the expected voltage means that component works. No reading? You’ve found your problem! Most basic multimeters cost under $20 and demystify electrical troubleshooting completely.
Replacement Parts Worth Stocking
Having a small stash of replacement parts can save you from ordering delays when repairs are needed. Here’s what Charles recommends keeping on hand:
**Batteries** are your most critical spare. Stock both AA and AAA rechargeable NiMH batteries (1.2V, 600-800mAh for solar lights). These typically cost $1-2 each and last 1-2 years. Avoid mixing old and new batteries—I learned this the hard way when half my pathway lights dimmed unevenly!
**Silicone sealant** (clear, waterproof type) prevents moisture damage and costs around $5-8 per tube at hardware stores. A single tube handles dozens of repairs.
**LED bulbs** vary by fixture, so photograph your existing bulbs before shopping. Most use 3V or 6V LEDs available online for under $2 each.
**Where to source affordably**: Hardware stores work for batteries and sealant, but online marketplaces like Amazon or AliExpress offer better bulk pricing for LEDs and batteries. Local battery specialty shops sometimes sell rechargeable cells individually, perfect when you only need a few. Home improvement store clearance sections occasionally stock solar light components at steep discounts—worth checking seasonally.
Keep parts in a labeled container so you’re ready when repairs strike!
Step-by-Step: Diagnosing Your Solar Light Problem
The Sunlight Test
Grab your solar light and head outside on a sunny day—this is the most straightforward way to check if your panel is doing its job. Place the light in direct sunlight for about 30 minutes, making sure no shadows fall across the panel. Here’s my trick: before you start, turn the light off completely (some have switches underneath). After the sun-soaking session, bring it into a dark space like a closet or garage and flip it on. If it lights up, congratulations—your panel is charging! If nothing happens, wipe the panel clean with a damp cloth and try again. Sometimes months of dust and grime block sunlight more than you’d expect. I learned this the hard way when I spent an hour troubleshooting a light that just needed a good cleaning!
The Battery Check
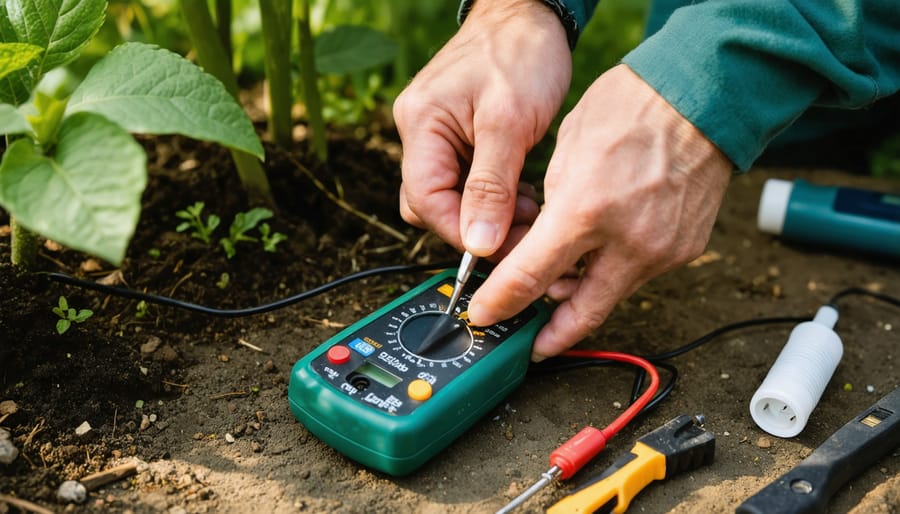
Testing your solar light’s battery is easier than you might think, and you don’t need to be an electrician to do it! I remember the first time Charles showed me this trick—I was amazed at how simple it was.
You’ll need an inexpensive multimeter, which you can pick up at any hardware store for under $15. Set it to the DC voltage setting (usually marked with a “V” and a straight line). Most solar lights use rechargeable AA or AAA batteries rated at 1.2 volts.
Here’s what your readings mean: A healthy, fully charged battery should read between 1.2 and 1.4 volts. If you’re getting 1.0 to 1.2 volts, the battery is weak but might recover with a good charging session in direct sunlight. Anything below 1.0 volt means the battery is likely done for and needs replacing.
Pro tip from Charles: Always test batteries after they’ve had a full sunny day to charge. Testing a depleted battery doesn’t tell you much! If your reading is zero or fluctuates wildly, check your multimeter connections—the metal probes should touch the battery terminals firmly.
Testing battery voltage with a simple multimeter helps identify whether the battery needs replacement.
Inspecting for Physical Damage
Start with a careful visual inspection of your solar light—I learned this the hard way after spending an hour troubleshooting electronics when the real culprit was a cracked solar panel! Look for obvious cracks or chips in the solar panel itself, as even small fractures can prevent charging. Check the light fixture housing for cracks that might let moisture inside, which is a common killer of solar lights.
Examine all wire connections carefully. Look for corroded (greenish or white buildup) or loose connections where wires meet the battery compartment or LED assembly. Gently tug on wires to ensure they’re secure—I’ve found several lights where wires had simply wiggled loose over time.
Don’t forget the battery compartment! Check for corrosion on the metal contacts (that crusty white or green stuff), which blocks electrical flow. The waterproof seals and rubber gaskets are also worth inspecting—if they’re cracked or missing, water damage is likely your problem. Finally, look at the LED bulb itself for any discoloration or burn marks, though LEDs typically outlast other components.
How to Replace Solar Light Batteries
Identifying the Right Replacement Battery
Finding the right replacement battery is crucial for getting your solar lights working again. I learned this the hard way when I grabbed the wrong battery type and wondered why my garden path lights still wouldn’t charge!
Most solar lights use one of three battery types: **NiMH (Nickel-Metal Hydride)**, **NiCd (Nickel-Cadmium)**, or **Li-ion (Lithium-ion)**. NiMH batteries are the most common today—they’re environmentally friendlier than older NiCd batteries and perform well in various temperatures. Li-ion batteries are increasingly popular in newer, high-end solar lights because they hold more charge and last longer.
Here’s what matters when choosing: **voltage must match exactly**. If your old battery says 1.2V, get a 1.2V replacement. Using mismatched voltage can damage your light’s circuitry.
**Capacity**, measured in milliamp-hours (mAh), tells you how long the battery will power your light. Higher numbers mean longer runtime. You can safely upgrade to higher capacity—like swapping 600mAh for 800mAh—for extended illumination, but never go lower than the original specification.
Check your existing battery’s label or your light’s manual before shopping. When in doubt, bring the old battery to your hardware store for comparison.
Replacing worn-out batteries is the most common and straightforward solar light repair.
Safe Battery Removal and Installation
Before you begin, power down your solar light and let it sit for a few hours to ensure any residual charge dissipates. I learned this the hard way when I got a tiny shock from a capacitor that was still holding juice—nothing dangerous, but definitely startling!
Start by locating the battery compartment, which is typically on the underside of the light head or in the stake. You’ll usually find a small Phillips or flathead screw, though some units simply twist open. Keep track of screws by placing them in a small container—trust me, they have a habit of disappearing into the grass.
Once open, take a photo with your phone before removing anything. This simple step saves countless headaches later. Now, carefully note the battery polarity. Look for the plus (+) and minus (-) symbols either on the battery itself or molded into the plastic housing. Most solar lights use standard rechargeable batteries with a positive terminal at the raised end and negative at the flat end.
Gently remove the old battery. If it’s corroded or stuck, use a small flathead screwdriver to carefully pry it loose, being mindful not to damage the metal contacts.
Insert your new battery matching the exact polarity you noted earlier. Double-check against your photo. A reversed battery won’t charge and could damage the circuit board.
Ensure the battery sits snugly against both contacts with no gaps. Replace the cover and screw it tight enough to maintain the weather seal, but don’t overtighten—you’ll crack the plastic housing.
When to Upgrade Your Battery
If your solar light runs out of charge too quickly or barely lasts through the evening, it’s time for an upgrade. I’ve found that swapping standard NiMH batteries with higher-capacity versions (look for 800-1000mAh ratings) dramatically extends runtime. This is especially helpful for pathway lights in shadier spots or decorative fixtures you want glowing all night. The cost difference is minimal—usually just a few dollars—but the performance boost is remarkable. Just match the battery size and voltage to avoid any compatibility issues.
Cleaning and Restoring Solar Panels
The Right Way to Clean Solar Panels
Keeping your solar panels clean doesn’t have to be complicated, but using the wrong materials can do more harm than good. I learned this the hard way when I scratched up my first solar light with a rough sponge—oops!
**What to Use:**
– Soft microfiber cloths or sponges
– Mild dish soap mixed with lukewarm water
– A soft-bristle brush for stubborn dirt
– Distilled water for the final rinse (prevents mineral deposits)
**What to Avoid:**
– Abrasive cleaners or scouring pads
– Paper towels (they can scratch!)
– High-pressure washers
– Harsh chemicals like ammonia or bleach
**The Technique:**
Start by gently brushing off loose dirt and debris. Mix a few drops of dish soap in a bucket of water, dip your microfiber cloth, and wipe the panel surface using circular motions. Don’t press too hard—let the cloth do the work. Rinse with clean water and dry with a fresh microfiber cloth to prevent water spots. For best results, clean panels in early morning or evening when they’re cool to the touch.
Dealing with Yellowed or Cloudy Panels
Cloudy or yellowed solar panels drastically reduce charging efficiency—I’ve seen lights that barely worked come back to life with this simple fix! The culprit is usually UV damage and oxidation on the plastic panel surface.
Start with a basic clean using dish soap and warm water. If cloudiness persists, try a baking soda paste (three parts baking soda to one part water). Gently rub it onto the panel in circular motions using a soft cloth, then rinse thoroughly. For stubborn yellowing, white vinegar works wonders—apply it directly, let it sit for 5-10 minutes, then wipe clean.
Here’s a trick from my workshop: automotive headlight restoration kits are perfect for solar panels! They contain mild abrasives that remove oxidation without scratching. After cleaning, apply a thin coat of clear nail polish or automotive UV protectant to prevent future yellowing. Your panels should look crystal-clear and perform like new again.
Fixing Corroded Connections and Water Damage
Cleaning Corroded Contacts
Corrosion on battery terminals and wire connections is one of the most common culprits behind solar light failures. That white, blue, or greenish crusty buildup blocks the electrical current, and I’ve seen perfectly good lights tossed out when they just needed a quick cleaning!
Before you start, safety first: remove the batteries and work in a well-ventilated area. For light corrosion, a simple mixture of baking soda and water (about one tablespoon to a cup of water) works wonders. Apply it with an old toothbrush, gently scrubbing the affected areas. The fizzing action you’ll see is the alkaline baking soda neutralizing the acidic corrosion—pretty cool chemistry in action!
For stubborn buildup, you can use white vinegar or a commercial contact cleaner spray. I’ve found that a small wire brush or even fine-grit sandpaper helps reach tight spots. After cleaning, rinse with distilled water if possible (tap water can leave mineral deposits), then dry thoroughly with a clean cloth.
Here’s a tip from my own experience: apply a thin layer of petroleum jelly or dielectric grease to cleaned terminals before reassembling. This creates a protective barrier against future corrosion, especially in humid climates. Your solar lights will thank you with years of reliable service!
Re-Sealing Your Solar Lights
Once you’ve replaced panels or batteries, proper sealing is your best defense against future water damage. I learned this the hard way when my first repaired light failed again after a heavy rainstorm—turns out I’d been too casual about reassembly!
Start with clear silicone sealant, available at any hardware store for a few dollars. Before sealing, thoroughly clean all mating surfaces with rubbing alcohol to remove dirt, old adhesive, and moisture. Apply a thin, continuous bead of sealant around gasket areas and screw holes. Don’t overdo it—excess sealant can squeeze into electronics and cause new problems.
For battery compartments, consider adding a rubber gasket if the original has degraded. You can cut these from automotive gasket material or purchase pre-made O-rings. Some DIYers swear by dielectric grease on electrical connections—it prevents corrosion while still allowing conductivity.
Here’s a pro tip from my toolbox: after sealing, let your lights cure for 24 hours before exposing them to weather. Test them indoors first to ensure everything works before reinstalling outside. This extra patience saves you from climbing that ladder twice!
When It Makes Sense to Replace vs. Repair
I’ll be honest with you—I’ve held onto solar lights way past their prime, trying repair after repair when I should’ve just moved on. Here’s how to make a smarter call than I did.
**The 50% Rule**: If repair costs exceed half the replacement price, it’s usually time to upgrade. A $3 battery replacement on a $15 light? Absolutely worth it. But spending $20 on components for that same light doesn’t make financial sense.
**Age matters too**. Solar panels typically last 20+ years, but the circuitry and LEDs? Around 3-5 years with regular use. If your lights are pushing that age and showing multiple issues, replacement often wins. I learned this after fixing the same garden light three times in one year—the universe was telling me something!
**Environmental considerations** add nuance here. Repairing extends product life and reduces e-waste, which aligns with solar’s eco-friendly mission. When repairs are simple—swapping batteries, cleaning panels, replacing LEDs—always choose repair. You’re keeping materials out of landfills and honoring the embodied energy in manufacturing.
However, newer models are significantly more efficient. If your old lights barely lasted four hours and new ones run eight hours on smaller panels, the upgrade actually reduces your environmental footprint over time through better resource use.
**Consider upgrading** when you’re constantly repairing, when replacement parts are hard to find, or when you’re ready to tackle more ambitious DIY solar light projects using your old components as learning tools rather than frontline fixtures.
There’s something deeply satisfying about breathing new life into a solar light that seemed destined for the landfill. I remember the first time I successfully repaired one of my own—it felt like a small victory against our throwaway culture. The truth is, most solar light problems are surprisingly fixable, even if you’ve never tackled anything like this before.
By choosing to repair rather than replace, you’re making a real difference. Every solar light you fix is one less item in a landfill and one less product that needs manufacturing, shipping, and packaging. It’s a small act, but when multiplied across our community of DIY enthusiasts, it adds up to genuine environmental impact.
The skills you’ve learned here apply to all kinds of solar light systems around your home. Once you understand the basic components—battery, solar panel, LED—you’ll find yourself naturally troubleshooting other devices too.
Now it’s your turn to join the conversation. Have you successfully revived a stubborn solar light? Did you discover a clever workaround we didn’t mention? Head over to our community forums and share your experiences. Your solution might be exactly what another reader needs to hear.
For more hands-on guides and helpful tools, explore the resources section on Spheral Solar. We’re constantly adding new calculators, tutorials, and troubleshooting guides to support your solar journey. Together, we’re building a community that fixes, shares, and keeps things shining bright.
How useful was this post?
Click on a star to rate it!
Average rating 0 / 5. Vote count: 0
No votes so far! Be the first to rate this post.
We are sorry that this post was not useful for you!
Let us improve this post!
Tell us how we can improve this post?
charlesnoble
Here at Spheral Solar, I’m a hands-on solar power enthusiast, constantly exploring and experimenting with DIY solutions. I’m dedicated to sharing my discoveries, insights, and even the bumps I hit along the way, all in the pursuit of a more sustainable future.
Why Your Solar Lights Keep Dying (And How to Fix… by Charlesnoble October 29, 2025 Check the rechargeable battery first—it’s the culprit in about 70% of solar light failures. Pop open the panel housing (usually just a screw or two), pull out the battery, and test it with a multimeter. If it reads below 1.2V for a standard NiMH battery, replacement costs just a few…
Why Your Solar Lights Keep Dying (And How to Fix… by Charlesnoble October 29, 2025 Check the rechargeable battery first—it’s the culprit in about 70% of solar light failures. Pop open the panel housing (usually just a screw or two), pull out the battery, and test it with a multimeter. If it reads below 1.2V for a standard NiMH battery, replacement costs just a few…
Why Your Solar Lights Keep Dying (And How to Fix… by Charlesnoble October 29, 2025 Check the rechargeable battery first—it’s the culprit in about 70% of solar light failures. Pop open the panel housing (usually just a screw or two), pull out the battery, and test it with a multimeter. If it reads below 1.2V for a standard NiMH battery, replacement costs just a few…
DIY Solar Generator – Complete Guide With Diagrams by Paul July 17, 2021 Building a weatherproof DIY solar generator involves mounting and wiring a battery, charge controller, inverter, trickle charger, and fusing inside a weatherproof case. Then all the relevant input and output sockets are wired and mounted on the outside of the case where they are easily accessible. What Exactly Are Solar…
How Does a Solar-Powered Drip Irrigation System Work by Paul September 13, 2021 Solar-powered drip irrigation can be installed in most gardens using a small solar system, readily available irrigation materials, and minimal tools. If you already have a home solar system, it can be tapped into without installing a dedicated system. And the installation of an average drip irrigation system is well…
How to Build a Solar-powered Electric Fence (With Diagrams) by Paul November 1, 2021 You can build a permanent DIY, 3-acre solar-powered electric fence can with basic technical skills in under a week. And depending on whether you opt for a custom or off-the-shelf solar fence charger, costs between $1,400 and $1, 800. And it could be up and running in a couple of…
Subscribe for handpicked DIY projects, exclusive tips, and giveaways.
Monitor your DIY solar system’s performance from anywhere using dedicated hardware monitors, smartphone-connected inverters, or cloud-based platforms that track voltage, current, and energy production in real-time. Install a basic Bluetooth-enabled shunt monitor for under $50 to see exactly how many watts your panels generate and how much power your batteries store—no electrician required. Check your… Read more: Never Worry About Your DIY Solar System Again With These Monitoring Solutions
Check the rechargeable battery first—it’s the culprit in about 70% of solar light failures. Pop open the panel housing (usually just a screw or two), pull out the battery, and test it with a multimeter. If it reads below 1.2V for a standard NiMH battery, replacement costs just a few dollars and takes five minutes.… Read more: Why Your Solar Lights Keep Dying (And How to Fix Them Yourself)
Check the rechargeable battery first—it’s the culprit in about 70% of solar light failures. Pop open the panel housing (usually just a screw or two), pull out the battery, and test it with a multimeter. If it reads below 1.2V for a standard NiMH battery, replacement costs just a few dollars and takes five minutes.… Read more: Why Your Solar Lights Keep Dying (And How to Fix Them Yourself)
")


")


")