Why Your Solar Panel’s J-Box Matters More Than You Think
Updated:
Flip over any solar panel and you’ll spot a small weatherproof box attached to the back—that’s the junction box, or j-box, and it’s the critical gateway between your panel’s delicate solar cells and your entire electrical system. Understanding this component isn’t just technical curiosity; it’s essential for anyone wiring their own solar setup safely and effectively.
The j-box serves as your panel’s protected connection hub, housing bypass diodes that prevent shading issues and providing those familiar positive and negative wire leads you’ll connect to your system. When I first started building my off-grid cabin setup, I made the rookie mistake of ignoring these little boxes, assuming they were just simple pass-throughs. That assumption nearly cost me when I couldn’t figure out why my shaded panels were dragging down my entire string’s performance—the bypass diodes inside were doing their job, but I didn’t understand how they worked.
For DIY solar installers, the j-box represents the starting point of your system’s electrical pathway. Those wires emerging from each panel need to connect somewhere safe, organized, and code-compliant. This is where understanding the relationship between your panel j-boxes, combiner boxes, and overcurrent protection becomes crucial. You’re not just connecting wires—you’re building a system where electricity flows safely from individual panels through properly sized conductors, gets combined with other strings, and receives appropriate protection before reaching your charge controller or inverter.
This guide walks you through exactly how these components work together, from the individual panel level to your complete array, with practical wiring examples you can actually use in your own installation.
What Exactly Is a Solar Panel J-Box?
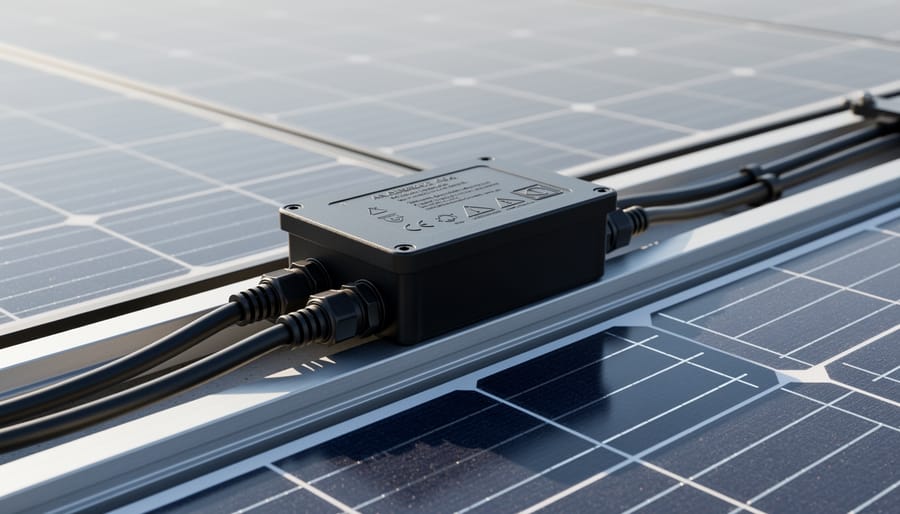
The junction box on the back of a solar panel houses critical electrical connections and bypass diodes that protect your system.
The Parts Inside Your J-Box
Pop open a j-box (carefully, when the panel isn’t energized!) and you’ll find a surprisingly simple setup inside. Think of it as the organized workspace where your solar panel’s electrical output gets ready for the journey to your home.
The first thing you’ll notice are the bypass diodes. These little components are like traffic detours for electricity. When part of your panel gets shaded by a tree branch or bird droppings, the diode creates an alternate path so the electricity can keep flowing around the problem area. Without them, one shaded cell could drag down your entire panel’s performance. Most residential panels have three bypass diodes, each protecting a section of cells.
Next up are the terminal connections, basically sturdy screw-down blocks where everything comes together. Your panel’s internal wiring connects here, and this is where you’ll attach your own cables during installation. These terminals are clearly marked with positive and negative symbols, because mixing those up would be a very bad day.
Finally, you’ve got the wire leads extending from those terminals. These are the actual cables you’ll work with, usually with MC4 connectors already attached. The red wire carries your positive charge, black handles negative, and sometimes you’ll see a green or bare copper wire for grounding.
I remember the first time I opened a j-box, expecting some complex circuit board situation. Instead, it was refreshingly straightforward. Everything has exactly one job, and that simplicity is actually what makes solar installations accessible for DIYers like us. Just remember to always work safely and follow proper shutdown procedures before touching anything inside.
Why Every Solar Panel Has One
When I first started working with solar panels, I wondered why that little rectangular box on the back was such a big deal. Turns out, the j-box is one of the most important safety features your panel has, and here’s why.
Think of the j-box as the protective gateway between your solar panel’s delicate internal wiring and the harsh outside world. Solar panels live outdoors 24/7, facing rain, snow, extreme heat, and UV exposure. Without that weatherproof enclosure, moisture would quickly corrode the electrical connections, leading to power loss or even dangerous shorts.
But protection from the elements is just the beginning. The j-box also houses critical components like bypass diodes, which prevent hot spots when part of your panel is shaded. These diodes keep electricity flowing safely even when conditions aren’t perfect.
Here’s the practical part: the j-box makes your life easier. Those wire leads coming out of it provide a safe, standardized connection point for your system wiring. No fumbling with exposed connections or worrying about proper sealing—the manufacturer has already done the hard work.
Every solar panel needs this junction point where power generation meets your electrical system, and the j-box does this job reliably while keeping everything code-compliant and safe for decades.
How J-Boxes Connect to Your Solar System
From J-Box to Combiner Box: Following the Wire
Let me walk you through how your solar panels actually connect together, because understanding this flow makes everything click into place. I remember when I first wired my backyard setup—seeing how the individual j-boxes fed into the combiner box was my lightbulb moment.
Each solar panel has its j-box with positive and negative wires coming out. When you’re building a solar array, you don’t just connect these randomly. Instead, you create series strings by connecting the positive wire from one panel’s j-box to the negative wire of the next panel’s j-box. Think of it like linking paper clips together in a chain.
Here’s a real-world example: Say you’re installing six panels on your garage roof. You might create two strings of three panels each. For the first string, you connect Panel 1’s positive output to Panel 2’s negative input at their j-boxes, then Panel 2’s positive to Panel 3’s negative. Now you have one string with two wires coming out—the negative from Panel 1 and the positive from Panel 3.
You repeat this process for your second string with the remaining three panels. Now you have two strings, meaning four total wires (two positive, two negative) that need to go somewhere safe and organized.
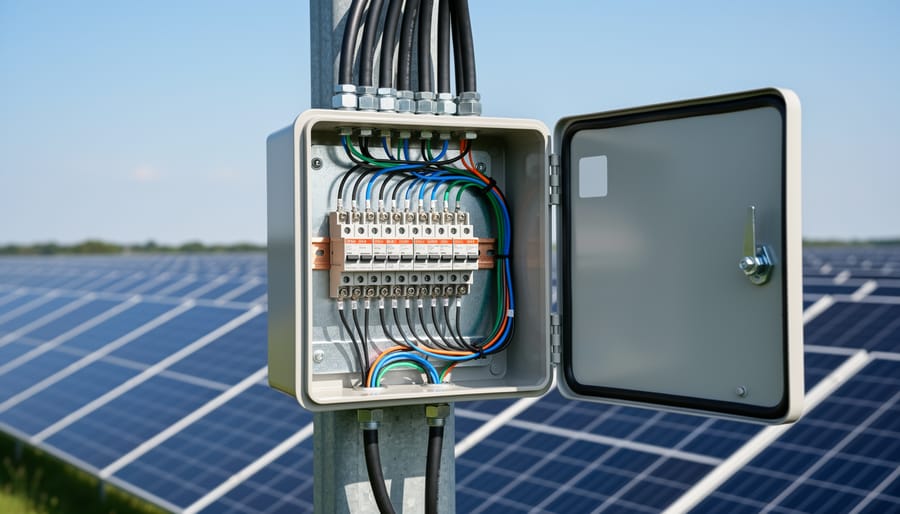
That somewhere is your combiner box. This is where combiner box wiring brings everything together. Those four wires from your two strings feed into the combiner box, which typically sits mounted near your array. Inside, your strings combine into a single positive and negative output that then runs to your charge controller or inverter.
The combiner box also houses your fuses or breakers—critical safety components that protect each string independently.
Understanding Combiner Boxes in Your Solar Setup
Do You Actually Need a Combiner Box?
Not every solar setup needs a combiner box, and understanding when you actually need one can save you money and simplify your installation. The general rule of thumb is pretty straightforward: if you’re connecting three or fewer strings of panels, you can usually skip the combiner box and wire directly to your charge controller or inverter.
For small systems, like a basic RV setup with two panels or a garden shed running a couple of strings, a combiner box is often overkill. You can connect these strings directly to your equipment, keeping things simple and reducing unnecessary components. Think of it this way: fewer junction points means fewer potential failure points.
Charles learned this lesson on his first cabin installation. “I bought a fancy combiner box for my four-panel system because I thought that’s what you’re supposed to do,” he recalls. “Turns out, I could have wired those two strings straight to my charge controller and saved myself $150 and an afternoon of mounting and wiring.”
However, once you’re managing four or more strings, a combiner box becomes practically essential. It provides a centralized location for overcurrent protection, makes troubleshooting individual strings easier, and keeps your wiring organized. Larger ground-mount arrays or whole-home systems definitely benefit from the structure a combiner box provides.
Consider your system’s growth potential too. If you’re starting small but plan to expand, installing a combiner box from the beginning might make future additions much easier, even if it seems unnecessary today.
What Happens Inside a Combiner Box
Now let’s peek inside a combiner box to see where all those wires from your solar panels meet up. Think of it as the neighborhood gathering spot where everyone brings their contribution before heading to the main event.
Inside the combiner box, you’ll find busbars, which are essentially thick metal bars that act as collection points. Each string of solar panels (connected in series) runs from the j-boxes through individual wires into the combiner box. These wires connect to the busbar, where all that delicious solar power gets pooled together before heading to your charge controller or inverter.
Here’s what makes this setup so important: when multiple strings combine, you’re adding up their current. If you have three strings each producing 8 amps, that’s 24 amps flowing through your main wire to the inverter. That’s why combiner boxes come equipped with fuses or circuit breakers for each string, providing crucial overcurrent protection.
I remember Charles telling me about his first combiner box installation. He’d gotten so excited about connecting everything that he almost forgot the fuses. “The whole point,” he said, laughing, “is preventing one faulty string from causing problems for the others or creating a fire hazard.”
The busbar essentially creates a safe, organized meeting point where current from multiple sources combines without creating chaos. Each incoming string has its own protective fuse, typically rated slightly above the string’s maximum current output. This way, if something goes wrong with one string, only that fuse blows, protecting your entire system while making troubleshooting much easier.
A combiner box consolidates multiple solar panel strings into a single connection point with integrated overcurrent protection.
DC Overcurrent Protection: Keeping Your System Safe
Fuses vs. Circuit Breakers: Which Should You Use?
When you’re setting up your solar system’s junction box, you’ll face a choice between fuses and circuit breakers for overcurrent protection. I remember Charles telling me about his first solar installation where he went with the cheapest fuses he could find, only to realize that replacing them on his roof in the middle of summer wasn’t exactly fun. Let’s break down which option makes sense for your setup.
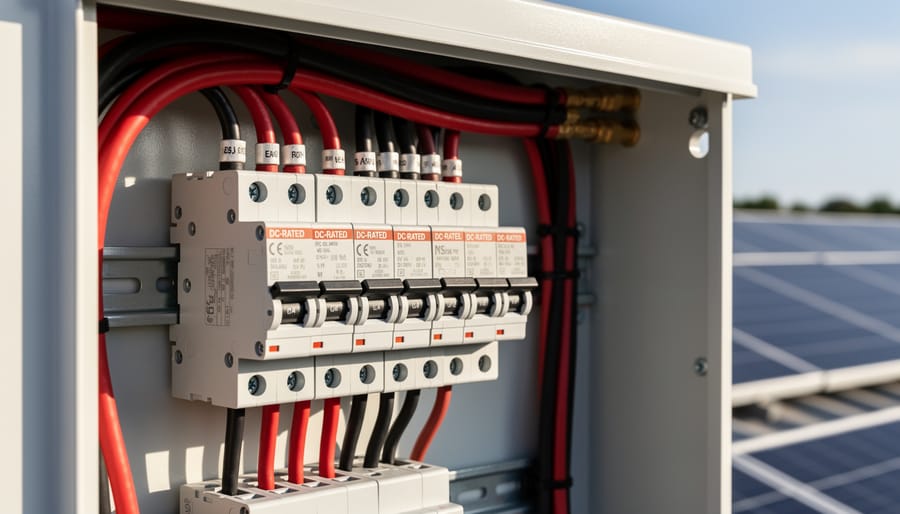
Fuses are the budget-friendly choice, typically costing just a few dollars each. They’re simple, reliable, and have been protecting electrical systems for over a century. When too much current flows through, the metal element inside melts and breaks the circuit. The downside? Once a fuse blows, you need to replace it. If you’re dealing with a tripped circuit caused by something simple like shading or a temporary cloud-induced surge, climbing up to your junction box with a replacement fuse gets old fast.
DC-rated circuit breakers cost more upfront, usually between $15 and $50 depending on the amperage rating, but they’re resettable. Just flip the switch back on once you’ve identified and fixed the problem. This convenience is huge for systems where you might need to troubleshoot occasionally. Charles now swears by circuit breakers for any junction box that’s difficult to access.
Here’s the practical rule: use fuses for permanent installations where you don’t expect frequent issues and where cost matters most. Choose circuit breakers for systems you’re still dialing in, rooftop installations, or anywhere that’s a pain to reach. Whatever you choose, make sure it’s DC-rated and properly sized for your panel’s specifications. Standard AC-rated protection devices won’t safely interrupt DC current and can create dangerous arcing situations.
DC-rated fuses and circuit breakers provide essential overcurrent protection for solar installations.
Sizing Your Overcurrent Protection Correctly
Getting the right overcurrent protection isn’t just good practice—it’s about keeping your solar installation safe and your insurance valid. I learned this the hard way when an electrician friend inspected my first DIY setup and pointed out my fuse was rated too high. Let me walk you through the proper way to size your protection devices.
Start by locating the specifications on your solar panel’s j-box label or in the manual. You’re looking for two critical numbers: the short circuit current (Isc) and the maximum series fuse rating. The Isc tells you the absolute maximum current that panel can produce under fault conditions, while the fuse rating is the manufacturer’s recommended upper limit.
Here’s the calculation method: multiply your panel’s Isc by 1.56 (per National Electrical Code requirements). This accounts for temperature variations and irradiance conditions that might push your panel beyond its standard test ratings. For example, if your panel has an Isc of 10 amps, you’d calculate 10 × 1.56 = 15.6 amps. You’d then select the next standard fuse size up, which would be a 20-amp fuse in this case.
However, never exceed the maximum series fuse rating printed on the j-box label. If that same panel lists a 15-amp maximum fuse rating, you must use a 15-amp fuse even though your calculation suggested 20 amps. The manufacturer’s limit always wins.
When connecting multiple panels in parallel through a combiner box, you’ll need to calculate protection for each string. The same 1.56 multiplier applies to each string’s combined current.
Several online solar calculators can help verify your math. The Northern Arizona Wind and Sun calculator is particularly user-friendly for beginners, and Renogy offers a straightforward tool specifically for DIY installations. Just plug in your panel specs and they’ll recommend appropriate fuse sizes.
Remember, undersizing protection devices means nuisance trips during peak sun hours, while oversizing creates genuine fire hazards. When in doubt, consult with a licensed electrician for a quick verification.
Where Protection Goes in Your System
Understanding where overcurrent protection fits into your solar system can feel like piecing together a puzzle, but once you see the big picture, it makes perfect sense. Think of it as creating a safety net at every point where electricity changes direction or combines.
The first line of defense sits right at your combiner box, where multiple solar panel strings meet. This is where you’ll install your initial overcurrent devices, typically inline fuses or circuit breakers rated for DC current. Each string coming from your panels needs its own protection here. I learned this the hard way years back when I skipped proper protection on a small system, and let me tell you, replacing fried wiring isn’t fun.
Next up is protection between your combiner box and charge controller. This stretch of wire carries the combined current from all your panels, so the protective device here needs higher amperage ratings. Many DIYers place a breaker or fuse holder along this run for easy disconnection during maintenance.
Your charge controller itself usually has built-in protection, but always verify this in your manual. Finally, protection between your charge controller and battery bank is crucial since batteries can deliver massive current during a fault.
The National Electrical Code spells out specific code requirements for these placements, but the basic principle remains consistent: protect every major junction point where current could potentially overload your wiring. Place all protection devices in accessible locations where you can safely reach them for inspection or replacement.
Common J-Box and Wiring Mistakes (And How to Avoid Them)
Waterproofing Issues That Come Back to Haunt You
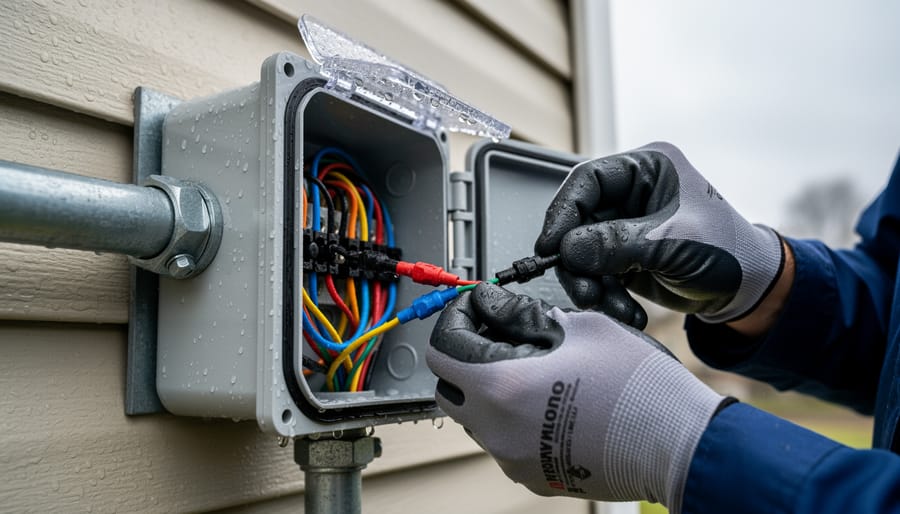
I learned this lesson the hard way during my first major installation. After six months of flawless performance, one of my panels started acting up during rainy weather. The culprit? A poorly sealed j-box connection that let moisture creep in and corrode the terminals.
Waterproofing issues at j-box connections are sneaky because they don’t always show up immediately. Water can slowly work its way past compromised seals, causing intermittent failures that are frustrating to diagnose. The most common problem areas include cracked cable glands, improperly tightened compression fittings, and overtightened strain reliefs that actually damage the cable insulation they’re supposed to protect.
When connecting proper solar connectors to your j-box, always use silicone-based sealant rated for outdoor use and UV resistance. Regular electrical tape won’t cut it under prolonged sun exposure. Apply a bead of sealant around cable entry points before tightening the glands, and make a drip loop in your wiring so water naturally runs away from the connection point rather than toward it.
Here’s my go-to weatherproofing checklist: inspect all cable entry points for gaps, verify gaskets are properly seated without tears or deformation, ensure drain holes at the bottom of the box remain clear, and apply heat-shrink tubing over any exposed conductor connections inside the box. Taking these extra ten minutes per panel during installation can save you from scrambling up on your roof during the next thunderstorm to troubleshoot mysterious power drops.
Proper weatherproofing at j-box connections prevents moisture intrusion and ensures long-term system reliability.
Wire Gauge Problems and Voltage Drop
Here’s something I learned the hard way during my second solar installation: I used wire that was too thin between my panels’ j-boxes and the combiner box, and I lost nearly 8% of my power before it even reached the charge controller. That mistake taught me that voltage drop is a real efficiency killer.
When electricity travels through wire, resistance creates heat and wastes energy. The longer the wire run and the smaller the diameter, the worse this problem becomes. From your panel’s j-box to your combiner box, you might have 20, 30, or even 50 feet of wire. If that wire is undersized, you’re essentially throwing away free solar energy.
The general rule is to keep voltage drop under 3% for the entire DC system. For most residential setups running 12V or 24V systems with runs under 50 feet, 10 AWG wire works well for currents up to 30 amps. If you’re running higher voltage (48V) or shorter distances, you might get away with 12 AWG. But for longer runs or higher currents, you’ll need 8 AWG or even 6 AWG wire.
Choosing the right wire gauge depends on three factors: the current your panels produce, the distance to your combiner box, and your system voltage. Online voltage drop calculators make this easy—just plug in your numbers and they’ll tell you the minimum wire size needed. Don’t skimp here; proper wire sizing protects your investment and maximizes your harvest.
Putting It All Together: A Complete Wiring Example
Let me walk you through a real-world example that combines everything we’ve covered. I’m going to use my friend Jake’s weekend camping setup because it perfectly illustrates how these components work together without getting overly complicated.
Jake wanted to power his camper van with a modest solar system: two 100-watt panels mounted on the roof. Simple enough, right? But even this basic setup requires proper j-box connections, a combiner box, and overcurrent protection to be both safe and functional.
Here’s how it all comes together. Each of Jake’s solar panels has a j-box already installed on the back by the manufacturer. Inside each j-box, the panel’s internal wiring connects to a pair of MC4 connectors: one positive, one negative. These connectors are essentially weatherproof plugs that make wiring super straightforward.
Since Jake has two panels, he needs to combine their output before sending power to his charge controller. That’s where the combiner box comes in. He mounted a small combiner box on the van’s roof, about three feet from the panels. Each panel’s positive and negative cables run from their j-boxes into this combiner box.
Inside the combiner box, Jake installed fuses on each positive wire coming from the panels. These are typically 15-amp fuses for 100-watt panels, providing that crucial overcurrent protection we discussed earlier. If something goes wrong with one panel or its wiring, the fuse blows and protects the rest of the system. The negative wires simply connect to a common busbar.
From the combiner box, a single pair of thicker cables runs down into the van and connects to Jake’s charge controller. This setup keeps everything organized and protects each circuit individually while reducing the number of wires running through the van’s interior.
What I love about Jake’s installation is its simplicity. The j-boxes came pre-installed and sealed from the factory. The combiner box keeps all the junction points protected from weather. And the fuses give him peace of mind knowing his system won’t become a fire hazard if something shorts out.
One lesson Jake learned the hard way: he initially tried skipping the combiner box and just splicing wires together under electrical tape. After one rainy weekend when moisture caused intermittent connection issues, he invested the extra forty dollars in a proper combiner box. Worth every penny for reliability and safety.
This same principle scales whether you’re installing two panels or twenty. The j-boxes handle connections at each panel, the combiner box brings everything together safely, and proper overcurrent protection guards each circuit. Master this basic flow, and you’ve got the foundation for any solar installation.
Understanding your solar panel’s junction box isn’t just about technical knowledge—it’s about taking charge of your solar journey with confidence and safety. When I first started working with solar panels, I’ll admit the j-box seemed like just another black box on the back of my panels. But once I understood how it connects to my combiner box and the entire system’s safety mechanisms, everything clicked into place. It transformed me from someone following instructions blindly to someone who genuinely understands what’s happening in my solar setup.
The junction box is your solar panel’s connection point to the world, and treating it with the respect and understanding it deserves means fewer headaches, safer installations, and better system performance. Whether you’re planning a small off-grid setup or expanding an existing system, knowing how these components work together gives you the power to troubleshoot issues, make informed decisions, and even help others in the community.
Ready to take the next step? Head over to our interactive calculators to size your system components properly, from wire gauges to overcurrent protection. And don’t forget to join our community forum where fellow DIYers share their experiences, troubleshooting tips, and creative solutions. Your solar journey is uniquely yours, but you don’t have to walk it alone. Together, we’re building a brighter, more sustainable future—one properly wired panel at a time.
How useful was this post?
Click on a star to rate it!
Average rating 0 / 5. Vote count: 0
No votes so far! Be the first to rate this post.
We are sorry that this post was not useful for you!
Let us improve this post!
Tell us how we can improve this post?
charlesnoble
Here at Spheral Solar, I’m a hands-on solar power enthusiast, constantly exploring and experimenting with DIY solutions. I’m dedicated to sharing my discoveries, insights, and even the bumps I hit along the way, all in the pursuit of a more sustainable future.
Why Your DIY Solar System Needs a 4 String PV… by Charlesnoble January 27, 2026 Connect your solar panel strings to a single positive and negative output cable using a 4 string PV combiner box—the essential junction point that safely consolidates power from four separate string circuits before feeding your charge controller or inverter. This weatherproof enclosure houses individual fuses or circuit breakers for each…
8 Best Wire Strippers in 2023 by Adeyomola August 4, 2021 A lightweight, versatile wire stripper with a sharp cutting edge and a solid grip is great. However, the best wire strippers stand out largely because of their broad wire gauge range. A versatile wire stripper does more than just wire stripping. Some brands design wire strippers and add extra features…
Why Your RV Solar Panels Aren’t Charging (And How to… by Charlesnoble November 30, 2025 Check your multimeter readings at each connection point along your solar charging path—from panels to charge controller to battery—to pinpoint exactly where voltage disappears. Most RV solar systems lose 10-30% of their potential power to voltage drop, but this invisible thief often goes undetected until you systematically measure and compare…
Why 2-Wire RS485 Is the Smartest Choice for Your DIY… by Charlesnoble March 31, 2026 Check your solar inverter’s communication ports right now – if you see two screw terminals labeled A and B (or D+ and D-), you’re looking at 2-wire RS485, the most common communication protocol in DIY solar monitoring setups. This simple two-wire system lets your solar equipment talk to monitoring devices,…
Why Your Solar Array Needs Proper Grounding (Before… by Charlesnoble November 24, 2025 Connect your solar array’s metal frame to a grounding rod driven at least eight feet into the earth near your installation. This creates a safe path for electrical faults and lightning strikes to dissipate harmlessly into the ground instead of through your home’s wiring or, worse, through you. Install grounding…
Why Connecting Your Solar Panel Directly to a… by Charlesnoble March 11, 2026 The short answer is yes, you can physically connect a solar panel directly to a battery, but you absolutely shouldn’t in most cases. Without a charge controller acting as the middleman, you’re essentially playing Russian roulette with your battery’s lifespan and potentially creating a fire hazard. I learned this lesson…
Subscribe for handpicked DIY projects, exclusive tips, and giveaways.
Connect your panels to a charge controller or battery system by running positive terminals to positive and negative to negative. This parallel configuration doubles your available current (amperage) while keeping voltage the same, which is exactly what you need when your system demands more power than a single panel can deliver. I learned this the… Read more: Why Two Solar Panels Beat One Every Time (Parallel Connection Explained)
Monitor your greenhouse temperature daily during peak sun hours—if it consistently exceeds 85°F or condensation builds up on interior surfaces, you’re losing crops to heat stress and creating the perfect environment for fungal diseases. A greenhouse solar ventilation fan addresses both problems without adding a penny to your electricity bill, making it one of the… Read more: Why Your Greenhouse Needs a Solar Ventilation Fan (Before Summer Hits)
Press and hold the adjust button (usually bottom-left) on your G-Shock for three seconds until the time display starts flashing—this unlocks manual time adjustment on most models. Navigate between hours, minutes, and date using the mode button, then use the forward/reverse buttons to change values. If you own a radio-controlled G-Shock with Multi-Band 6 technology,… Read more: How to Adjust Time on Your G-Shock Solar Watch (Without Breaking It)

")

")

")
")
")

")

")
")


