Why Your Rooftop Solar Could Block Firefighters (And How to Fix It)
Updated:
Measure three feet from your roof’s eaves before placing any solar panels—this clearance creates a critical pathway firefighters use to ventilate roofs during emergencies. When flames engulf a building, firefighters climb onto roofs and cut ventilation holes near the eaves to release heat and smoke, giving occupants precious escape time and preventing flashover conditions inside. Your solar array, while generating clean energy, can block this life-saving access if installed without proper setbacks.
Position panels at least 18 inches back from roof edges on all sides, and maintain a 36-inch clear pathway to ridge lines on peaked roofs. These aren’t arbitrary numbers—fire departments across the country developed these requirements after responding to structure fires where rooftop solar installations prevented effective firefighting operations. The International Fire Code and California’s Title 24 now mandate these setbacks, and your local building department will reject permit applications that ignore them.
Calculate your usable roof space before purchasing equipment. A standard residential roof loses approximately 15-20% of its area to required setbacks, which means that attractive theoretical capacity you calculated needs adjustment for real-world compliance. Map your roof dimensions, subtract the required perimeters and pathways, then design your array within those boundaries.
Understanding eaves fire protection transforms from regulatory obstacle to design priority when you recognize the stakes. Those empty spaces around your array represent more than lost watts—they’re insurance that emergency responders can do their jobs if disaster strikes. Smart DIY solar installers build safety margins into their projects from day one, creating systems that generate power reliably while respecting the realities of fire response. Your installation can be both code-compliant and productive with proper planning.
What Firefighters Really Need When Your Roof Is On Fire
The Eaves Problem: Why These Edges Matter Most
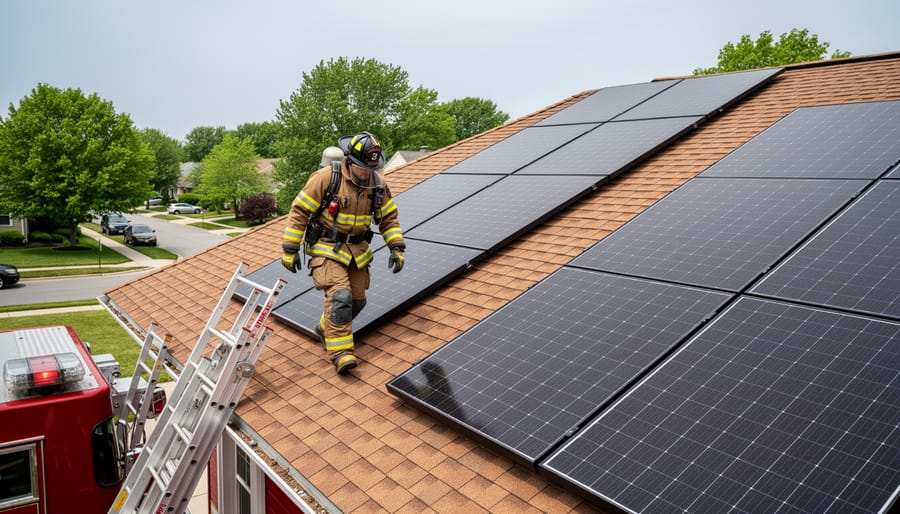
Here’s something I learned during my first solar installation that completely changed how I think about roof work: the edges are where everything happens during a fire emergency. While we DIYers often focus on the center of the roof where panels sit, firefighters are primarily concerned with the eaves—those overhanging edges where your roof meets the walls.
Why do eaves matter so much? Think about how firefighters actually work during a structure fire. They don’t magically appear on your roof’s peak. They position ladders against the eaves, climb up at these perimeter zones, and create ventilation openings near the edges to release heat and smoke. These activities happen under intense time pressure, often in low visibility conditions, which is why having clear, panel-free access zones is critical for their safety—and ultimately, yours.
The fire behavior at eaves also creates unique challenges. Heat and smoke naturally travel upward and outward, concentrating at roof edges where they meet exterior walls. This makes eaves both a critical access point and a particularly dangerous work zone. When solar panels extend too close to these edges, they create obstacles that slow down firefighters when every second counts.
Just like you’d never skip fall protection systems during your own installation, fire codes ensure firefighters have the workspace they need. Understanding this perspective helps us see setback requirements not as arbitrary rules, but as practical safety measures designed by people who’ve faced these emergencies firsthand.
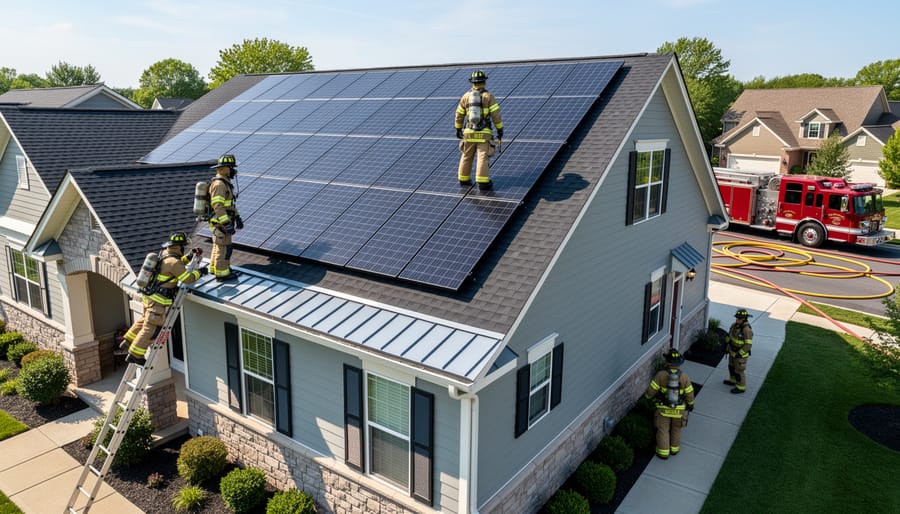
Firefighters require clear access to roof eaves and perimeter areas during emergency response operations on homes with solar installations.
The Electrical Hazard Nobody Talks About
Here’s something most DIY solar enthusiasts don’t realize until they dig into fire codes: solar panels create a life-threatening hazard for firefighters that has nothing to do with flames. I learned this the hard way during my first permit application when the inspector asked, “How are you protecting first responders from electrocution?”
Solar panels can’t be switched off like your breaker box. As long as sunlight hits them, they’re generating potentially lethal voltage—even while your house is burning. When firefighters arrive at 2 AM to battle a blaze, they’re already dealing with smoke, heat, and structural instability. The last thing they need is a live electrical grid across your roof that stays energized no matter what they do.
This is precisely why eaves setbacks exist. Those clear pathways along the roof edges aren’t just walking spaces—they’re safety zones where firefighters can operate without risking electrocution from damaged or exposed solar wiring. During ventilation operations, when crews cut through roofs or navigate in zero visibility, these setback zones provide crucial buffer space from energized equipment. It’s a simple requirement that could literally save the life of someone trying to save your home.
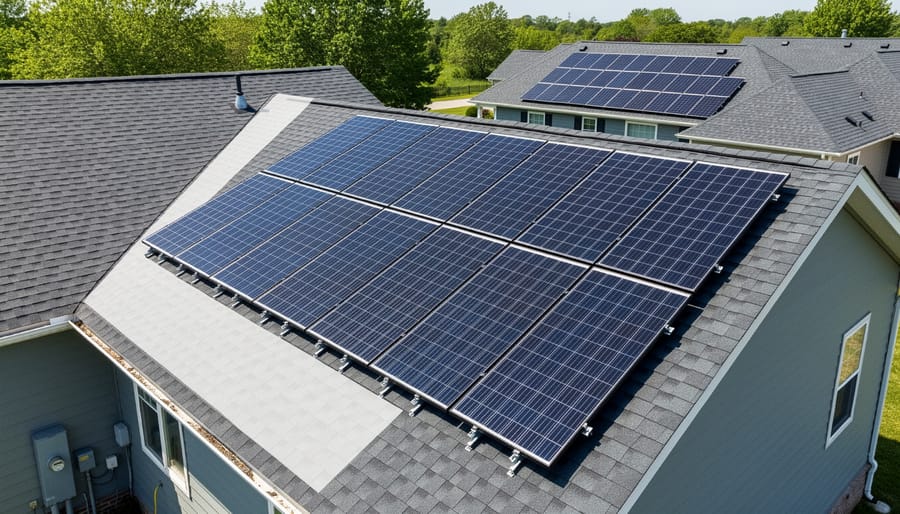
Understanding PV Roof Setbacks: The Rules That Keep Everyone Safe
Proper solar panel layout includes mandatory setbacks from roof edges and clear pathways for firefighter access and safety.
The Standard Setback Rules for DIY Solar Installers
When I first looked into installing solar panels on my roof, I was surprised to discover that I couldn’t just cover every available inch with panels. Fire codes require specific setback zones, primarily to give firefighters safe access during emergencies. Let me break down what you need to know.
The most common requirement you’ll encounter is the 3-foot perimeter rule. This means leaving a clear 3-foot strip around all edges of your roof, including the eaves, rakes, and ridges. Think of it as creating a walking path for firefighters who might need to access your roof during an emergency. This 3-foot zone must remain completely free of panels, mounting hardware, and conduit.
You’ll also need to provide pathways to the ridge. Most codes require at least one 3-foot-wide pathway from the eaves to the ridge on each roof plane. These pathways act as access corridors, allowing firefighters to move safely across your roof without tripping over equipment or stepping on slippery panels.
For roofs with hips and valleys, the requirements get a bit more specific. You’ll typically need to maintain 18 inches of clearance on each side of hips and valleys, creating a 36-inch total clear zone along these features.
Here’s where it gets interesting: these rules aren’t one-size-fits-all. Smaller residential roofs under 1,000 square feet might have reduced requirements in some jurisdictions, while larger commercial installations face stricter standards. Your local fire marshal has the final say, and some areas have adopted more recent codes that modify these traditional measurements.
Before you finalize your panel layout, always check with your local building department. I learned this lesson when my initial design had to be completely reworked after discovering my county had adopted updated setback requirements that differed from what I’d read online.
When Your Roof Gets a Setback Exception (And When It Doesn’t)
Here’s the thing about fire setback rules: they’re not one-size-fits-all, and that can be both frustrating and liberating depending on your situation.
I remember chatting with a neighbor who was installing panels on his small garden shed. He was convinced the same three-foot setback applied to his tiny 8×10 roof. Turns out, many jurisdictions have scaled requirements for smaller structures. Some codes reduce or even waive setback requirements for roofs under a certain square footage, typically around 250 square feet. The reasoning? Firefighters can access these smaller structures from multiple angles without needing rooftop pathways.
However, and this is crucial, certain situations have non-negotiable setbacks regardless of roof size. If your home is in a wildfire-prone area designated as a Wildland-Urban Interface zone, expect stricter requirements across the board. Multi-family dwellings, commercial buildings, and structures over three stories almost always face full setback requirements with no exceptions.
The configuration of your roof matters too. Some jurisdictions allow modified setbacks when you have multiple access points or when the building has adequate perimeter access for aerial equipment. Hip roofs sometimes get different treatment than gable roofs because of how firefighters approach them.
Bottom line? Your local building department and fire marshal have the final say. Bring your roof measurements and installation plans to them early in your planning process. Those conversations can save you from costly redesigns later.
Planning Your DIY Solar Layout With Fire Safety in Mind
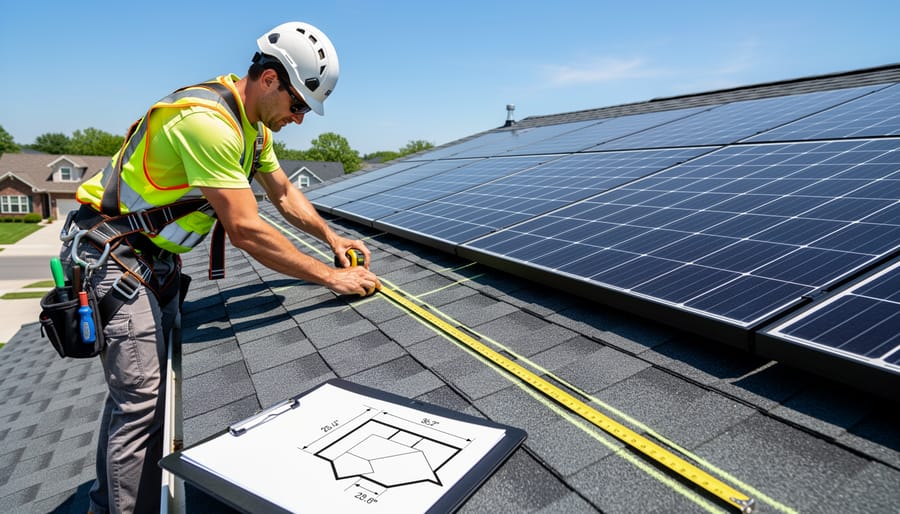
Measuring and Marking Your Safety Zones
Before you start positioning your solar panels, you need to establish clear safety zones around your roof’s edges. Think of this as creating invisible boundaries that firefighters will thank you for later. I learned this the hard way on my first installation when I had to reposition an entire row of panels because I’d measured from the wrong reference point!
Start at the eaves, which are the lower edges where your roof overhangs the walls. Most fire codes require a 36-inch setback from these edges. To measure this accurately, have a helper hold one end of your measuring tape at the very edge of the roof while you mark the 36-inch point. Use bright-colored chalk to snap a line parallel to the eaves all the way across. This chalk line becomes your no-panel boundary.
For ridges (the peak of your roof) and valleys (where two roof planes meet), you’ll typically need 18-inch setbacks on each side. Measure from the center of the ridge or valley outward, marking both sides. Before investing in your panels, measure your available installation area within these boundaries. If you’re working with standard 65-inch by 39-inch panels, sketch out how many will fit in your marked zone before purchasing.
Pro tip: Always use appropriate roof safety equipment when taking these measurements. Take photos of your marked boundaries from multiple angles so you can reference them during installation when panels might obscure your chalk lines.
Accurate measurement of setback distances from roof edges is essential for code-compliant solar panel placement.
Calculating Lost Production vs. Gained Safety
Here’s the reality check every DIY solar installer faces: those fire setbacks will reduce your available panel space, which means less electricity generated. But before you worry too much, let’s put this in perspective.
When I planned my first system, I calculated I’d lose about 12-15% of my theoretical maximum panel coverage due to eaves setbacks. Initially, that felt like a huge compromise. But here’s what changed my thinking: that remaining 85% of usable roof space still generated more power than I actually needed for my home’s energy goals.
The key is running the numbers before you panic. Start by calculating your household’s actual energy consumption—most families use between 20-30 kWh daily. Then map out your available roof space after applying the required setbacks. You might be surprised to find the “lost” production barely impacts your energy independence goals.
Consider this practical example: if setbacks reduce your potential 8kW system to 7kW, you’re still generating substantial power while giving firefighters safe access to your roof. That trade-off isn’t just about compliance; it’s about being a responsible community member. Plus, properly permitted systems with correct setbacks maintain your home’s resale value and insurance coverage—benefits that far outweigh squeezing out a few extra panels.
Creative Solutions for Tight Roof Spaces
Don’t let limited roof space stop your solar dreams! When fire setbacks eat up too much of your roof area, there are creative alternatives that still let you harvest the sun’s energy.
I remember Charles mentioning a neighbor who faced this exact challenge—steep roof, lots of eaves, not much usable space after meeting code. Instead of abandoning the project, they installed a ground-mounted array in their backyard. Ground mounts often have more relaxed setback requirements and give you flexibility with orientation and tilt angles.
Another popular option is solar carports. These dual-purpose structures protect your vehicles while generating power, and they typically face fewer eaves-related restrictions since they’re separate structures. Plus, they’re often easier to access for maintenance than rooftop installations.
If you’re set on roof mounting, consider strategic placement. Prioritize your south-facing sections where you’ll get maximum production, and leave other roof areas clear to satisfy setback requirements. Sometimes a smaller, well-positioned array performs nearly as well as a larger, compromised installation. The key is working with your home’s unique layout rather than fighting against it.
Common DIY Mistakes That Violate Fire Codes
The ‘Just a Few More Panels’ Temptation
I’ll be honest with you—I’ve seen this happen more times than I can count. You’re planning your solar layout, carefully measuring everything, and suddenly that voice in your head says, “I could squeeze two or three more panels right here near the edge.” The math looks tempting: more panels equals more power, right?
Here’s what Charles learned the hard way during his first installation: those extra panels in the setback zone create way more headaches than they’re worth. Beyond the obvious issue of failing your inspection, you’re putting your entire investment at risk. Insurance companies can deny claims if your system doesn’t meet code, and many jurisdictions require expensive modifications or even complete removal of non-compliant panels.
The reality is that those few panels you’re gaining might only add 5-8% to your total production, but they expose you to 100% of the compliance risk. Think about it this way: firefighters need that clear perimeter to safely operate on your roof during emergencies. By avoiding critical errors like encroaching into setback zones, you’re not just following rules—you’re protecting your home, your investment, and potentially lives. Design your system to work within the setback requirements from day one, and you’ll sleep better knowing everything is legitimate and safe.
Forgetting About Snow Guards and Panel Frames
Here’s something I learned the hard way during my first winter after installing panels: I measured my setbacks perfectly for the solar panels themselves, got everything approved, and felt pretty proud. Then came the first snowfall, and I realized my snow guards were actually sitting closer to the eaves than my panels were. Rookie mistake!
When you’re planning your eaves setback, remember that it’s not just about where the panels end. Those mounting rails typically extend several inches beyond the panel edges. Your snow retention systems, whether they’re bars or individual guards, add another few inches. Even those micro-inverters or optimizers mounted on the back can technically count toward the measurement in some jurisdictions.
I’ve seen DIYers get caught by this during final inspections. They’ll have their panels set back the required three feet, but their hardware creeps into that zone by six or eight inches. Some inspectors might give you a pass on small mounting clips, but others are sticklers for keeping everything behind that setback line.
The solution is simple: when you’re doing your layout, mark your setback line first, then work backward from there, accounting for all the extras. Think of the setback zone as a complete no-go area for any solar-related equipment. It’s better to lose a few inches of potential panel space than to fail inspection.
Working With Your Local Fire Department and Inspectors
Questions to Ask Before You Start Installing
Before you climb up on that roof with panels in hand, take a moment to connect with the folks who wrote the rules. I learned this the hard way on my second installation when I assumed my county followed the same setbacks as my neighbor’s jurisdiction. Spoiler alert: they didn’t.
Start by calling your local fire department’s fire prevention bureau. Ask them specifically: What are the required eave setbacks for residential solar installations in our area? Do they follow the current International Fire Code exactly, or have they adopted modified requirements? Some jurisdictions require larger setbacks than the standard three feet, while others have reduced them based on local firefighting equipment and practices.
Next, contact your building department. Key questions include: Are there additional setback requirements beyond fire code? What documentation do they need to see on permit applications? Do they accept installation diagrams, or do they require stamped engineering drawings?
Also ask both departments: Are there any upcoming code changes we should know about? Getting clarity now prevents costly reinstallation later. Most fire marshals and building inspectors genuinely want to help DIYers succeed safely—they’d much rather answer questions upfront than deal with non-compliant installations. Don’t be shy about reaching out.
Documentation That Makes Inspections Smooth
Good documentation is your best friend when it comes to inspections. I learned this the hard way on my second solar project when I showed up to an inspection with nothing but confidence and a smile—not recommended! Here’s what actually works.
Start with a simple site plan showing your panel layout and the eaves setback measurements clearly marked. Include dimensions from the edge of the roof to the closest panel on all sides. Take photos before installation showing the roof’s condition and measurements with a tape measure visible in the shot. During installation, document each step with timestamped photos showing how you maintained the setbacks.
Create a one-page summary listing the fire code requirements you’re following, your actual measurements, and reference the specific code sections. Most inspectors appreciate seeing IRC R324.6.1 or your local equivalent right on the document. Include your equipment specs and installation manual references too.
Keep both digital and printed copies handy. When the inspector arrives, hand them your documentation packet—it shows you’re taking safety seriously and makes their job easier. Many inspectors have told me that organized documentation often means faster approvals because it demonstrates you understand the why behind the requirements, not just the what.
Beyond Compliance: Making Your Solar Installation Truly Safe
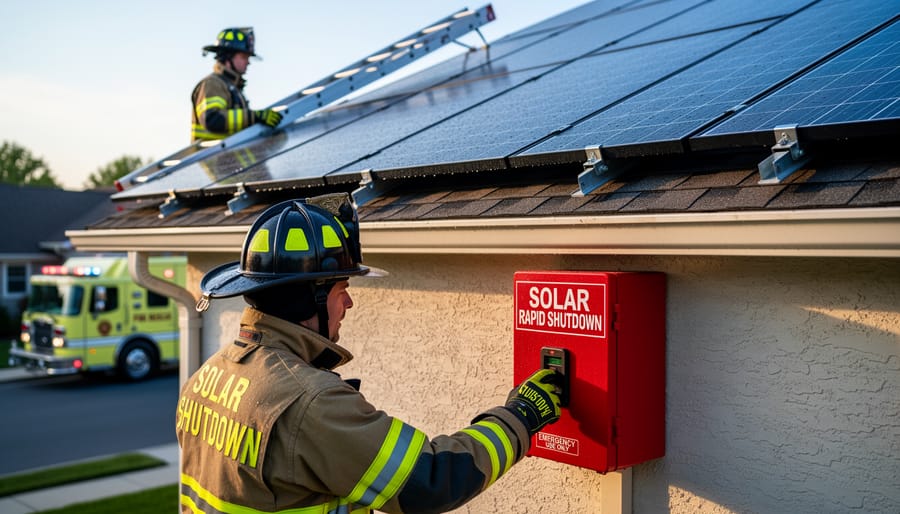
Rapid Shutdown Systems: Your Safety Net
Rapid shutdown systems are one of the most important safety systems in modern solar installations, and they’re now required by the National Electrical Code in most situations. Here’s what you need to know: when activated, these systems automatically reduce the voltage in your solar array to safe levels within seconds, typically 30 volts or less.
Think of it as an emergency off switch for your entire system. If firefighters arrive at your home, they can quickly shut down the electrical hazard that solar panels normally present, even during bright daylight when panels are actively generating power. This protection extends beyond just emergency responders too. If you ever need to work on your roof or your system develops a fault, rapid shutdown gives you peace of mind.
Most modern inverters have this functionality built right in, making compliance straightforward for DIYers. The system includes module-level devices or optimizers that communicate with a central controller, allowing you to deactivate everything from a single, clearly marked point. When planning your installation, budget for this equipment from the start because retrofitting can be costly and complicated.
Rapid shutdown systems allow first responders to quickly de-energize solar panels during emergency situations.
Labeling and Signage That Could Save Lives
Even the best-planned setbacks won’t help firefighters if they can’t quickly identify your solar system’s layout and electrical hazards. That’s where proper labeling comes in—think of it as leaving a roadmap for emergency responders.
Most fire codes require specific labels at key locations: near your main service panel, at the inverter disconnect, and ideally at roof access points. These labels should clearly indicate “SOLAR ELECTRIC SYSTEM ON ROOF” and include basic information about voltage and shutdown procedures. When I helped my neighbor install his panels last year, we created simple laminated signs showing exactly where his solar array was located—firefighters arriving at 2 AM in thick smoke don’t have time to guess.
Consider adding reflective markers at the corners of your setback pathways too. Some DIYers use reflective tape to outline the clear zones, making them visible even in low-light conditions. Your local fire marshal can provide specific requirements for your jurisdiction, and many are surprisingly helpful when you approach them during the planning stage. Remember, clear signage isn’t just about code compliance—it’s about ensuring everyone goes home safely when an emergency happens.
Look, I get it. When you’re eager to harness the sun’s power and start generating your own electricity, setback requirements can feel like unnecessary roadblocks. I remember when I first encountered these rules on my own installation—I thought, “Really? All this empty roof space just sitting there?”
But here’s the thing: fire safety setbacks aren’t bureaucratic red tape dreamed up by officials with nothing better to do. They’re practical requirements born from real-world emergencies where firefighters had to navigate rooftops to save lives and property. That unobstructed three-foot pathway along your eaves? It could be the difference between firefighters being able to ventilate your roof safely or having to make dangerous choices under pressure. And remember, the life they might be saving could be yours or your family’s.
Viewing setback planning as an essential part of responsible DIY solar installation isn’t about limiting your system—it’s about building something you can be proud of, something that won’t create liability issues down the road or put first responders at risk. It’s part of the same careful planning that goes into choosing quality components and proper electrical connections.
Ready to design a system that’s both powerful and compliant? Head over to our interactive calculators to map out your panel layout with proper setbacks factored in from the start. And if you’ve navigated setback planning successfully—or have questions about your specific situation—share your experience in our community forum. Your insights might help another DIYer build safer, and together we’re creating a more responsible solar movement.
How useful was this post?
Click on a star to rate it!
Average rating 0 / 5. Vote count: 0
No votes so far! Be the first to rate this post.
We are sorry that this post was not useful for you!
Let us improve this post!
Tell us how we can improve this post?
charlesnoble
Here at Spheral Solar, I’m a hands-on solar power enthusiast, constantly exploring and experimenting with DIY solutions. I’m dedicated to sharing my discoveries, insights, and even the bumps I hit along the way, all in the pursuit of a more sustainable future.
Why Your Battery Storage System Needs Better Airflow… by Charlesnoble December 31, 2025 Position your Energy Storage System at least three feet away from walls and combustible materials to ensure adequate air circulation prevents dangerous gas buildup and heat accumulation. Last summer, I learned this lesson when a friend’s improperly ventilated battery bank overheated during a heatwave—the batteries swelled, and we had to…
Don’t Risk Your Life Installing Solar Panels: Fall… by Charlesnoble December 26, 2025 Secure yourself with a personal fall arrest system before stepping onto any roof pitch over 4:12—that’s a harness, lanyard, and proper anchor point rated for 5,000 pounds per worker. Install temporary roof anchors at the ridge line or use permanent mount anchors if you’re planning multiple trips up for maintenance,…
Why Your Solar Conduit Installation Could Start a… by Charlesnoble March 27, 2026 Measure your conduit run before purchasing materials by mapping the exact path from your solar array to the inverter and battery location, accounting for a 10% waste factor and additional length for bends. PVC electrical conduit remains the most cost-effective protective solution for DIY solar installations, but improper installation creates…
Why Your PV Wire Management Could Fail Inspection… by Charlesnoble April 9, 2026 Route your PV wires through UV-resistant conduit within 18 inches of leaving the solar array, securing it every 3 feet with proper clamps to prevent wind damage and code violations. This single step prevents 80% of the wire degradation issues I’ve seen in DIY solar installations over the past decade.…
Why Your DIY Solar System Needs Proper Grounding… by Charlesnoble January 31, 2026 Ground your solar system before you connect a single wire—improper grounding has destroyed thousands of dollars in equipment and created deadly shock hazards in homes just like yours. I learned this the hard way when a lightning strike fried my neighbor’s ungrounded inverter, teaching me that grounding isn’t optional paperwork…
Why Your Solar Ground Rod Might Be Too Short (And… by Charlesnoble January 15, 2026 Drive your 8-foot copper-clad steel grounding rod at least eight feet into the earth, or to the depth where you meet solid bedrock. This isn’t arbitrary—the National Electrical Code requires this specific length because it ensures your solar panels and battery storage system have a reliable path to dissipate dangerous…
Subscribe for handpicked DIY projects, exclusive tips, and giveaways.
Electricity powers our homes from five main sources: solar panels, wind turbines, hydroelectric generators, fossil fuel generators, and battery storage systems. If you’re building a reliable off-grid setup or backing up your solar array, understanding how these sources work together transforms a single-point-of-failure system into resilient, year-round power. I learned this the hard way during… Read more: 5 Sources of Electrical Energy Every Solar DIYer Should Know for Complete Off-Grid Power
Connect your panels to a charge controller or battery system by running positive terminals to positive and negative to negative. This parallel configuration doubles your available current (amperage) while keeping voltage the same, which is exactly what you need when your system demands more power than a single panel can deliver. I learned this the… Read more: Why Two Solar Panels Beat One Every Time (Parallel Connection Explained)
Monitor your greenhouse temperature daily during peak sun hours—if it consistently exceeds 85°F or condensation builds up on interior surfaces, you’re losing crops to heat stress and creating the perfect environment for fungal diseases. A greenhouse solar ventilation fan addresses both problems without adding a penny to your electricity bill, making it one of the… Read more: Why Your Greenhouse Needs a Solar Ventilation Fan (Before Summer Hits)
")

")
")
")
")
")

")
")
")
")


