Why Your Bifacial Solar Panels Need a Completely Different Array Design
Updated:
Flip your bifacial solar panels over and you’ll find a second active surface that can boost your system’s energy production by 10-30% – but only if you design your array to take advantage of it. Unlike traditional panels that capture sunlight from one side, bifacial modules harvest energy from both their front and rear surfaces, fundamentally changing how you should approach installation height, ground coverage, row spacing, and tilt angles.
Most DIY solar installers make the critical mistake of mounting bifacial panels the same way they would conventional ones, leaving 20% or more of potential energy on the table. I learned this the hard way during my first bifacial installation, where I followed my usual ground-mount specs and wondered why my output gains were disappointing. The problem wasn’t the panels – it was my design.
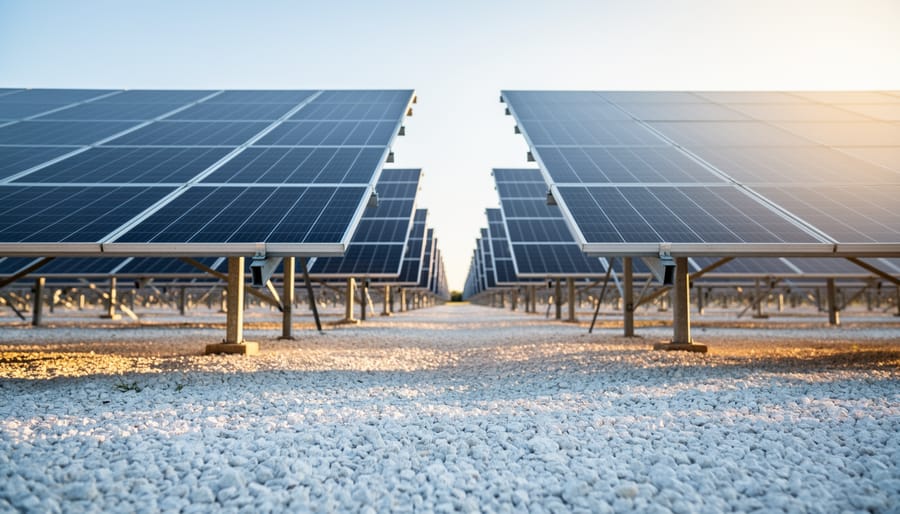
The back side of a bifacial panel generates power from reflected and diffused light bouncing off the ground and surrounding surfaces. Think of it like this: if you mount panels just two feet off the ground over dark soil, that rear surface barely sees any light. Raise them to four feet over white gravel, and suddenly you’re capturing an additional 25% energy from the same panel. The physics is straightforward, but the design implications touch everything from racking selection to electrical configuration.
This guide walks you through the specific design adjustments that make bifacial technology pay off. You’ll learn exactly how high to mount your panels, how to treat the ground beneath them, how spacing between rows affects rear-side production, and why your string inverter configuration needs rethinking. Whether you’re planning a new installation or retrofitting an existing array, these bifacial-specific design principles will help you maximize every watt your investment can deliver.
What Makes Bifacial Panels Different (And Why It Matters for Your Design)
Bifacial solar panels feature transparent back sheets that allow light to reach photovoltaic cells from both sides, unlike traditional panels with opaque backing.
The Rear-Side Energy Bonus You’re Missing
Here’s the thing that got me excited when I first learned about bifacial panels: you’re essentially getting free bonus energy just from light bouncing around. But how much bonus are we actually talking about?
In real-world conditions, the rear side of your bifacial panels typically generates between 5% and 30% additional energy compared to what the front side produces alone. That’s a pretty wide range, and understanding why helps you maximize your system’s potential.
The biggest factor influencing your rear-side bonus is something called albedo, which is just a fancy word for how reflective your ground surface is. Fresh white concrete or light-colored gravel can reflect up to 80% of sunlight, pushing you toward that 30% bonus range. Standard grass reflects around 20-25%, getting you maybe 10-15% extra generation. Dark soil or asphalt? You’re looking at the lower end, around 5-10%.
Height matters too. Remember our earlier discussion about mounting height? Panels installed just a foot off the ground might only capture a 5-8% boost, while those at three feet can reach 20% or more under the same conditions.
Weather plays a surprising role as well. Snowy conditions can temporarily boost rear-side generation dramatically since snow reflects about 80% of sunlight. I’ve seen winter days where my bifacial array outperformed expectations purely because of snow cover below.
Your location’s latitude also influences the bonus. Higher latitudes with more diffuse light throughout the day tend to see better rear-side performance than equatorial regions with more direct overhead sun.
When Bifacial Panels Actually Make Sense for DIYers
Let me be straight with you: bifacial panels are incredible technology, but they’re not always the smart choice for DIY projects. I learned this the hard way when I nearly spent an extra $800 on bifacial panels for a ground-mounted array that would have been shaded by tall grass within weeks.
Bifacial panels make excellent sense in specific scenarios. If you’re building a raised deck or pergola where panels will sit at least four feet above a light-colored surface, you’ll actually capture that rear-side energy gain. The same goes for ground mounts with proper elevation and white rock or concrete underneath. Off-grid systems with battery banks particularly benefit because that extra 10-25% production can mean the difference between running your fridge through cloudy days or not.
However, standard panels are usually the smarter investment for rooftop installations, especially on dark shingles where rear-side gains disappear. The same applies to budget-conscious projects where mounting hardware costs add up quickly, since bifacial panels demand specialized racking to avoid blocking their backs.
Here’s my rule of thumb: if achieving proper mounting height and maintaining reflective ground surfaces feels complicated or expensive, stick with standard panels. The 15-30% price premium for bifacial technology only pays off when your installation naturally provides the conditions they need. For most DIY rooftop projects, that extra money is better spent on additional standard panels or a larger battery bank. Calculate your actual rear-side gain potential before getting excited about bifacial specs, because theoretical efficiency and real-world performance are very different things in solar projects.
Ground Surface Matters More Than You Think
Best and Worst Ground Surfaces for Bifacial Arrays
The ground beneath your bifacial array matters more than you might think. Different surfaces reflect varying amounts of light back to your panels, and understanding these differences can help you make smarter installation choices without breaking the bank.
Let me break down the most common ground surfaces and their albedo ratings, which measure how much light they reflect on a scale from 0 to 1:
White gravel or crushed stone tops the list with an albedo of 0.25 to 0.40, making it the champion for maximizing rear-side production. If you’re serious about squeezing every watt from your bifacial setup, spreading white gravel under your array can boost overall output by 10-15%. The downside? It’s the priciest option and requires occasional maintenance to keep weeds at bay.
Concrete comes in second with an albedo around 0.25 to 0.35. If you’re mounting panels on an existing concrete pad or flat roof, you’re already sitting pretty. No extra investment needed.
Grass and vegetation register between 0.15 and 0.25, making them decent middle-ground options. Charles installed his test array over lawn, and while the gains aren’t as dramatic as white gravel, he noted the zero-cost advantage and natural weed suppression. Plus, you can still mow underneath if you mount high enough.
Bare dirt or soil scores lowest at 0.10 to 0.20. If this is your starting point, consider that even letting grass grow naturally will improve your reflectivity without spending a dime.
Snow deserves special mention with its impressive 0.60 to 0.90 albedo. During winter months, bifacial panels truly shine in snowy climates, sometimes producing surprisingly high output on clear, cold days when conventional panels would underperform.
Ground surface reflectivity dramatically impacts bifacial panel performance, with white gravel and concrete providing significantly more rear-side energy than grass or dirt.
DIY Ground Treatments That Actually Work
You don’t need to spend hundreds of dollars to boost your bifacial panel performance through better ground reflectivity. I learned this the hard way after initially dismissing ground treatments as too expensive, only to realize I was leaving 15-20% of potential energy on the table.
Let’s start with the most budget-friendly option: white landscaping stones or pea gravel. At around $30-50 per ton from your local landscaping supplier, this can cover roughly 100 square feet at 2-3 inches deep. White stones typically provide 25-35% reflectivity and last for years with minimal maintenance. I used this method for my first bifacial installation, and it worked beautifully.
Reflective ground sheeting offers even better performance. White TPO roofing membrane, available at roofing supply stores for about $0.75-1.25 per square foot, can achieve 60-75% reflectivity. Secure it with landscape staples and weight the edges with stones. The initial cost is higher, but the performance boost is substantial.
For concrete surfaces under your array, specialized reflective white paint designed for roofs runs $40-60 per gallon, covering approximately 100-150 square feet. This bumps reflectivity from concrete’s typical 15-20% up to 50-60%.
Here’s a quick comparison for a 100 square foot area: white stones cost around $35, reflective sheeting about $100, and paint roughly $50. Calculate your potential energy gain using our solar calculator tool, then decide which option delivers the best return for your specific situation. Even the cheapest option makes a noticeable difference.
Getting the Mounting Height Right
Proper mounting height allows reflected light to reach panel rear surfaces while providing clearance for ground reflection and air circulation.
The Ground-Mount Height Formula That Works
Getting the height right is one of those details that can make or break your bifacial panel performance. After installing my first ground-mount installations too low and watching snow pile up, I learned this lesson the hard way.
Here’s a simple formula that works for most DIY setups: take your panel’s shortest dimension and multiply by 0.5. That’s your minimum clearance. For a standard 39-inch wide panel mounted in portrait, you’d want at least 20 inches of ground clearance. However, I recommend starting at 1.5 feet minimum for any installation, with 2-3 feet being the sweet spot for maximizing that precious rear-side light reflection.
Why does height matter so much? Every inch you raise those panels increases the ground’s ability to bounce light onto the back surface. Plus, you’re keeping your investment safe from ground moisture, vegetation growth, and debris that could damage the panels or block airflow.
For snow-prone areas, add your average snowfall depth to your minimum clearance. If you typically get 18 inches of snow, you’ll want panels at least 3 feet up. Trust me, digging out buried panels in January isn’t fun.
A quick calculation tool: minimum height equals panel width divided by two, plus local snow depth, with a 1.5-foot absolute minimum. Round up for peace of mind. Your back will thank you during maintenance, and your panels will produce better year-round.
Roof-Mount Reality Check
Let me be straight with you: bifacial panels on standard roof installations rarely deliver their promised rear-side gains. I learned this the hard way when I helped my neighbor install bifacials on his composite shingle roof, expecting that 10-15% boost. We got maybe 2-3% because there simply wasn’t enough space between the panels and roof surface for light to reach the back.
The problem is simple physics. Most rooftop racking systems sit just 4-6 inches off the surface, which doesn’t allow meaningful light reflection to reach the rear cells. Dark shingles absorb rather than reflect light, making things worse.
That said, you can make bifacials work on roofs if you’re willing to invest in elevated racking systems. Look for mounting solutions that raise panels 12-18 inches above your roof surface. Some folks I know have built custom standoffs using treated lumber, though this requires careful waterproofing and structural calculations.
Light-colored metal roofing helps tremendously too. If you’re re-roofing anyway, consider white or light-gray metal panels underneath your array location. The combination of height and reflective surfaces can recapture most of that bifacial advantage.
Bottom line? Standard roof installations should probably stick with traditional monofacial panels unless you’re committed to specialized mounting and have the right roof type.
Row Spacing and Shade Management
Proper row spacing prevents shadows from front rows from blocking reflected light to rear surfaces of panels behind them, maximizing bifacial energy production.
Calculating Your Ideal Row Spacing
Getting the right spacing between your panel rows is one of those things that seems complicated at first, but once you break it down, it’s totally manageable. I learned this the hard way when I installed my first bifacial array—I was so excited about maximizing the number of panels that I crammed them too close together. The result? My back panels were sitting in shadows for much of the day, completely defeating the purpose of going bifacial in the first place.
Here’s the straightforward approach I use now. Start by determining your latitude—this tells you how high the sun travels across the sky at different times of year. The lower the sun angle (which happens in winter), the longer the shadows your panels will cast. A general rule of thumb is to space rows at least 2 to 2.5 times the panel’s tilted height apart. So if your panels are mounted at a 30-degree tilt and stand 3 feet high at the back edge, you’ll want roughly 6 to 7.5 feet between rows.
But here’s where it gets personal to your situation. Consider what matters most to you: maximum energy production year-round, or squeezing in more panels for higher total output even if it means some seasonal shading? Many DIYers find that targeting minimal shading during the winter solstice (December 21st in the Northern Hemisphere) gives them the sweet spot.
To make this calculation easier, we’ve created an interactive spacing calculator on our site that factors in your specific latitude, tilt angle, and ground reflectivity. Just plug in your numbers, and it’ll show you the recommended spacing for your location. It takes about two minutes and saves hours of head-scratching with trigonometry tables.
Portrait vs. Landscape Orientation for Bifacial Arrays
When I first installed bifacial panels, I assumed orientation didn’t matter much beyond the usual considerations. Boy, was I wrong! The way you orient bifacial panels significantly impacts how much light reaches the rear side and how you should space your arrays.
Portrait orientation (vertical mounting) tends to produce more consistent rear-side gains throughout the day because the narrower shadow cast allows light to reach beneath the panels more easily. This orientation typically requires less spacing between rows, around 1.5 to 2 times the panel height, making it ideal for smaller properties where space is at a premium.
Landscape orientation (horizontal mounting) creates wider shadows that can reduce rear-side gains unless you increase row spacing to about 2.5 to 3 times panel height. However, landscape does offer benefits in windy locations since it presents less surface area to gusts and can be structurally more stable.
For most DIY installations on residential properties, portrait orientation is your best bet. It maximizes your bifacial gains without eating up your entire backyard. If you’re working with commercial-scale ground mounts or have acres to spare, landscape might work better for structural reasons. Our solar array spacing calculator can help you determine the optimal layout for your specific situation based on your available space and chosen orientation.
Tilt Angle Optimization for Dual-Sided Production
Finding Your Bifacial Sweet Spot Angle
Here’s something I learned the hard way during my first bifacial installation: the standard “tilt at your latitude” rule doesn’t quite cut it anymore. When I adjusted my array to 35 degrees (my latitude), I noticed the rear panels weren’t catching nearly as much reflected light as they could. After some experimentation, I found my sweet spot was actually closer to 25 degrees.
Bifacial panels love a shallower tilt than traditional modules because lower angles expose more of the rear surface to reflected ground light. Think of it like opening a book wider to see both pages better. Most DIYers find their optimal angle runs about 10-15 degrees less than their latitude, though this varies based on your ground surface reflectivity.
The math gets interesting here. While steeper tilts maximize front-side production, they create shadows that block rear-side gains. Shallower angles sacrifice some direct sunlight but can boost total energy capture by 5-15% when rear production kicks in.
Your local conditions matter tremendously. If you’ve got highly reflective ground cover like white gravel or concrete, go shallower. Darker surfaces like grass or dirt? You might stick closer to traditional angles.
I recommend using our tilt angle calculator as a starting point, then subtract 10-12 degrees for your bifacial setup. Better yet, if you’re mounting on an adjustable rack, experiment seasonally. Track your production data and find what works best for your specific situation. This hands-on approach taught me more than any formula ever could.
Wiring and Electrical Considerations
Sizing Components for the Rear-Side Boost
Here’s something I learned the hard way during my first bifacial installation: I sized everything perfectly for the front-side production, then watched my charge controller hit its limits regularly because I forgot about that extra rear-side boost. Don’t make my mistake!
When you’re working with bifacial panels, you need to remember that your system components aren’t just handling the rated panel capacity. That rear-side production we talked about earlier needs to flow through your equipment too. If your panels produce an extra 10-20% from the rear, your charge controller, inverter, and wiring all need to handle that additional power safely.
Start with sizing charge controllers and inverters at 120-125% of your array’s front-side rating. So if you have 3,000 watts of panels facing the sun, plan your equipment for around 3,600-3,750 watts. This accounts for typical bifacial gains plus gives you a comfortable safety margin for those surprisingly bright days when everything’s working perfectly.
Your wiring deserves the same attention. Calculate wire gauge based on the maximum expected current, including rear-side production. Undersized wires create resistance, waste energy as heat, and can become fire hazards. I always bump up one wire gauge size from my calculations when working with bifacial arrays.
Think of it like buying a slightly larger water pipe. The extra capacity costs a bit more upfront, but it prevents bottlenecks and keeps everything running smoothly for years. Your future self will thank you when your system performs flawlessly instead of constantly hitting limits.
Avoiding Common Bifacial Wiring Mistakes
I learned this the hard way when I first installed bifacial panels at my workshop. I wired them exactly like my standard panels, and boy, did I create headaches for myself! The biggest mistake? Treating both sides of the panel as if they’ll produce the same power. They won’t, and that matters more than you’d think.
Here’s what trips up most DIYers: when you’re sizing your strings, you can’t just use the front-side specs from the datasheet. Bifacial panels can generate 20-30% more current than standard panels because of that rear-side boost. If you size your charge controller or inverter based only on front-side numbers, you might exceed their input limits on sunny days with reflective ground surfaces. I’ve seen folks blow expensive equipment this way.
Another common error is mixing bifacial and standard panels in the same string. The voltage and current characteristics differ enough to create serious mismatch losses. If you must combine them in your system, keep them on separate strings with separate maximum power point tracking.
Also, don’t forget that shading affects bifacial panels differently. A shadow on the ground can impact the rear side, creating unexpected current mismatches between panels in your string. When planning your string configuration, consider both top and bottom shading scenarios, not just what’s overhead.
Real-World Performance: What to Actually Expect
Tracking Your Bifacial Array Performance
Understanding whether your bifacial panels are actually capturing that bonus rear-side energy is simpler than you might think. You don’t need expensive equipment to get valuable insights into your array’s performance.
The most straightforward approach is comparing your actual production against what you’d expect from monofacial panels with the same front-side rating. If your 400W bifacial panels consistently produce 440-480W during peak hours, you know that rear-side contribution is working. Most basic inverters or charge controllers already display current power output, giving you this baseline data.
For more detailed tracking, affordable monitoring tools like WiFi-enabled power meters (around $30-50) can log production throughout the day. I installed one on my backyard test array, and seeing that consistent 15-20% production boost compared to my older monofacial setup was incredibly satisfying. It confirmed my ground preparation and mounting height decisions were paying off.
A simple DIY method I love is the “shadow test.” On a bright day, hold a light meter or even your smartphone’s light sensor app behind your panel at different spots. You should see significantly higher readings in areas where reflected light hits compared to shaded zones. This quick check helps identify if nearby objects are blocking your rear-side gains.
Consider taking monthly production snapshots and comparing them seasonally. Snow cover in winter or changing vegetation can dramatically affect rear-side performance, and tracking these patterns helps you optimize ground treatments year-round. Keep a simple spreadsheet noting average daily production alongside weather conditions and ground surface changes.
Here’s what I’ve learned after years of tinkering with bifacial panels in my own backyard: these modules are powerful tools, but they’re not magic. The difference between a well-designed bifacial array and a poorly planned one can be 25% more energy production or a disappointing few percentage points that barely justify the extra cost. The good news? You now have the knowledge to design systems that capture those real gains.
The fundamentals we’ve covered aren’t complicated, but they matter enormously. Mount your panels higher to let light reach the back. Space your rows generously to minimize shading. Think about what’s under your array, because a reflective surface can transform performance while dirt or grass will leave potential energy on the table. And don’t forget the electrical considerations, because your inverter and wiring need to handle those extra amps.
I’ve watched too many DIY solar friends install bifacial panels the same way they would monofacial ones, then wonder why the results were underwhelming. Don’t be that person. Take advantage of the calculators and tools on this site to model your specific situation before you start drilling holes and pulling wire.
The DIY solar community has always been about sharing knowledge and pushing boundaries together. I’d love to hear how your bifacial projects turn out. What worked? What surprised you? Your experiences help all of us get better at this.
Remember, every well-designed home solar array, including yours, moves us all toward a cleaner energy future. Now get out there and build something great.
How useful was this post?
Click on a star to rate it!
Average rating 0 / 5. Vote count: 0
No votes so far! Be the first to rate this post.
We are sorry that this post was not useful for you!
Let us improve this post!
Tell us how we can improve this post?
charlesnoble
Here at Spheral Solar, I’m a hands-on solar power enthusiast, constantly exploring and experimenting with DIY solutions. I’m dedicated to sharing my discoveries, insights, and even the bumps I hit along the way, all in the pursuit of a more sustainable future.
The Right Tilt Angle Can Boost Your Solar Panel… by Charlesnoble April 10, 2026 Position your solar panels at an angle equal to your latitude for year-round performance, or adjust seasonally by adding 15 degrees in winter and subtracting 15 degrees in summer to capture maximum sunlight during each season’s sun path. Use a simple angle finder app on your smartphone against the back…
Why Series-Parallel Wiring Could Save Your Solar… by Charlesnoble March 24, 2026 When your solar array needs more power than a simple series connection provides, but your charge controller can’t handle high voltages, series-parallel wiring becomes your solution. This hybrid approach combines the voltage-boosting benefits of series connections with the current-increasing advantages of parallel wiring, giving you the flexibility to match your…
How Orlando Airport’s Solar EV Charging Could… by Charlesnoble April 30, 2026 Picture this: You’ve just landed at Orlando International Airport after a long flight, your electric vehicle waiting in long-term parking with a battery that’s somehow fuller than when you left it. Sound like science fiction? It’s happening right now at MCO, where solar-powered EV charging stations are transforming how travelers…
Subscribe for handpicked DIY projects, exclusive tips, and giveaways.
AGM batteries outperform traditional flooded lead acid batteries in nearly every practical measure that matters for solar installations, but whether that performance justifies their 50-100% higher upfront cost depends entirely on how hands-off you want your system to be and how often you’ll cycle the battery deeply. After running both types through real-world solar setups… Read more: AGM vs. Lead Acid Batteries: Which Is Better for Your Solar Setup?
A portable power station will typically run your camping devices for anywhere from a few hours to several days on a single charge, depending on what you’re powering and the station’s capacity. As for lifespan, most quality units last between 3 to 10 years before the battery degrades enough to need replacement. The distinction matters… Read more: Your Portable Power Station Won’t Last as Long as You Think (Here’s Why)
A J1772 solar charger combines a standard J1772 charging connector (the same Type 1 plug used by most North American EVs and electric bikes) with solar panels and battery components to create an off-grid or grid-supplemented charging system. You’ll need three core elements: solar panels (typically 400-800 watts for practical ebike charging), a battery storage… Read more: How to Choose a J1772 Solar Charger for Your Ebike: A Buying Guide


")
")

")
")


