Why Your Solar Setup Needs Both a Charge Controller and Inverter (And How to Pick the Right Ones)
Updated:
Check the maximum voltage and current ratings first—these determine whether your controller can actually handle your solar panel array without frying itself on the first sunny day. I learned this the hard way when my first DIY system shut down every afternoon because I’d paired 600 watts of panels with a controller rated for only 30 amps.
Match your inverter’s continuous wattage rating to your actual daily loads, not your theoretical maximum. Most people oversize by 50-100%, wasting money on capacity they’ll never use. Calculate what you’re actually running simultaneously—your laptop, fridge, and a few lights probably total 500 watts, not the 2000-watt inverter the salesperson recommended.
Understand that combo charge controller/inverters simplify wiring and save space, but separate components give you flexibility to upgrade individual pieces later. If you’re building a small portable system or camper van setup, combos make sense. For expandable home systems, keeping them separate prevents replacing everything when you add more panels in three years.
Look beyond the efficiency percentage everyone obsesses over. A controller that’s 94% efficient instead of 97% costs you maybe $20 annually in lost power, but one without proper temperature compensation for your battery type will cost you hundreds in premature battery replacement. The datasheet specs that actually matter are battery charging profiles, temperature sensors, and whether it supports your specific battery chemistry—flooded, AGM, lithium, or gel.
Focus on real-world compatibility with your existing equipment rather than chasing the highest numbers on paper. Your system only works as well as its weakest link, and that’s usually the part where specifications didn’t match your actual installation conditions.
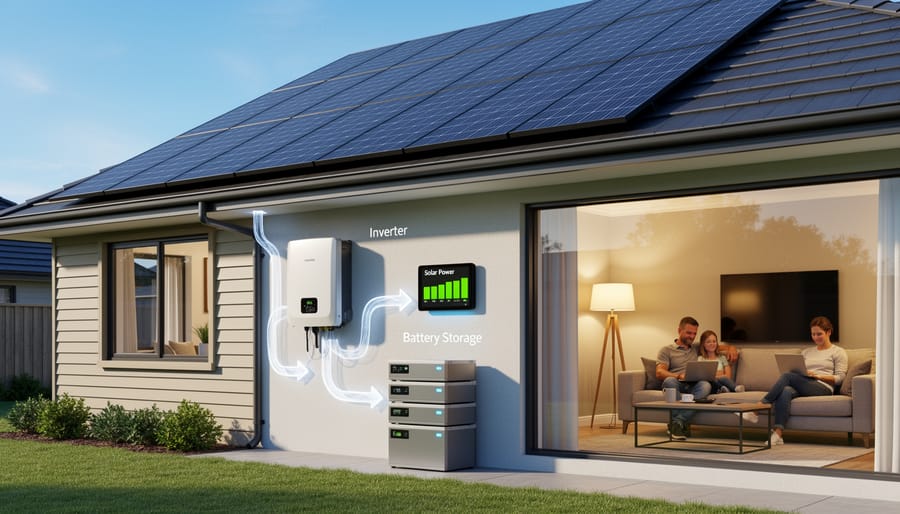
What Actually Happens Inside Your Solar System
A complete solar system showing the path energy takes from panels through batteries to power your home.
The Charge Controller’s Job: Protecting Your Battery Investment
I learned this lesson the hard way during my first solar setup. I skipped the charge controller to save a few bucks, and within three months, my battery bank was toast. That $200 I saved cost me over $800 in battery replacements. Trust me, you don’t want to repeat my mistake.
Think of a charge controller as your battery’s personal bodyguard. Its primary job is managing the electrical flow between your solar panels and battery storage, ensuring batteries charge safely and efficiently. Without this protection, your batteries face two major threats: overcharging and deep discharging.
Overcharging happens when solar panels continue pumping electricity into fully charged batteries. This creates excessive heat, causes electrolyte loss in flooded batteries, and can permanently damage lithium batteries. The charge controller recognizes when batteries reach full capacity and reduces or stops the charging current accordingly.
Deep discharging is equally problematic. When batteries drain too low, sulfation occurs in lead-acid types, and lithium batteries can enter protective shutdown modes. A quality charge controller monitors voltage levels and can disconnect loads before damage occurs.
The financial impact is substantial. A decent lead-acid battery bank costs between $300 and $1,000, while lithium systems run $500 to $3,000 or more. Premature battery failure means replacing this investment every few years instead of the expected 5 to 15 years. Quality charge controllers typically cost $50 to $500, making them one of the smartest investments in your entire solar system.
The Inverter’s Role: Making Solar Power Usable
Here’s where things get really interesting. Your solar panels generate DC (direct current) electricity—the same type of power you’d get from a battery. But here’s the problem: almost everything in your home runs on AC (alternating current) power. Your refrigerator, laptop charger, coffee maker, and pretty much every appliance with a standard plug expects AC electricity.
That’s exactly what an inverter does—it converts that DC power from your panels or batteries into the AC power your appliances can actually use. Think of it as a translator between two different electrical languages.
I learned this the hard way during my first solar project. I had my panels perfectly positioned, charge controller humming along nicely, batteries fully charged, and then… nothing worked when I tried plugging in my power tools. I’d completely forgotten about the inverter! Without one, you’re limited to only DC-powered devices like some LED lights or specialized DC appliances—not exactly practical for most people.
The conversion process is pretty fascinating. The inverter rapidly switches the DC current on and off in a specific pattern that mimics the wave-like flow of AC electricity. Better inverters create what’s called a “pure sine wave” that’s virtually identical to grid power, while cheaper ones produce a “modified sine wave” that works fine for basic devices but can cause issues with sensitive electronics.
Without an inverter, your beautifully generated solar power essentially sits there unusable for standard household purposes.
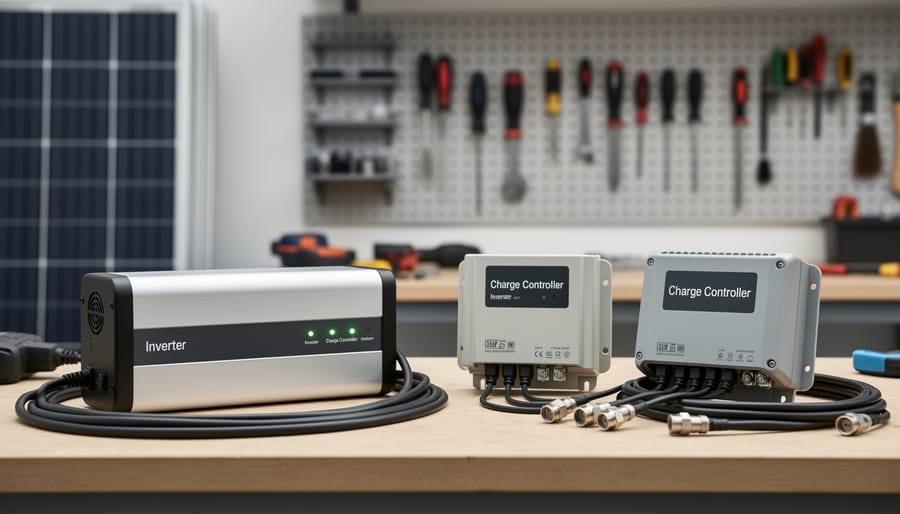
All-in-One vs. Separate Components: Which Path Should You Take?
All-in-one combo units versus separate charge controllers and inverters offer different advantages depending on your system needs.
When a Combo Unit Makes Perfect Sense
Combo units really come into their own when you’re working with limited space and want to keep things simple. I learned this firsthand when I helped my neighbor set up her teardrop camper—trying to mount separate components in that tiny space would’ve been a nightmare!
RVs and campers are the perfect match for integrated solar charge controller/inverters. You get everything in one compact box, which is crucial when every square inch counts. The simplified wiring also means fewer connection points that could come loose while you’re bouncing down rough roads.
Small off-grid cabins benefit enormously too. If you’re managing a modest system—say, running LED lights, charging phones, and powering a small fridge—a combo unit keeps installation straightforward without sacrificing functionality. Plus, you won’t need to become an electrical engineer to wire everything correctly.
Weekend camping setups are another sweet spot. Portable solar kits with integrated units let you set up quickly and start generating power without complicated configuration.
The main advantages? Simplicity wins every time. One unit means one installation, one warranty, and one troubleshooting process if issues arise. Space savings matter tremendously in confined areas, and the reduced wiring minimizes potential failure points. For systems under 3000 watts, combo units typically offer excellent value while keeping your setup clean and manageable.
When You’re Better Off Buying Separate Units
Sometimes separate units make more sense, especially as your solar ambitions grow. If you’re powering a whole house or planning to expand over time, buying individual components gives you flexibility that combo units simply can’t match.
Charles learned this firsthand when his small cabin system grew into a full home setup. “I started with a combo unit for my workshop,” he recalls, “but when I wanted to add more panels and batteries to power the house, I hit the combo’s limits fast. Switching to separate components meant I could upgrade my charge controller without replacing a perfectly good inverter.”
Larger systems typically need this modularity. When you’re managing 3,000+ watts of solar panels, you’ll likely want a high-capacity MPPT controller paired with a pure sine wave inverter sized for your specific loads. Separate units let you replace or upgrade one component without touching the others, spreading costs over time.
Expandability is another key factor. Starting small but dreaming big? Separate units let you size each component for your future plans, not just today’s needs. You’ll also find better warranty coverage since you’re dealing with specialized equipment rather than an all-in-one box where one failure affects everything. The upfront cost is higher, but the long-term flexibility often pays off.
Charge Controller Specifications Decoded
Voltage Rating: Matching Your Battery Bank
Your solar charge controller must match your battery bank’s voltage, or things simply won’t work. Most DIY systems run on 12V, 24V, or 48V configurations.
Here’s the breakdown: 12V systems are perfect for small setups like RVs, boats, or tiny cabins with modest power needs. They’re beginner-friendly and components are widely available. However, 24V systems handle medium-sized installations more efficiently, reducing current draw and allowing thinner, less expensive wire. The 48V option suits larger home systems where serious power flows through the system.
When I upgraded from 12V to 24V in my workshop, I learned this lesson the hard way: your controller voltage rating must exactly match your battery bank configuration. A 12V controller connected to a 24V battery bank won’t just underperform; it could fail completely.
The simple rule of thumb? Add up your daily power consumption in watt-hours. Under 1,000Wh? Go 12V. Between 1,000-3,000Wh? Choose 24V. Above 3,000Wh? Consider 48V. Always verify your controller explicitly supports your chosen voltage before purchasing. Most quality controllers clearly state their compatible voltage on the specification sheet.
Current Rating: Don’t Strangle Your Solar Panels
I learned this lesson the hard way when I tried to run three 100W panels through a controller rated at only 10A. The system worked fine on cloudy days, but the first time full sun hit those panels, my controller went into protection mode faster than I could say “overload.” Here’s the thing: your charge controller needs to handle not just your panels’ typical output, but their maximum possible output.
The basic calculation is straightforward. Take your total panel wattage, divide it by your battery voltage, then add a safety margin. For example, if you have 400W of panels and a 12V battery system, that’s 33.3A at peak production. But here’s where beginners often trip up – you absolutely need a safety buffer.
I recommend a 25% safety margin minimum. So for that 33.3A example, you’d want at least a 42A controller. Why? Solar panels can actually exceed their rated output in ideal conditions, and voltage fluctuations can temporarily spike the amperage. Plus, you might want to expand your array later.
The good news is you don’t have to do this math manually. Spheral Solar’s calculator tool does the heavy lifting for you – just plug in your solar panel specifications and battery voltage, and it recommends appropriate controller ratings with safety margins already factored in. This takes the guesswork out of sizing and helps you avoid both undersized controllers that’ll shut down and oversized ones that waste money.
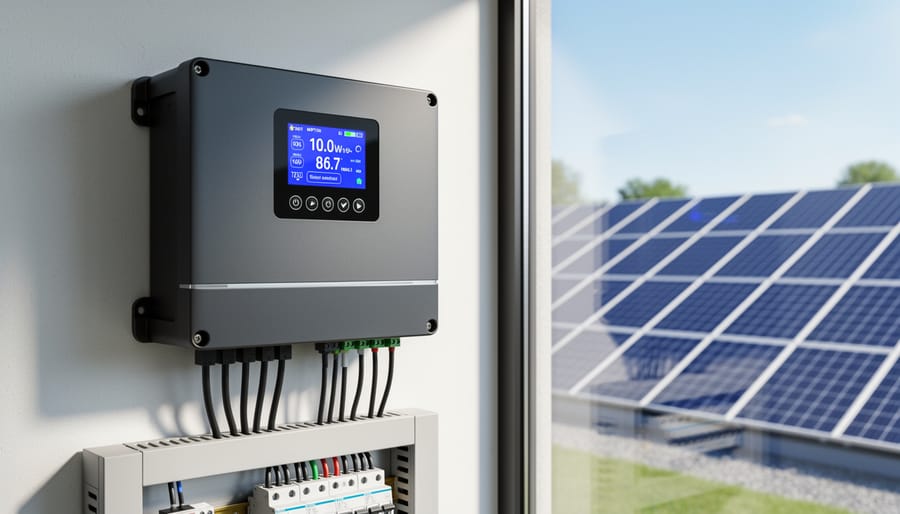
Modern MPPT charge controllers use advanced technology to maximize energy harvest from your solar panels.
MPPT vs. PWM: The Efficiency Question That Actually Matters
Here’s the truth: MPPT controllers are more efficient, but that doesn’t always mean they’re the right choice for your setup.
I learned this the hard way when I upgraded my small shed system from PWM to MPPT, expecting miraculous results. The reality? On my 100-watt panel setup, I saw maybe a 5% improvement in real-world conditions. That barely justified the extra $80 I spent.
PWM controllers work fine when your solar panel voltage closely matches your battery voltage. Think 12V panels charging 12V batteries. The efficiency loss is around 25-30% compared to MPPT, but these controllers cost $20-40 for basic models. For small systems under 200 watts, that price difference matters more than the efficiency gain.
MPPT really shines when there’s a voltage mismatch. Got higher-voltage panels (like residential panels running at 30-40V) that you want to use with a 12V battery bank? MPPT will harvest 20-30% more energy than PWM in these situations. That’s the difference between running your fridge comfortably and constantly worrying about battery levels.
Here’s my rule of thumb: Systems under 200 watts with matched voltages? PWM is perfectly adequate. Systems over 400 watts, or anytime you’re using higher-voltage panels? MPPT pays for itself within a year or two through increased harvest.
Cold weather also tips the scales toward MPPT. Solar panels produce higher voltages when cold, and MPPT controllers capture that extra energy while PWM just clips it off. If you’re in a northern climate, factor in an extra 10-15% efficiency advantage for MPPT during winter months.
The bottom line: Don’t buy MPPT just because it sounds fancier. Match the technology to your actual setup and budget.
Inverter Specifications That Impact Your Daily Life
Continuous vs. Surge Power: Why Your Inverter Keeps Shutting Down
Here’s something I learned the hard way during my first solar setup: I hooked up a small chest freezer to my shiny new inverter rated for 1000W continuous power. The freezer’s label said 150W, so I figured I was golden. The inverter shut down within seconds. Frustrating, right?
The culprit was surge power. Your inverter’s continuous rating tells you what it can handle steadily, like running lights or charging laptops. But when motor-driven appliances like refrigerators, power tools, or air compressors start up, they demand a massive surge of power that can be 3-7 times their normal operating wattage. That 150W freezer? It actually needed about 900W just to get the compressor spinning.
This is probably the most common mistake in the DIY solar community. I’ve seen countless forum posts from folks who bought inverters based only on continuous ratings, then couldn’t figure out why their circular saw kept tripping the system. One community member told me about powering a well pump rated at 750W with a 1000W inverter, only to discover it needed 2500W at startup.
Here’s the fix: always check your inverter’s surge rating (sometimes called peak power). A quality inverter should handle surge loads for at least a few seconds. For my freezer situation, I needed an inverter with a 2000W surge rating, even though my continuous load was minimal. Calculate your highest surge requirement first, then work backwards to find your inverter.
Pure Sine Wave vs. Modified Sine Wave: Does It Really Matter?
Here’s the truth from my own trial and error: not every appliance cares about sine wave quality, and understanding this difference can save you hundreds of dollars.
Pure sine wave inverters produce smooth, grid-quality power that mimics what comes from your wall outlet. Modified sine wave inverters create a choppier, stepped approximation. The question is, does your gear notice?
Appliances that absolutely need pure sine wave include anything with sensitive electronics: laptops, phone chargers, medical equipment, variable speed tools, and modern appliances with digital displays. I learned this the hard way when my modified sine wave inverter made my coffee maker buzz like an angry hornet and refuse to brew. Audio equipment, microwaves, and anything with a motor also perform better and last longer with pure sine wave.
What doesn’t care? Incandescent light bulbs, basic heaters, simple power tools, and older appliances without digital components work fine on modified sine wave.
The cost difference? Pure sine wave inverters typically run 50-100% more expensive than modified versions. For a 2000-watt inverter, expect to pay around $200-300 for modified versus $400-600 for pure sine wave.
My advice: if you’re powering anything beyond basic lighting and simple tools, spring for pure sine wave. The investment protects your electronics and eliminates the headache of compatibility issues. For an emergency backup system running just lights and a fan, modified sine wave works perfectly fine and keeps your budget happier.
Efficiency Ratings: The Hidden Cost in Your System
Here’s something I learned the hard way: a 95% efficient inverter sounds impressive until you realize that missing 5% might be costing you an extra hour of battery runtime every night.
Think of efficiency ratings as the “leak” in your energy bucket. When you pull 1000 watts from your battery through an 85% efficient inverter, you’re actually only getting 850 watts to your appliances. That 150-watt difference becomes heat, and more importantly, drains your battery faster than you’d expect.
Let me show you a real example. Say you’re running a 500-watt load for 4 hours through an 85% efficient inverter versus a 95% efficient one. With the less efficient model, you’re actually drawing 588 watts from your battery (500 ÷ 0.85), totaling 2,352 watt-hours. The better inverter only needs 526 watts (500 ÷ 0.95), or 2,105 watt-hours total. That’s 247 watt-hours saved, which in a 12V system equals over 20 amp-hours of battery capacity preserved.
This is especially crucial during low-light winter months when every watt-hour counts. Always check efficiency ratings at your typical load levels, not just peak efficiency numbers often advertised on spec sheets.
The Specifications Most Beginners Overlook (But Shouldn’t)
Temperature Derating and Operating Range
Temperature is one of those sneaky factors that can really mess with your solar system’s performance, especially if you’re setting up in less-than-ideal conditions. Most charge controllers and inverters are rated to operate between -4°F to 140°F, but here’s the catch: they start losing efficiency as temperatures climb past 77°F.
Charles learned this the hard way when he installed his first system in his garage during a Texas summer. “I mounted everything on a metal panel on the back wall,” he remembers, “and within two weeks, the inverter was hitting thermal protection and shutting down every afternoon.” The metal absorbed heat, and the garage easily hit 110°F. After relocating the equipment to an interior wall with better ventilation, his problems disappeared.
For camping setups, this matters less since you’re usually outdoors with natural airflow. But if you’re building a permanent installation in a shed, garage, or RV, pay attention to ventilation. Look for specs showing derating curves that tell you exactly how much capacity drops at higher temperatures. Some units derate by 2-3% for every degree above their rated temperature. This means a 3000W inverter might only safely deliver 2400W in extreme heat. Always leave at least two inches of clearance around your equipment and consider adding a small fan if your installation space gets toasty.
Display and Monitoring Features
Here’s the thing about display screens on charge controllers and inverters – they’re not just fancy add-ons. They’re your window into what’s actually happening with your solar setup. When I installed my first system, I went with a basic controller without a display to save money. Big mistake. When my batteries weren’t charging properly, I had no idea if the problem was my panels, wiring, or controller settings.
Modern monitoring capabilities have changed the game for DIYers. At minimum, you want a display showing voltage, current, and battery state of charge. But Bluetooth or Wi-Fi connectivity takes troubleshooting to another level. I can check my system’s performance from my phone while I’m still having morning coffee, spotting issues before they become problems.
App-based monitoring lets you track historical data, identify patterns, and optimize settings without climbing onto your roof. You’ll see exactly when your panels produce peak power, how weather affects output, and whether your battery capacity matches your actual usage. For troubleshooting, this data is gold – it tells you definitively whether that cloudy day performance drop is normal or indicates a wiring issue.
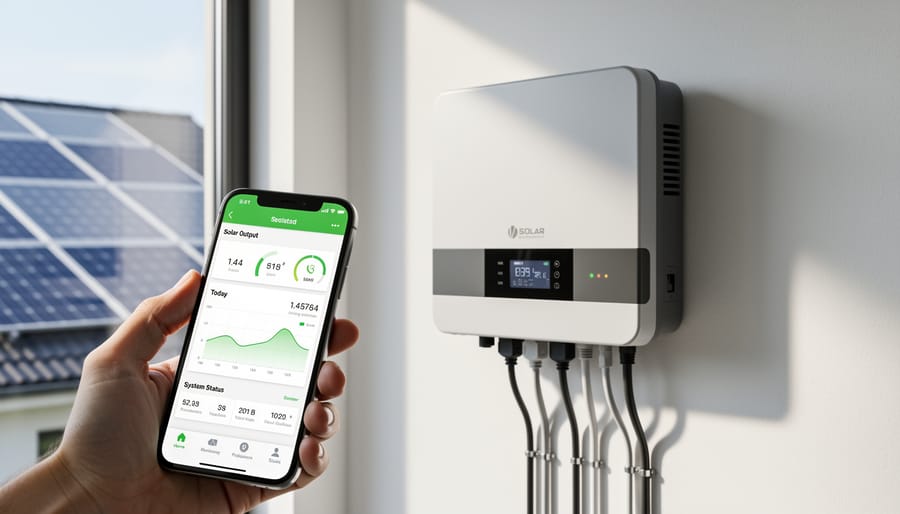
Modern inverters with monitoring capabilities let you track system performance and troubleshoot issues from your smartphone.
Certifications and Safety Standards
When I first started building solar systems, I honestly thought certifications were just fancy stickers manufacturers slapped on boxes to charge more money. Then my friend’s insurance company denied a claim because his equipment lacked proper certification. That changed my perspective fast.
UL (Underwriters Laboratories) and CE (European Conformity) certifications aren’t bureaucratic nonsense. They’re proof that independent labs tested your equipment under real-world conditions, including worst-case scenarios like short circuits and overheating. These certifications mean your charge controller or inverter won’t become a fire hazard when things go wrong.
Here’s the practical impact: many insurance policies require UL-listed equipment for homeowner coverage. Without it, you might be personally liable for any damage. Building inspectors often demand certified equipment too, especially if you’re connecting to your home’s electrical system.
Look for UL 1741 for inverters and UL 1012 for charge controllers. If you’re in Europe or buying imported equipment, CE marking is essential. These aren’t just checkboxes on a spec sheet—they’re your protection and peace of mind.
Sizing Your Components: A Simple Approach That Works
Here’s the truth: sizing your solar components doesn’t require a degree in electrical engineering. I learned this the hard way during my first solar project when I spent three days cross-referencing spec sheets, only to realize I was massively overthinking it. Let me share a simpler approach that actually works.
Start with what you know: how much power you need. Make a list of everything you want to run on solar. Include your phone charger, laptop, mini-fridge, or whatever devices matter to you. Write down each item’s wattage (usually found on a label or in the manual) and how many hours per day you’ll use it. Multiply wattage by hours for each device, then add everything together. That’s your daily watt-hours, which is the foundation for sizing everything else.
Now comes the fun part. Take your daily watt-hours and divide by your system voltage (usually 12V or 24V for small systems). This gives you amp-hours, which helps determine your battery bank size. For your charge controller, add up the total wattage of your solar panels, divide by your system voltage, then add 25% as a safety margin. That’s your minimum controller amp rating.
For the inverter, identify your highest-wattage device and multiply by 1.5 to account for startup surge. This gives you the minimum continuous wattage your inverter needs. Don’t forget about power requirements that might grow over time, either.
If math isn’t your thing (and honestly, who enjoys doing calculations when you’d rather be building?), Spheral Solar offers interactive calculators that do the heavy lifting for you. Just plug in your devices and usage patterns, and the calculator recommends appropriate component sizes. I wish these existed when I started.
One practical tip from my experience: round up, not down. When I sized my first system too tightly, cloudy days left me without power. Adding 20% breathing room to all calculations saved me from that frustration on future builds. Your future self will thank you for the extra capacity.
Understanding the specifications for solar charge controllers and inverters might seem intimidating at first, but once you grasp the basics, you’ll realize these numbers are actually your roadmap to building a solar system that works perfectly for your needs. I remember when Charles first started helping DIYers through our community forums – the most common regret he heard was either overspending on equipment with unnecessary capacity or undersizing components and hitting frustrating limitations. Both scenarios are completely avoidable when you know what to look for.
The beauty of getting these specs right is that you’re not just saving money – you’re creating a system that performs reliably for years to come. Whether you’re powering a weekend cabin, running essential appliances during outages, or going completely off-grid, matching your equipment to your actual needs makes all the difference.
We’ve built our calculator tools specifically to take the guesswork out of this process. Rather than getting lost in datasheets, start by plugging your requirements into our sizing calculators. They’ll help you translate your daily power usage into the specifications that actually matter for your setup.
And remember, you’re not alone in this journey. Our community is full of DIYers who’ve been exactly where you are now. They’ve made the mistakes, learned the lessons, and are eager to share their experiences. Drop a comment below with your questions or share what worked in your build – your insights might be exactly what someone else needs to hear.
How useful was this post?
Click on a star to rate it!
Average rating 0 / 5. Vote count: 0
No votes so far! Be the first to rate this post.
We are sorry that this post was not useful for you!
Let us improve this post!
Tell us how we can improve this post?
charlesnoble
Here at Spheral Solar, I’m a hands-on solar power enthusiast, constantly exploring and experimenting with DIY solutions. I’m dedicated to sharing my discoveries, insights, and even the bumps I hit along the way, all in the pursuit of a more sustainable future.
Wire Your Solar System Right the First Time (Before… by Charlesnoble March 18, 2026 Sketch your complete solar system on paper before purchasing a single component—mapping the physical distance from your solar panels to the charge controller, then to the battery bank, and finally to your inverter will reveal the exact wire gauges you need and prevent the costly mistake of voltage drop that…
Why Series-Parallel Is the Sweet Spot for Small Solar Setups by Charlesnoble December 2, 2025 Connect two panels in series to double your voltage, then wire two of these series pairs in parallel to maintain higher voltage while increasing your amperage—this series-parallel configuration gives you the sweet spot between performance and practicality for most small-scale solar setups. I learned this the hard way during my…
Why 8 AWG Solar Wire Might Be Wrong for Your System… by Charlesnoble December 29, 2025 Calculate your system’s maximum current first—8 AWG solar wire safely handles 40-55 amps depending on installation conditions, making it the sweet spot for mid-sized solar arrays between 1,200 and 3,000 watts at 12-24 volts. If your panels produce more than 40 amps combined, you need thicker wire; less than 30…
Why Lithium-Ion Batteries Changed Everything About… by Charlesnoble December 3, 2025 Match your battery’s voltage to your solar panel system—12V, 24V, or 48V configurations must align perfectly, or you’ll waste energy through conversion losses and potentially damage expensive equipment. Check the battery’s amp-hour (Ah) rating against your daily power consumption: multiply your total watt-hours by 1.2 to account for inefficiency, then…
Why Your Solar Panel Connectors Matter More Than You Think by Charlesnoble March 4, 2026 Choose MC4 connectors for most residential solar installations—they’ve become the industry standard since 2011, offering waterproof reliability and simple snap-together connections that even first-time DIYers can master in minutes. I learned this the hard way when my first solar setup used mismatched connectors that corroded after one rainy season, costing…
Why Your Solar Panels Need the Right Mounting System… by Charlesnoble February 7, 2026 Your solar panels are only as reliable as what holds them in place. A solar array mounting system is the structural foundation that secures your panels to rooftops, ground surfaces, RVs, or portable setups, and choosing the wrong one can lead to damage, reduced efficiency, or even safety hazards. Think…
Subscribe for handpicked DIY projects, exclusive tips, and giveaways.
A portable power station will typically run your camping devices for anywhere from a few hours to several days on a single charge, depending on what you’re powering and the station’s capacity. As for lifespan, most quality units last between 3 to 10 years before the battery degrades enough to need replacement. The distinction matters… Read more: Your Portable Power Station Won’t Last as Long as You Think (Here’s Why)
A J1772 solar charger combines a standard J1772 charging connector (the same Type 1 plug used by most North American EVs and electric bikes) with solar panels and battery components to create an off-grid or grid-supplemented charging system. You’ll need three core elements: solar panels (typically 400-800 watts for practical ebike charging), a battery storage… Read more: How to Choose a J1772 Solar Charger for Your Ebike: A Buying Guide
Installing a whole house ventilation system powered by solar takes about 6 to 8 hours for a moderately skilled DIYer and delivers continuous fresh air circulation without touching your electric bill. The core method involves mounting a solar panel on your roof to power an intake or exhaust fan, routing ductwork through your attic or… Read more: How to Install a Whole House Ventilation System Using Solar Power

")

")
")

")
")

")
")

")


