Why Your 1500V DC Solar System Needs the Right Combiner Box (Before It’s Too Late)
Updated:
When I first upgraded my solar array to 1500V, I learned quickly that the combiner box isn’t just another component—it’s the critical safety hub protecting your entire system from potentially catastrophic overcurrent events. This unassuming metal enclosure sits between your solar panel strings and inverter, consolidating multiple DC inputs while providing individual overcurrent protection for each circuit.
The jump to 1500V DC systems represents a significant evolution in residential and commercial solar installations. Higher voltage means reduced current for the same power output, allowing you to use smaller gauge wiring and reduce resistive losses across longer cable runs. But this voltage level demands respect and proper equipment—which is exactly where a quality combiner box becomes essential.
Think of your combiner box as a traffic controller for electrical current. Each solar string enters through its own fused disconnect, gets monitored for abnormal conditions, then combines onto a common bus bar heading to your inverter. Without this protection layer, a single fault in one string could cascade through your entire array, potentially causing equipment damage or fire hazards.
Whether you’re planning a new ground-mount installation or upgrading an existing roof system, understanding combiner box sizing, fuse ratings, and proper installation techniques will save you headaches and ensure your investment operates safely for decades. This guide walks you through everything you need to make informed decisions about these critical system components.
What Makes 1500V DC Combiner Boxes Different (And Why It Matters)
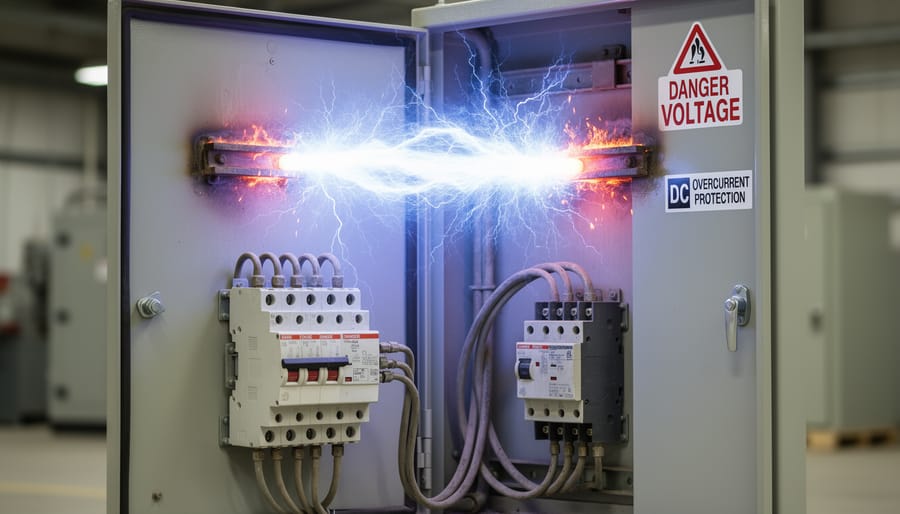
A 1500V DC combiner box with visible internal components shows the robust construction required for high-voltage solar applications.
The Voltage Evolution in Solar Systems
For years, most residential solar systems operated at 600V or 1000V DC. But here’s the thing—as solar installations grew larger and people like us wanted to power more of our homes (or entire properties), these voltage levels started showing their limitations. I remember talking with Charles about his first large installation, and he mentioned how the wire costs alone were making him reconsider his expansion plans.
That’s when 1500V systems started gaining traction in the DIY community, around 2015-2016. Originally developed for massive commercial solar farms, the technology eventually became accessible to serious home installers. The advantages are pretty compelling: at higher voltages, you can use thinner wires to carry the same amount of power, which means significant savings on copper costs. You can also string more panels together in series, reducing the number of parallel connections and simplifying your system design.
For larger DIY installations—think 10kW and above—1500V systems can cut balance-of-system costs by 10-20% compared to 1000V designs. The reduced current flowing through your wires also means less energy lost as heat, making your system more efficient overall. Of course, with great voltage comes great responsibility for safety, which is exactly why proper combiner boxes designed for 1500V became essential equipment for ambitious DIY solar builders.
Breaking Down the Combiner Box Components
Let me walk you through what’s actually packed inside a 1500V DC combiner box—think of it as the organized control center where your solar strings meet before heading to the inverter.
First up are the fuses or circuit breakers, which are your frontline defenders against electrical problems. I remember Charles explaining this to me using a water pipe analogy: “If too much water flows through a pipe, it bursts. These fuses stop that from happening with electricity.” Each string from your solar array gets its own fuse, typically rated for the string’s maximum current. In larger systems, you might encounter 4 string PV combiner boxes where managing multiple inputs becomes essential.
Next are the terminals and busbars—basically connection points where your wires meet. These create secure, low-resistance connections between your incoming strings and the combined output heading to your inverter. Quality terminals matter because loose connections can create heat and fire hazards.
The enclosure itself deserves attention too. You’ll see ratings like IP65 or NEMA 3R, which tell you how well the box handles dust and water. For outdoor installations, weatherproof ratings aren’t optional—they’re essential for longevity and safety.
Some combiner boxes also include disconnect switches, giving you a safe way to shut down power for maintenance. At 1500V, that manual shutoff capability becomes incredibly important for your safety during system work.
How DC Overcurrent Protection Keeps Your System (And You) Safe
Understanding DC Arc Faults at High Voltage
I learned about DC arcs the hard way during my first high-voltage solar project. I was troubleshooting a connection issue when I accidentally created a tiny gap in the circuit—the resulting arc was blinding and terrifying. That experience taught me why we take arc faults so seriously, especially at 1500V.
Here’s the thing about DC electricity: unlike AC current that naturally crosses zero 120 times per second (giving arcs a chance to extinguish), DC current is constant. When an arc starts in a DC system, it wants to keep going. At 1500V, you’re dealing with significantly higher voltage than the more common 600V or 1000V systems, which means arcs can jump across larger air gaps and sustain themselves more easily.
Think of it like this—if a 600V arc is a candle flame, a 1500V arc is more like a welding torch. These arcs generate temperatures exceeding 10,000 degrees Fahrenheit, hot enough to melt metal components, ignite surrounding materials, and cause serious fires. The higher voltage also means more energy available to sustain the arc, making it incredibly difficult to stop once it starts.
This is where your combiner box becomes a critical safety component. Quality 1500V combiner boxes include specialized arc fault circuit interrupters (AFCIs) that constantly monitor for the electrical signatures of arcing. When detected, these devices can interrupt the circuit in milliseconds—fast enough to prevent the arc from causing damage. The box also provides proper spacing between conductors and uses arc-resistant materials that help contain any potential faults.
DC arc faults at high voltage create dangerous plasma arcs that can exceed 10,000 degrees Fahrenheit, making proper overcurrent protection essential.
Fuses vs. Circuit Breakers: Which Protection Method Works Best?
When I first started building solar systems, I spent way too long agonizing over fuses versus circuit breakers. Here’s what I’ve learned from actual field experience with both.
Fuses are the budget-friendly choice. They’re simple, reliable, and perfect if you’re working with a tight budget. A good quality DC-rated fuse might cost you $5-15, while a comparable circuit breaker runs $30-80. For a basic setup with 4-6 strings, that difference adds up quickly. The downside? Once a fuse blows, you need to replace it. I keep spares in my garage because there’s nothing worse than having your system down while waiting for a replacement to arrive.
Circuit breakers are the convenience option. They cost more upfront, but you can simply flip them back on after a fault clears. No climbing on the roof with replacement parts. For systems you’ll be monitoring regularly or where accessibility matters, breakers make life easier. I switched to breakers on my main array after the third time I had to diagnose a problem with blown fuses.
Here’s my practical recommendation: use fuses for string-level protection inside your combiner box where they’re less likely to trip frequently. Save circuit breakers for the main disconnect where you might need to reset them for maintenance or troubleshooting. This hybrid approach balances cost with convenience.
One crucial note regardless of which you choose: always use DC-rated protection devices. AC-rated fuses and breakers can’t safely interrupt DC current at 1500V. That’s a safety issue you absolutely cannot compromise on, even if DC-rated components cost slightly more.
When Your DIY Solar Project Actually Needs a 1500V Combiner Box
Calculating Your System Voltage (The Easy Way)
Here’s the truth: figuring out your system voltage doesn’t require an engineering degree. I remember Charles helping a neighbor who was convinced he needed to hire an electrician just for this calculation. Turns out, it’s pretty straightforward once you know the steps.
Start with your solar panel’s open-circuit voltage (Voc), which you’ll find on the spec sheet or the back of the panel itself. This is the maximum voltage your panel produces when not connected to anything. Here’s the catch though: cold temperatures actually increase voltage output. On a freezing morning, your panels can produce 15-20% more voltage than the rating suggests.
To calculate your true maximum voltage, multiply your panel’s Voc by the temperature coefficient (also on the spec sheet), then factor in your location’s coldest recorded temperature. For example, if you’re wiring panels in series or parallel configurations, and connecting three 400-watt panels with 48V Voc each in series, that’s 144V at standard temperature. But on a cold winter day, it might spike to 165V or higher.
The good news? Most solar equipment manufacturers offer free online calculators that do this math for you. Just plug in your panel specs and location, and the calculator handles the temperature adjustments automatically. This ensures you stay safely under that 1500V threshold while maximizing your string length for efficiency.
Common DIY Scenarios: 600V vs. 1000V vs. 1500V
Let me share how I’ve seen different voltage classes work in real-world scenarios. For a simple shed or RV setup with maybe two or three 300-watt panels, a 600V system is your sweet spot. I helped my neighbor Charles wire up his workshop last spring, and we stayed with 600V components because it kept everything affordable and straightforward. The combiner box was basic, the wire sizing was manageable, and we had no trouble finding compatible equipment at the local supply store.
When you’re looking at a typical residential rooftop with 15-20 panels, that’s where 1000V systems shine. You get better efficiency with longer string lengths, which means fewer home runs back to your inverter and less complex wiring. This is the territory most homeowners find themselves in when going solar.
Now, 1500V systems are where serious DIYers graduate to when tackling larger projects. Think whole-house off-grid systems, small farms, or community installations. The upfront learning curve is steeper, but the payoff comes from reduced cable costs and improved system efficiency over larger distances. I’ve watched several community solar projects make the jump to 1500V and never look back, though they definitely needed extra attention to safety protocols and proper component selection.
Choosing the Right 1500V Combiner Box for Your Setup
Must-Have Features vs. Nice-to-Haves
When I was building my first 1500V system, I learned quickly that not all features are created equal. Let me break down what you absolutely need versus what’s simply nice to add.
Essential features start with proper voltage and current ratings—this is non-negotiable. Your combiner box must handle 1500V DC and match your string current output. Look for listed overcurrent protection devices like fuses or breakers rated for DC applications. I once saw someone use AC-rated components in a DC system, and that’s a recipe for disaster. You also need weatherproof enclosures rated at least NEMA 3R for outdoor installations, plus clear labeling and grounding provisions for safety.
Nice-to-have features include monitoring capabilities that let you track each string’s performance. While not essential for basic operation, these can help you spot problems early. Disconnects with visible blade positions offer extra peace of mind during maintenance. Tool-free terminal blocks speed up installation but aren’t mandatory if you’re comfortable with standard wiring methods.
Here’s my rule: invest in safety-critical components like proper overcurrent protection and quality enclosures. Save money on convenience features like monitoring if budget is tight—you can always add those later. The goal is protecting your system and yourself first, optimization second.
Reading the Spec Sheet Without Losing Your Mind
I remember the first time I tried reading a combiner box spec sheet—it felt like deciphering ancient hieroglyphics! But here’s the secret: manufacturers organize these sheets pretty consistently, and once you know what to look for, it becomes much easier.
Start with the voltage rating. You’ll see “1500V DC” prominently displayed, which tells you the maximum voltage the box can safely handle. This is your upper limit, not your target. Your actual system voltage should be comfortably below this number to leave safety margin.
Next, check the current rating, usually listed as “maximum input current per string” and “total output current.” Think of these like water pipes—each string input is a smaller pipe feeding into one larger output pipe. If your spec sheet says 15A per string with 8 inputs, that’s your capacity per connection.
The “number of inputs” seems straightforward, but here’s a pro tip from my own experience: don’t max out every single input just because they’re there. I learned this the hard way when I needed to add panels later and had no spare connections!
Look for the IP rating, which indicates weatherproofing. IP65 or higher means your box can handle outdoor conditions. Anything less, and you’ll want additional protection.
Finally, check the breaker or fuse ratings listed. These should match your string specifications—this is your overcurrent protection doing its job. Don’t assume you can swap in different rated breakers without consequences.
Installing Your 1500V Combiner Box: The Critical Steps
Location, Location, Location: Where to Mount Your Combiner Box
Choosing the right spot for your 1500V DC combiner box might seem straightforward, but trust me, I learned this lesson the hard way during my first installation. I mounted mine too close to the ground, and after one rainy season, I was dealing with unnecessary moisture issues that could have been avoided with better planning.
First, think about accessibility. You’ll need to reach this box for maintenance, inspections, and potential troubleshooting. Mount it at a comfortable working height, typically between chest and eye level, where you can safely open the enclosure without a ladder. However, keep it out of daily foot traffic areas to prevent accidental bumps or tampering.
Weather protection is crucial for longevity. While these boxes are designed for outdoor use, avoid spots with direct water runoff, standing water, or excessive sun exposure that could degrade seals over time. A shaded area under an eave works wonderfully, or consider adding a small rain shield above the unit.
Distance matters too. Position your combiner box as close as practical to your string arrays to minimize voltage drop, but ensure it meets all code compliance requirements for clearances from windows, vents, and other building features. Most codes require specific distances from these elements for safety reasons. Always check your local regulations before drilling that first hole.
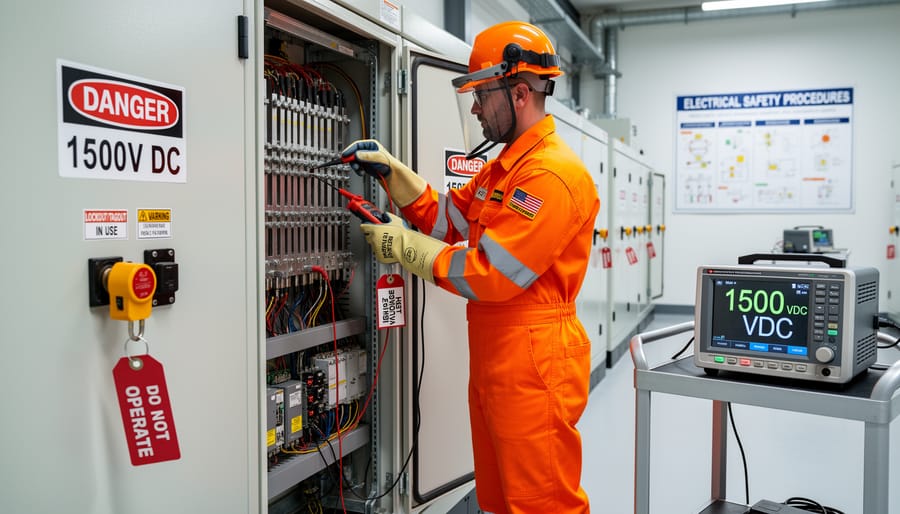
Proper testing procedures with appropriate safety equipment are critical when working with 1500V DC systems.
Wiring Connections That Won’t Come Back to Haunt You
I learned this lesson the hard way during my first major installation—loose connections at 1500V aren’t just annoying, they’re genuinely dangerous. Let me walk you through the process that’s kept my systems running flawlessly ever since.
Start by studying combiner box wiring diagrams specific to your model before touching a single wire. Trust me, five minutes of review saves hours of troubleshooting.
Strip your wire insulation precisely to manufacturer specifications—typically 10-12mm. Too much exposed copper creates arc risk, too little prevents solid contact. Use quality wire strippers, not your teeth or a pocket knife (yes, I’ve seen both attempted).
Here’s where torque matters tremendously. Each terminal has a specific torque specification, usually between 7-15 inch-pounds for smaller terminals. Invest in a proper torque screwdriver—they’re about thirty dollars and worth every penny. Under-tightened connections create resistance and heat; over-tightened ones crack terminals or strip threads.
For polarity management, I use a simple color-coding system: red heat-shrink for positive, black for negative, even when wiring is already color-coded. Double-checking never hurts at this voltage level. Before making final connections, verify polarity with a multimeter on every string.
Always use proper solar connectors rated for 1500V. Generic connectors aren’t worth the savings.
Finally, label everything clearly. Your future self will thank you during maintenance or troubleshooting sessions.
The Safety Checks You Can’t Skip
Before flipping that switch, let’s talk about the safety checks that could save your equipment and maybe even your life. I learned this the hard way during my first major installation when I got a bit too eager and nearly created some very expensive fireworks.
Start with a simple visual inspection. Look for loose connections, exposed wire, or anything that just doesn’t look right. Trust your gut here. Next, grab a multimeter and verify polarity at every connection point. Reversing positive and negative on a 1500V system isn’t just embarrassing, it’s dangerous.
Test your overcurrent protection devices with a continuity check before energizing. Make sure fuses are properly rated and circuit breakers actually trip when they should. I always create a simple checklist and physically mark off each test as I complete it.
Finally, do a megger test to check insulation resistance between conductors and ground. This reveals problems you can’t see with your eyes. Only after everything checks out should you energize the system gradually, monitoring voltage at each stage. Taking these 30 minutes of testing seriously prevents hours of troubleshooting later, and keeps everyone safe.
Troubleshooting and Maintenance Tips for Long-Term Reliability
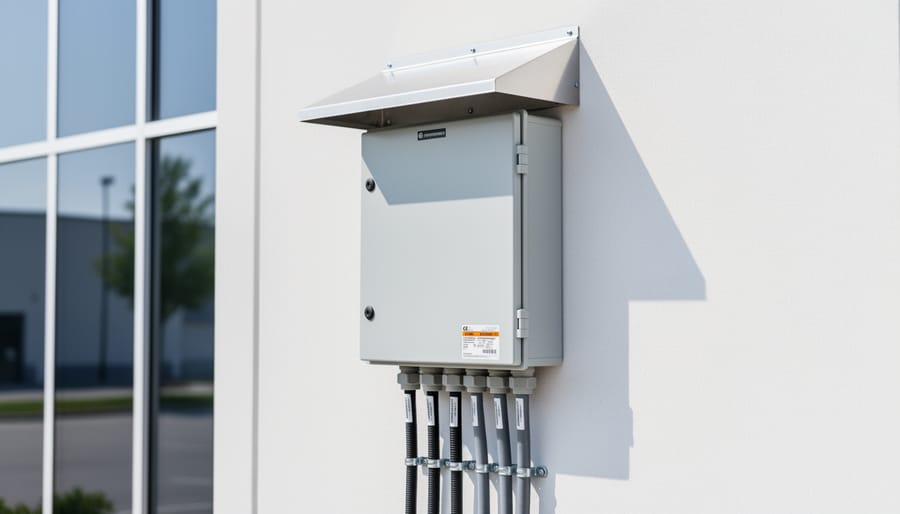
A well-maintained combiner box installation demonstrates proper mounting location and weather protection for long-term reliability.
When to Call a Professional (And When You Can Handle It)
Here’s where I need to be completely straight with you: 1500V DC systems aren’t typical DIY territory. I learned this the hard way when consulting on a friend’s installation—the potential consequences of mistakes at this voltage level are severe.
You can absolutely handle the planning, component selection, and simple visual inspections yourself. Understanding how your system works empowers better maintenance decisions. However, the actual wiring, connection work, and initial energization should involve a licensed electrician with solar experience. This isn’t about doubting your abilities—it’s about safety margins.
High-voltage DC behaves differently than household AC. Arc faults can sustain themselves, and there’s no “zero crossing” like AC to help extinguish them. Professional installers carry specialized tools, insurance, and experience managing these risks.
Think of it this way: research and plan your system thoroughly, then bring in a professional for the dangerous bits. You’ll save money on the front end while ensuring your family’s safety. Many jurisdictions require permitted work anyway, so partnering with a pro often streamlines inspections and interconnection approvals.
Choosing the right 1500V DC combiner box isn’t just about checking boxes on a spec sheet—it’s about protecting your investment and keeping your solar system running safely for decades to come. I’ve seen firsthand how a quality combiner box makes troubleshooting easier and gives you peace of mind knowing your system has proper overcurrent protection where it matters most.
As you move forward with your solar project, take time to evaluate your specific needs. Consider your string configuration, environmental conditions, and future expansion plans. Don’t hesitate to reach out to fellow DIYers in solar forums or community groups—I’ve learned some of my best installation tricks from other enthusiasts who’ve been in the trenches.
Ready to take the next step? Double-check your calculations, review local electrical codes, and if you’re feeling uncertain about any aspect of the installation, consulting with a licensed electrician is always money well spent. Your solar journey is a marathon, not a sprint, and getting the foundation right with proper component selection sets you up for years of clean, reliable energy. Share your experiences and questions in the comments below—we’re all learning together in this solar community.
How useful was this post?
Click on a star to rate it!
Average rating 0 / 5. Vote count: 0
No votes so far! Be the first to rate this post.
We are sorry that this post was not useful for you!
Let us improve this post!
Tell us how we can improve this post?
charlesnoble
Here at Spheral Solar, I’m a hands-on solar power enthusiast, constantly exploring and experimenting with DIY solutions. I’m dedicated to sharing my discoveries, insights, and even the bumps I hit along the way, all in the pursuit of a more sustainable future.
Why Your Solar Panel’s J-Box Matters More Than You Think by Charlesnoble January 8, 2026 Flip over any solar panel and you’ll spot a small weatherproof box attached to the back—that’s the junction box, or j-box, and it’s the critical gateway between your panel’s delicate solar cells and your entire electrical system. Understanding this component isn’t just technical curiosity; it’s essential for anyone wiring their…
Why Your DIY Solar System Needs a 4 String PV… by Charlesnoble January 27, 2026 Connect your solar panel strings to a single positive and negative output cable using a 4 string PV combiner box—the essential junction point that safely consolidates power from four separate string circuits before feeding your charge controller or inverter. This weatherproof enclosure houses individual fuses or circuit breakers for each…
Solar Combiner Box Wiring Diagram: Essential… by Paul June 8, 2021 If you have a solar combiner box with a confusing or missing wiring diagram, you’ll have to find a better example, seek advice on deciphering it, or even draw one up yourself. We can help you do this by describing the different types of diagrams you may encounter and how…
Why Your Solar Array Needs Branch Connectors (And… by Charlesnoble May 26, 2026 Picture this: you’ve just installed your third solar panel on the roof, wires dangling everywhere, and suddenly you realize your two-panel string needs to connect with your new addition. You need a solar branch connector, but you’re staring at product listings wondering if you’re about to make an expensive mistake.…
Why 2-Wire RS485 Is the Smartest Choice for Your DIY… by Charlesnoble March 31, 2026 Check your solar inverter’s communication ports right now – if you see two screw terminals labeled A and B (or D+ and D-), you’re looking at 2-wire RS485, the most common communication protocol in DIY solar monitoring setups. This simple two-wire system lets your solar equipment talk to monitoring devices,…
Why Your RV Solar Panels Aren’t Charging (And How to… by Charlesnoble November 30, 2025 Check your multimeter readings at each connection point along your solar charging path—from panels to charge controller to battery—to pinpoint exactly where voltage disappears. Most RV solar systems lose 10-30% of their potential power to voltage drop, but this invisible thief often goes undetected until you systematically measure and compare…
Subscribe for handpicked DIY projects, exclusive tips, and giveaways.
A portable power station will typically run your camping devices for anywhere from a few hours to several days on a single charge, depending on what you’re powering and the station’s capacity. As for lifespan, most quality units last between 3 to 10 years before the battery degrades enough to need replacement. The distinction matters… Read more: Your Portable Power Station Won’t Last as Long as You Think (Here’s Why)
A J1772 solar charger combines a standard J1772 charging connector (the same Type 1 plug used by most North American EVs and electric bikes) with solar panels and battery components to create an off-grid or grid-supplemented charging system. You’ll need three core elements: solar panels (typically 400-800 watts for practical ebike charging), a battery storage… Read more: How to Choose a J1772 Solar Charger for Your Ebike: A Buying Guide
Installing a whole house ventilation system powered by solar takes about 6 to 8 hours for a moderately skilled DIYer and delivers continuous fresh air circulation without touching your electric bill. The core method involves mounting a solar panel on your roof to power an intake or exhaust fan, routing ductwork through your attic or… Read more: How to Install a Whole House Ventilation System Using Solar Power


")

")

")

")

")

")


