DIY Solar Pool Heater – Beginner’s Guide With Diagrams
Updated:

Although you may think it’s a tall order, you can build a DIY solar pool heater using irrigation tubing and fittings, framing lumber, and basic tools and expertise, all in a weekend or less.
And that’s not an exaggeration. You can build a functional and efficient solar pool heater using Home Depot class hardware and common DIY hand and power tools. In terms of complexity, the average solar pool heater is also well within the abilities of the average DIY weekend warrior.
Today, we’ll look at the most common types of DIY solar pool heaters in action.
How Does a DIY Solar Pool Heater Work?
Solar pool heaters use an abundant, free, and natural energy source to heat water and circulate it through your pool — sunlight.
No matter which design or type of DIY solar pool heater you choose, they all work on a similar principle. Coldwater is pumped from the swimming pool through a system of pipes or channels known as collectors that are exposed to sunlight and heated by solar radiation.
The hot water is then returned to the pool, gradually raising the whole body of water temperature. The process may not be as quick as a system using electric or gas heaters, but it’s green and free!
Here is an example of the basics of DIY solar pool heaters.
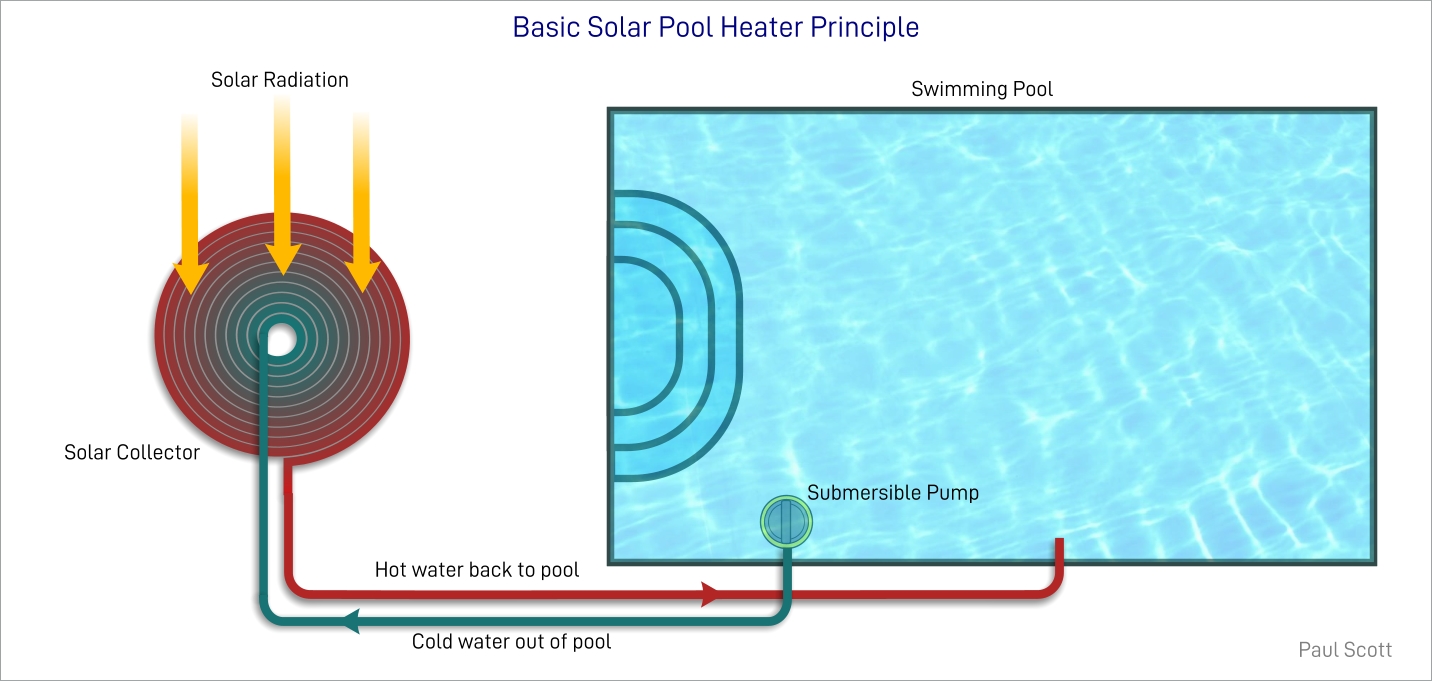
Many folks new to solar water heating are surprised at how hot the water can get in a solar heater. If your collector is well-designed, built, and exposed to sufficient sunlight, you’ll get steam out of the hot water line even on a warm day. The water can boil in a well-built DIY solar pool heating system.
This is done in many ways, from simple open-channel heaters to large and complex solar collector systems. Some systems rely on the pool pump to circulate the water through the heater, while others utilize a dedicated submersible pool pump.
However, all options share the same physics alchemy to raise the pool temperature so that a dip is no longer a religious experience.
Note: An interesting fact about DIY pool heater projects! Experiments have proved that homemade solar pool heater projects deliver between 77% and 80% efficiency figures. That is what you can expect from a commercial pool heater, so you won’t sacrifice performance by rolling your own solar pool heater.
How to Make DIY Solar Pool Heater in 7 Steps
We’ll now look at how to construct and install a coiled tube solar pool heater. Although the process is fairly simple, some woodworking skills are required. We’ll assume you have those skills, basic woodworking power, and hand tools.
We will also detail the construction of a moderately sized, single-coil collector. In reality, most folks would choose to use a couple connected in series. Once you have one nailed, putting additional units together would be routine.
Important Notes for the DIY Solar Pool Project
The sizing and design of this example are based on a couple of standards that fit together well and make for convenient construction.
- The standard ½ inch plywood sheet size is 4′ x 8′. You can get two separate 4′ x 4′ boxes or a full sheet box divided into two 4′ x 4′ partitions.
- A 4′ x 4′ box accommodates approximately 220 feet of ½ inch PVC or PEX tubing. One of the common tube roll sizes is 250 feet, which is convenient if you want to construct a single box. The other common roll size is 500 feet, which works well for a double box.
- The 2 x 4 framing timber is a good size choice for the box walls because 4″ gives you enough side height to accommodate the tube roll and braces. At the same time, it’s not too roomy and creates an ideal thermal space.
What You Need
- 1 or 2, 250 -foot rolls of ½ inch PVC drip irrigation or PEX tubing
- ½ inch compression fittings for irrigation tubing
- ½ inch drip tubing ball valve
- 1 x 4′ x 8′ sheet of ½ inch plywood
- 5 x 10′ lengths of 2″ x 4″ framing timber
- 1 x roll of foil-faced insulating foam
- 1 x quart tin of Rust-Oleum high heat black paint
- 2 x 12 oz cans of Rust-Oleum high heat black spray paint
- 1 x sheets of 0.08″ x 48″ x 48″ clear acrylic sheet (if you can’t find 48 x 48, 2 sheets of 24 x 48 will do)
- 2 tubes of silicone sealer and applicator
- Battery or power drill
- Set of drill bits
- Zip ties
- An assortment of countersunk wood screws
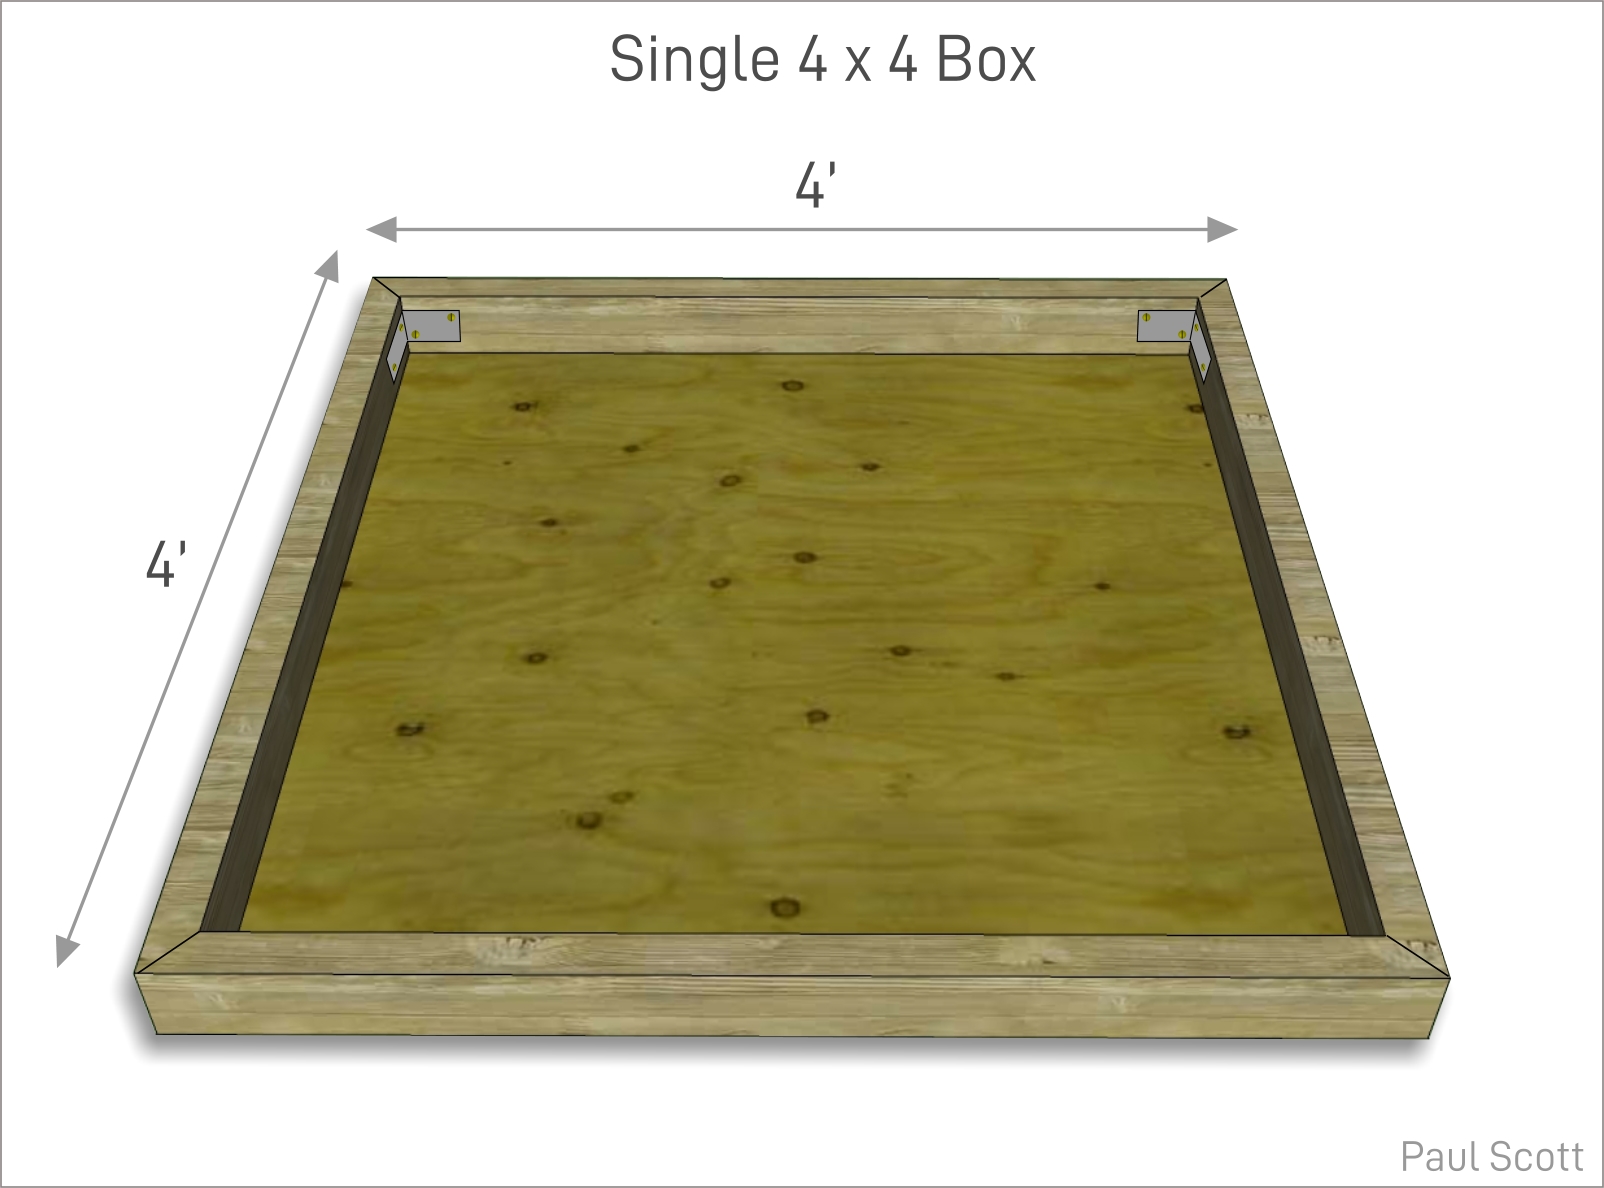
1. Building a Single Box
- Cut the plywood sheet into two 4′ x 4′ squares to get a single box set up.
- Then, cut 4 pieces of framing timber 4′ in length with 45º miter corners.
- Arrange the framing timbers in a box shape on a flat surface.
- Mark, drill, and attach a corner brace plate inside each corner of the box or frame with wood screws.
- Now, run a bead of wood glue along the top edges of the frame.
- Place one of the 4 x 4 sheets of plywood on top of the box, ensuring it perfectly fits the frame.
- Drill pilot holes at regular intervals through the plywood and into the frame.
- Insert wood screws and tighten the plywood sheet down firmly onto the frame.
Now turn the box over, and you’ll have something like this.
2. Painting and Insulating the Box
At this point, you can run silicon sealer around all the joints in the bottom and sides of the box. When the sealer has cured, paint the box inside and out with the high-heat black paint.
Why do we do this: All solar water heaters rely on absorbing the maximum amount of solar energy for efficiency. Black doesn’t reflect sunlight, so painting the box in that color ensures anything in the box will absorb as much heat as possible. Sealing the box also prevents heat loss from the interior space.
When the paint is dry, you can cut the insulating foam to size and use wood glue to stick it down firmly in the bottom of the box. This ensures no heat is lost from the tubing through direct contact with the back of the box. This is what you’ll end up with.

3. Laying Out the Tubing
This is undoubtedly the most challenging and time-consuming part of setting up this DIY solar pool heater. Coil the rolls of tubing tight and high, and you’ll have to go at it systematically if you want to get a flat, single-layer layout.
There’s no real magic wand method of doing this, and you’ll have to plod away until you have spread the whole roll out flat. Just try as far as possible to avoid kinking the pipe.
A box this size won’t take a full 250-foot roll of tubing, and you’ll have to trim around 30 feet off to leave enough space in the center of the roll. This is approximately the relationship between the outside and inside diameter of the coil you need to be aiming for.

When you lay the tube out flat, you can feed the inside end under the coil and trim both ends to leave yourself with a layout similar to the illustration below.
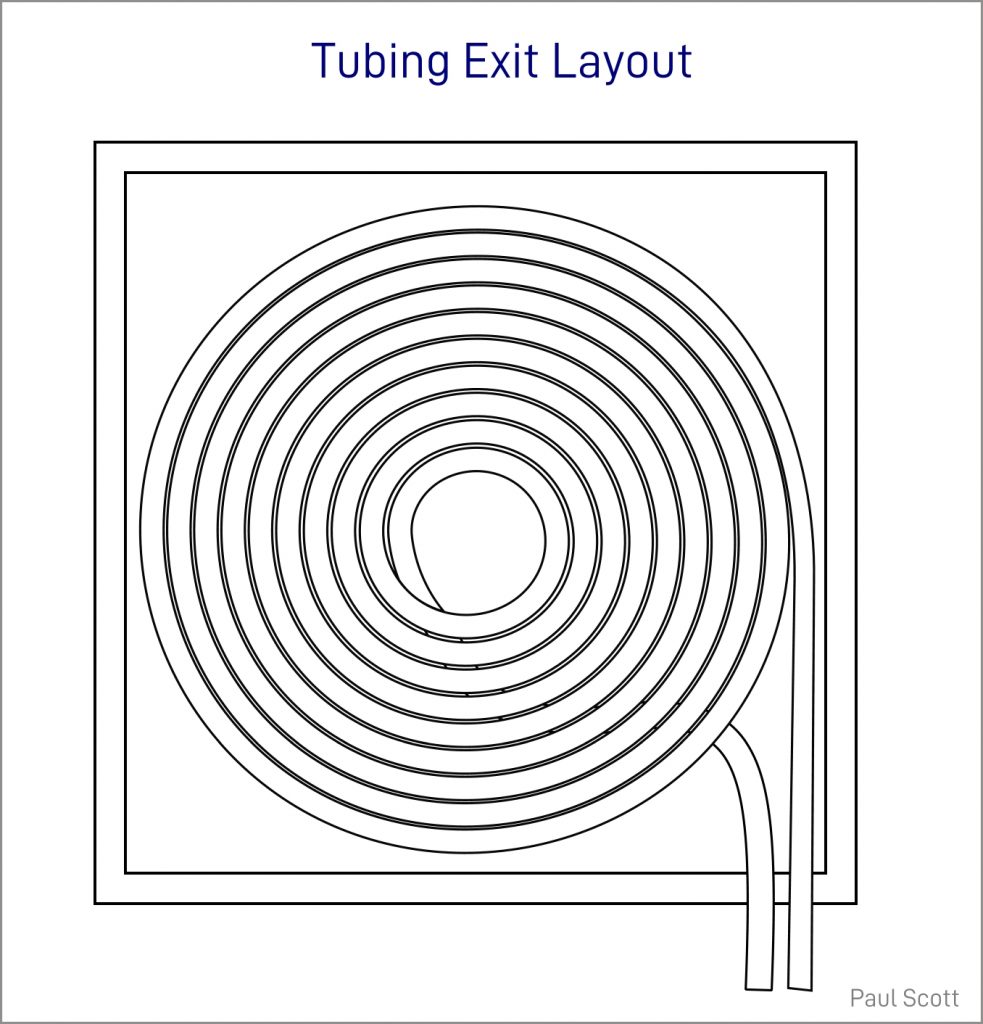
Now, you can use zip ties to keep the roll together and flat. Lay the tube roll back in position and mark out cut-out channels in the foam insulation sheet as indicated by the dashed red lines below.
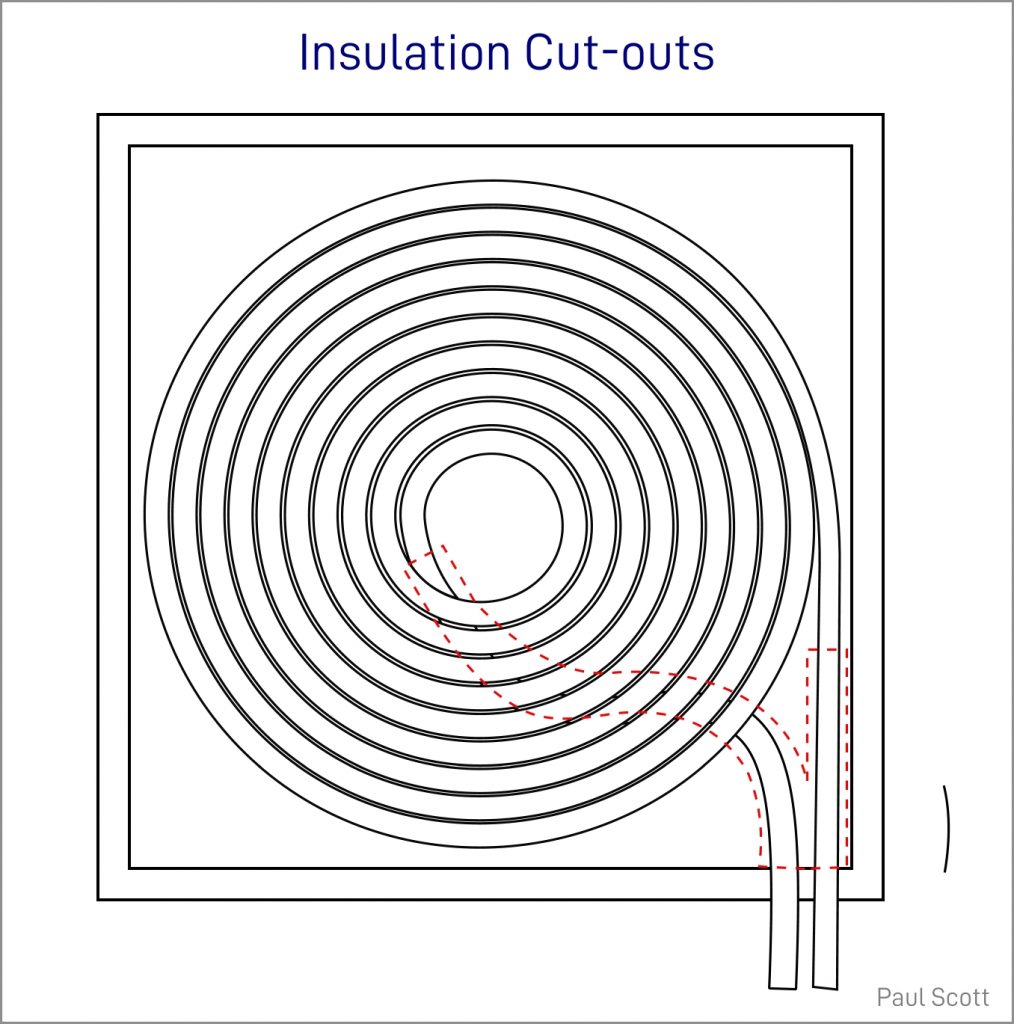
This step will allow the tube roll to lie flat on the insulating sheet when the tubing is brought through the box for connection. That way, you will still have enough space to install the braces to keep the roll secure.
Important Note
If you have opted to use black PVC drip irrigation tubing, you’ll be ready to terminate the collector and close the box. On the other hand, if you are using red PEX tubing, there is one more step you need to complete.
If your collector comprises PEX tubing, take the trimmed and zip-tied roll out of the box and reach for the black spray paint. Spray all exposed surfaces of the PEX tube roll with at least two coats of high-heat matt black spray paint. Let each coat dry thoroughly before re-spraying.
Try to make sure that you cover all red areas of the tubing before proceeding. There is an excellent reason for doing this; you will examine this step’s importance later.
4. Terminating the Collector
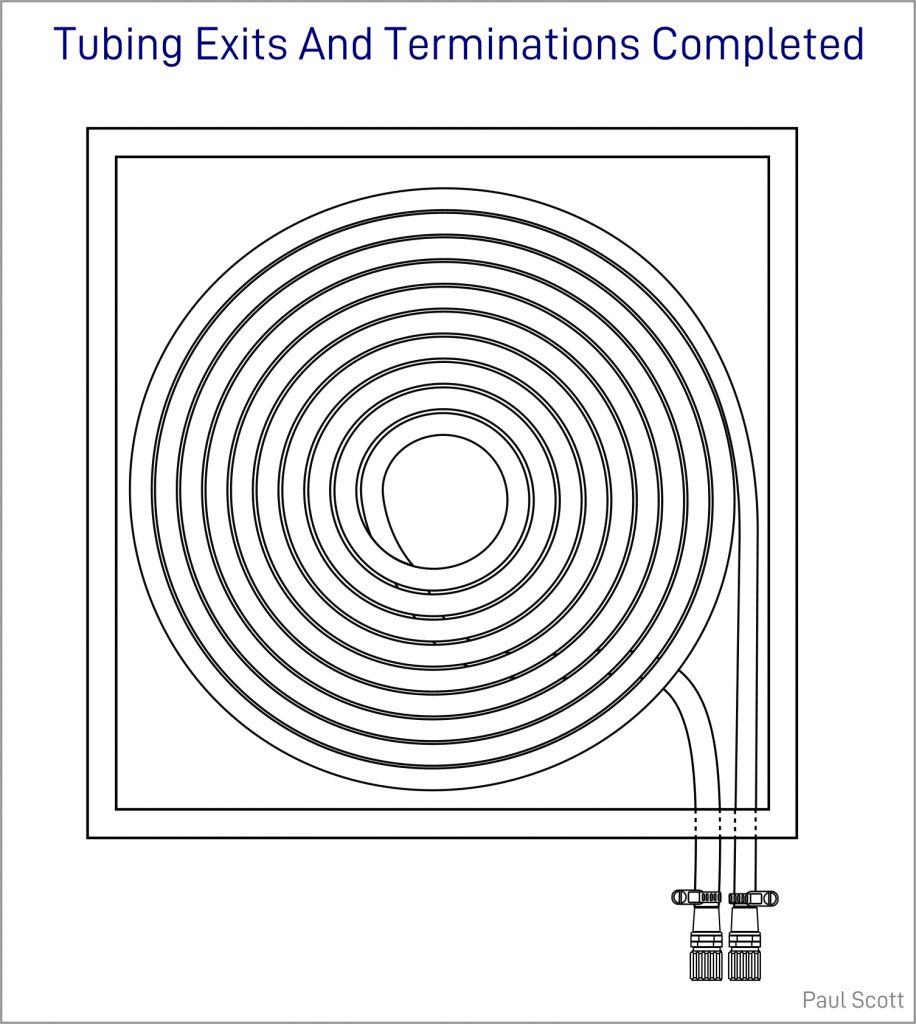
Once you have cut the relief slots in the insulation sheet, place the collector roll in its final position and mark the exit points for the two ends of the roll. Remove the roll and drill two suitably sized holes for the tube ends to exit the box.
Now replace the roll feeding the two tube ends through the holes. You can terminate the tube ends now with suitable fittings ready for connection to the water circuit. This should leave you with this result.
5. Bracing the Collector
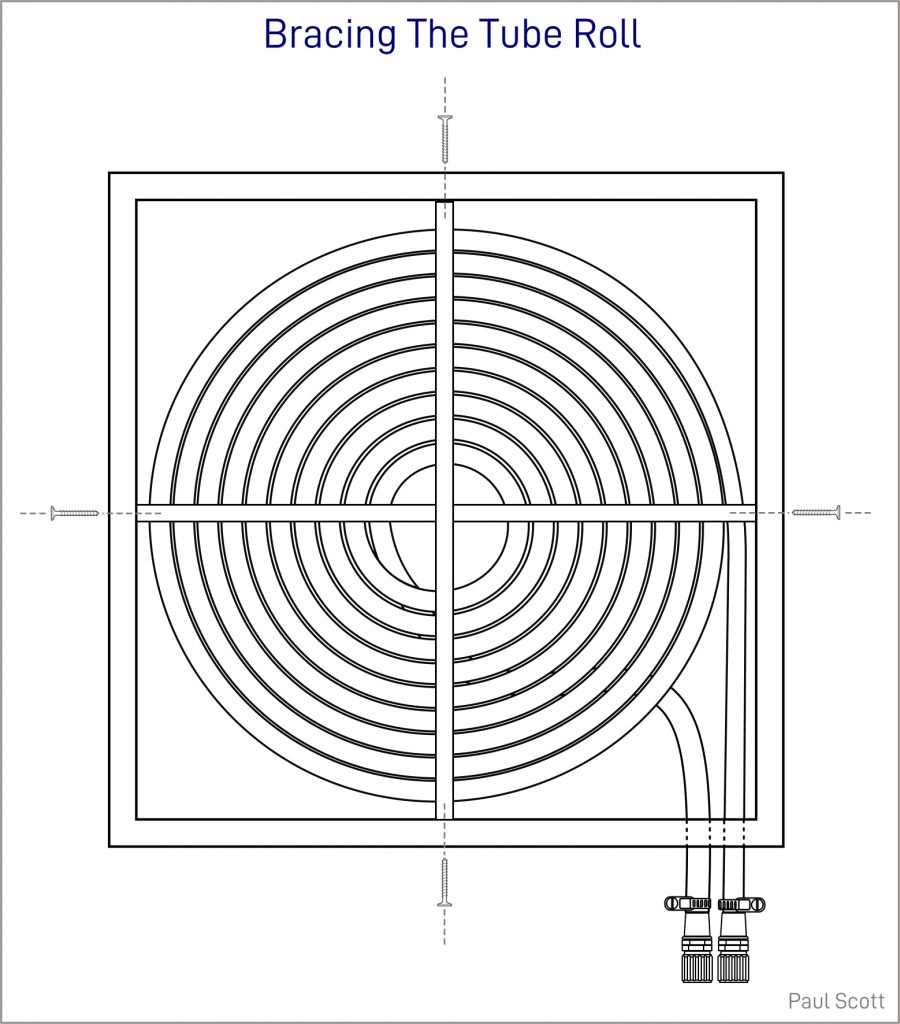
You will likely have to place at least one brace across the collector coil to keep it secure in the box. You will not have much room between the roll’s top surface and the framing’s top edge. So, some experimentation and sawdust generation will be called for.
The easiest way to get this done is to cut two thin 4′ braces to a suitable thickness and install them in a cross formation across the tube roll. When installing the braces, make sure they press firmly against the tube without deforming it and that the brace members are below the frame’s top level.
The bracing will secure the tube roll and support the clear sheet cover when fitted. And, if you can’t find 4′ x 4′ acrylic sheets, the bracing across the center of the box will make joining two 2′ x 4′ sheets easier.
This is what that would look like.
Note:
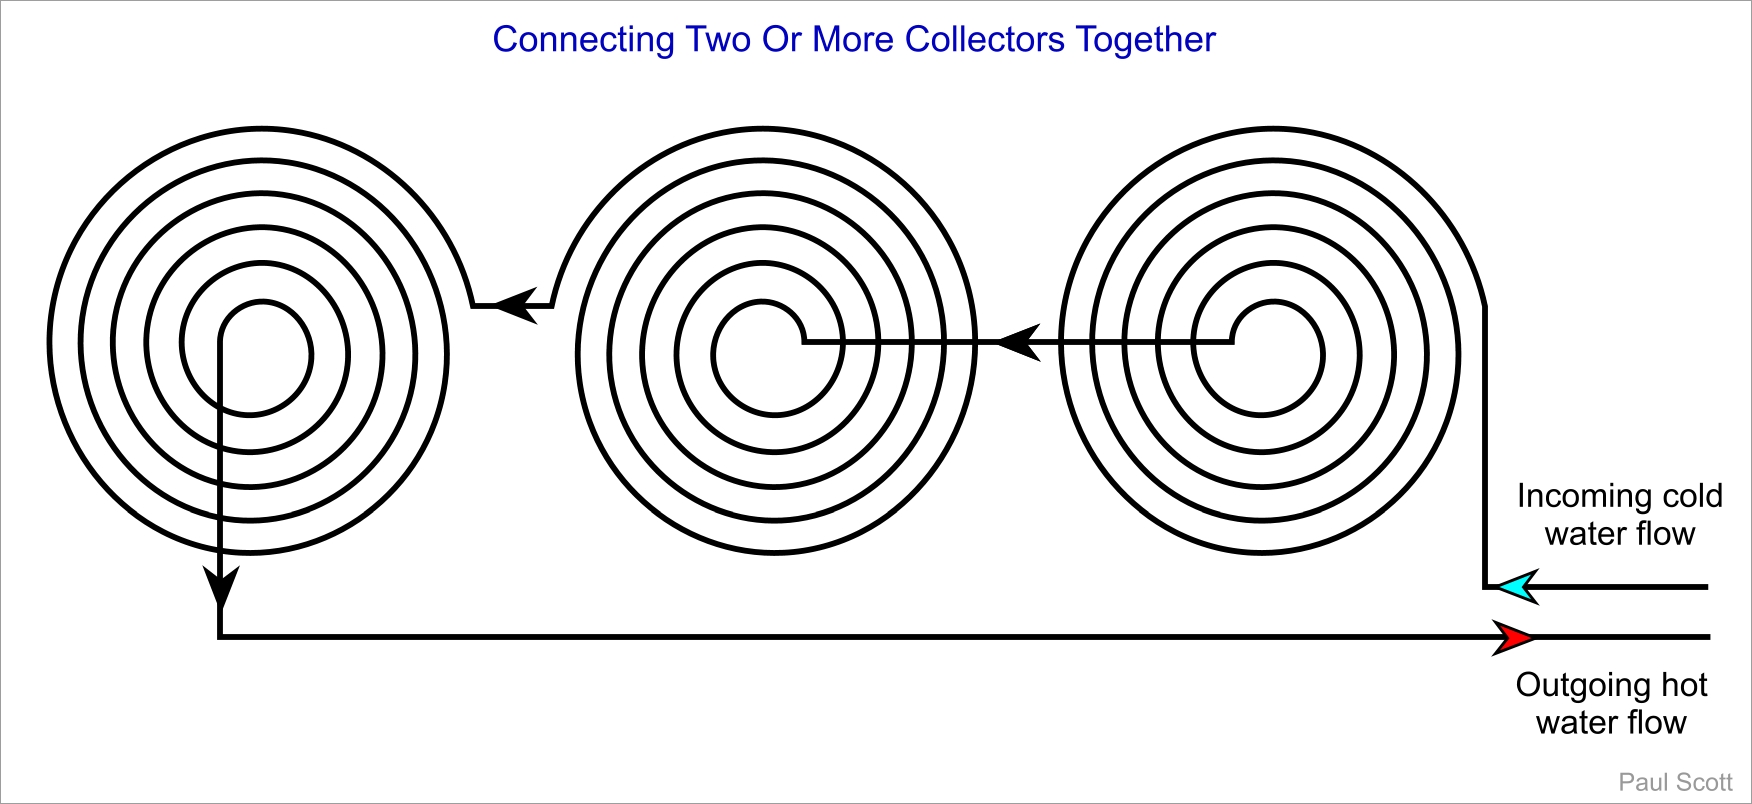
If you want to use multiple collectors, here’s a diagram connecting two or more rolls. In electrical terms, this would be a series connection.
6. Closing Up the Box
To complete the collector box construction, you must cover it with a clear polycarbonate or acrylic sheet. This keeps dust, debris, and bugs out of the box and ensures a good seal against heat loss. Some DIY solar heater designs use black polycarbonate sheets. However, we feel a clear sheet serves the sealing purpose while allowing the maximum sunlight to reach the tubes.
To do this, place the pre-cut clear sheet on the box, lining up all the edges. Then, drill pilot holes around the sheet into the top of the frame. Remove the sheet, run a bead of silicone sealer around the frame, replace it, and screw it down securely.
7. Completing the Installation
All that remains is to give the whole pool heater setup a once-over. Then, check that all gaps and the pipe exits are correctly sealed. Then, you can connect the DIY solar pool heater to the pool pump output and return lines to the swimming pool water circuit. How this is done will depend on your specific solar heater setup, so it’s not feasible to go into too much detail here.
One important note, though:
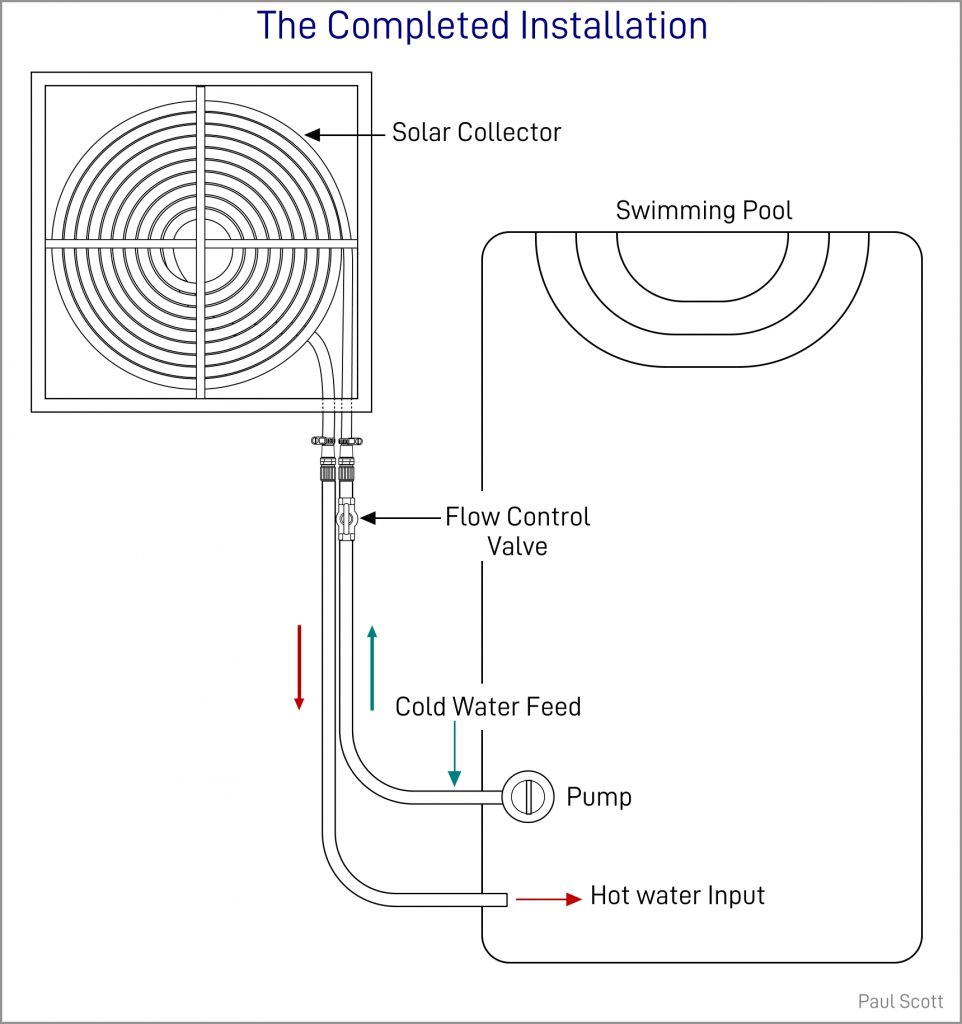
The input hose from the pump MUST be fitted with an inline spigot or valve to control the flow from the pump to the collector. This is going to be important when setting the solar pool heater up for maximum efficiency. See detail below.
Typically, the completed solar pool heater setup would look something like this.
Snag List and Flow Control
Once the entire system is connected and running, the first order of business is to check all connection points for leaks. This type of DIY pool heater keeps all connections outside the box. So, this is relatively easy to do.
If you are satisfied that your system is leak-free, you can start tweaking the flow rate to get the best results.
Controlling the Flow
All solar pool heaters have a well-defined performance curve that depends on the amount of solar radiation the collector receives versus the water flow the pool pump delivers.
Anyone who has used an instantaneous water heater will know that the output depends on how wide you open the water flow for any given heat setting. The same principle applies here to your solar heater.
The collector or group has a maximum efficiency threshold based on heat absorption related to water volume. If you increase the incoming pool water volume too much, you upset the balance. And the output temperature flattens out and eventually drops.
This is why including a flow control valve in the cold water input to the collector is important. It allows you to adjust the water flow through the collector to get the optimal flow rate. Again, there are no magic formulas here – it’s all trial and error-experimentation.
Note: Although it can be costly, one extra measure to improve the thermal efficiency of your heater and pool water is to install a good pool cover. They keep dirt out of the pool water and trap heat, making it easier to maintain comfortable water temperatures.
PVC Tubing Versus PEX for Solar Pool Heater Projects
We’ve made a couple of references to using conventional drip irrigation and PEX tubing for solar heater installations. Let’s consider the issues surrounding using PEX tubing in more detail here.
PEX, or crosslinked polyethylene tubing, is extensively used for indoor open plumbing in homes. It has some characteristics that lend and limit its use to solar pool heater installations.
Pros
- PEX tubing is far more robust and flexible than PVC drip tubing. It is a lot less inclined to kink and is easier to arrange in complex or tight patterns
- .It is easier to terminate effectively. Because it is predominantly used in plumbing applications, more effective fitting options are available for PEX tubing. Making it easier to install and troubleshoot your homemade solar pool heater installation.
- Red PEX tubing is rated for temperature ceilings far over those in a DIY solar pool heater circuit.
- Pex tubing is way less prone to damage in freezing conditions due to its robust flexibility making it ideal for solar heater projects in areas with very cold winters.
Cons
- PEX tubing is more expensive than drip irrigation tubing. However, this is not a big issue with homemade solar pool heater projects if you consider the pros.
- Pex tubing is not UV stable and degrades very quickly when exposed to sunlight. This may sound like a huge no-brainer killer for SOLAR pool heaters, but there is a caveat. If PEX tubing is coated with paint, this problem disappears. So, as mentioned in the paragraphs above, if you paint your PEX tubing with black high-heat paint, there are almost zero UV degradation issues.
- Contamination risks. Pex tubing can cause contamination of water supplies where incorrectly graded tubing is used. However, unless you plan on drinking the water from your solar pool heater system, this is purely academic.
Off-the-Shelf Alternatives for Building a Solar DIY Pool Heater for in-Ground and Above Ground Pool Types
For the most part, a DIY pool heater is generally understood as an end-to-end solution with all parts being hand-built. There are, however, other choices that include store-bought components integrated into homemade solar pool heater projects.
The solar collector is the most commonly used component in this case. Here are two off-the-shelf collectors that DIY enthusiasts use to build their own solar pool heater projects.
Dome Type Solar Collectors
Solar dome collectors consist of a ready-built spiral tube stack housed in a clear polycarbonate dome. They are easily integrated into DIY solar pool heater systems and produce good outputs.
Solar Collector Mats
Solar pool heater mats are equally efficient collector options and mimic the vertical riser types mentioned above. You can easily add them to DIY pool heater projects while cutting down on the amount of leg-work required to complete these projects.
4 Common DIY Solar Pool Heater Systems
1. Open Collector Solar Pool Water Heaters
Among the most basic and simple DIY solar pool heater designs, the open collector heater depends on an open water flow over an exposed surface. Also known as a trickle sheet collector, it uses a custom profiled sheet to channel cold water from a cold water manifold to a heated water collector, where it is sent back to the pool.
While the water flows over the sheet, sunlight heats it, bringing its temperature above the incoming pool water. Although deceptively simple, open collector systems are surprisingly effective, with 10-degree increases in the water temperature across the collector being quite realistic.
Here is an example of this system.
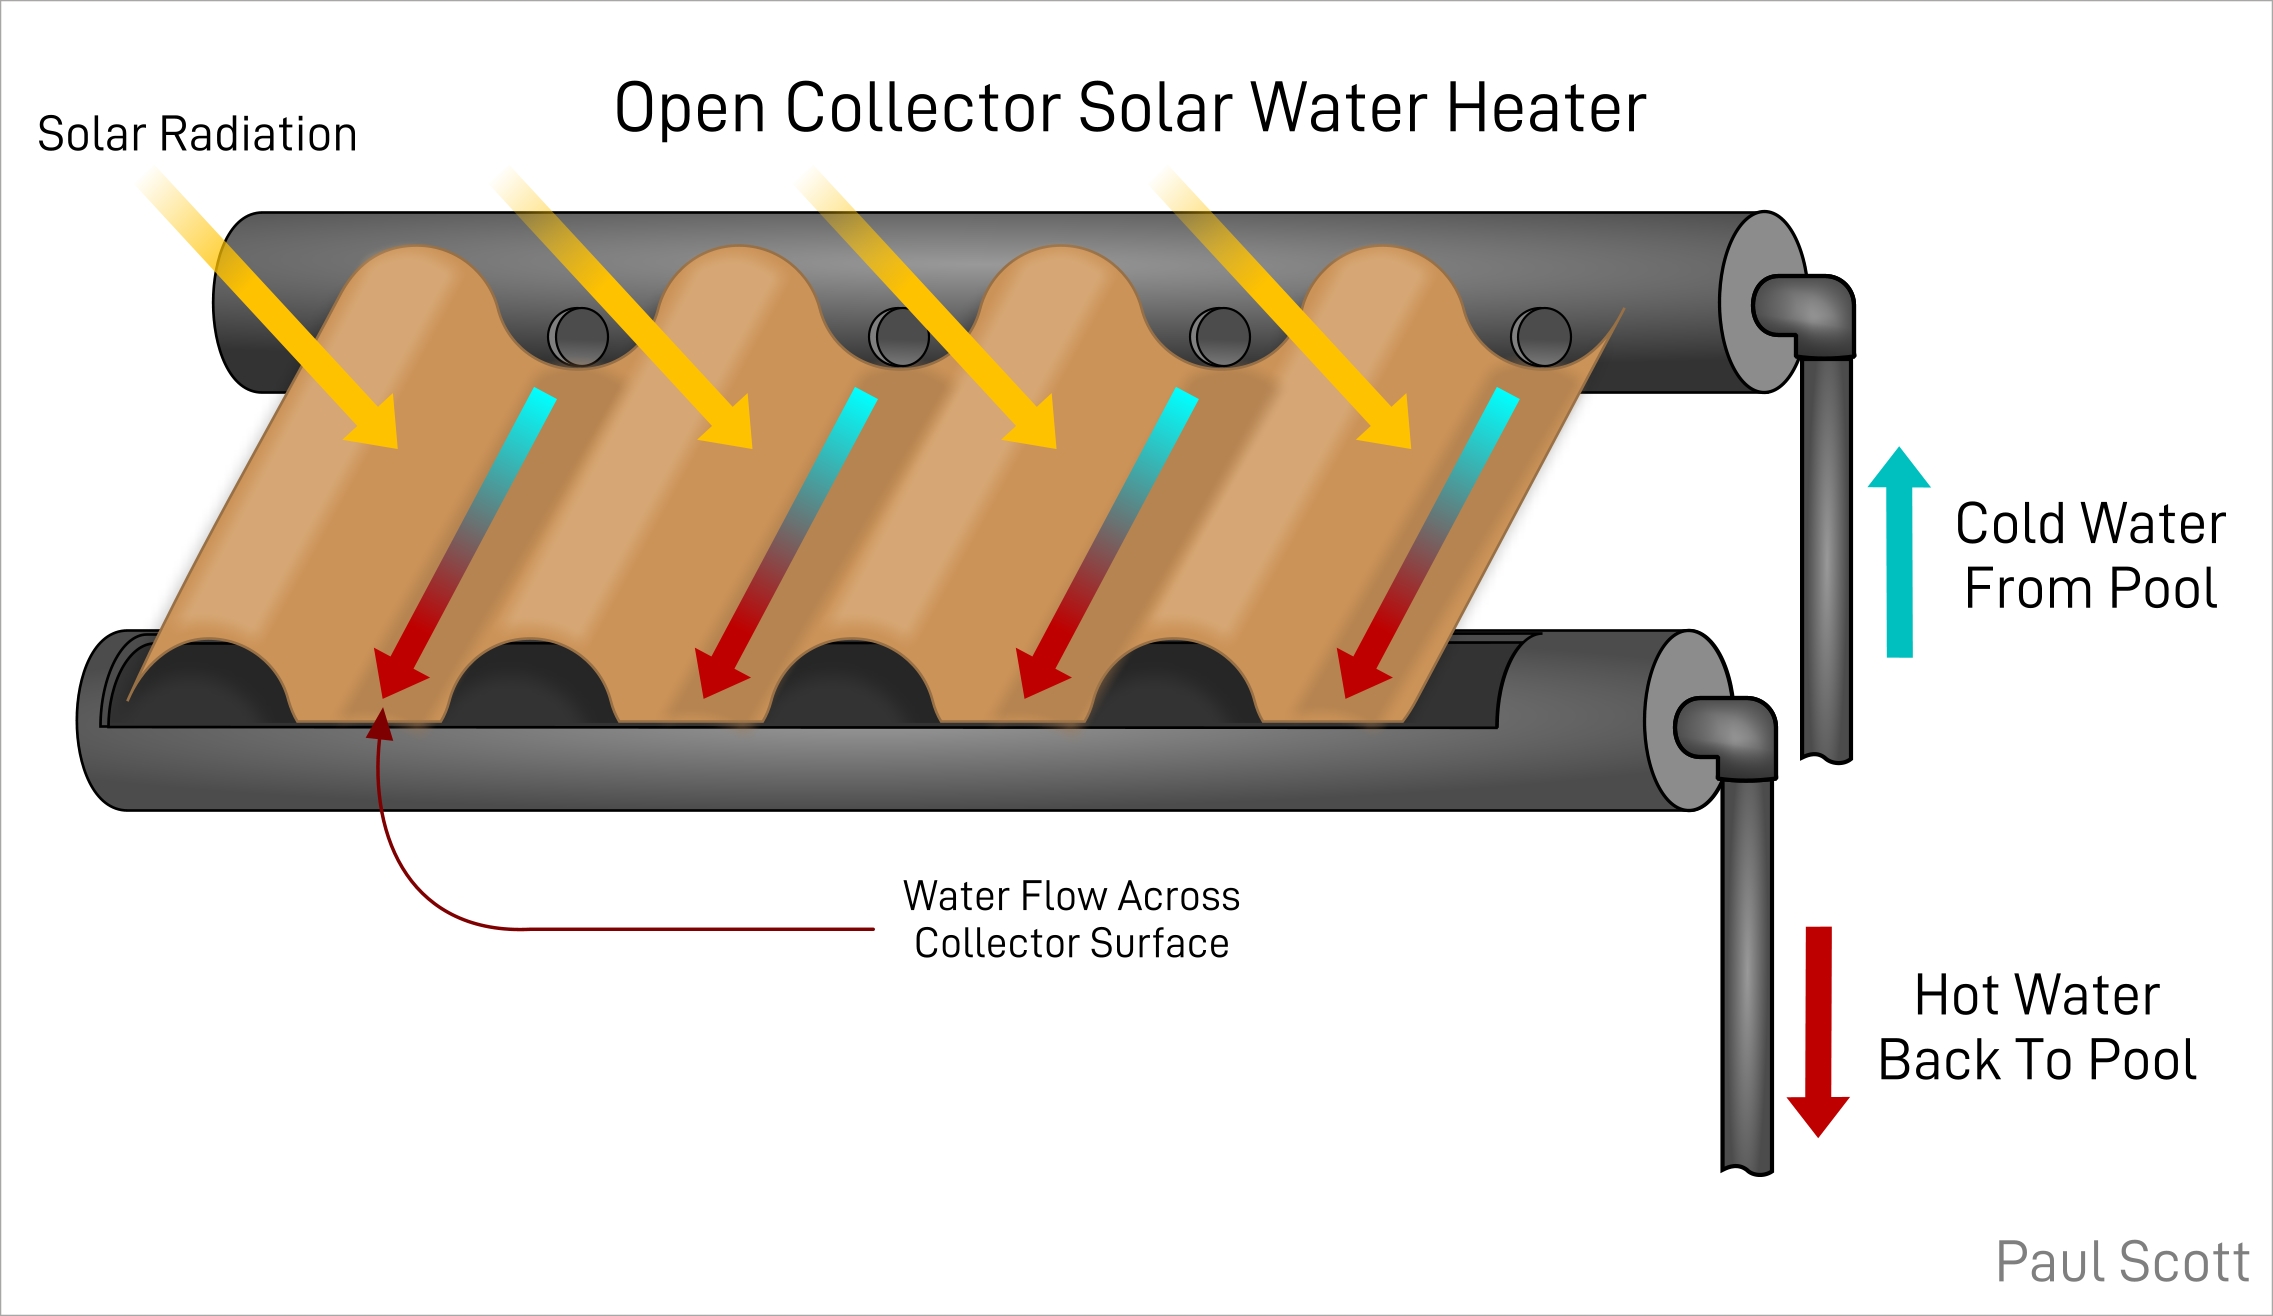
For a DIY open collector system, conventional corrugated roofing sheets and PVC piping would be perfect for the manifolds and collector surface. This type of system’s simplicity and low cost is its biggest pro point. Unfortunately, the exposed water flow can introduce debris, dust, and other contamination into the pool water. They are also less efficient than closed-circuit heaters and are really only suited to heating small above-ground pool types.
2. Serpentine Copper Tube Solar Pool Heater
As the name implies, this type of DIY solar pool heater uses a copper tube arranged like a snake’s coils to heat the water. Typically the copper tube is soldered onto a copper backplate to ensure rigidity and maximum radiation heating. The backplate and tubing are then painted black and enclosed in an insulated box covered with a sheet of glass to maximize heat transfer.
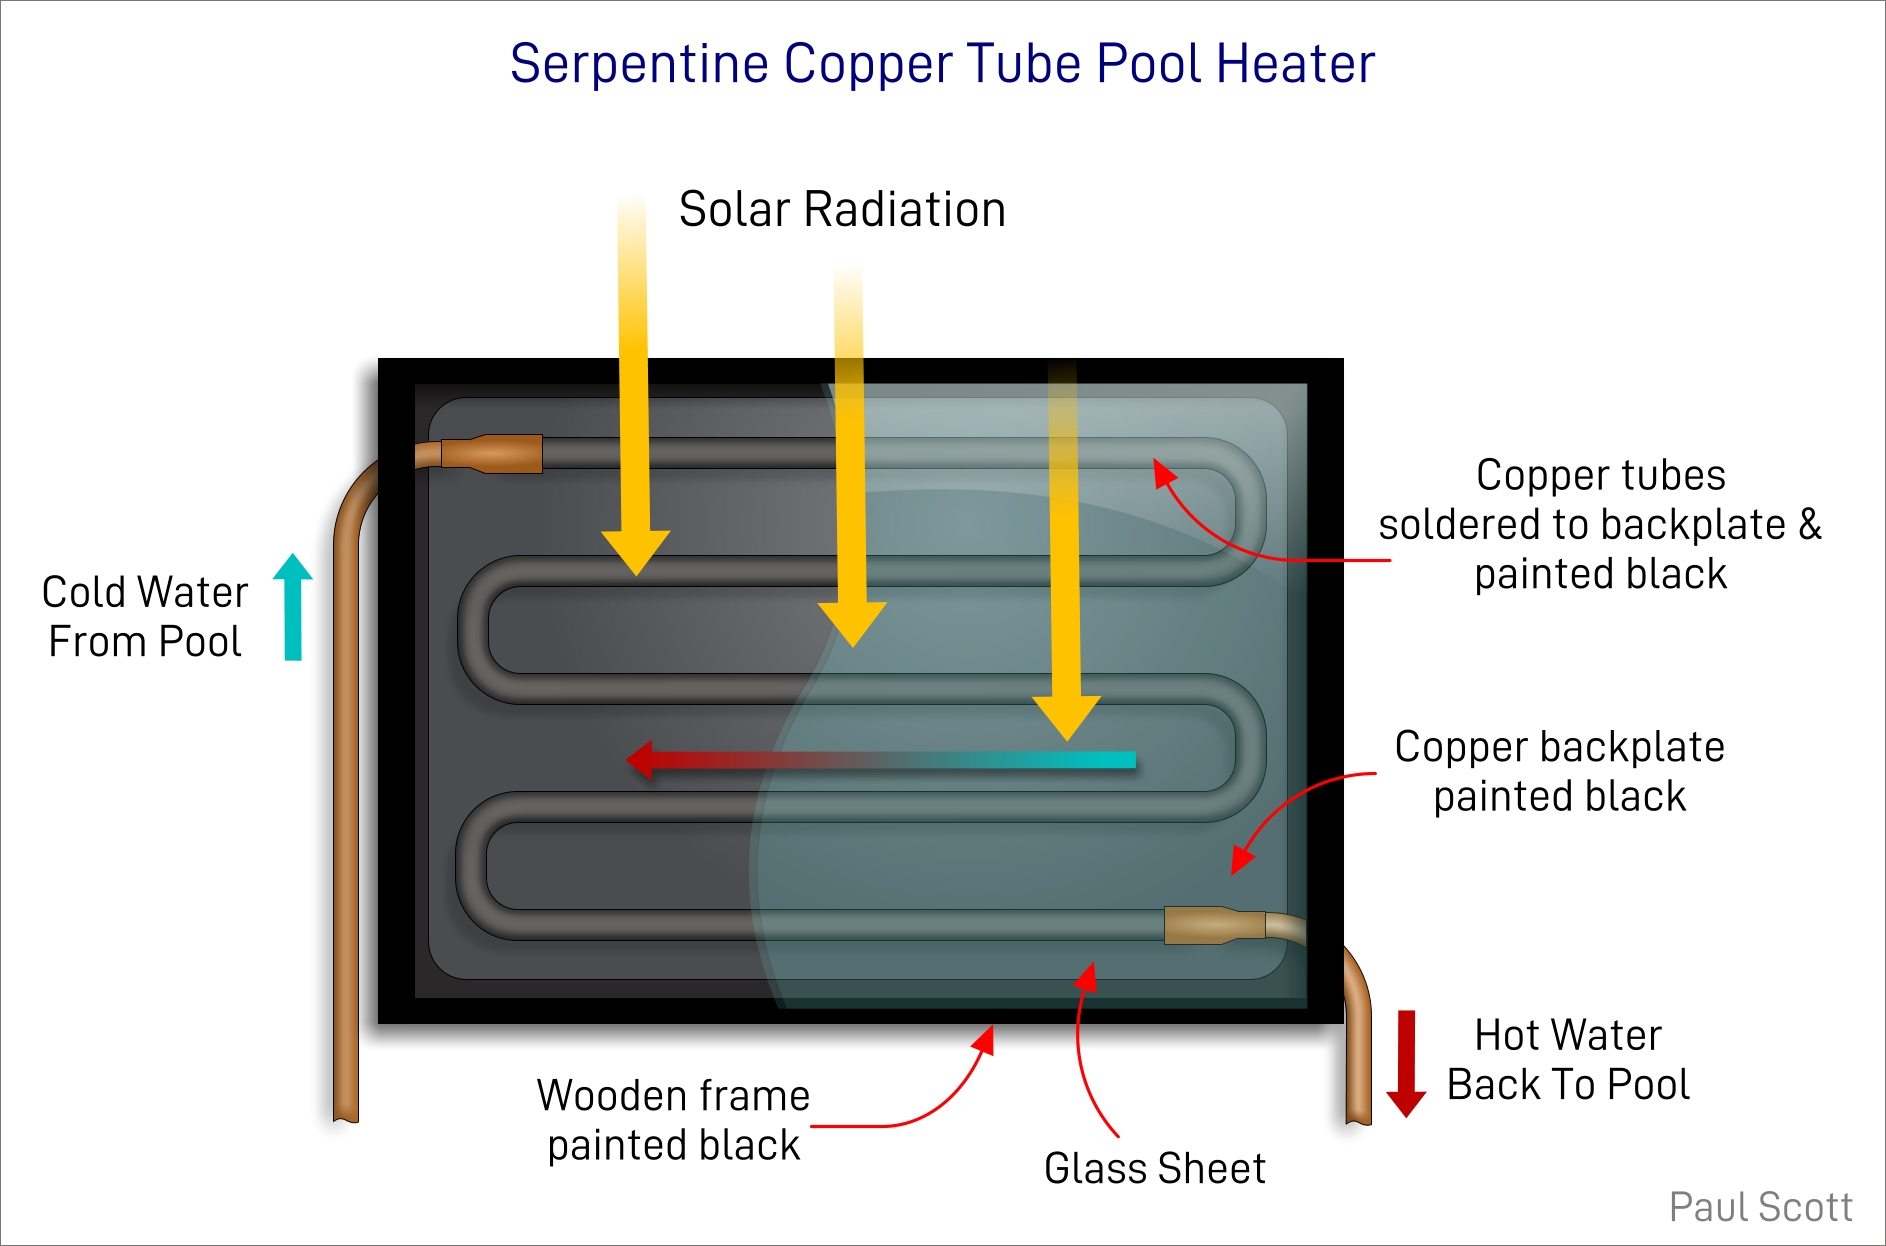
Copper tube collector heaters are more durable than PVC or PEX tube systems but are more challenging to construct. Working with copper tubing isn’t as easy as working with plastic tubing, as the coil forming and soldering process can be tricky. Copper tube collectors are also quite a bit heavier than their PVC peers and, if something goes wrong, a lot more difficult to repair.
Depending on the size of the collector, serpentine copper tube heaters can be used to heat both an above-ground pool and an in-ground pool type.
3. PVC Coiled Tube Collector DIY Solar Pool Heater
The coiled PVC tube collector model is surely the most common type of DIY solar pool heater. They are easy to build using hardware store supplies and are flexible and very efficient.
The heart of a coiled tube DIY solar pool heater is a large round or race-track pattern of PVC tubing typically enclosed in an insulated box frame. Water is pumped out of the pool and through the coil of tubing, where it heats courtesy of solar radiation. The heated water returns to the swimming pool, slowly raising its overall temperature. An example of this type of system is illustrated in the basic solar pool heating principles illustration above.
We will examine this type of DIY solar pool heater in detail later in this article.
4. PVC Tube Vertical Riser Solar Pool Heater
This DIY solar pool heater is another very popular DIY project due to its simplicity and efficiency. In this design, you form the hot water collected by a closely spaced group of PVC tubes that run vertically between two manifolds. Coldwater from the swimming pool is pumped into the top manifold, runs down the tubes where it is heated, and exits the system via the bottom manifold. Let’s look at the layout of this type of heater.
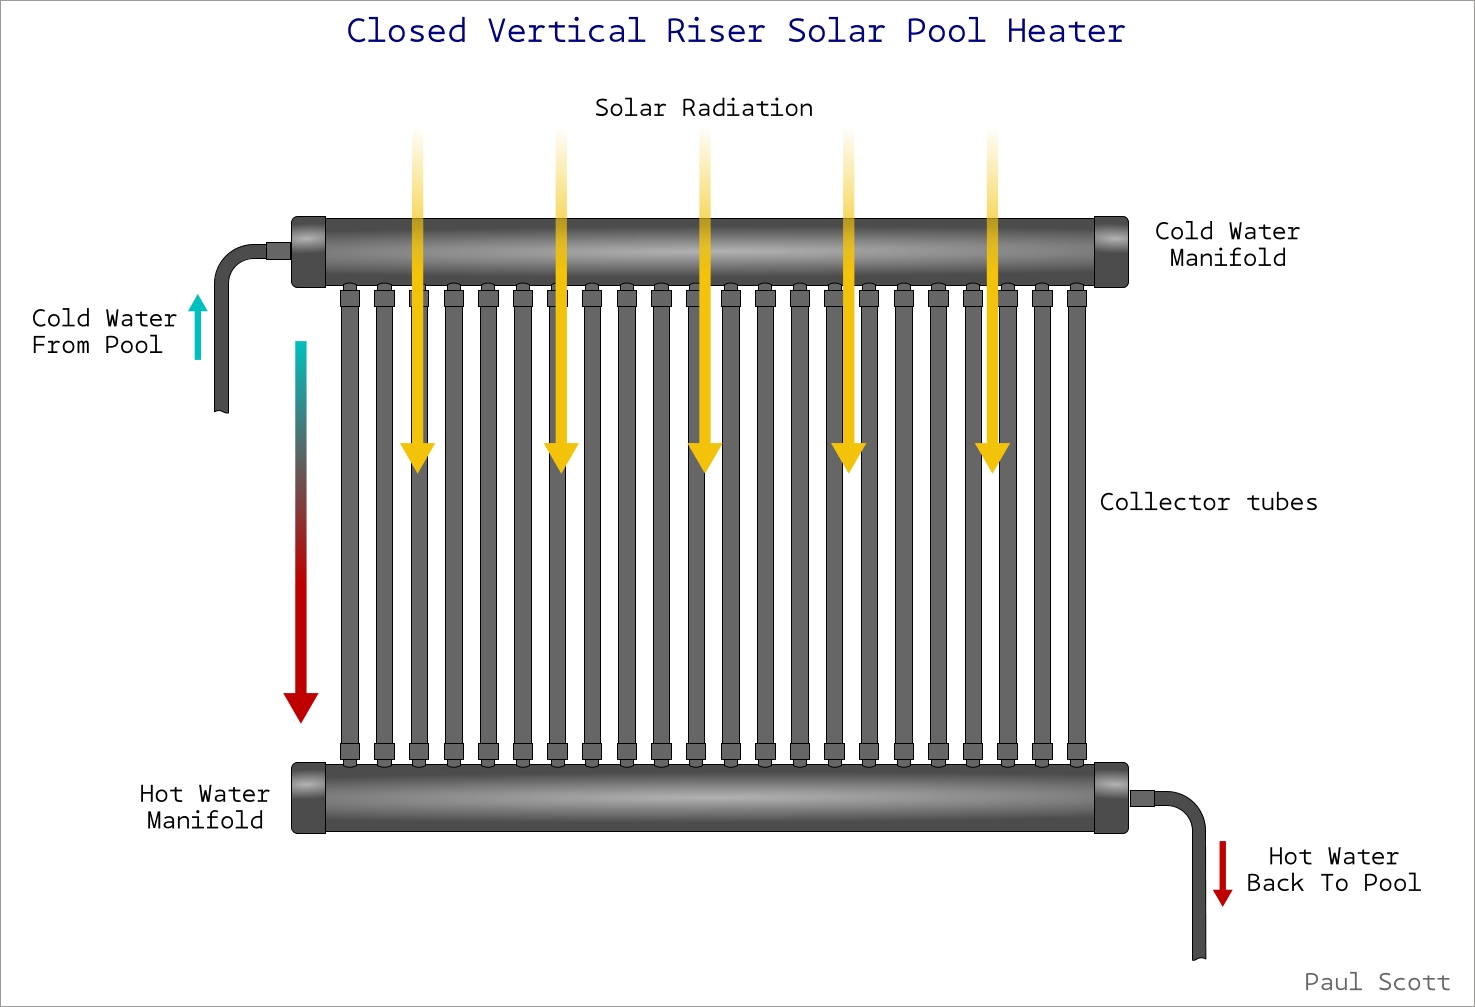
Vertical riser heaters are a lot more efficient in terms of the space they take up, making them attractive options for rooftop installations. They can also be mounted in insulated, sealed boxes and are equally effective DIY pool heaters as their coiled cousins. And depending on how many units you stack up, this type of solar heater is good for an in-ground pool and above-ground pool designs.
Wrapping Up
A solar pool heater is a great addition to any outdoor entertainment area. They can add months of swimming time every year, which adds tremendously to your pool’s value. Hopefully, this article has demonstrated that a solar pool heater is, in fact, fairly easy to build and affordable to boot.
If you have any ideas or questions regarding solar pool heater construction, please leave a comment below.


