Right-Sizing Your Solar Generator: Why Most People Get It Wrong (And How to Calculate It Perfectly)
Updated:
Calculate your daily watt-hour consumption by listing every device you plan to power, multiplying each item’s wattage by the hours you’ll run it, then adding everything together. A laptop drawing 65 watts for 4 hours needs 260 watt-hours, while a mini-fridge at 60 watts running 8 hours requires 480 watt-hours. This total becomes your baseline power requirement.
Add a 20-30% buffer to your calculated needs because real-world conditions never match laboratory specifications. Batteries lose efficiency in cold weather, inverters consume power during conversion, and cloudy days reduce solar input. I learned this the hard way during my first camping trip when my undersized system died halfway through the weekend because I calculated to the exact watt-hour without accounting for losses.
Divide your buffered daily consumption by your location’s average sun hours to determine required solar panel capacity. Phoenix averages 6.5 peak sun hours daily, so a 1,000 watt-hour system needs roughly 154 watts of panels. Seattle’s 3.5 sun hours demands 286 watts for the same consumption. Online solar calculators simplify this step by factoring in seasonal variations automatically.
Match your battery capacity to store at least one full day of consumption, giving you reserve power for cloudy periods or nighttime use. A 1,200 watt-hour daily need requires a minimum 100Ah lithium battery at 12 volts, though 200Ah provides comfortable autonomy for extended off-grid situations.
Understanding these fundamentals transforms solar system sizing from guesswork into a straightforward process you can confidently execute before making any purchase decisions.
Why Solar Generator Sizing Actually Matters
I learned this lesson the hard way during a camping trip in 2019. I’d bought what I thought was a “decent-sized” solar generator without doing any real calculations—just went with my gut. That first night, my wife and I watched helplessly as our unit died halfway through cooling our small fridge, leaving us with lukewarm drinks and questionable food safety. Meanwhile, my buddy down the trail had invested twice as much in a massive system that could probably power a small house, and he spent the weekend lugging around extra weight he didn’t need. Neither of us got it right, and we both learned an expensive lesson.
Getting your solar generator size wrong costs you in real ways. Buy too small, and you’ll face constant frustration—devices that won’t run, batteries that drain before sunset, and the nagging feeling you wasted money on something that doesn’t actually meet your needs. You might find yourself rationing power like it’s the apocalypse, choosing between charging your phone or running your laptop. Not exactly the freedom solar power promises, right?
On the flip side, oversizing is like buying a semi-truck when you need a sedan. Sure, it’ll get the job done, but you’ve spent hundreds or even thousands more than necessary. That oversized system is heavier to transport, takes longer to recharge, and the extra capacity just sits there unused. Before exploring solar generator pros and cons, you need to know what size actually matches your lifestyle.
Proper sizing isn’t about guessing or buying the biggest system you can afford. It’s about understanding your actual power consumption and matching it with the right capacity. That’s what we’re here to figure out together.
Understanding Your Power Needs: The Foundation of Sizing
Understanding the power requirements of your devices is the crucial first step in sizing your solar generator correctly.
Making Your Device List (The Right Way)
Grab a notebook or open a spreadsheet—it’s time to play detective with your home appliances. When I first did this exercise, I walked around my house with a notepad feeling a bit silly, but trust me, this step is the foundation of getting your solar system size right.
Start in the room where you’ll use solar power most. For each device, you need two pieces of information: the wattage and how long you’ll run it daily. Finding wattage is easier than you think. Most devices have a label or sticker somewhere—usually on the back, bottom, or near the power cord. Look for “W” (watts), “kW” (kilowatts), or sometimes you’ll see “V” (volts) and “A” (amps) listed separately.
Here’s a quick tip: if you only see volts and amps, multiply them together to get watts. So a device showing 120V and 2A uses 240 watts. Simple math, big results.
What about devices without clear labels? I’ve been there—staring at a coffee maker with no specs in sight. Three options: check the manufacturer’s website using the model number, use a wattage meter you can pick up for around twenty dollars (incredibly handy tool), or look up typical wattage ranges online for that device type.
Create columns for device name, wattage, hours used daily, and notes. Don’t forget the small stuff—phone chargers, fans, lights. They add up faster than you’d expect. Be honest about usage time, not aspirational. You’re building a realistic picture of your actual power needs, which makes all the difference in choosing the right system.
Watts vs. Watt-Hours: The Difference That Trips Everyone Up
Here’s the thing that confused me for months when I first started with solar: watts and watt-hours sound similar, but they’re completely different measurements. Getting this wrong is the number one reason people end up with a solar generator that doesn’t meet their needs.
Think of it like this: watts measure power (how fast electricity flows), while watt-hours measure energy (the total amount of electricity used over time). It’s like the difference between your car’s speed and the distance you travel. Your speedometer might read 60 miles per hour (that’s power), but if you only drive for 30 minutes, you’ve only traveled 30 miles (that’s energy).
When you look at a device like a laptop charger that says “65 watts,” that’s telling you how much power it draws while running. But to know how much energy it actually uses, you need to know how long it runs. That 65-watt laptop running for 3 hours consumes 195 watt-hours of energy (65 watts × 3 hours = 195 watt-hours).
Why does this matter for your solar generator? Because your appliances are rated in watts (power draw), but your battery capacity is measured in watt-hours (stored energy). You need to match both. Your generator must handle the wattage of devices running simultaneously, and it must store enough watt-hours to keep them running for your desired duration. Miss either measurement, and you’ll be disappointed with your purchase.
Surge Power: The Hidden Requirement You Can’t Ignore
Here’s where things get interesting—and where I made a costly mistake early in my solar journey. Many devices with motors or compressors need a massive jolt of power just to start up, sometimes 2-3 times their running wattage. Your trusty refrigerator might run on 150 watts, but it needs about 450-600 watts for those first few seconds when the compressor kicks on. I learned this the hard way when my perfectly calculated system kept shutting down every time the fridge started.
Power tools are even worse. A circular saw running at 1,200 watts can demand 3,600 watts at startup. Your air conditioner, well pump, or even a basic table saw all have similar surge requirements.
Here’s the practical fix: identify which surge-heavy devices might run simultaneously. Let’s say your fridge and a power tool could both be running. Add the highest surge wattage from that scenario to your total calculation. If your fridge surges to 600 watts and your saw to 3,600 watts, you need a system that can handle at least 4,200 watts of surge capacity, even if your continuous load is much lower. Most quality solar generators list both continuous and surge ratings—now you know why both numbers matter.
The Simple Formula for Calculating Your Solar Generator Size
Step 1: Calculate Your Daily Energy Consumption
The first step in sizing your solar system is figuring out how much energy you actually use daily. This is easier than it sounds, and I learned this the hard way on my first camping trip when I drastically underestimated my power needs and ended up with a dead phone by day two.
Here’s the simple formula: multiply the wattage of each device by the number of hours you’ll use it daily. This gives you watt-hours per day for that device. Then add up all your devices to get your total daily energy consumption.
Let me walk you through a practical camping scenario. Say you want to power a few essentials for a weekend getaway:
Your LED camping lights use 10 watts and you’ll run them for 5 hours each evening. That’s 10 watts times 5 hours, which equals 50 watt-hours per day.
Your phone charger draws about 20 watts and takes roughly 2 hours to fully charge. That’s 20 times 2, giving you 40 watt-hours.
A small portable fan rated at 25 watts running for 8 hours overnight equals 200 watt-hours.
Add these together: 50 plus 40 plus 200 equals 290 watt-hours per day total.
This number is your baseline, and it’s crucial for the next steps. Pro tip: check the wattage label on your devices or use a simple watt meter to get accurate readings. Most devices list their power consumption right on the label or in the user manual.
Here’s the hard truth I learned the expensive way: your solar system won’t perform at 100% efficiency in the real world. When I built my first setup, I added a modest 20% buffer to my calculations, thinking I was being conservative. Within six months, I was constantly running out of power on cloudy days and wondering what went wrong.
The reality is that solar panels rarely hit their rated output. Dust, temperature, shade from passing clouds, and the angle of the sun all chip away at performance. You’re typically looking at 75-85% of rated capacity on good days. Then there’s battery efficiency—lithium batteries lose about 10-15% of energy during charging and discharging cycles. Over time, battery degradation means you’ll see another 20% capacity loss over several years.
When you stack these losses together, that 20% buffer disappears fast. I now recommend a 30-50% buffer depending on your situation. If you live somewhere with frequent cloudy weather or plan to use your system year-round, lean toward 50%. Live in sunny Arizona with mostly summer use? You might get away with 30%.
This buffer isn’t wasteful—it’s your insurance policy against frustration and ensures your system actually meets your needs when conditions aren’t perfect.
Step 3: Determine Battery Capacity You Need
Now that you know your daily energy needs in watt-hours, it’s time to figure out how much battery capacity you’ll need to store that energy. Here’s where things get interesting, and I’ll walk you through it step by step.
The basic formula is simple: take your daily watt-hour usage and divide it by your battery’s voltage to get amp-hours (Ah). For example, if you need 2,400 watt-hours per day and you’re using a 12-volt battery system, that’s 2,400 ÷ 12 = 200 Ah.
But wait, there’s a crucial catch. You can’t actually use 100% of your battery’s capacity without damaging it. This is called depth of discharge, or DoD. Most lead-acid batteries should only be discharged to about 50% of their capacity to maintain longevity, while lithium batteries can safely go down to 80-90%. So that 200 Ah battery? You’re really only getting 100 Ah of usable power if it’s lead-acid.
Let’s adjust our calculation: 200 Ah ÷ 0.5 (for 50% DoD) = 400 Ah of total battery capacity needed for lead-acid batteries. With lithium, you’d need 200 Ah ÷ 0.8 = 250 Ah.
I learned this the hard way during my first solar setup. I didn’t account for DoD limitations and ended up replacing my batteries way sooner than expected. Don’t make my mistake!
Also consider days of autonomy. If you want your system to run for two days without sun, simply multiply your battery capacity by two. This is especially important if you live in areas with frequent cloudy weather.
Step 4: Calculate Solar Panel Requirements
Now it’s time to figure out how many solar panels you’ll need to keep those batteries charged up. This is where understanding your local sunshine becomes crucial—and trust me, I learned this the hard way when I first moved to Seattle and wondered why my panels weren’t performing like they did back in Arizona!
The key number you need is your area’s peak sun hours. These aren’t just daylight hours—they represent the equivalent hours of full-strength sunshine your panels receive daily. Most of the U.S. gets between 3-5 peak sun hours, though sunny states like Arizona can see 5-7, while cloudier regions might only get 2-4.
Here’s the basic formula: divide your daily watt-hours (from Step 3) by your peak sun hours, then add 25% as a buffer for efficiency losses and cloudy days. So if you need 2,400Wh daily and get 4 peak sun hours, that’s 2,400 ÷ 4 = 600 watts, plus 25% buffer = 750 watts of solar panels.
Want your battery to recharge in one day? Use the formula above. Need faster charging? Increase your panel wattage proportionally. A quick online peak sun hours map can show you exactly what to expect in your location, making this calculation surprisingly straightforward once you know your local conditions.
Real-World Sizing Examples You Can Follow
A properly sized weekend camping setup powers essential devices without the bulk and expense of an oversized system.
Weekend Camping Setup
Let me walk you through a real-world weekend camping scenario that I’ve personally used dozens of times. This calculation will help you understand exactly what you need to power a comfortable off-grid setup.
Start by listing your devices and their power consumption. A typical LED camping light uses about 10 watts, your phone charger draws 15 watts, a small USB fan needs 5 watts, and a portable cooler runs at roughly 40 watts. Here’s where it gets practical: you won’t run everything simultaneously or continuously.
For a realistic calculation, estimate your actual usage hours. Let’s say you run lights for 4 hours nightly (10W × 4h = 40Wh), charge two phones once daily (15W × 2h = 30Wh), use the fan for 6 hours (5W × 6h = 30Wh), and keep the cooler running intermittently for an average of 12 hours daily (40W × 12h = 480Wh). Your total daily consumption equals 580 watt-hours.
For a 3-day trip, multiply by 3 to get 1,740Wh total. Now add a 25% safety buffer for cloudy days and inefficiencies, bringing you to approximately 2,175Wh. This means you’ll want a solar generator with at least 2,200Wh capacity paired with 200-300 watts of solar panels for reliable recharging. Many of the best solar generators in this range offer expandable battery capacity, which gives you flexibility as your needs grow.
Emergency backup systems must account for high-wattage appliances like refrigerators that run continuously during outages.
Emergency Home Backup
Let’s walk through a practical example that many of you might relate to. When I first started exploring solar backup solutions, I wanted something that could keep my family comfortable during those unexpected outages that seem to happen at the worst times.
For a basic emergency backup system, start by listing your absolute essentials. A typical refrigerator runs on about 150-200 watts continuously but needs 600-800 watts for startup. Add some LED lighting at roughly 10-20 watts per bulb, your internet router at 10 watts, a laptop at 50 watts, and maybe a phone charging station at 25 watts. That brings you to around 250-300 watts of continuous power, but remember that startup surge.
Here’s the calculation: multiply your continuous wattage by the hours you want backup. For 8 hours overnight, that’s 300 watts times 8, giving you 2,400 watt-hours or 2.4 kWh. Add 30% for inefficiency and future needs, so you’re looking at roughly 3.1 kWh of battery capacity. While this won’t handle powering a house completely, a 2,000-watt solar generator with 2-3 kWh battery capacity would cover these essentials comfortably. This size strikes a balance between affordability and reliability when you need it most.
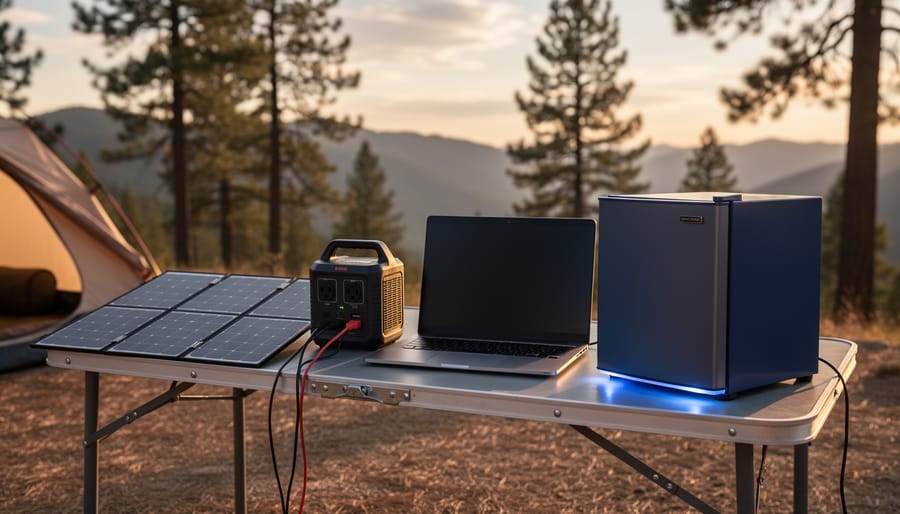
Off-Grid Work Station
Remote work has completely changed how we think about power needs! When I first started advising van-lifers and digital nomads, I realized their requirements were surprisingly consistent and totally manageable with solar.
Let’s break down a typical off-grid workstation. Your laptop probably draws 50-65 watts while in use, though gaming laptops can pull 100-150 watts. An external monitor adds another 30-50 watts. Your phone charger uses about 10-15 watts, and don’t forget those extras like a wireless mouse, portable hard drives, or a small desk fan that might add another 20 watts combined.
Here’s a real-world example: If you’re working 6 hours daily with a laptop (60W), monitor (40W), and phone charging (15W), that’s 115 watts per hour, totaling 690 watt-hours daily. Add 20% for inverter losses and you need about 830Wh of usable battery capacity.
For solar panels, divide your daily usage by average sun hours in your location. With 5 peak sun hours, you’d need roughly 170 watts of panels, though I’d recommend 200-300 watts for cloudy days and seasonal variations.
The beauty of work setups is they’re predictable and modest compared to other applications, similar to RV generator sizing principles. A 500-1000Wh portable power station handles most remote work scenarios beautifully.
Common Sizing Mistakes (And How to Avoid Them)
Forgetting About Vampire Loads
Here’s something I learned the hard way during my first solar setup: even when you think everything’s off, your system is still bleeding power. These sneaky energy drains are called vampire loads, and they’ll quietly empty your batteries overnight if you don’t account for them.
Think about all those devices with little LED lights, clocks, or standby modes. Your WiFi router, phone chargers, microwave clock, and even your inverter itself all consume power 24/7. Most inverters draw between 10-30 watts just sitting idle, which adds up to 240-720 watt-hours per day doing absolutely nothing useful.
When I calculated my first system, I forgot about these phantom loads completely. I’d wake up to dead batteries even though I hadn’t used much power the night before. The culprit? My inverter’s idle draw plus a handful of chargers still plugged in.
Here’s the fix: Walk through your space and identify everything that stays plugged in. Add up their standby consumption, then multiply by 24 hours. Include your inverter’s idle draw from its specs sheet. This number needs to be part of your daily energy calculation, or you’ll consistently come up short on power when you need it most.
Overestimating Sunlight Hours
Here’s something I learned the hard way during my first solar setup: those peak sun hour maps showing your area gets 5-6 hours daily? They’re measuring ideal conditions with panels perfectly angled, zero cloud cover, and spotless surfaces. In reality, you’ll see much less.
Most locations experience 20-30% lower output than predicted peak sun hours due to cloud cover, atmospheric haze, and seasonal variations. Winter months can deliver 40-50% less solar energy than summer, even in sunny climates. I once calculated my system based on summer performance and found myself scrambling for backup power come December.
When sizing your system, use conservative estimates. If your area averages 5 peak sun hours, calculate based on 3.5-4 hours instead. Account for rainy seasons, typical weather patterns, and the angle limitations of portable panels. Morning dew, dust accumulation, and even nearby trees create shade you might not notice initially.
A simple reality check: track your location’s actual weather patterns for a month using our interactive solar calculator. You’ll quickly see the gap between theoretical and practical performance, helping you size your system appropriately without disappointment.
Ignoring Temperature Effects on Battery Performance
I learned this lesson the hard way during a winter camping trip when my supposedly “fully charged” battery bank gave out way faster than expected. Temperature has a significant impact on battery performance that many first-time solar system builders overlook. Cold weather is particularly brutal—most lithium batteries lose around 10-20% of their capacity below freezing, while lead-acid batteries can lose up to 50% in extreme cold. Heat isn’t much better, causing faster discharge rates and potentially shortening your battery’s lifespan.
When calculating your system size, add a temperature buffer of at least 20-30% to your battery capacity if you’ll be using your system in temperatures below 40°F or above 90°F. For example, if your calculations say you need a 1000Wh battery, consider going with 1200-1300Wh instead. This ensures you’ll still have the power you need when the weather doesn’t cooperate, giving you peace of mind year-round.
Temperature extremes and weather conditions significantly impact solar generator performance and must be factored into sizing calculations.
Using the Spheral Solar Calculator to Double-Check Your Math
After working through all those calculations by hand, I’ll let you in on something that’s made my life easier: our Spheral Solar Calculator. I remember spending an entire evening double-checking my math with a notepad and calculator when I was planning my first DIY solar generator, second-guessing every number. That’s exactly why we built this tool.
Here’s the thing though—the calculator isn’t meant to replace what you just learned. Think of it more like a trusted friend who checks your work. You’ve already done the hard part by understanding how to calculate your wattage needs, factor in surge power, and account for battery capacity. Now you can plug those numbers into our interactive tool and see if everything lines up.
The calculator walks you through the same steps we covered, but it does the heavy lifting on the math side. You enter your appliance wattages, how long you’ll run them, and your location details. Within seconds, it suggests appropriate system sizes and even accounts for things like panel efficiency and seasonal variations.
I still recommend going through the manual calculations first, especially if you’re new to solar. Understanding the why behind the numbers helps you make smarter decisions when unexpected variables pop up—like realizing you need extra capacity for cloudy days or planning for future expansion. Use the calculator to validate your work and catch any mistakes before you start shopping.
When to Size Up (And When Not To)
I learned this lesson the hard way during a camping trip in Colorado. I’d sized my system perfectly for my typical needs, but then hit three straight cloudy days. My carefully calculated system fell short, and I ended up rationing power like it was the apocalypse. That experience taught me when a buffer makes sense.
Oversizing is smart when you’re relying on solar as your primary power source during extended trips or emergencies. If you’re planning multi-day camping adventures or want backup power during outages, adding 20-30% capacity above your calculated needs gives you breathing room for cloudy weather and unexpected usage spikes. It’s also wise if you anticipate adding devices later, like upgrading from a basic cooler to an electric one.
The cost-benefit calculation is straightforward: adding capacity now costs less than buying a second system later. A 2000W system might only cost 15-20% more than a 1500W system, making that buffer relatively affordable.
However, oversizing becomes wasteful in certain situations. If you’re using solar occasionally for light duty tasks like charging phones and laptops, buying a massive system means paying for capacity you’ll never use. The panels will spend most of their life underutilized, and batteries degrade over time regardless of use.
Here’s my rule of thumb: if your usage patterns are predictable and you have backup power options available, stick close to your calculated size. If you’re embracing solar as a lifestyle with variable conditions, build in that buffer. Your future self will thank you when unexpected situations arise.
You’ve now got the knowledge to calculate exactly what size solar system you need—and that’s genuinely empowering. I remember when I first started working with solar, I made the classic mistake of guessing instead of calculating. I ended up with a system that couldn’t handle my weekend camping fridge, and let me tell you, warm beverages on a hot day taught me a valuable lesson about doing the math first.
The best part? You don’t need an engineering degree to get this right. Grab your device inventory today and start listing everything you want to power. Write down those wattages, estimate your usage hours, and run through the calculations we’ve covered. It might take you twenty minutes, but those twenty minutes will save you hundreds of dollars and endless frustration down the road.
Getting your system size right the first time means you’ll actually enjoy your solar setup instead of constantly worrying about running out of power or regretting an oversized purchase that sits half-empty.
If you’re working through your calculations and hit a snag, or you’ve got a unique setup that’s got you scratching your head, drop your questions in the community forum. Chances are, someone else has tackled something similar, and we’re all here to help each other succeed. Your solar journey starts with that first calculation—so why not begin today?
How useful was this post?
Click on a star to rate it!
Average rating 5 / 5. Vote count: 1
No votes so far! Be the first to rate this post.
We are sorry that this post was not useful for you!
Let us improve this post!
Tell us how we can improve this post?
charlesnoble
Here at Spheral Solar, I’m a hands-on solar power enthusiast, constantly exploring and experimenting with DIY solutions. I’m dedicated to sharing my discoveries, insights, and even the bumps I hit along the way, all in the pursuit of a more sustainable future.
Build Your Own Solar Generator Kit for Under $500… by Charlesnoble December 30, 2025 Gather four essential components—a 100-300 watt solar panel, a charge controller rated for your panel’s output, a deep-cycle battery (lithium or AGM), and a pure sine wave inverter matching your power needs—then connect them in sequence to create a functional solar generator for under $500. I built my first system…
11 Best Solar Generators for Your 2023 Camping Trip by Adeyomola June 22, 2021 Before buying a solar generator for your next camping trip, you should estimate how much power you need to run your appliances. Consider features like output power rating, charge controller type, weight, portability, charging rate, and battery type. But what truly makes a solar-powered generator stand out is its battery…
What Size Generator Do I Need for My RV? by Charlesnoble October 11, 2023 To determine the appropriate generator size you need for your RV, calculate your electrical requirements and choose a unit that meets those needs without excessive capacity. This article will discuss the importance of selecting the right generator size and a step-by-step guide on how to size your RV generator, with…
DIY Solar Generator – Complete Guide With Diagrams by Paul July 17, 2021 Building a weatherproof DIY solar generator involves mounting and wiring a battery, charge controller, inverter, trickle charger, and fusing inside a weatherproof case. Then all the relevant input and output sockets are wired and mounted on the outside of the case where they are easily accessible. What Exactly Are Solar…
Why Your Solar Generator Battery Dies Too Soon (And… by Charlesnoble February 4, 2026 Check your battery’s state of charge monthly and recharge before it drops below 50% to prevent sulfation damage that permanently reduces capacity. Store your solar generator in temperatures between 50-77°F, as every 15-degree increase above this range can cut battery lifespan in half. Avoid the common mistake of leaving your…
Your Kohler Generator Won’t Start? Here’s How I… by Charlesnoble November 12, 2025 **Check your fuel level and oil pressure first**—90% of Kohler generator failures trace back to these two simple issues. I learned this the hard way during a three-day power outage when my generator shut down unexpectedly, leaving my solar battery backup system without its safety net. **Listen to your generator’s…
Subscribe for handpicked DIY projects, exclusive tips, and giveaways.
When your solar array needs more power than a simple series connection provides, but your charge controller can’t handle high voltages, series-parallel wiring becomes your solution. This hybrid approach combines the voltage-boosting benefits of series connections with the current-increasing advantages of parallel wiring, giving you the flexibility to match your system’s exact requirements. Most DIYers… Read more: Why Series-Parallel Wiring Could Save Your Solar Setup (And Your Wallet)
An 8kW solar system typically generates between 24 and 40 kWh per day, depending on your location, season, and installation quality. That’s enough to power most average homes completely, but the reality is more nuanced than a single number can capture. I remember installing my first 8kW array in Arizona and being thrilled when it… Read more: How Much Power Does an 8kW Solar System Actually Produce Each Day?
Flip your bifacial solar panels over and you’ll find a second active surface that can boost your system’s energy production by 10-30% – but only if you design your array to take advantage of it. Unlike traditional panels that capture sunlight from one side, bifacial modules harvest energy from both their front and rear surfaces,… Read more: Why Your Bifacial Solar Panels Need a Completely Different Array Design


")


")
")
")


")
")