Why 6 Volt Batteries Might Be Your Solar System’s Best Friend
Updated:
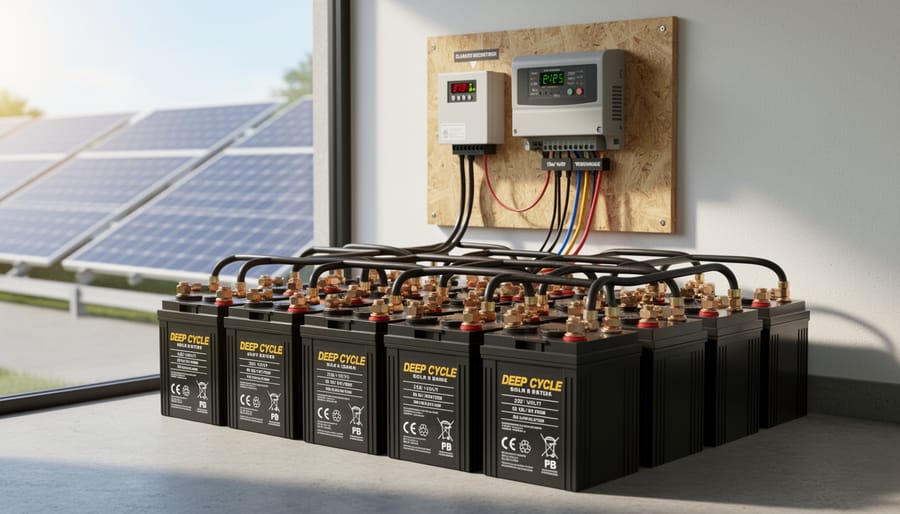
Connect 6-volt batteries in series pairs to create 12-volt banks that deliver superior amp-hour capacity and longer lifespan than single 12-volt alternatives. This wiring configuration doubles your voltage while maintaining the individual battery capacity, giving you more usable power for off-grid applications. Most RV and camping solar setups benefit from golf cart-style 6V deep-cycle batteries because they use thicker lead plates that withstand repeated discharge cycles better than standard automotive batteries.
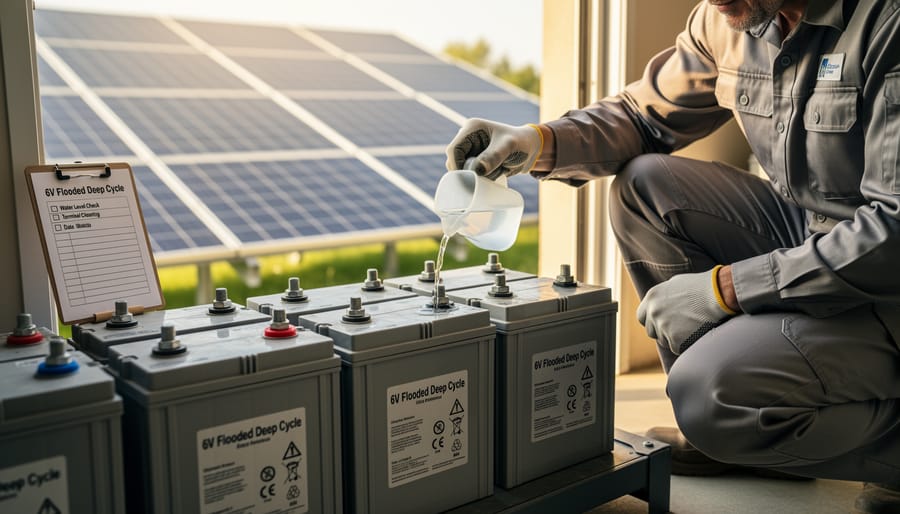
Choose flooded lead-acid 6-volt batteries when you need the most affordable deep-cycle option and don’t mind monthly maintenance, or opt for AGM sealed versions if your battery bank sits in living spaces or hard-to-reach locations. The flooded type requires checking water levels and cleaning terminals every 4-6 weeks, while AGM models cost 40-60% more but eliminate maintenance headaches entirely.
Calculate your daily power consumption in watt-hours before sizing your battery bank, then divide by your system voltage (12V or 24V) to determine required amp-hours. Add 50% capacity buffer to prevent over-discharge, which destroys battery lifespan faster than any other factor. A typical weekend camping setup drawing 50 amp-hours daily needs at least 150Ah of battery capacity, easily achieved with two 6V golf cart batteries wired in series.
Monitor your depth of discharge religiously because dropping below 50% capacity regularly cuts your battery life in half. Install a simple battery monitor or voltage meter to track real-time consumption, and recharge before voltage drops below 12.2V for 12-volt systems. This single habit separates solar enthusiasts who replace batteries every 2-3 years from those enjoying 7-10 years of reliable service from the same investment.
What Makes 6 Volt Batteries Different (And Why It Matters)
6-volt batteries feature thicker plates and robust construction designed specifically for deep discharge cycles in solar applications.
The Series Connection Advantage
Here’s something I learned the hard way during my first solar installation: I spent hours researching individual batteries without understanding how they actually work together in a system. The real magic of 6V batteries happens when you connect them in series, and it’s simpler than you might think.
When you wire two 6V batteries in series (positive terminal of one battery to the negative terminal of the other), their voltages add up to create 12V. Need 24V for a larger system? Just connect four 6V batteries in series. Think of it like stacking batteries in a flashlight, where each one contributes to the total power.
Here’s why this matters for your solar setup: By using multiple smaller-capacity batteries instead of one large one, you’re essentially spreading the workload. Each battery in the series handles the same amount of current, which means more even wear across your battery bank. It’s like having two people carrying a heavy box instead of one person struggling alone.
This configuration also gives you flexibility in maintenance. If one battery starts showing signs of weakness, you can identify and replace it without necessarily replacing your entire battery bank. Plus, the series connection creates natural checkpoints for monitoring your system’s health. You can test individual batteries to catch problems early.
The beauty of this setup is that it scales with your needs. Starting small with a 12V system? Use two batteries. Ready to upgrade to 24V? Just add two more in the same series pattern.
RV and camping setups benefit from the durability and deep-cycle capability of 6-volt battery systems paired with solar panels.
When 6 Volt Batteries Shine in Solar Applications
Golf Cart Batteries: The DIY Solar Secret Weapon
Here’s something I learned during my first solar project that nobody tells you upfront: those hefty golf cart batteries sitting in your local battery shop are exactly what serious DIYers use for home solar systems. I remember walking past them dozens of times before realizing they were my secret weapon for affordable off-grid power.
Golf cart batteries have become the go-to choice for solar enthusiasts, and the reasons are pretty straightforward. First, they’re everywhere. Unlike specialty solar batteries that require ordering online or hunting down obscure suppliers, golf cart batteries are stocked at battery retailers, big-box stores, and even some automotive shops. When you need a replacement, you’re not waiting weeks for shipping.
The cost factor really seals the deal. A quality 6-volt golf cart battery typically runs between $100-200, making them significantly more budget-friendly than marketed solar batteries with identical specifications. You’re essentially getting the same deep-cycle technology that handles repeated charging and discharging, just without the solar premium price tag.
Performance-wise, these workhorses deliver where it counts. Golf cart batteries are designed for deep-cycle use, meaning they’re built to be drained down to 50% capacity and recharged daily. Sound familiar? That’s exactly what happens in a solar system. They handle 500-800 charge cycles when properly maintained, giving you years of reliable service.
The DIY community loves them for another reason: standardization. Most golf cart batteries follow similar dimensions and specifications, so finding replacement parts, building battery boxes, and sharing wiring diagrams becomes much simpler. When I connect with other solar DIYers at workshops, we’re often using the same Trojan or Crown batteries, which makes troubleshooting and advice-sharing incredibly easy.
Golf cart batteries connected in series create reliable 12-volt or 24-volt power banks for off-grid solar systems.
Maintaining Your 6 Volt Solar Batteries the Right Way
Water Levels and Electrolyte Checks
If you’re using flooded 6-volt batteries in your solar setup, checking water levels is one of those simple tasks that can dramatically extend your battery life. I learned this the hard way when Charles, our community tech advisor, found one of my batteries with plates exposed because I’d forgotten to check for three months. Don’t be like early-me!
Here’s your straightforward maintenance routine. Check water levels once a month during regular use, or every two weeks if your batteries are working hard in hot weather. Always check after charging, never before, since the electrolyte expands during charging and you might overfill.
Safety first: wear safety glasses and rubber gloves. Battery acid isn’t something you want on your skin or in your eyes. Work in a well-ventilated area since batteries can release hydrogen gas.
Remove the battery caps and peek inside with a flashlight. The electrolyte should cover the lead plates by about a quarter to half inch. If you can see the plates, it’s time to add water.
Use only distilled water, which you can grab from any grocery store for about a dollar a gallon. Tap water contains minerals that will slowly kill your battery by building up deposits on the plates. Charles jokes that feeding batteries tap water is like giving them a slow-acting poison.
Add water gradually using a plastic squeeze bottle or turkey baster until the fluid reaches the indicator line inside the cell. If there’s no line, aim for just covering the plates plus that quarter-inch cushion. Don’t overfill, as the electrolyte needs room to expand during charging.
Replace the caps securely and wipe down any spills with a damp cloth and baking soda solution to neutralize acid.
Regular water level checks and maintenance are essential for keeping flooded 6-volt batteries performing optimally in solar systems.
Equalization Charging for 6V Battery Banks
Equalization charging might sound complicated, but think of it as a spa day for your battery bank. When you connect multiple 6V batteries in series, individual cells can develop slightly different charge levels over time—kind of like how siblings might squabble over who got more dessert. Equalization fixes this imbalance by applying a controlled overcharge that brings all cells back to the same level.
Here’s why it matters: Without regular equalization, some batteries in your series string work harder than others, leading to premature failure of the weakest links. I learned this the hard way years ago when Charles and I were troubleshooting a friend’s solar setup. Half their battery bank was practically brand new, but uneven charging had already damaged two batteries beyond repair.
Most modern solar charge controllers have a built-in equalization mode, making the process straightforward. Check your controller’s manual for the specific procedure, but generally you’ll press a button or adjust settings to trigger equalization mode. The controller will then raise voltage to around 15.5-16V for flooded lead-acid 6V batteries, typically for 2-4 hours.
Important safety notes: Only equalize flooded lead-acid batteries, never sealed AGM or gel types. Perform equalization in a well-ventilated area since the process releases hydrogen gas. Remove any loads from your system first, and monitor battery temperatures—if they exceed 125°F, stop immediately.
Plan to equalize your battery bank monthly during heavy use or quarterly during lighter seasons. Your batteries will thank you with longer, more reliable service.
Terminal Cleaning and Connection Care
Keeping your 6V battery terminals clean might seem like a small detail, but trust me—it makes a huge difference in your solar system’s performance. I learned this the hard way when Charles pointed out the crusty buildup on my first battery bank that was silently stealing power!
Corrosion is your battery connections’ worst enemy. That white or blue-green crusty stuff you sometimes see around terminals? It creates resistance that wastes energy and can eventually prevent your batteries from charging properly. The good news is prevention is simple: after connecting your batteries, apply a thin layer of petroleum jelly or a specialized anti-corrosion spray to each terminal. This creates a protective barrier against moisture and acid vapors.
Before connecting terminals, give them a quick clean with a wire brush or battery terminal cleaner. If you spot existing corrosion, disconnect the battery (negative terminal first!) and scrub it away using a paste of baking soda and water—it neutralizes the acid beautifully.
Here’s something many beginners overlook: proper torque matters. Over-tightening can crack battery posts, while loose connections create resistance and heat. Most 6V batteries need terminals tightened to about 95-100 inch-pounds. A small torque wrench is worth the investment, though snug-plus-a-quarter-turn works if you’re careful.
Check your connections quarterly—it takes five minutes and prevents headaches down the road!
Common Mistakes That Kill 6 Volt Battery Performance
I learned this lesson the hard way during my first off-grid cabin project. After investing in a beautiful bank of 6 volt batteries, I watched my performance plummet within months. Turns out, I’d made nearly every mistake in the book. Let me share what I discovered so you can skip the frustration.
The biggest performance killer is mixing old and new batteries in the same series string. I once added two fresh batteries to replace failed units in my existing bank, thinking I’d save money. Wrong move. The older batteries with reduced capacity dragged down the new ones, forcing them to work harder and age faster. Within six months, the new batteries were performing just as poorly as the old ones they’d joined. Always replace entire strings at once, and keep batteries from the same manufacturing batch together when possible.
Improper charging settings rank as mistake number two. Many DIYers grab whatever charger they have lying around without checking voltage specifications. Your 6 volt flooded batteries need different charging profiles than AGM or gel types. I accidentally used settings for 12 volt batteries on my 6 volt bank early on, which meant each battery received half the voltage it needed. The result was chronic undercharging and sulfation buildup. Take five minutes to verify your charge controller matches your specific battery chemistry and voltage configuration.
Over-discharging silently destroys battery lifespan. Most quality 6 volt deep cycle batteries shouldn’t drop below 50 percent state of charge regularly. I used to drain mine to 20 percent thinking I was getting my money’s worth from each cycle. Instead, I was shaving years off their life expectancy. Install a simple battery monitor to track your actual depth of discharge, not just voltage readings which can be misleading under load.
Finally, neglecting individual cell monitoring in flooded batteries caught me off guard. While my overall bank voltage looked fine, one cell in one battery was failing. This weak link compromised the entire series string. Now I check specific gravity in each cell monthly using an inexpensive hydrometer. This fifteen-minute task has saved me from multiple premature battery failures.
These mistakes are completely avoidable once you know what to watch for. Your batteries will thank you with years of reliable performance.
Choosing and Sizing 6 Volt Batteries for Your Solar Setup
Flooded vs. AGM vs. Gel: Which 6V Type Is Right for You?
Choosing the right 6V battery technology for your solar system comes down to understanding how each type fits your lifestyle and maintenance commitment. Let me break down the three main options based on my years of tinkering with solar setups.
Flooded lead-acid batteries are the budget-friendly workhorses. They’re the least expensive upfront, typically lasting 4-7 years with proper care. The catch? They need regular maintenance—checking water levels monthly and ensuring proper ventilation since they release hydrogen gas during charging. I started with these in my first solar setup, and honestly, the maintenance routine became oddly meditative once I got used to it. They’re perfect if you’re hands-on and want to maximize your dollar.
AGM (Absorbed Glass Mat) batteries occupy the middle ground. They cost about 1.5 to 2 times more than flooded batteries but offer significant convenience. You’ll never add water, and they handle deep discharge cycles better, lasting 5-8 years typically. They’re also spill-proof and produce minimal gas, though you should still check AGM battery venting requirements for your installation. I switched to AGM for my remote cabin project, and the maintenance-free nature was game-changing.
Gel batteries represent the premium option, costing roughly twice what flooded batteries do. They excel in extreme temperatures and deliver the longest lifespan at 8-10 years. They’re incredibly sensitive to charging voltage though—overcharging can permanently damage them. Think of gel batteries as the precision instruments of the battery world: excellent performance if you have a quality charge controller that can handle their specific needs.
For most DIY solar enthusiasts, AGM batteries offer the sweet spot between cost, performance, and convenience.
Troubleshooting Your 6 Volt Battery Bank
Even well-maintained 6 volt battery banks can develop issues, and knowing how to diagnose problems quickly can save you time and money. I learned this the hard way during my first winter with my solar setup when I noticed my battery bank wasn’t holding a charge like it used to.
The most common problem you’ll encounter is uneven charging between batteries in your series string. This happens when one battery develops higher internal resistance than its partners, causing it to charge faster but also discharge more quickly. To diagnose this, disconnect your batteries and measure each one individually using battery voltage charts as your reference. A healthy 6V battery should read around 6.3 volts when fully charged. If one battery consistently reads lower than the others, it’s likely failing and dragging down your entire system’s performance.
Rapid discharge issues often point to either a parasitic load you didn’t account for or sulfation buildup on your battery plates. I once spent two days troubleshooting rapid discharge before realizing my inverter’s standby mode was drawing more power than expected. Check all your connections for corrosion and ensure your charge controller is properly configured for your battery type.
Reduced capacity over time is normal, but sudden drops indicate problems. If your system that used to power your home for three days now barely makes it through one, test each battery’s specific gravity if you have flooded batteries. Readings below 1.265 suggest sulfation or cell damage.
Here’s my go-to troubleshooting checklist: First, verify all connections are tight and corrosion-free. Second, test each battery individually under load. Third, check your charging voltage matches your battery specifications. Finally, inspect for physical damage like bulging cases or leaking electrolyte. Most issues I’ve encountered traced back to loose connections or mismatched batteries in the string, both entirely preventable with regular maintenance.
So there you have it—6 volt batteries might seem like the underdog in the solar world, but for the right applications, they’re absolute workhorses. Whether you’re powering a small cabin, building a golf cart setup, or creating a reliable battery bank for your RV adventures, 6V deep-cycle batteries offer impressive durability and performance that’s hard to beat. The key takeaway? These batteries shine brightest when you match them to appropriate applications and commit to proper maintenance.
I’ve learned through my own solar journey that there’s no one-size-fits-all solution. Sometimes a 6V configuration is perfect; other times, 12V batteries make more sense. The important thing is understanding your power needs, being honest about your maintenance commitment, and choosing components that work together harmoniously.
Now I’d love to hear from you! Have you used 6 volt batteries in your solar setup? What challenges did you face during installation or maintenance? Maybe you’ve discovered a clever workaround or maintenance tip that others could benefit from. Head over to the Spheral Solar community forum and share your experiences. Your insights could be exactly what another DIYer needs to solve their power puzzle.
Remember, every expert was once a beginner who asked questions and learned from others. By sharing knowledge and supporting each other, we’re not just building better solar systems—we’re building a more sustainable future together. Here’s to your solar success, whatever voltage you choose!
How useful was this post?
Click on a star to rate it!
Average rating 0 / 5. Vote count: 0
No votes so far! Be the first to rate this post.
We are sorry that this post was not useful for you!
Let us improve this post!
Tell us how we can improve this post?
charlesnoble
Here at Spheral Solar, I’m a hands-on solar power enthusiast, constantly exploring and experimenting with DIY solutions. I’m dedicated to sharing my discoveries, insights, and even the bumps I hit along the way, all in the pursuit of a more sustainable future.
Do AGM Batteries Need to Be Vented? by Charlesnoble October 27, 2023 Yes, AGM batteries do need to be vented. Even though they produce relatively less hydrogen gas compared to conventional batteries, AGM batteries can still release hydrogen gas in certain overcharge conditions. Ventilation provides a safety release for these gases. This comprehensive guide will cover all you need to know about…
Why Your 8 Volt Battery Won’t Charge (And How to Fix… by Charlesnoble February 25, 2026 Match your charger voltage to your battery’s 8-volt requirement, or risk permanent damage to your battery bank. Most standard chargers output 6V or 12V, making them incompatible with the less common 8V configuration found in certain golf carts, floor scrubbers, and older solar setups. Use a dedicated 8-volt charger with…
Which Solar Battery Actually Lives Up to the Hype? by Charlesnoble November 8, 2025 Compare capacity ratings in amp-hours (Ah) and watt-hours (Wh) first—these numbers tell you exactly how much energy each battery stores and how long it’ll power your devices. Check the depth of discharge (DoD) percentage next, because a battery with 90% DoD gives you far more usable energy than one limited…
Why LFP Batteries Changed Everything About Solar… by Charlesnoble April 3, 2026 Match your LFP battery capacity to your actual lighting needs by calculating your nightly watt-hour consumption and multiplying by three—this gives you enough storage for cloudy stretches without overspending on unused capacity. A 20-watt LED running five hours nightly needs a 300Wh minimum battery, which translates to a 100Ah 12V…
Lead Acid Battery Voltage Charts by Charlesnoble November 25, 2023 Battery voltage charts provide an easy way to estimate a battery’s state of charge. You can simply measure the voltage of the battery and use a voltage charge to estimate the current charging level of the battery. But remember that each type of lead acid battery will have a different…
10 Best Rechargeable Batteries for Solar Lights by Nick April 23, 2021 While lithium-ion batteries have long been touted as the future of the solar battery world, some close rivals are giving them a run for their money. This blog post gives you a closer look at the best rechargeable batteries for solar lights currently available for solar light applications. We’ve covered…
Subscribe for handpicked DIY projects, exclusive tips, and giveaways.
Understand that 6000 volts sounds terrifying but delivers surprisingly low amperage—typically around 120 milliamps for just 3/10,000th of a second per pulse. This combination creates an unforgettable shock that trains animals to avoid the fence without causing lasting harm. The voltage pushes current through thick fur and hide, while the minimal amperage and microsecond duration… Read more: Why 6000 Volts Won’t Kill Your Livestock (But Will Stop Predators Cold)
Check the maximum voltage and current ratings first—these determine whether your controller can actually handle your solar panel array without frying itself on the first sunny day. I learned this the hard way when my first DIY system shut down every afternoon because I’d paired 600 watts of panels with a controller rated for only… Read more: Why Your Solar Setup Needs Both a Charge Controller and Inverter (And How to Pick the Right Ones)
Grab a 9-volt solar panel from your local electronics supplier and test it with a multimeter in direct sunlight—if it produces 9-12 volts under load, you’ve got a working unit ready for small-scale projects. These compact panels excel at trickle-charging rechargeable 9V batteries, powering LED lighting systems for camping, or running low-draw electronics like portable… Read more: Why 9 Volt Solar Panels Are Perfect for Your First Portable Power Setup


")

")


")

")


