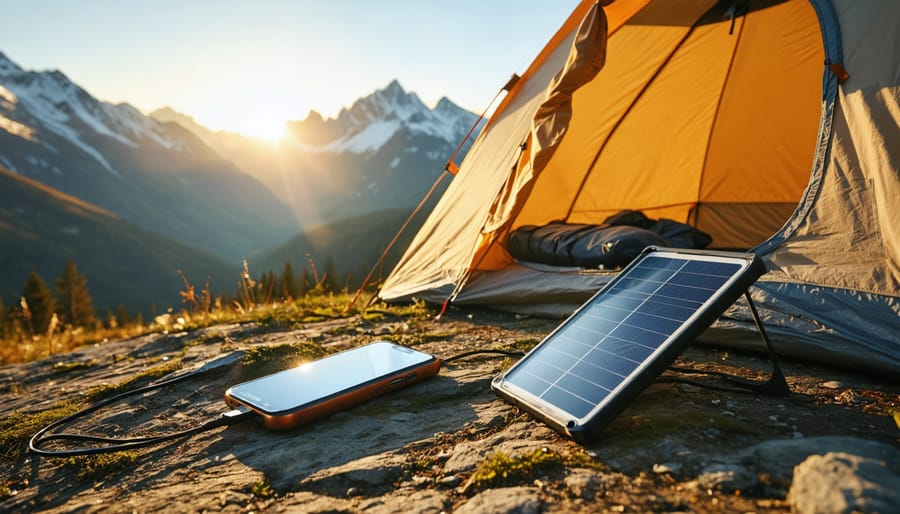
Charge your iPhone anywhere the sun shines by pairing a solar panel rated at minimum 10 watts with a portable battery bank that has USB output. I learned this the hard way during a week-long camping trip in Colorado when my flimsy 5-watt panel couldn’t keep up with my phone’s drain, leaving me without navigation on day three.
Match your solar panel size to your actual needs: a 20-watt folding panel charges a phone fully in 3-4 hours of direct sunlight, while smaller 10-watt models work for emergency top-ups but struggle as primary power sources. The key difference isn’t just speed; larger panels maintain charging even in partly cloudy conditions when smaller ones quit entirely.
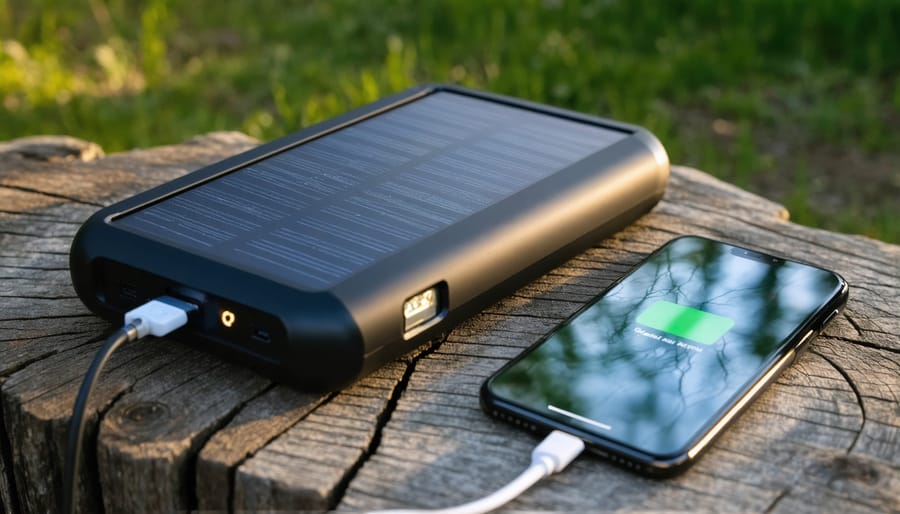
Always charge through a battery bank rather than plugging your iPhone directly into solar panels. Direct solar charging creates voltage fluctuations as clouds pass overhead, potentially damaging your phone’s battery or triggering protective shutoffs that interrupt charging. A quality 10,000-20,000 mAh power bank acts as a buffer, storing stable power for overnight charging and cloudy periods.
Position panels perpendicular to the sun’s rays and adjust every few hours for maximum efficiency. That 20-watt panel only delivers its rated power when angled correctly; pointing skyward during morning or evening can cut output by 60 percent or more.
The technology works reliably once you understand these fundamentals, but realistic expectations matter. You’re not replacing wall charging; you’re creating independence from electrical outlets for adventures, emergencies, and outdoor work where the sun becomes your power outlet.
Why Solar Charging Makes Sense for Your iPhone
Solar charging enables iPhone users to stay connected during extended outdoor adventures without relying on wall outlets.
When You Actually Need Solar Charging
Let me be honest with you: solar charging your iPhone isn’t something you need while sitting at home with perfectly good wall outlets nearby. But there are specific situations where it transforms from a novelty into a genuine necessity.
During my week-long backcountry camping trip last summer, my solar setup became my lifeline for navigation and emergency communication. When you’re hiking the Pacific Crest Trail or spending days at a music festival where the nearest outlet is a mile away, solar charging stops being experimental and starts being essential.
Van life enthusiasts understand this reality intimately. If your vehicle is your home and you’re boondocking in remote locations, solar power becomes your entire electrical infrastructure. The same applies to outdoor workers—wildlife photographers, field researchers, or construction crews working off-grid—who depend on their phones for more than just Instagram.
Power outages from storms or natural disasters create another critical use case. When the grid goes down for days, a solar charger with battery backup means you can still reach emergency services and stay connected with family.
The key difference? In these scenarios, you’re not choosing solar because it’s trendy—you’re choosing it because traditional charging simply isn’t available. That’s when the technology proves its worth beyond the marketing hype.
The Environmental and Practical Benefits
I’ve spent enough mornings watching the sunrise from a campsite to appreciate what solar charging really offers beyond the environmental talking points. Sure, you’re tapping into renewable energy instead of fossil fuels, and yes, that matters. But here’s what struck me during my first successful solar-powered weekend: I wasn’t hunting for wall outlets or rationing my phone’s battery like it was precious water.
The freedom piece is real. Whether you’re hiking, dealing with a power outage, or just spending a day at the beach, having a charged phone without depending on the grid changes how you plan your day. You’re not tied to coffee shops or visitor centers anymore.
From a practical standpoint, every watt-hour you generate from the sun is one less you’re pulling from your utility company. It’s not going to transform your electric bill overnight, but it’s a tangible step toward energy independence. And if you’re already curious about solar technology, charging your iPhone is honestly one of the easiest entry points. The equipment is affordable, portable, and immediately useful. You’re learning the basics of solar power management without committing to a rooftop installation or complex system design.
Understanding How Solar iPhone Charging Actually Works
The Three Key Components You Need
Getting your iPhone charged from the sun isn’t complicated, but you do need three essential pieces working together. Think of it like a relay race – each component passes the energy along until it reaches your phone.
First up are the solar panels themselves. These are the energy collectors that convert sunlight into electricity. For iPhone charging, you’re looking at portable panels that typically fold up for easy transport. They come in various sizes, usually measured in watts – anywhere from 10W pocket-sized options to 100W+ panels for faster charging or multiple devices.
Next, you’ll want a battery bank or portable power station. Here’s something I learned the hard way on my first camping trip: solar panels only work when the sun’s actually shining. A battery bank stores that solar energy so you can charge your iPhone at night or on cloudy days. These range from compact 10,000mAh pocket batteries to hefty power stations that can run small appliances. For basic iPhone charging, a mid-range battery bank around 20,000-30,000mAh hits the sweet spot between portability and capacity.
Finally, you need the right charging cables and adapters. Most solar setups use USB connections, so you’ll need a Lightning cable for your iPhone. Some battery banks include built-in cables, which honestly makes life easier and means one less thing to forget.
Together, these three components create a complete off-grid charging solution that keeps you connected wherever adventure takes you.
Why You Can’t Just Plug Your iPhone Directly Into a Solar Panel
I learned this the hard way during my first attempt at solar charging on a backpacking trip. I connected my iPhone directly to a small solar panel, thinking I was being clever by eliminating the middleman. The result? My phone flashed between charging and not charging, got uncomfortably warm, and didn’t gain any meaningful battery percentage.
Here’s the problem: solar panels produce wildly inconsistent voltage depending on sun angle, cloud cover, and even temperature. Your iPhone expects a steady 5 volts delivered consistently. When a cloud passes overhead, the panel’s output might drop from 6 volts to 2 volts in seconds. This voltage fluctuation can confuse your phone’s charging circuitry or, worse, potentially damage the battery over time.
That’s where battery banks and charge controllers come in. A battery bank acts as a buffer, storing solar energy when the sun’s strong and delivering it smoothly to your phone. A charge controller regulates the incoming solar power, ensuring it charges the battery bank safely without overcharging. Think of it like a translator between two people who don’t speak the same language. The solar panel speaks “variable sunshine,” but your iPhone only understands “steady USB power.” You need something in the middle to make them communicate properly.
Types of Solar Charging Solutions for iPhones
A complete solar charging setup includes a portable folding panel, battery bank, and appropriate charging cables for your iPhone.
All-In-One Solar Power Banks
All-in-one solar power banks combine a battery pack with integrated solar panels, creating a compact charging solution that looks perfect for iPhone users on the go. I’ll be honest with you though—these devices work best as emergency backup rather than your primary charging method. Here’s why: those built-in panels are typically quite small, maybe the size of a credit card or slightly larger. In ideal conditions with direct sunlight, they might take 20-40 hours to fully recharge the internal battery. That’s several days of perfect sunshine just to top up the power bank itself.
The advantages? They’re incredibly portable, require no extra equipment, and give you peace of mind knowing you have a backup power source if you’re stranded. The downsides include slow charging speeds and limited panel efficiency due to their compact size. I’ve used these on backpacking trips, and honestly, they’re lifesavers when you need just enough juice for an emergency call, but don’t expect to stream music all day.
Understanding how solar power banks work helps set realistic expectations. They shine during multi-day trips where you can leave them charging during the day while you explore, then use that stored power overnight. Think of them as trickle chargers rather than rapid refueling stations.
Portable Folding Solar Panels with Battery Banks
Here’s what I’ve found works best for iPhone solar charging after years of tinkering: skip the integrated solar phone chargers and go with separate foldable panels paired with a quality battery bank. This combo gives you the most bang for your buck.
The setup is straightforward. Your foldable solar panel (typically 20-30 watts) charges a portable battery bank during the day, then that battery bank charges your iPhone whenever needed. Why split them up? Because you can position your panel in direct sunlight while keeping your iPhone safely in the shade. Plus, battery banks charge iPhones much faster than direct solar ever could.
I learned this the hard way on a camping trip when my all-in-one solar charger couldn’t keep up. The separate system meant I could leave my panel outside all day while my phone stayed protected in my tent.
When choosing the right battery, look for something with at least 10,000mAh capacity. That’ll fully charge most iPhones twice over. Match it with a 20-watt foldable panel, and you’ve got a reliable system that works in real-world conditions, not just perfect laboratory sunlight.
Solar Generators and Power Stations
If you’re planning a week-long camping trip or setting up a base camp where multiple people need reliable power, solar generators and portable power stations are worth considering. These are essentially large battery banks with built-in solar charging capabilities, and they’ve become surprisingly affordable in recent years.
I remember my friend Charles taking one on a family camping trip last summer. His 500Wh power station kept four iPhones, two tablets, and even a portable fan running for five days straight with just a couple hours of solar charging each afternoon. The key advantage is capacity—these units store enough power to charge your iPhone 20-40 times before needing a recharge themselves.
Look for models in the 300-500Wh range for weekend trips, or 1000Wh+ if you’re powering a group or staying out longer. Most include multiple USB ports, AC outlets, and can charge from solar panels, wall outlets, or your car. The investment makes sense if you regularly spend extended time off-grid, travel with family or groups, or want emergency backup power at home. Prices range from $200 for basic units to $1000+ for premium models, but the versatility and peace of mind can justify the cost for serious outdoor enthusiasts.
DIY Solar Charging Systems
For those who love a challenge and want maximum flexibility, building your own iPhone solar charging system from scratch is totally doable. I remember when Charles first experimented with this approach during a weekend cabin project—he was amazed at how much more power he could generate compared to portable chargers.
The basic setup includes a standard solar panel (typically 50-100 watts), a charge controller to regulate voltage, and optionally a battery bank for storing power. You’ll connect everything together, then plug your iPhone charging cable into the system’s USB output or use an inverter for your standard wall adapter.
This DIY route gives you serious advantages: more charging capacity, the ability to power multiple devices simultaneously, and expandability as your needs grow. You can mount panels permanently on an RV, shed, or even create a portable briefcase-style system.
The main consideration? You’ll need some basic electrical knowledge and comfort working with wiring. But don’t worry—we’ve created detailed step-by-step tutorials on this site walking you through the entire process, from selecting compatible components to making your first connections safely. Think of it as leveling up your solar game.
What to Look for When Choosing Solar Charging Equipment
Solar Panel Wattage and Efficiency
Here’s the thing about solar panel wattage that I wish someone had explained to me earlier: those numbers on the box are measured under perfect laboratory conditions that you’ll rarely see in real life. When you see a 21W solar panel, that’s its peak output in direct, perpendicular sunlight at noon on a cloudless day.
Your iPhone typically needs about 5-12 watts to charge at a reasonable speed. A 10W panel might sound sufficient, but in practice, you’ll get maybe 60-70% of that rating on a good day. Angle the panel wrong or deal with some clouds, and you’re looking at 30-50% efficiency. This means a panel rated at 21W might deliver around 10-15 watts in typical conditions, which is actually perfect for iPhone charging.
Charging times vary wildly based on conditions. In full sun with a quality 20W+ panel, expect your iPhone to charge at near-normal speeds, reaching 50% in about 30-45 minutes. Partial shade or overcast skies? That same charge could take two to three hours. Early morning or late afternoon sunlight hits panels at less effective angles, reducing output by half or more. The key is managing expectations and choosing panels with enough overhead capacity to handle less-than-ideal conditions you’ll inevitably encounter outdoors.
Battery Capacity (mAh and Wh Explained)
When I first started exploring solar charging for my iPhone, the mAh and Wh numbers on battery packs looked like alphabet soup. Let me break this down in a way that actually makes sense for your adventures.
Battery capacity gets measured in milliamp-hours (mAh) or watt-hours (Wh). Think of mAh as the fuel tank size. A typical iPhone 14 has around 3,279 mAh, while an iPhone 14 Pro Max holds about 4,323 mAh. So if you’ve got a 10,000 mAh power bank, you’re looking at roughly 2-3 full charges in real-world conditions, not the theoretical three charges the math suggests.
Here’s the thing nobody tells you upfront: you lose about 20-30% of capacity during the charging process due to heat and conversion inefficiency. That 20,000 mAh battery? It’ll realistically give you around 4-5 iPhone charges, not six.
To figure out what you actually need, count your devices and how many days you’ll be off-grid. Weekend camping with one phone? A 10,000-20,000 mAh battery paired with a solar panel works perfectly. Week-long expedition with multiple devices? You’re looking at 25,000+ mAh territory.
Our battery capacity calculator takes the guesswork out by factoring in those real-world losses and helping you match your specific setup needs.
Weather Resistance and Durability
When I first started taking solar chargers on hiking trips, I learned the hard way that not all weather ratings are created equal. Let me break down what those IP ratings actually mean and what you really need.
IP ratings consist of two numbers: the first indicates dust protection, the second covers water resistance. An IP65 rating means complete dust protection and can handle water jets from any direction, which sounds impressive but might be overkill for casual use. For most weekend camping or backyard charging, IP64 is perfectly adequate. It protects against dust and splashing water, handling light rain without issue.
Here’s my practical take: if you’re just charging your iPhone on your patio or during fair-weather hikes, IP64 works great. Beach days or kayaking? Go for IP67, which can survive brief submersion. I wouldn’t trust anything below IP54 outdoors, honestly.
Durability goes beyond water resistance. Look for reinforced corners and rubberized edges since solar panels will inevitably get bumped around in backpacks. I’ve dropped my charger more times than I’d like to admit, and those protective features saved it every time. Also check that the USB ports have weatherproof covers. Exposed ports collect moisture and dust, even on sunny days, which can damage both the charger and your iPhone over time.
Proper connections between your solar-charged battery bank and iPhone ensure efficient power transfer and device safety.
How Long Does Solar Charging Actually Take?
Let’s talk real-world numbers here, because this is where expectations meet reality. A typical 20-watt solar panel in direct, unobstructed sunlight can take 8-12 hours to fully charge a 10,000mAh battery bank. That same setup under partly cloudy conditions? You’re looking at 15-20 hours, sometimes more.
I learned this the hard way on a weekend camping trip when I confidently told my family we’d have plenty of power. Clouds rolled in, and what I thought would be a 4-hour charge stretched into two days. Now I always plan with weather in mind.
For direct phone charging with smaller 5-10 watt panels, expect your iPhone to gain about 20-30% battery per hour in peak sun conditions. A full charge typically takes 3-5 hours of good sunlight. Panel size matters tremendously. A 28-watt folding panel can cut those times nearly in half compared to a compact 10-watt model.
Your location and season also play huge roles. Summer charging in Arizona? Lightning fast. Winter in Seattle? Pack extra patience. To get precise estimates for your specific setup, you can calculate charging times based on your panel wattage and battery capacity. Always budget extra time beyond the calculator’s estimate for real-world conditions.
The Weather Factor and Seasonal Considerations
Here’s the reality check I wish someone had given me before my first camping trip with solar gear: sunshine isn’t created equal. I learned this the hard way when my supposedly “high-powered” solar charger barely trickled any juice into my iPhone on a partly cloudy June morning.
Cloud cover is your biggest enemy. Even wispy clouds can cut your charging speed by 50-70%, and on overcast days, you might only see 10-20% of the panel’s rated output. That 20-watt panel? It’s effectively a 2-4 watt trickle charger when clouds roll in.
Winter presents double trouble. The sun sits lower in the sky, reducing intensity, and you get fewer daylight hours to work with. A panel that fully charges your iPhone in 3 hours during July might need 6-8 hours in December, assuming clear skies.
Time of day matters tremendously. Peak charging happens between 10 AM and 2 PM when the sun is highest. Morning and late afternoon sun hits your panel at sharper angles, delivering significantly less power. Even slight shade from a tree branch can disproportionately tank performance due to how solar cells are wired together.
My advice? Plan for real-world conditions by assuming you’ll get about half the advertised wattage on average days. This mindset shift will help you choose appropriately sized equipment and avoid frustration in the field.
Getting Started: Your First Solar iPhone Charging Setup
A Simple Starter System That Actually Works
After testing dozens of combinations on my own camping trips, I’ve found the sweet spot for iPhone solar charging: a 20-30W portable solar panel paired with a 20,000mAh battery bank. Here’s why this combo works brilliantly.
The 20-30W panel gives you enough juice to meaningfully charge your battery bank during daylight hours without being ridiculously large to carry. I learned this the hard way after lugging a 50W panel through Yosemite—totally unnecessary! A quality 25W foldable panel typically measures around 11×6 inches when folded, fitting easily in a backpack side pocket.
The 20,000mAh battery bank is the real hero here. It stores roughly 4-5 full iPhone charges, letting you power up overnight or during cloudy stretches. This capacity hits the goldilocks zone: enough power for several days off-grid, but not so heavy you’ll regret packing it.
Look for panels with built-in USB outputs and battery banks with pass-through charging capability, meaning they can charge your phone while being charged themselves by the panel. This simple setup has never let me down, whether I’m weekend camping or working remotely from a beach. Total investment? Usually between 60-100 dollars for reliable brands.
Setup Tips and Positioning for Maximum Charging
Getting the most from your iPhone solar charging setup is all about positioning, and honestly, I learned this the hard way on a weekend camping trip where I spent half a day wondering why my phone wasn’t charging at all. The culprit? My panel was sitting flat on a picnic table instead of angled toward the sun.
For maximum efficiency, tilt your solar panel to face the sun as directly as possible. In most of North America during summer, this means angling it about 30-40 degrees from horizontal, facing south. If you’re camping, prop your panel against a rock or backpack. Some portable panels come with built-in kickstands, which are incredibly handy.
Throughout the day, the sun moves across the sky. If you’re staying put for a few hours, repositioning your panel every couple of hours makes a significant difference. I’ve noticed charging speeds can double just by adjusting the angle mid-afternoon.
Shade is your enemy here. Even partial shade from a tree branch or tent corner can dramatically reduce output. Scout your campsite for the sunniest spot, and keep an eye out for shadows that might creep in as the sun moves. Clear, unobstructed sunlight from roughly 10 AM to 3 PM gives you the best charging window, so plan your outdoor activities accordingly.
Positioning your solar panel at the correct angle toward the sun maximizes charging efficiency throughout the day.
Common Beginner Mistakes to Avoid
I’ve learned from countless conversations with fellow solar enthusiasts that the biggest mistake newcomers make is expecting their iPhone to charge as quickly as it does from a wall outlet. Solar charging is genuinely slower, especially in less-than-perfect conditions, and that’s completely normal. Another common pitfall is placing your solar panel in partial shade, thinking a little sunlight is enough. Even a small shadow from a tree branch can cut your charging efficiency dramatically.
Many people also underestimate how much battery capacity they actually need. If you’re planning a three-day camping trip and want to charge your phone daily, a pocket-sized 5,000mAh power bank won’t cut it. Calculate your actual usage and add a buffer—I always recommend at least 50 percent more capacity than you think you’ll need.
Finally, double-check compatibility before you buy. Not all solar chargers output the right voltage for iPhones, and some cheaper cables can cause charging issues. Look for products specifically mentioning iPhone compatibility and USB certifications. Trust me, spending an extra ten dollars upfront beats discovering your gear doesn’t work when you’re already off-grid.
Tips and Tricks for Maximizing Your Solar Charging
Reducing Your iPhone’s Power Consumption
Before we even talk about solar panels, let me share something I learned the hard way during a three-day camping trip: the best solar charge is the one you don’t need. Sounds contradictory, right? But reducing your iPhone’s power consumption means smaller, lighter solar panels and faster charging times.
Start with Low Power Mode, which you’ll find in Settings under Battery. This single feature can extend your battery life by hours, reducing background activity and visual effects. I enable it the moment I leave for any outdoor adventure, and honestly, I barely notice the difference in daily use.
Screen brightness is your biggest power drain. Drop it to around 30-40 percent when outdoors. Yes, it’s trickier to see in bright sunlight, but you’ll gain substantial battery life. Speaking of which, disable Background App Refresh for apps you don’t urgently need. Those weather and social media apps can wait until you’re back to civilization.
Here’s a practical strategy: use Airplane Mode when you’re truly off-grid. Your iPhone constantly searches for cell towers, draining battery fast in remote areas. Enable it, then manually turn on Wi-Fi or Bluetooth only when needed. This combination has doubled my battery life on backcountry trips, making solar charging far more effective.
The Pre-Charging Strategy for Extended Trips
Here’s the reality I learned the hard way on a week-long backpacking trip in Colorado: solar panels are amazing, but the sun doesn’t always cooperate. Rain, dense forest cover, and early sunsets can derail your charging plans fast. That’s why pre-charging is your secret weapon.
Before any extended trip, charge everything to 100 percent. Your iPhone, obviously, but more importantly, your battery bank. A fully topped-off 20,000mAh power bank gives you roughly four to five complete iPhone charges, independent of weather conditions. Think of it as your energy insurance policy.
I now travel with a two-battery system for trips longer than three days. One battery stays connected to the solar panel during the day, while the other powers my devices. This rotation means I’m never stuck waiting for a charge when I need my phone for navigation or emergencies.
Pack your backup batteries in an accessible spot, not buried at the bottom of your pack. During lunch breaks or rest stops, you can quickly swap batteries or reposition your solar panel toward optimal sunlight. These small habits make the difference between staying connected and rationing your last 5 percent battery for three days.
Troubleshooting Common Solar Charging Issues
When Your Device Won’t Charge
I’ve been there—watching my iPhone sit stubbornly at 12% despite being plugged into my solar setup. It’s frustrating, but usually fixable! Start by checking all your connections. Loose cables are surprisingly common culprits, especially outdoors where things get bumped around. Next, inspect your charging cable itself. Solar setups can mean more wear and tear, so look for fraying or damage.
Voltage issues often surprise newcomers. Most iPhones need 5 volts to charge properly. If your solar panel isn’t producing enough power (say, on a cloudy day), charging simply won’t happen. Check if your panel has an LED indicator showing power output.
Here’s something I learned the hard way during a weekend camping trip: battery banks can completely drain without you realizing it. Before assuming your solar panel is the problem, test your battery bank with another device to confirm it’s actually charged.
Finally, compatibility matters. Not all solar chargers play nice with iPhones, particularly newer models with specific charging requirements. Double-check that your setup explicitly supports iOS devices.
Slow or Inconsistent Charging
I’ve been there—checking my phone every five minutes wondering why it’s barely gaining any charge. When your iPhone isn’t charging as expected from your solar panel, start with the basics. First, reposition your panel to face the sun directly. Even a 30-degree angle off can cut your charging efficiency by half. I learned this the hard way on a cloudy beach day.
Next, give your panel a quick wipe-down. Dust, fingerprints, and grime block sunlight surprisingly well. Check your cable too—cheap or damaged cables often can’t handle the power fluctuations from solar panels. If possible, test with a different cable you trust.
Weather matters more than you’d think. Thin clouds can reduce output by 50-80%, and extreme heat actually makes panels less efficient. Finally, dive into your iPhone’s battery settings. Low Power Mode helps, and closing background apps reduces the power your phone draws while charging. Sometimes the fix is simpler than expected—my friend once spent an hour troubleshooting before realizing his phone case was blocking the charging port.
Solar charging for your iPhone has genuinely moved beyond the “cool gadget” phase into practical, reliable territory—especially if you match your setup to your actual needs. I’ve watched this technology mature over the past decade, and the difference between today’s efficient panels and what we had even five years ago is remarkable. What once required a suitcase-sized panel now fits comfortably in a daypack.
The key insight I hope you’re taking away is this: start modest, learn as you go, and let your real-world experience guide your next steps. Grab a quality 20-watt panel and a small power bank, head outside for an afternoon, and see how it works in your environment. You’ll learn more from one weekend of experimentation than from reading dozens of reviews.
Our community has built some fantastic resources to help you navigate these decisions. The solar power system calculator on this site can help you size your setup based on your specific devices and usage patterns—no guesswork required. And don’t hesitate to share your experiences in the comments. Some of the best tips I’ve received came from readers who discovered clever solutions to problems I hadn’t even considered.
There’s something genuinely satisfying about watching your phone charge from pure sunshine. It’s a small step toward energy independence, sure, but it’s also tangible proof that renewable energy works in everyday life. Whether you’re preparing for adventures, building resilience for emergencies, or simply reducing your grid dependence, you’re now equipped to harness the sun’s power effectively. The technology is ready. The question is: are you?
How useful was this post?
Click on a star to rate it!
Average rating 0 / 5. Vote count: 0
No votes so far! Be the first to rate this post.
We are sorry that this post was not useful for you!
Let us improve this post!
Tell us how we can improve this post?
charlesnoble
Here at Spheral Solar, I’m a hands-on solar power enthusiast, constantly exploring and experimenting with DIY solutions. I’m dedicated to sharing my discoveries, insights, and even the bumps I hit along the way, all in the pursuit of a more sustainable future.
Why Your LiFePO4 Battery Fails in Winter (And How to Fix It) by Charlesnoble February 9, 2026 Your lithium iron phosphate battery won’t charge below 32°F and risks permanent damage from freezing—a problem that catches many first-time solar DIYers off guard during their system’s first winter. LiFePO4 batteries operate within a specific temperature window: charging requires 32°F to 113°F (0°C to 45°C), while discharging tolerates a wider…
How Solar Energy Actually Works in Your Home (And… by Charlesnoble December 5, 2025 Capture sunlight with photovoltaic panels that convert solar radiation into direct current electricity through semiconductor technology. Position your panels at the optimal angle for your latitude—typically between 30 and 45 degrees in most locations—to maximize energy absorption throughout the day. Store excess electricity in deep-cycle lithium or lead-acid batteries, which…
Stop Killing Your E-Bike Battery: Charging Mistakes… by Charlesnoble November 6, 2025 Charge your e-bike battery to only 80% for daily rides—this single habit can double its usable lifespan compared to always topping off to 100%. Store the battery at room temperature between 32°F and 77°F, removing it from the bike during extreme weather since heat above 90°F accelerates degradation faster than…
Why NiMH Batteries Keep Your Solar Lights Running… by Charlesnoble November 20, 2025 Choose rechargeable NiMH batteries rated between 600-1000mAh for most standard solar garden lights, matching the voltage of your original batteries—typically 1.2V AA or AAA sizes. These batteries outperform regular alkaline batteries because they handle the constant charge-discharge cycles that solar lights demand daily, lasting 2-3 years compared to just months…
Which Solar Battery Actually Lives Up to the Hype? by Charlesnoble November 8, 2025 Compare capacity ratings in amp-hours (Ah) and watt-hours (Wh) first—these numbers tell you exactly how much energy each battery stores and how long it’ll power your devices. Check the depth of discharge (DoD) percentage next, because a battery with 90% DoD gives you far more usable energy than one limited…
Why Your Solar Lights Keep Dying (and How 9V… by Charlesnoble January 25, 2026 Match your solar panel’s voltage output to your 9V battery’s charging requirements by selecting panels rated between 9-12 volts to prevent undercharging or damaging overcharge. Test your panel’s actual output with a multimeter in full sunlight before connecting any battery—you’ll often find advertised voltages don’t match real-world performance, especially on…
Subscribe for handpicked DIY projects, exclusive tips, and giveaways.
Route your PV wires through UV-resistant conduit within 18 inches of leaving the solar array, securing it every 3 feet with proper clamps to prevent wind damage and code violations. This single step prevents 80% of the wire degradation issues I’ve seen in DIY solar installations over the past decade. Group your positive and negative… Read more: Why Your PV Wire Management Could Fail Inspection (And How to Fix It)
Understand that 6000 volts sounds terrifying but delivers surprisingly low amperage—typically around 120 milliamps for just 3/10,000th of a second per pulse. This combination creates an unforgettable shock that trains animals to avoid the fence without causing lasting harm. The voltage pushes current through thick fur and hide, while the minimal amperage and microsecond duration… Read more: Why 6000 Volts Won’t Kill Your Livestock (But Will Stop Predators Cold)
Check the maximum voltage and current ratings first—these determine whether your controller can actually handle your solar panel array without frying itself on the first sunny day. I learned this the hard way when my first DIY system shut down every afternoon because I’d paired 600 watts of panels with a controller rated for only… Read more: Why Your Solar Setup Needs Both a Charge Controller and Inverter (And How to Pick the Right Ones)


")
")

")

")
")
")

")

")


