Transform Your Yard After Dark: Solar Lights That Actually Work
Updated:
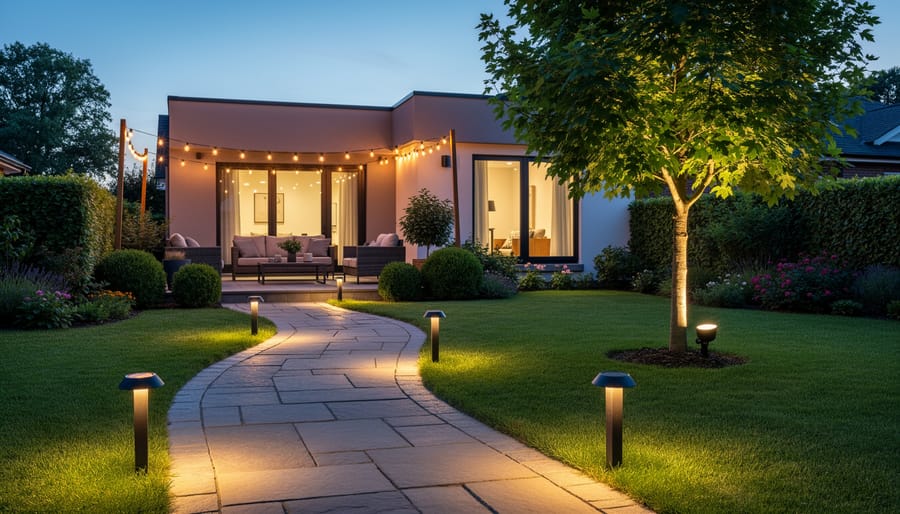
Position your solar path lights along walkways where they’ll receive at least 6-8 hours of direct sunlight daily—shaded placement is the number one reason homeowners complain about dim performance after sunset. I learned this the hard way when I installed a beautiful string of solar lanterns under my patio overhang, only to find they barely glowed for an hour each evening.
Expect modern quality solar lights to run 6-10 hours on a full charge, with LEDs producing 10-200 lumens depending on size and price point. The $5 bargain lights you’ll find at big box stores typically disappoint within months, while mid-range options ($20-40 per fixture) use better batteries and weather-sealed components that actually last multiple seasons. This isn’t just decoration—it’s an investment in your outdoor living space.
Choose between five main categories based on your specific needs: path lights for walkways and borders, spotlights for highlighting landscaping features, string lights for ambient entertaining areas, decorative lanterns for tables and posts, and wall-mounted sconces for entrances. Each serves different functions, and mixing types creates the layered lighting effect that makes outdoor spaces feel professionally designed.
Test your soil conditions before installing stake-mounted fixtures. Rocky or heavily compacted ground requires pre-drilling pilot holes, while sandy soil may need stabilizing bases to prevent tipping. I’ve watched too many beautiful solar lights topple after the first rainstorm because people assumed they could just push them into any ground.
The technology has genuinely improved over the past five years. Better photovoltaic cells, lithium batteries replacing old nickel-cadmium ones, and smarter charge controllers mean today’s decorative solar lighting actually delivers on its promise—if you select wisely and install correctly.
Why Decorative Solar Lighting Changes Everything (Beyond Just Looking Pretty)
I’ll be honest with you—when I first installed decorative solar lights around my backyard, I thought they’d just make evening gatherings look nicer. What I didn’t expect was how completely they’d transform how we actually use our outdoor space.
Here’s what I’ve learned after years of testing these lights: they’re not just pretty decorations. They’re problem-solvers.
The most obvious benefit? Zero electrical costs. Every decorative solar light you install is one less fixture drawing power from your grid. Over time, that adds up. I’ve had pathway lights running for five years now without paying a single cent for their operation. Compare that to traditional landscape lighting, and the math speaks for itself.
Then there’s the safety factor. Those charming lanterns lining your walkway aren’t just atmospheric—they’re preventing twisted ankles and midnight stumbles. I positioned solar spotlights near our deck stairs after my neighbor took a tumble at a barbecue. Problem solved, and it looks intentional, not like an afterthought.
Property value gets a real boost too. Real estate agents consistently mention that well-lit outdoor spaces photograph better and create that “move-in ready” impression. Decorative solar lighting shows you’ve invested in the property without the buyer worrying about complex electrical systems to maintain.
But here’s my favorite part: the DIY appeal. You don’t need permits, electricians, or specialized tools. If you can push a stake into soil or hang a hook, you can install these lights. This accessibility has opened up countless DIY solar lighting projects for people who’d never tackle traditional electrical work.
And let’s talk environmental impact. Every solar light represents a tiny but meaningful shift toward renewable energy. It’s not going to save the planet single-handedly, but it’s a tangible step anyone can take. No guilt, just good lighting powered by sunshine.
Solar string lights transform an ordinary patio into an inviting nighttime retreat without electrical wiring.
The Real-World Performance Question: What to Expect
How Much Light You’ll Actually Get
Let’s talk honestly about brightness—because I’ve learned the hard way that decorative solar lights won’t illuminate your backyard like stadium floodlights, and that’s actually okay once you understand what you’re getting.
Most decorative solar lights produce between 1-15 lumens per fixture. To put that in perspective, a standard 60-watt incandescent bulb puts out about 800 lumens. String lights typically hover around 1-3 lumens per bulb, creating that magical twinkle effect but providing virtually zero functional lighting. Pathway markers usually range from 5-15 lumens—enough to define a walkway edge but not enough to read by. Those decorative lanterns and stake lights fall somewhere in the middle at 3-10 lumens.
Here’s how I think about it: if you want to safely navigate your garden path without tripping, you’ll need lights on the higher end of that spectrum, ideally 10+ lumens spaced every few feet. But if you’re after ambiance—that warm glow for evening gatherings or subtle garden accents—lower lumen counts work beautifully.
I installed 2-lumen string lights across my patio last summer, and while they’re absolutely useless for task lighting, they create the perfect atmosphere for dinner parties. For the pathway to my shed, though, I needed 15-lumen markers because I actually walk that route carrying tools.
The key takeaway? Decorative solar lights excel at mood lighting, not replacement floodlights. Match your expectations to their actual output, and you’ll be delighted rather than disappointed. Consider layering different types—ambient string lights for atmosphere, brighter pathway lights where you need visibility.
Runtime and Weather Reality Check
Let me be honest with you about what to expect from your solar lights, because nobody likes unpleasant surprises. Most decent decorative solar lights will run between 6 to 8 hours after a full day’s charge in summer. That’s the good news. The reality check? That drops to 4-6 hours in winter, and sometimes less if you live somewhere with extended cloudy periods.
I learned this the hard way during my first winter in Seattle. Those charming pathway lights that glowed beautifully until midnight in July were barely making it to 9 PM by December. It wasn’t that they broke—they were just doing their best with about 40% less sunlight.
Geographic location makes a huge difference. When I consulted with a homeowner in Arizona, their lights performed like champions year-round with that abundant sunshine. Meanwhile, my cousin in Maine had to accept that her garden lights would be mood lighting at best from November through February.
Here’s what I’ve found actually works: adjust your expectations seasonally. In summer, you’ll get full performance and can rely on your lights for evening gatherings. In winter, think of them as accent lighting rather than primary illumination. Position your solar panels to capture maximum sun—even a slight angle adjustment can add 30 minutes of runtime.
Cloudy stretches are tough on all solar lights. After three rainy days, expect reduced brightness and shorter run times. The batteries need that sunshine to recharge properly. Some higher-quality lights include battery indicators, which I’ve found incredibly useful for managing expectations.
Temperature affects battery performance too. Extreme cold can reduce efficiency by 20-30%, while moderate climates see more consistent performance. If you live somewhere with harsh winters, consider bringing your favorite pieces indoors during the coldest months to preserve battery life for the seasons when you’ll actually use them outside.
Types of Decorative Solar Lights That Actually Deliver
String and Fairy Lights: Creating Magical Spaces
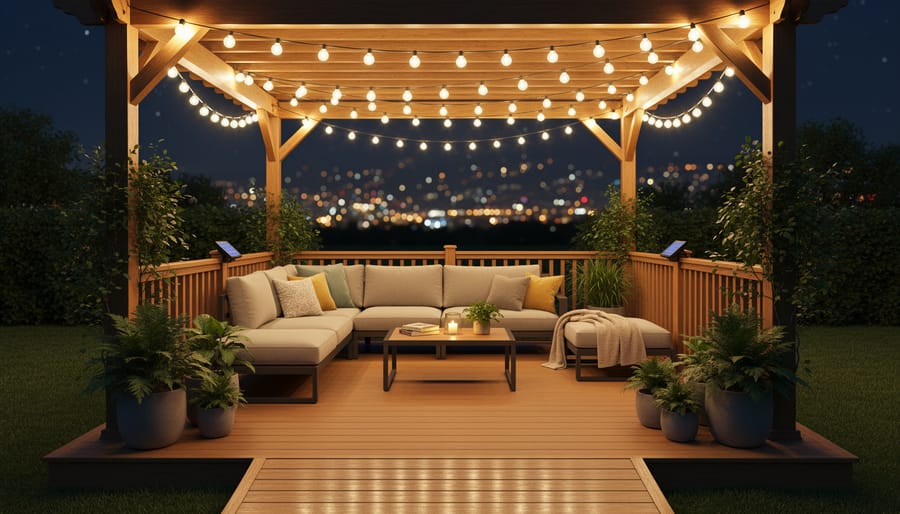
Solar string lights transform ordinary outdoor spaces into enchanting retreats without the hassle of running electrical wiring. I’ve draped these across my own pergola, and the warm glow they create for evening gatherings is simply magical.
When choosing solar string lights, you’ll encounter three main bulb styles: Edison-style bulbs for vintage charm, globe lights for a festive atmosphere, and LED fairy lights for delicate sparkle. Edison bulbs typically offer warmer tones, while LEDs provide brighter illumination with longer battery life. Spacing matters too—bulbs positioned 12-18 inches apart create cozy ambiance, while wider spacing works better for larger areas.
For installation, start with creative installation methods that maximize solar panel exposure. Position the panel where it receives at least 6-8 hours of direct sunlight daily. Use hooks, zip ties, or guide wires to support the strings, ensuring they’re taut enough to prevent sagging but not overstretched.
Pro tip: test your lights before permanent installation. Many quality sets include rechargeable batteries that need a full charge cycle before optimal performance. Consider purchasing extra clips or hooks—you’ll inevitably need more than the package includes for that perfect drape effect.
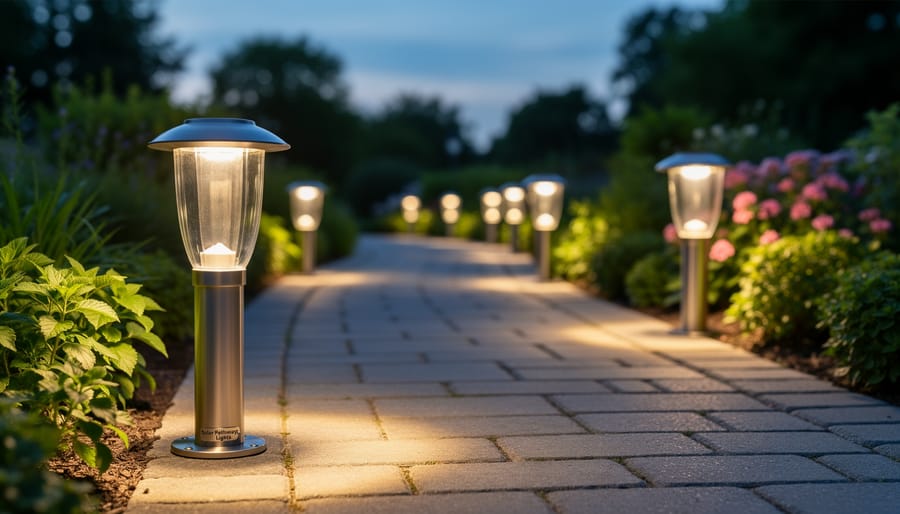
Quality decorative solar pathway lights combine aesthetic appeal with functional illumination for garden walkways.
Pathway and Garden Stake Lights: Form Meets Function
Pathway lights are where decorative solar lighting really shines, transforming functional illumination into artistic expression. I’ve experimented with everything from minimalist modern stakes to whimsical butterfly designs in my own garden, and the right choice depends entirely on your landscape personality.
For spacing, I recommend placing pathway lights every 6-8 feet along walkways. This creates a gentle guiding ribbon of light without overwhelming the space or your budget. When I first installed mine, I made the mistake of spacing them too close together—it looked more like a runway than a garden path!
Design cohesion matters more than you might think. Mixing styles can work if you’re intentional about it, but randomly scattered designs often feel chaotic. I suggest picking one primary style for main pathways and reserving accent pieces for garden beds or focal points. Glass globes offer timeless elegance, while geometric metal designs complement contemporary homes beautifully.
Consider brightness levels too. Subtle warm-white LEDs work wonderfully for ambient lighting, while brighter options serve better for safety along stairs or uneven terrain. The beauty of solar stakes is their flexibility—you can experiment with placement before committing, adjusting until you achieve that perfect balance between function and visual appeal.
Lanterns and Hanging Fixtures: Statement Pieces
Solar lanterns and hanging fixtures really transformed my backyard last summer—I hung a few vintage-style metal lanterns along my pergola, and honestly, they create such a welcoming atmosphere during evening gatherings. These statement pieces come in incredible variety, from Moroccan-inspired metal cutouts that cast beautiful shadow patterns to classic Edison-bulb lanterns and colorful glass globes.
Material choice matters more than you might think. I’ve tested metal (typically powder-coated steel or copper), plastic, and glass options. Metal lanterns offer durability and timeless appeal but can get hot in direct sun, while high-quality plastics resist weather damage without the weight. Glass provides authentic charm but requires careful handling during installation.
Placement strategy is key to maximizing both function and aesthetics. Shepherd’s hooks work wonderfully for creating height variation—I stagger mine at different distances along pathways to guide guests naturally. For hanging fixtures, ensure the solar panel gets adequate sunlight even when suspended under eaves or tree branches. Sometimes I’ll position the panel separately and run the included wire to a shadier hanging spot.
One practical tip from experience: choose lanterns with replaceable batteries. After two seasons, you’ll appreciate being able to swap them out rather than replacing the entire fixture. Look for models with at least 6-8 hours of runtime after a full charge for reliable evening illumination.
Accent and Spot Lights: Highlighting Your Landscape
Accent and spot lights are where solar technology really gets to show off. I installed several solar uplights around my Japanese maple last spring, and the transformation at night is absolutely stunning. These fixtures sit low to the ground and cast light upward, creating dramatic shadows and highlighting architectural details or interesting tree bark textures.
Solar spotlights work similarly but offer more directional control. Position them to illuminate a garden sculpture, flag, or building facade. Modern versions include adjustable heads and surprisingly bright LEDs that rival their wired counterparts. For those wanting to experiment with color, many models now feature RGB options that cycle through different hues or stay fixed on your chosen shade.
The key is restraint. Start with one or two focal points rather than lighting everything at once. This creates visual hierarchy and makes your landscape feel professionally designed. Check out our guide on landscape lighting design ideas for placement strategies that maximize impact. Remember, these lights need direct sun exposure during the day, so avoid placing them under dense canopy cover where they’ll struggle to charge.
Decorative Wall and Fence Lights: Vertical Interest
When you want to add visual interest to vertical surfaces, wall-mounted solar sconces and fence post caps offer surprisingly effective solutions. I installed several sconces along my back fence last year, and they’ve completely transformed evening gatherings—no electrician required!
Solar wall sconces come in styles ranging from modern stainless steel to vintage lantern designs. Look for models with separate solar panels that you can position for optimal sun exposure while mounting the light fixture in shadier decorative spots. This flexibility makes a huge difference in performance.
Fence post caps are my personal favorite for quick impact. They simply slip over standard fence posts and charge throughout the day. The best ones have replaceable batteries and durable polycarbonate lenses that withstand weather without yellowing. I’ve found that spacing them every 6-8 feet creates consistent lighting without overwhelming your fence line.
For brick or siding installations, choose sconces with pre-drilled mounting holes and included hardware. Most install in under fifteen minutes with just a drill and screwdriver. Position them where they’ll receive at least 4-6 hours of direct sunlight for reliable nightly performance.
What Separates Good Solar Lights from Yard Sale Junk
Panel Quality and Placement: The Power Source
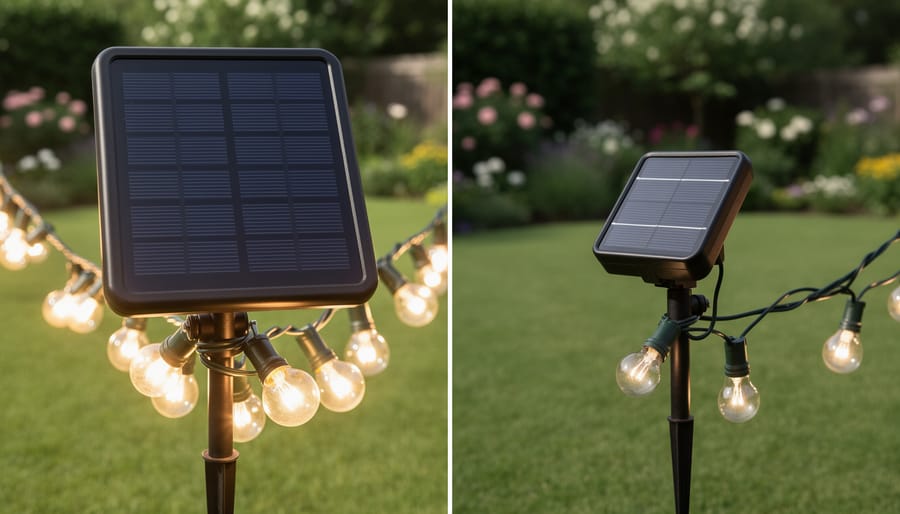
Not all solar panels are created equal, and this becomes especially important in decorative lighting where aesthetics often compete with functionality. The solar panel is your light’s power plant, and understanding its capabilities will help you set realistic expectations.
Most decorative solar lights use monocrystalline or polycrystalline panels. Monocrystalline panels are more efficient, converting about 15-20% of sunlight into electricity, while polycrystalline typically reaches 13-16%. In practical terms, this means monocrystalline lights can charge faster and potentially run longer on cloudy days.
You’ll encounter two basic configurations: integrated panels (built into the light fixture itself) and remote panels (connected by a cable). Integrated designs are cleaner looking and easier to install, but they only work well when the decorative piece itself can be positioned in full sun. Remote panels offer flexibility, letting you place the attractive fixture in shade while the panel soaks up sun elsewhere.
Here’s where positioning becomes critical. Even partial shade from trees, eaves, or fences can reduce charging efficiency by 50% or more. Charles always recommends observing your intended location throughout the day before committing to placement. He’s developed a simple calculator on our site that helps estimate how much sun exposure you’ll need based on your light’s battery capacity and nightly runtime goals. This quick calculation has saved many DIYers from disappointment when their beautifully placed lantern doesn’t get enough juice to shine.
The solar panel quality and size directly determines how well decorative lights charge and perform after dark.
Battery Capacity: The Make-or-Break Component
Here’s the honest truth: your solar lights are only as good as their batteries. I learned this the hard way when my first batch of pathway lights died after six months because the batteries couldn’t hold a charge anymore.
Most decorative solar lights use either NiMH (Nickel-Metal Hydride) or lithium batteries. NiMH batteries are the budget-friendly workhorses you’ll find in most basic lights. They handle temperature swings reasonably well and cost less to replace. Lithium batteries, on the other hand, are the premium choice—they charge faster, last longer through winter conditions, and maintain their capacity better over time.
Now, about those mAh ratings you see on product specs: think of milliamp-hours (mAh) as your light’s fuel tank size. A 600mAh battery holds less energy than a 1200mAh one, plain and simple. For decorative accent lights that only glow for a few hours, 300-600mAh works fine. But if you want pathway lights illuminating your walkway from dusk till midnight, look for at least 800-1200mAh.
Here’s my community tip: always check if batteries are replaceable before buying. Some manufacturers seal everything shut, turning a 40-dollar fixture into disposable junk once the battery dies. Quality lights let you swap batteries easily, extending their lifespan by years instead of months.
Build Quality That Survives Real Weather
I learned about IP ratings the hard way when three of my beautiful pathway lights turned into water-logged paperweights after one spring rainstorm. Here’s what I wish I’d known: that two-digit IP code actually matters.
The first number (0-6) shows dust protection, and the second (0-8) indicates water resistance. For outdoor solar lights, you want at least IP44 for covered areas, but IP65 or higher for anything exposed to direct rain. I now only buy IP65-rated fixtures for my garden, and they’ve survived two harsh winters without issues.
Material choice depends on your climate. In my coastal area, I’ve watched cheap plastic housings crack within months from UV exposure and salt air. Stainless steel and powder-coated aluminum hold up beautifully, though they cost more upfront. For desert climates, metal can get scorching hot, so high-quality UV-resistant plastics work better.
Pay attention to the solar panel quality too. Glass-covered panels outlast plastic ones significantly. My neighbor’s bargain lights with plastic panels became so clouded after one summer that they barely charged anymore.
The battery compartment seal is another weak point. Check that it has a proper gasket, not just a snap-on cover. This small detail separates lights that last years from those lasting months.
Installation and Placement Strategies That Maximize Performance
Sunlight Mapping: Finding the Sweet Spots
Finding the right spot for your solar lights doesn’t require fancy equipment—just a little observation and common sense. I learned this the hard way when I first installed pathway lights under what I thought was “partial sun.” Turns out, three hours of morning light wasn’t cutting it!
The easiest technique is the shadow tracking method. On a sunny day, check your proposed locations at 10 AM, noon, and 3 PM. Ideally, you want at least 6-8 hours of direct sunlight hitting the solar panel. Take photos at each time slot—your phone’s time stamp becomes a simple mapping tool you can reference later.
Shade challenges are trickier than they seem. That small tree casting afternoon shadows now? In summer, it might block twice the area. Seasonal variations matter significantly—winter sun sits lower in the sky, meaning your fence or building might cast longer shadows that weren’t there in July.
Here’s a practical tip from my own yard: if a location gets great morning sun but afternoon shade, consider it marginal rather than optimal. Morning light tends to be less intense than midday rays.
For stubborn shady areas you really want to illuminate, look into models with separate panels on extension cables. You can mount the panel in full sun while placing the decorative fixture wherever you need light. It’s a game-changer for challenging installations.
Creative Installation Without Electrical Skills
Here’s the great news: installing decorative solar lights is genuinely as simple as stake-and-forget or hang-and-enjoy. No trenching, no wiring, and definitely no electrician bills.
For pathway and garden stake lights, the process couldn’t be easier. Most come with pointed stakes that push directly into soil. I learned this trick the hard way after bending several stakes: water the ground first if your soil is compacted or rocky. Push straight down with a slight twisting motion rather than forcing it. If you hit a rock, relocate the light a few inches rather than risking damage to the stake.
String lights present slightly more challenge but remain completely doable. For patio or deck installations, adhesive hooks designed for outdoor use work wonderfully on wood, vinyl, or stucco surfaces. Clean the mounting surface with rubbing alcohol first to ensure the adhesive bonds properly. For spanning larger areas like yards or between trees, use screw-in cup hooks on wooden surfaces or shepherd’s hooks pushed into the ground as anchor points. The key is creating a gentle swag rather than pulling strings taut, which stresses both the lights and mounting points.
Wall-mounted solar fixtures typically include mounting hardware. Mark your holes with a pencil, drill pilot holes slightly smaller than your screws, and mount directly to wood siding, fence posts, or masonry with appropriate anchors. I always recommend mounting solar panels where they’ll receive maximum sunlight, even if that means positioning the fixture a few inches from where you originally envisioned it.
For renters or those avoiding permanent installations, freestanding shepherd’s hooks, deck rail brackets, and weighted planters with built-in light holders offer completely removable solutions that work surprisingly well.
Maintenance That Takes Minutes (Not Hours)
Let me share something I learned the hard way: when I first installed solar path lights around my garden, I basically ignored them for eight months. By the time I remembered they existed, half weren’t lighting up at all, and the others were putting out this sad, dim glow that barely illuminated anything. I thought they’d died. Turns out, they just needed about ten minutes of basic care.
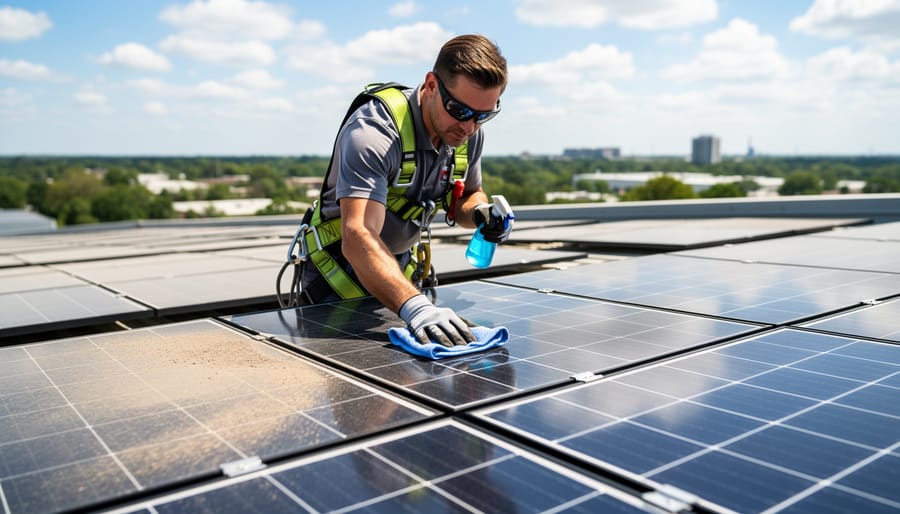
Here’s the good news—keeping decorative solar lights in top shape is genuinely simple. The most important task takes maybe five minutes per light: cleaning the solar panel. Dust, pollen, bird droppings, and general outdoor grime create a film that blocks sunlight from reaching the photovoltaic cells. I use a soft, damp microfiber cloth and wipe the panel down every month or two. If you’ve got stubborn buildup, add a drop of mild dish soap to your water. This one action can restore lights to nearly full brightness.
The second maintenance task is seasonal battery replacement. Most decorative solar lights use rechargeable AA or AAA batteries that last 1-2 years. When you notice your lights getting dimmer or not staying lit as long, swap in fresh rechargeable batteries. I keep a labeled container in my garage with replacement batteries specifically for this purpose. It’s a five-minute job that feels like giving your lights a complete reset.
Beyond that, occasionally check for debris around the sensors or in fixture crevices. Spiderwebs love to accumulate in decorative lanterns, and leaves can block light sensors. A quick brush or rinse handles this.
During winter months in harsh climates, consider bringing in especially delicate glass or ceramic fixtures. But honestly, most quality solar lights handle weather just fine if you’ve positioned them thoughtfully.
I now set a reminder on my phone every six weeks: “Solar light check.” That’s it. Fifteen minutes total for my whole yard, and my lights perform like they’re brand new. Compare that to the hours I’ve spent troubleshooting conventional landscape lighting, and solar maintenance feels like a genuine gift.
Regular cleaning of solar panels takes just minutes and significantly improves charging performance.
Common Problems and Quick Fixes
Even the best decorative solar lights occasionally hiccup. I’ve spent countless evenings troubleshooting my own installations, and most issues have surprisingly simple fixes that don’t require any special tools or expertise.
If your lights are barely glowing or dying out quickly, the solar panel is usually the culprit. I learned this the hard way when my pathway lights became so dim I could barely see them. Nine times out of ten, the panel has accumulated a layer of dust, pollen, or debris that blocks sunlight absorption. Grab a damp cloth and gently wipe the panel surface—you’ll be amazed at the difference. If cleaning doesn’t help, check whether nearby tree branches or structures have grown to cast shadows on your panels during peak sun hours. Even partial shade can slash charging efficiency by 70 percent or more.
Short runtime problems typically point to aging batteries. Most decorative solar lights use rechargeable batteries that gradually lose capacity after 1-2 years of regular use. The good news? Replacement batteries cost just a few dollars and usually pop right out with a simple twist of the battery compartment. I keep spare batteries on hand now after watching my favorite lanterns fade to nothing mid-evening during a backyard gathering.
For lights that flicker or refuse to turn on entirely, moisture infiltration is often to blame. Check the battery compartment and internal wiring for condensation or corrosion, especially after heavy rain. A cotton swab with a bit of rubbing alcohol works wonders for cleaning corroded contacts. If water keeps getting inside, apply a thin bead of waterproof silicone sealant around seams and the solar panel edge.
One trick I’ve discovered: if lights won’t turn on at dusk, cover the solar panel completely with your hand for thirty seconds. Sometimes the light sensor gets confused and needs a manual reset to recognize darkness. It sounds silly, but this simple trick has saved me from unnecessarily replacing perfectly functional lights more times than I can count.
Your outdoor solar lighting journey doesn’t need to begin with a major overhaul of your entire yard. In fact, I’ve found that starting small allows you to experiment, learn what works in your specific environment, and gradually build the outdoor space you’ve been envisioning. Maybe it’s a single pathway with stake lights, or a decorative string across your patio. Each installation teaches you something new about placement, sunlight patterns, and what styles truly resonate with you.
The beauty of solar lighting is the freedom it gives you. No trenching, no electrician bills, no permits in most cases. Just you, your creative vision, and the sun doing the heavy work. I still get genuine satisfaction every evening when my lights click on automatically, knowing they’re powered entirely by renewable energy and arranged exactly how I want them. That sense of accomplishment never gets old.
Don’t forget to explore budget-friendly DIY alternatives if you’re looking to stretch your budget even further while adding personal touches. The DIY solar community is full of generous people sharing their successes and failures, so you’re never truly experimenting alone. Share your projects, ask questions, and enjoy the process. Your sustainable, beautifully lit outdoor sanctuary is closer than you think, and it starts with that first light.
How useful was this post?
Click on a star to rate it!
Average rating 0 / 5. Vote count: 0
No votes so far! Be the first to rate this post.
We are sorry that this post was not useful for you!
Let us improve this post!
Tell us how we can improve this post?
charlesnoble
Here at Spheral Solar, I’m a hands-on solar power enthusiast, constantly exploring and experimenting with DIY solutions. I’m dedicated to sharing my discoveries, insights, and even the bumps I hit along the way, all in the pursuit of a more sustainable future.
10 Best Outdoor Solar Lights in 2023 by Adeyomola August 30, 2021 You will get the best experience with outdoor solar lights when you opt for lights with good solar panels and long lighting times. But besides that, ensure your choice can charge quickly and offers sufficient brightness. Such a selection will give you a complete experience. Best Solar Lights for Outdoors…
Mason Jar Solar Lights That Actually Work (And Cost… by Charlesnoble November 12, 2025 Transform ordinary mason jars into enchanting garden lights by securing solar lids to clean, dry containers—no wiring, no electricity bills, just pure sun-powered ambiance. Position them along walkways where they’ll capture at least 6 hours of direct sunlight daily, then watch them automatically illuminate your evenings with a warm, welcoming…
Solar Inground Lights That Actually Survive Winter… by Charlesnoble February 5, 2026 Bury solar inground lights 4-6 inches deep in compacted soil along pathways, ensuring the solar panel faces true south for maximum charge—a lesson I learned after my first installation facing southeast yielded only 3 hours of nightly illumination instead of the promised 8. Test soil drainage before purchasing by digging…
Why Your Flagpole Deserves Solar Light (And How to… by Charlesnoble November 7, 2025 Choose a solar light specifically designed for flagpole tops—not generic garden lights—with at least 20 lumens output and a downward-facing beam angle that creates the proper illumination pattern required by U.S. Flag Code. Mount the solar panel where it receives 6-8 hours of direct sunlight daily, even if that means…
Solar Post Lamps That Actually Light Your Driveway… by Charlesnoble May 9, 2026 Position solar post lamps 15-20 feet apart along your driveway perimeter to create consistent illumination without dark gaps between fixtures. This spacing works for most residential driveways and prevents the frustrating experience of adequate lighting at the posts but pitch darkness in between—a mistake I made on my first installation…
11 Best Solar-Powered Heat Lamps in 2023 by Adeyomola July 2, 2021 Best solar-powered heat lamps prioritize solar panel efficiency, rapid charging time, and long-running time (high battery capacity) in their product. While those features are desirable, the best solar-powered heat lamps above the rest are their luminous flux/output power. Best Solar Heat Lamps at a Glance AGPTEK Solar Pendant Light -…
Subscribe for handpicked DIY projects, exclusive tips, and giveaways.
A portable power station will typically run your camping devices for anywhere from a few hours to several days on a single charge, depending on what you’re powering and the station’s capacity. As for lifespan, most quality units last between 3 to 10 years before the battery degrades enough to need replacement. The distinction matters… Read more: Your Portable Power Station Won’t Last as Long as You Think (Here’s Why)
A J1772 solar charger combines a standard J1772 charging connector (the same Type 1 plug used by most North American EVs and electric bikes) with solar panels and battery components to create an off-grid or grid-supplemented charging system. You’ll need three core elements: solar panels (typically 400-800 watts for practical ebike charging), a battery storage… Read more: How to Choose a J1772 Solar Charger for Your Ebike: A Buying Guide
Installing a whole house ventilation system powered by solar takes about 6 to 8 hours for a moderately skilled DIYer and delivers continuous fresh air circulation without touching your electric bill. The core method involves mounting a solar panel on your roof to power an intake or exhaust fan, routing ductwork through your attic or… Read more: How to Install a Whole House Ventilation System Using Solar Power

")
")
")
")


")
")
")
")


