How to Make DIY Solar Tubes for Free Natural Lighting in Your Home
Updated:
You can build a DIY solar tube for $50 to $150 and start harvesting natural daylight in a weekend. This simple project combines a reflective tube, clear dome, and diffuser to channel sunlight from your roof into dark interior spaces, delivering illumination equivalent to multiple bulbs without electrical costs or ongoing energy consumption.
I remember the first time I installed a commercial solar tube in my own hallway back in 2018. The transformation was immediate: a once-gloomy corridor became bright and welcoming. But the $600 price tag stuck with me. When my neighbor asked for advice on lighting his workshop last year, we tackled a DIY version together using aluminum ducting and acrylic domes. Total cost? $87. The space went from needing overhead lights all day to relying purely on natural light until sunset.
The beauty of this project lies in its simplicity. Unlike full solar lighting conversions that require electrical work, solar tubes are purely passive light transporters. They work on the same principle as how solar lights work capturing and redirecting energy, but without batteries or circuitry. You’re essentially punching a controlled hole through your roof and installing a highly reflective pipe that bends and bounces sunlight down to where you need it.
The typical build takes 4 to 6 hours for someone with basic carpentry and roofing experience. You’ll work from both attic and roof, so comfort with ladders and heights is essential. The hardest part isn’t the installation itself but the planning: locating roof rafters, calculating angles, and weatherproofing the roof penetration properly.
What Are Solar Tubes and How Do They Work?
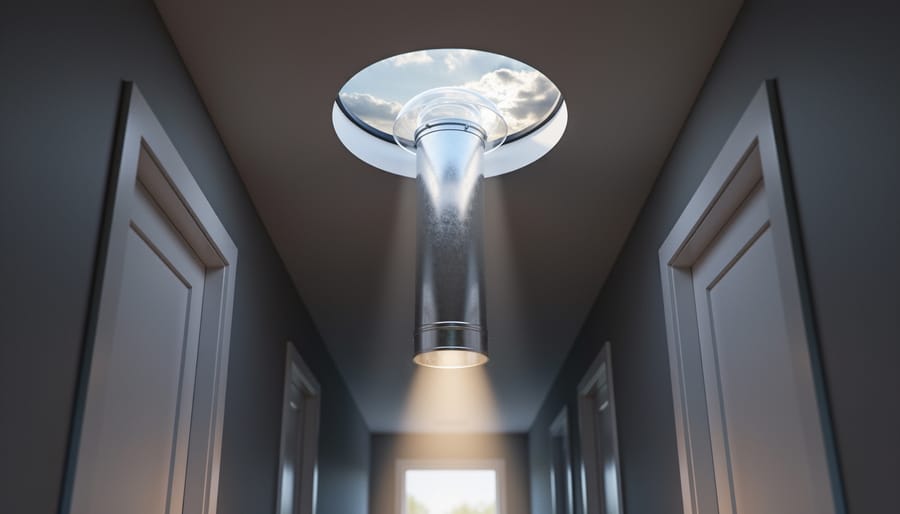
Solar tubes are passive daylighting devices that channel sunlight from your roof into interior rooms without windows. Think of them as periscopes for sunlight: a clear dome on the roof captures light, a highly reflective tube transports it through your attic or ceiling cavity, and a diffuser on your ceiling spreads that natural light throughout the room. You might also see them called sun tubes, light tubes, or tubular skylights, but they all work on the same principle.
The science is surprisingly simple. The rooftop dome acts like a lens, gathering light from a wide angle even when the sun isn’t directly overhead. This dome typically includes UV-filtering acrylic or polycarbonate that can catch light from nearly 180 degrees of sky. Once inside, the light bounces down through a tube lined with highly reflective material, usually rated at 95-99% reflectivity. Each bounce loses a tiny bit of intensity, which is why shorter, straighter tubes perform better than long, winding ones. The ceiling diffuser then scatters this concentrated beam into soft, even illumination that mimics the quality of electric lighting.
Key Takeaway: Solar tubes require zero electricity, work even on overcast days by capturing diffuse skylight, stay cooler than traditional skylights (no direct heat gain), and typically deliver light equivalent to a 200-400 watt incandescent bulb during daylight hours.
The basic components break down into three parts you’ll build or source: the capture dome (weatherproof and clear), the reflective tube (rigid or flexible, 10-14 inches in diameter for most rooms), and the diffuser (frosted or prismatic to spread light evenly). Unlike skylights that require major structural changes, cutting large roof openings, and often need blinds to control heat and glare, solar tubes use small holes roughly the size of a dinner plate. This makes them perfect DIY projects since you’re working with manageable openings, minimal structural impact, and straightforward sealing techniques. The compact size also means less risk of leaks and no need for expensive custom flashing or structural reinforcement.
A bright daylight beam enters through the ceiling diffuser, showing how solar tubes can illuminate dark indoor spaces without electricity.
Tools and Materials You’ll Need
Before you climb onto the roof, let’s talk about what you’ll actually need. I remember my first solar tube attempt, I thought I could wing it with just a jigsaw and some duct tape. Spoiler: that didn’t end well. Having the right gear makes this project significantly easier and safer.
The good news is you don’t need a massive budget to build a functional solar tube. You can start with around $50 in materials if you’re scrappy, or invest $200-300 for a more polished result that rivals commercial installations.
Here’s what you’ll need for a standard 10-inch diameter installation:
Tools: Jigsaw or reciprocating saw, drill with hole saw kit, measuring tape, chalk line, utility knife, caulking gun, safety glasses and dust mask
Capture dome: Clear acrylic dome 10-14 inches ($25-60) or repurposed skylight dome
Reflective tube: Rigid aluminum ducting ($15-30 per 4-foot section) or flexible aluminum duct ($10-20 for 8 feet)
Reflective coating: Commercial solar tube film ($40-70), automotive chrome vinyl wrap ($20-35), or emergency blankets/Mylar sheets ($5-15 for DIY approach)
Diffuser: Frosted acrylic sheet ($15-25), prismatic light panel ($25-40), or white plastic ceiling fixture cover ($8-15)
Flashing and sealing: Metal step flashing ($12-20), roofing cement ($8), aluminum tape ($6), foam weatherstripping ($5)
Structural materials: 2×4 lumber for framing ($8-15), metal brackets or angle iron ($10-18), screws and fasteners ($10)
Optional upgrades: UV-resistant polycarbonate dome ($60-90), commercial reflective tubing ($80-120 for pre-coated sections)
The biggest decision you’ll face is choosing between flexible and rigid tubing. Flexible ducting costs less and navigates tricky attic spaces easily, but it has more bends that reduce light transmission. Rigid aluminum duct provides better light output because it maintains a straighter path, though it requires more careful planning and precise cuts.
For reflective coating, emergency blankets work surprisingly well for tight budgets. I used them on my first tube and got about 70% of the light output compared to commercial film. The automotive chrome wrap splits the difference nicely, better reflectivity than emergency blankets at half the cost of specialized solar tube film.
The key parts of a solar tube, capture dome, reflective tube, and ceiling diffuser, are arranged to help visualize how the system works.
Safety Considerations Before You Start
Before you grab a saw and head for the ceiling, let’s talk about keeping yourself safe. I learned this the hard way on my first solar tube project when I nearly stepped through the ceiling drywall while navigating my attic. Working at heights, cutting structural materials, and dealing with hidden utilities demands respect and proper precautions.
Start with ladder safety. Use a sturdy, properly rated ladder that extends at least three feet above your roof edge. Have someone hold the base while you climb, and never overreach to the side. On the roof itself, wear shoes with good grip, work during dry conditions, and consider a safety harness if your pitch is steep. I always work in the morning when it’s cooler and the shingles aren’t slippery from heat.
Warning: Before cutting anything, verify there’s no electrical wiring, plumbing, or HVAC ducts in your path by checking your attic space thoroughly. Many areas also require building permits for roof penetrations, so contact your local building department first.
Protective gear matters more than you might think. Safety glasses are non-negotiable when cutting overhead, drywall dust and insulation fibers love to find your eyes. Wear a quality dust mask or respirator when working around insulation, gloves for handling sharp edges and roofing materials, and long sleeves to avoid fiberglass irritation.
Know your limits. If you’re uncomfortable working on a steep roof, have never cut through roofing before, or discover structural complications like load-bearing members in your tube path, calling a professional isn’t admitting defeat. It’s smart decision-making that could prevent injury or costly damage to your home.
Roof safety and careful positioning matter when cutting and weatherproofing the roof opening for a solar tube.
Planning Your Solar Tube Installation
Location is everything when planning a solar tube. Start by identifying which rooms need light most during the day, hallways, bathrooms, closets, and interior spaces without windows are prime candidates. Walk through your home and note where you find yourself switching on lights even at midday.
Once you’ve identified target rooms, head up to the attic (or outside if you don’t have attic access) to trace the potential path from roof to ceiling. The shortest, straightest route delivers the most light. Every bend or elbow in the tube reduces light output by roughly 10-15%, so aim for a direct vertical run whenever possible. Measure the distance between your ceiling and roof, anything under 6 feet is ideal for maximum brightness.
When selecting your exact installation spot, consider these key factors:
Sun exposure: South-facing roof sections receive the most consistent daylight throughout the day
Room darkness: Prioritize spaces with zero natural light over rooms with small windows
Structural obstacles: Avoid areas directly under ridge beams, HVAC ducts, or plumbing stacks
Aesthetics: Center the tube in the ceiling for a professional look, or place it strategically to avoid furniture placement issues
Tube diameter matters more than most DIYers realize. For small spaces like closets or powder rooms (up to 50 square feet), a 10-inch diameter tube works fine. Standard bathrooms and hallways (50-150 square feet) need 14-inch tubes. Larger spaces benefit from multiple tubes rather than one oversized installation.
I’ve built a calculator tool on my site that factors in tube length, diameter, number of bends, and your latitude to estimate actual light output in lumens. For a straight 4-foot run with a 14-inch tube, expect roughly 800-1000 lumens on a sunny day, equivalent to a 60-watt bulb. Add two 90-degree bends and you’re down to 600-700 lumens.
Mark potential obstacles in your attic with tape before committing. Ceiling joists typically run perpendicular to roof rafters, so you might need to offset your ceiling position slightly to find a clear path through both. It’s worth spending an extra hour in the planning phase to avoid discovering a massive obstruction halfway through your roof.
Step-by-Step: Building Your DIY Solar Tube
Step 1: Mark and Cut the Ceiling Opening
Start by choosing a central spot in your target room where a tube will provide the most even light distribution. I learned the hard way that corner placements look neat but create shadows. Stand in the room at midday and look up, that’ll tell you where light would help most.
Before you cut anything, check for obstructions above. Use a stud finder to locate ceiling joists, and mark them with painter’s tape. Your opening needs to fall between joists, not through them. If you have recessed lights or HVAC vents nearby, measure their locations from walls to estimate where their runs might be in the attic.
For the actual cut, trace your tube diameter using a compass or a string tied to a pencil. Most DIY tubes work well with 10 or 14-inch openings. Score the drywall along your circle with a utility knife first, this prevents the finish from tearing beyond your cut line.
Here’s my mess-minimizing trick: tape a plastic garbage bag directly under your cutting area, leaving the center open. As you cut with a drywall saw, most dust falls into the bag instead of coating your furniture. Cut slowly and check above frequently with a flashlight through the growing hole. You might spot a wire or duct you missed and can adjust before committing to the full circle.
Step 2: Navigate Through the Attic Space
Climb into your attic with a flashlight and locate the hole you just cut from below. You’ll probably find yourself staring at insulation, don’t just shove it aside. Wear gloves and a dust mask, because fiberglass insulation is miserable stuff that’ll itch for hours. Gently pull back the insulation and set it aside; you’ll replace it later around the finished tube.
Now trace an imaginary straight line from your ceiling opening up to the roof. This is where things get interesting. If you’re lucky, nothing’s in the way. More likely, you’ll hit a truss, rafter, or crossbeam. You can’t cut structural members without seriously weakening your roof, so you’ll need to offset your tube slightly. Most tubes can angle up to 30 degrees without losing much light.
Once you’ve found a clear path, stand directly below where the roof opening should be. Push a thin wire or drill bit through the roof so it pokes out the top, this becomes your reference point. From the outside, you’ll use this marker to center your roof cut. Before leaving the attic, double-check there’s no electrical wiring in your path.
Inside the attic, the reflective tube and insulation setup help carry daylight efficiently while minimizing heat loss and drafts.
Step 3: Cut the Roof Opening and Install the Dome
Cutting through your roof feels intimidating the first time, but with the right approach it’s straightforward. From inside the attic, you’ve already marked where your tube will exit, so now drill a pilot hole through the center point to mark the exact spot on the exterior. Head up to the roof with your tools, find that pilot hole, and use it as the center to mark your circle, most domes need an 8-10 inch opening depending on tube diameter.
Before you cut, check what roofing material you’re dealing with. Asphalt shingles are the easiest: use a utility knife to carefully cut and remove the shingles in your marked circle, then cut through the underlayment and roof decking with a reciprocating saw or jigsaw. For metal roofing, you’ll need metal snips or a nibbler tool. Tile roofs are trickier and honestly might warrant calling a pro, cracked tiles leak.
Once your opening is cut, test-fit the dome assembly. The flashing is what keeps water out, so this step matters more than anything else. Slide the base flashing under the shingles above the opening and over the shingles below, water should always flow over the flashing, never under it.
Warning: Apply a generous bead of roofing sealant under all flashing edges and test with a hose before moving on, finding leaks now beats ceiling damage later.
I learned this the hard way on my first installation when I skimped on sealant and rushed the flashing. After the first rain, I had water dripping down the inside of my tube. Had to climb back up, pull everything apart, and redo it properly with actual weatherproofing attention.
Secure the dome to the flashing base according to manufacturer instructions, or if you’re building fully custom, use stainless steel screws with rubber washers. Add another bead of sealant where the dome meets the flashing, and you’re weatherproofed.
Step 4: Build and Install the Reflective Tube
The reflective tube is where the magic happens, it’s what channels sunlight from your roof dome down to your ceiling. You’ve got two main paths here: rigid or flexible tubing.
For rigid tubes, I used 10-inch diameter aluminum ductwork from the HVAC section at my local hardware store. It’s cheap, already reflective, and cuts easily with tin snips. The downside? You’ll need multiple 90-degree elbows if your path isn’t perfectly straight, and each bend reduces light transmission by about 10-15%. Connect sections with aluminum foil tape, never use standard duct tape, which degrades and creates dark spots.
Flexible tubing is more forgiving for tricky angles. I’ve had great results with corrugated aluminum duct, though the ribbed interior does scatter some light. To boost reflectivity, line the inside with emergency space blankets (the shiny silver kind). Cut them into strips, spray the tube interior with adhesive, and smooth the blankets carefully to avoid wrinkles. Alternatively, automotive chrome vinyl wrap gives a near-mirror finish but costs more.
Commercial options like Mylar film offer 95%+ reflectivity versus DIY solutions at 80-85%, but we’re talking maybe 10% more light for triple the cost.
When connecting your tube between the roof dome and ceiling opening, work from top down. Secure each joint with sheet metal screws and seal with aluminum tape. The straighter your tube run, the more light reaches your room, aim for minimal bends.
Step 5: Install the Ceiling Diffuser
With your tube in place, it’s time to finish the interior side. I remember staring at my first ceiling opening thinking it looked rough, the diffuser transforms it completely.
Start by test-fitting your diffuser into the ceiling opening. Most diffusers have a trim ring that sits on the ceiling surface while the dome portion extends slightly into the opening. Apply a thin bead of clear silicone around the opening’s edge before pressing the diffuser into place. The silicone creates an airtight seal and prevents dust from the attic filtering down.
For a flush finish, use finishing trim or decorative molding around the diffuser ring. I prefer simple white trim that matches the ceiling, but you can get creative here. Some DIYers paint the trim ring to match their ceiling exactly, making the tube almost invisible except for the light it provides.
Diffuser choice matters more than you’d think. Frosted acrylic spreads light evenly and works great in most rooms, it’s what I used in my hallway. Prismatic diffusers create interesting light patterns and deliver slightly more brightness but can show dust more easily. For decorative options, consider frosted glass with etched patterns for bathrooms or textured acrylics that double as ceiling features.
Whatever style you choose, make sure it’s secured properly. Most use tension clips or small screws through the trim ring into the ceiling material.
Step 6: Seal and Insulate
Sealing and insulating your solar tube is where many DIY installations fail, leading to energy loss and moisture problems down the road. Start in the attic around the tube penetration, use expanding foam to fill gaps between the tube and surrounding framing, but don’t overfill or you’ll create bulges. Once cured, trim excess flush with a utility knife.
Wrap the tube with standard fiberglass batts or foam pipe insulation, securing with foil tape at seams. The goal is R-13 minimum to match your existing attic insulation value. Pay special attention where the tube meets both the ceiling and roof penetrations, these transition points are prime spots for air leaks.
On the roof, apply a generous bead of roofing sealant around the flashing-shingle interface. Check that your dome’s gasket sits flat against the flashing with no wrinkles or gaps. After your first heavy rain, head back to the attic with a flashlight to inspect for moisture or water stains.
Testing and Verifying Your Installation
Give your new solar tube a full day to settle, then run through these verification checks to confirm everything works as it should.
Morning test: Check light output when the sun rises. You should see soft, diffused illumination spreading across the room even before direct sunlight hits the dome.
Midday test: At peak sun, stand directly under the diffuser. The light should be bright enough to read comfortably without any harsh glare or visible hot spots.
Evening test: Watch how the tube performs with low-angle sunlight. Some drop-off is normal, but the light should remain useful until sunset.
Rain check: After the first rain, inspect the attic around your tube opening with a flashlight. Look for water stains, dampness, or drips. Also check the ceiling diffuser for any moisture.
If you notice dim light during peak hours, the issue is usually poor reflectivity inside your tube. Many of the same principles from general solar lights troubleshooting apply here: check for dust, condensation on the dome, or sections where your reflective coating has peeled away. A quick wipe of the dome and diffuser can make a surprising difference.
Drafts around the ceiling diffuser mean you need better sealing. Remove the diffuser, apply weatherstripping or caulk to the gap, and reinstall. Condensation inside the tube signals inadequate insulation in your attic section. Wrap that portion with foam pipe insulation or fiberglass batts.
Charles learned this the hard way: his first tube worked beautifully until winter, when cold attic air meeting warm house air created constant fogging. Adding insulation around the tube eliminated the problem completely. If you’re still seeing issues after these fixes, the techniques to fix dim performance in solar lighting systems can guide your troubleshooting process.
Cost Breakdown: DIY vs Commercial Solar Tubes
Let’s talk money. When I built my first solar tube in 2018, I spent about $85 on materials. A comparable Solatube kit would’ve cost me $550, and professional installation would’ve pushed that past $900.
Here’s the breakdown: Your DIY costs include a $25-40 acrylic dome, $15-30 for reflective material (Mylar or emergency blankets work), $20-35 for rigid ducting or dryer vent components, a $10-15 ceiling diffuser, and $15-25 for flashing and sealant. Total: $85-145 depending on tube diameter and material choices.
Commercial kits like Velux Sun Tunnel or Solatube cost $350-700 just for materials. You’re paying for engineered components, better reflectivity (99% vs your DIY 85-92%), and warranties. They’re genuinely higher quality.
So where does DIY win? Pure material savings, obviously. The satisfaction of building it yourself. And the knowledge you gain transfers to other projects.
Where commercial makes sense: If you’re doing multiple tubes, their consistency matters. If your roof pitch is complex, their flashing kits are thoroughly tested. And if you plan to add a hybrid system later with an LED backup battery choice starting with quality reflective tubes maximizes your solar charging efficiency.
My take? Build your first one DIY to learn. If you love it and want more, consider commercial for the rest.
Hybrid Solar Tube Conversions: Adding LED Backup
Once you’ve mastered basic solar tube installation, you can upgrade your system into a 24-hour lighting solution by adding a small solar panel and LED ring. This hybrid approach combines passive daylight during the day with active LED illumination after dark, giving you continuous natural-looking light without touching your home’s electrical system.
The conversion is surprisingly straightforward. You’ll need a small 10-20 watt solar panel (typically mounted near your dome or on a nearby roof section), a charge controller, a small 12V battery (even a motorcycle battery works), and an LED ring designed to fit around your diffuser. The solar panel charges the battery during the day while your tube provides natural light, then powers the LEDs at night. Most people wire in a simple switch at the diffuser so they can control the LED independently.
I added this setup to my garage solar tube after realizing I needed light for evening projects but didn’t want to run electrical wiring. The LED ring cost me about $25, and I used a salvaged 5W panel with a basic PWM controller. The whole upgrade took maybe two hours, and now I have light in that space from sunrise to midnight if I need it.
Tip: If you’re planning multiple solar tubes, consider connecting them to a shared battery bank and solar array for a comprehensive off-grid lighting system throughout your home.
The real benefit comes during power outages. While your neighbors are fumbling with flashlights, your hybrid solar tubes keep working exactly as they always do. You get daylight for free during the day, and the stored solar energy powers your LEDs at night without depending on the grid.
The LED rings typically produce 300-800 lumens depending on the model, which is plenty for most rooms. Look for warm white (2700-3000K) LEDs to match the color temperature of natural daylight filtering through your tube. Some people even add a dimmer switch to adjust brightness based on their needs.
Frequently Asked Questions
Do solar tubes work on cloudy days?
Yes, they still provide light even when the sky is overcast. You’ll get about 30-40% of the output compared to direct sunlight, which is usually enough to avoid turning on electric lights during daytime hours.
How much light does a DIY solar tube actually provide?
A 10-inch tube with good reflective material typically delivers the equivalent of a 60-100 watt bulb in a small to medium room. The output depends on tube diameter, length, number of bends, and the quality of your reflective surface.
Can I install solar tubes in a two-story house?
Absolutely, though you’ll need to run the tube through the second floor ceiling and first floor ceiling below. The longer the tube and more bends required, the more light you’ll lose, so bigger diameter tubes work better for multi-story installations.
Will my DIY solar tube leak?
Not if you properly flash and seal the roof penetration. Most leaks happen from rushed installations where the flashing wasn’t tucked correctly under shingles or sealed with enough roofing cement.
How long will a DIY solar tube last?
With quality materials, expect 15-20 years minimum. The dome might yellow slightly over time from UV exposure, and you may need to reseal the flashing every decade, but the reflective tube itself should last indefinitely if protected from moisture.
Do I need a building permit to install a solar tube?
This varies by location. Many areas don’t require permits for small roof penetrations under 12 inches, but some municipalities treat any roof work as requiring inspection. Check with your local building department before cutting into your roof.
These questions come up constantly in the Spheral Solar community, and honestly, the answers are what convinced me to tackle my first solar tube project. The permit question especially trips people up. I called my city’s building department and got conflicting answers from two different people, so I ended up pulling a permit just to be safe. Cost me $75 and a half-day wait for inspection, but it gave me peace of mind and kept everything above board for future home sales.
The cloudy day performance surprised me most. I installed my first tube in November and worried I’d made a terrible mistake when the weather turned grey. But even on completely overcast winter days, the tube brightened my hallway enough that I never reached for the light switch during daylight hours. That’s when I realized these things aren’t just for sunny climates.
Building your first DIY solar tube is more than just a weekend project, it’s an invitation to rethink how you light your home. I still remember standing in my previously dark hallway after installing my first tube, watching natural light flood a space that had always needed electricity during the day. That single installation cut my daytime lighting costs in that area to zero and opened my eyes to what’s possible with solar energy.
The beauty of solar tubes as an entry point is their simplicity. You’re not dealing with complex electrical systems or expensive battery arrays. You’re capturing free daylight and redirecting it where you need it most. Once you see how effective one tube can be, you’ll start spotting opportunities throughout your home, that dim bathroom, the windowless closet, the interior bedroom that never sees sun.
For me, that first solar tube was the gateway to a much larger solar journey. The confidence I gained from successfully completing this project gave me the foundation to tackle solar panel installations, battery systems, and eventually designing integrated solar solutions for my entire property. You might find the same path opening up for you.
I’d love to hear about your solar tube build. What challenges did you face? What would you do differently? Share your experience in the comments or our community forum, your insights help everyone learn and improve their own projects.
How useful was this post?
Click on a star to rate it!
Average rating 0 / 5. Vote count: 0
No votes so far! Be the first to rate this post.
We are sorry that this post was not useful for you!
Let us improve this post!
Tell us how we can improve this post?
charlesnoble
Here at Spheral Solar, I’m a hands-on solar power enthusiast, constantly exploring and experimenting with DIY solutions. I’m dedicated to sharing my discoveries, insights, and even the bumps I hit along the way, all in the pursuit of a more sustainable future.
5 Sources of Electrical Energy Every Solar DIYer… by Charlesnoble July 1, 2026 Electricity powers our homes from five main sources: solar panels, wind turbines, hydroelectric generators, fossil fuel generators, and battery storage systems. If you’re building a reliable off-grid setup or backing up your solar array, understanding how these sources work together transforms a single-point-of-failure system into resilient, year-round power. I learned…
What Should a Pool Be Heated To? The Complete… by Charlesnoble July 4, 2026 Most residential swimming pools should be heated to 78-82°F for comfortable recreational use, though your ideal temperature depends on how you plan to use the pool, who’s swimming, and whether you want to keep energy costs in check. If you’re heating with solar, you’ll find this sweet spot is easy…
Why Two Solar Panels Beat One Every Time (Parallel… by Charlesnoble June 22, 2026 Connect your panels to a charge controller or battery system by running positive terminals to positive and negative to negative. This parallel configuration doubles your available current (amperage) while keeping voltage the same, which is exactly what you need when your system demands more power than a single panel can…
Subscribe for handpicked DIY projects, exclusive tips, and giveaways.
You can build a DIY solar tube for $50 to $150 and start harvesting natural daylight in a weekend. This simple project combines a reflective tube, clear dome, and diffuser to channel sunlight from your roof into dark interior spaces, delivering illumination equivalent to multiple bulbs without electrical costs or ongoing energy consumption. I remember… Read more: How to Make DIY Solar Tubes for Free Natural Lighting in Your Home
Most residential swimming pools should be heated to 78-82°F for comfortable recreational use, though your ideal temperature depends on how you plan to use the pool, who’s swimming, and whether you want to keep energy costs in check. If you’re heating with solar, you’ll find this sweet spot is easy to maintain in most climates… Read more: What Should a Pool Be Heated To? The Complete Temperature Guide for Comfort and Efficiency
Electricity powers our homes from five main sources: solar panels, wind turbines, hydroelectric generators, fossil fuel generators, and battery storage systems. If you’re building a reliable off-grid setup or backing up your solar array, understanding how these sources work together transforms a single-point-of-failure system into resilient, year-round power. I learned this the hard way during… Read more: 5 Sources of Electrical Energy Every Solar DIYer Should Know for Complete Off-Grid Power