How to Hook up Solar Panels to RV Batteries
Updated:

Learning how to hook up solar panels to RV batteries is a straightforward process. But things can quickly turn bad when you are dealing with electricity. A single wrong connection can turn this reasonably simple task into your worst nightmare.
Therefore, you’ll need some instructions and guidelines before you commence working on your RV solar power setup. This blog post aims to provide you with the tools and knowledge required to help you get going.
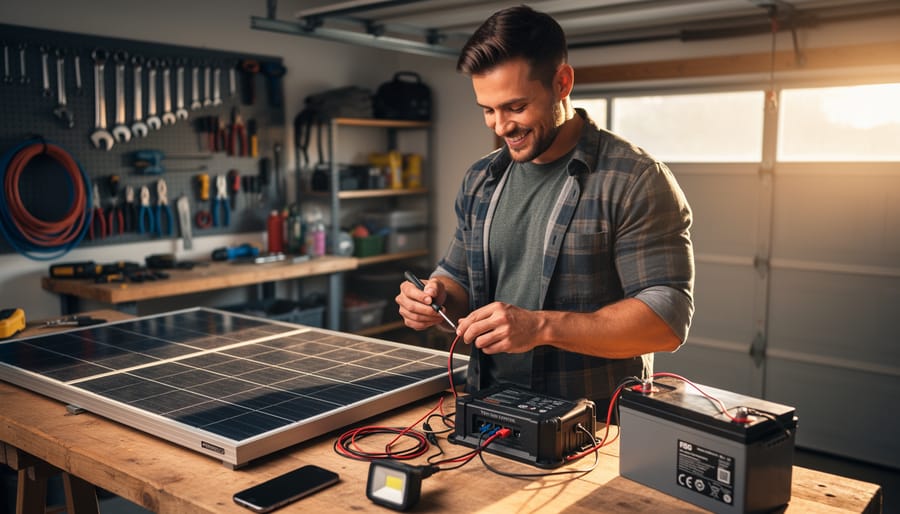
Here, we will walk you through a step-by-step process of connecting your solar panels to RV batteries and other essential components like inverters and controllers in the solar setup. But before we dive into the subject, here is a list of tools you’ll need during the process.
Basic Components
- Solar panels
- A 12v deep cycle solar battery
- Charge controller
- Solar inverter
Besides the essential components, you will also need a screwdriver, copper wires with clips, electrical tape, and some MC4 connectors.
How to Hook Up Solar Panel to RV Batteries
The simplest way to hook up a solar panel to RV batteries is to connect the positive wire from the panels to the battery’s positive terminal and the negative wire to the negative battery terminal. The resulting charging circuit will comfortably charge the solar battery pack and power your RV appliances.
However, connecting a battery directly to your solar panels can potentially cause two problems.
- Battery Discharge
- Battery Overcharge
The first issue arises mainly when the battery is fully charged, and no solar energy falls on the solar panel. Electricity can slowly leak back into the solar panel, which will gradually discharge the battery. The amount of current leakage is meager, and you can avoid it by placing a blocking diode in line. The diode acts as a one-way valve for electric power and prevents the current from leaking back into the panels.
The second problem is serious since it can damage the battery and the appliances. If left on their own, the solar panels can overcharge the battery and damage it due to overheating. To avoid battery overcharge, you can use a charge controller that stops the solar power from flowing into the battery once it’s full.
To hook up solar panels to RV batteries, follow the step-by-step procedure outlined below.
Step 1— Mount the Solar Panels
Before you begin connecting the solar panels with the battery, you should first install them on your RV using the solar panel mounting brackets. It’s important to choose a location on the RV roof where the panel is exposed to maximum sunlight to generate solar power.
Although you can hook up solar panels to RV batteries right away, you’ll need to install a platform on the RV roof for other types of solar panels. We recommend aluminum rails because they are lightweight, durable, and can withstand high wind pressure.
If you’ve many solar panels, you can take the following two wiring options.
- Parallel Wiring
- Series Wiring
When wired in parallel, the negative terminals of the solar panels are connected and wired to the negative lead of the battery. Then, in a series connection, we connect the negative terminal of one panel to the positive terminal of another panel and join them in a Combiner Box as depicted in the wiring diagram.
To learn more about series and parallel connections, our RV solar panels guide is required reading.

Step 2— Connect the Charge Controller to the Battery Bank
After wiring the solar panels together, it’s time to connect the battery to the charge regulator. A charge controller is an essential component of the solar system as it bridges the RV solar kits/panels and batteries. It’s always advised to connect the battery with the controller to avoid a sudden surge from damaging the controller.
To connect a solar power battery to the controller, take wires from the positive and negative battery terminals and slide them into the input ports on the controller specified for a battery. Then, tighten the screws with a screwdriver to ensure that the wires are safely in place.
Warning: Pay attention to the positive and negative cables and make sure they match up with the appropriate ports. Improper connection can short out your charge regulator or battery.
Step 3— Connect the Controller to the RV Solar Panels
Wiring RV solar panels to the controller requires special connectors called MC4 connectors. These are long cylindrical fittings with a male and female side. If your solar panels don’t fit with them, you will need to attach them manually to the cables. You can easily find MC4 connectors at the local electrical store or online outlets. They should come with easy instructions on attaching them to the wires.
In most cases, the wire attached to the RV solar panel is short and doesn’t usually reach the controller. So you’ll need to manually measure the length of wire required for the connection, bearing in mind that the controller should be kept near the batteries.
Once you’ve attached the input wires, you must match up the male and female connectors and snap them into place. A ‘click’ sound signifies that the connectors are seated securely.

Step 4— Double-Check the Connections to Make Sure Everything is Working
After you’re done with the wiring, you must ensure the setup works correctly. Most charge controllers have digital screens showing the amount of current flowing to the battery. Check the reading on display to determine everything is wired correctly.
Leave the RV battery connected until it’s fully charged. The amount of time it’ll take to charge the battery fully will depend on the battery size, solar panel wattage, power usage, and sunlight.
At this point, your RV solar system is all set to power the RV appliances that run on DC power. To run AC-powered appliances, you’ll need an additional step to connect an inverter in the line.
Step 5— Connect a Solar Inverter to the Battery
The main purpose is to ‘invert’ or translate the DC power coming from the solar panels to 110V AC power so that your RV can use it. Next, connect the RV battery to the lugs of the solar inverter and connect it further to the AC appliances. Once the setup is complete, you can power all your devices, including the RV refrigerator, TV, and microwave.
Knowledge about proper wiring is imperative, but it’s also necessary to have a good idea about the RV solar power system components. To help you thoroughly understand the solar power setup, we discuss solar controllers and lead-acid batteries and their work in the following section.
Solar Charge Controller
A solar charge controller, or regulator, is a unit that sits between the RV solar panel and battery pack. It oversees the flow of charge to the battery in the solar setup and prevents the battery from overcharging. Most 100-watt solar panels rated for 12V put out about 16V to 20V, which can damage a battery if there’s no battery monitor in place during the charging process.
If you’re trying to go completely off-grid, there’re two types of solar regulators you can use:
PWM Charge Controller
A Pulse Width Modulation (PWM) controller is the standard type of solar regulator available in the market. It’s simpler and less expensive than the MPPT controllers.
PWM controller works by gradually reducing the amount of charge going into the RV battery as it approaches full capacity. The PWM controller maintains a state of ‘trickle’ to keep the battery topped off.
MPPT Charge Controller
The Maximum Power Point Tracking (MPPT) regulator is a more advanced, more expensive option for the solar charge regulator. However, it offers the same switch-like protection as a PWM and lowers the charge flowing to the solar cells as it nears full capacity.
How Solar Charge Controllers Work
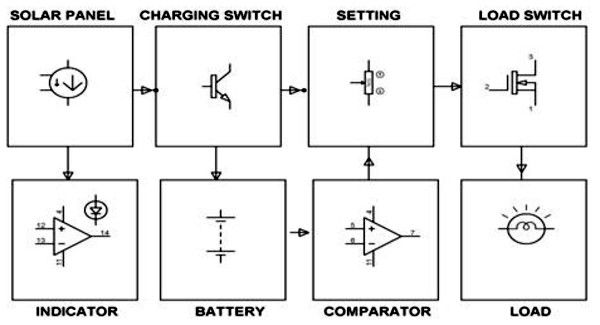
Solar charge controllers regulate panel voltage and load current using a set of operational amplifiers. They sense the battery state using a Comparator and indicates it with the help of LEDs. The controller uses a set of LEDs to indicate undercharging, overcharging, and deep discharge conditions.
The controller uses a metal-oxide-semiconductor field-effect transistor (MOSFET) as a semiconductor switch to prevent overcharging, as shown in the wiring diagram. When the battery is full, the additional power from the solar panel system is bypassed to a dummy load using the transistor.

Lead-Acid Battery
Invented in 1859, the lead-acid battery was the first rechargeable battery made available for commercial use. It’s the most widely used battery today, and there are good reasons for its popularity. First, it’s dependable and cheaper on a cost-per-watt base than other battery types.
Although changes in the manufacturing method and improvements in the material have occurred, the basic functionality of the battery has remained unchanged over the years.
Lead-Acid Battery Basics – How do They Work?
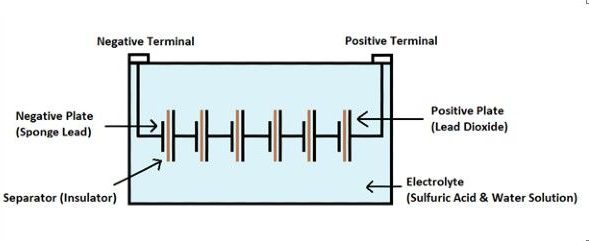
To understand the functionality of the lead-acid battery, it’s necessary to take a look at its components. A single cell of the battery contains the following four elements:
- A Positive Plate covered with lead dioxide
- A Negative Plate made of sponge lead
- A Separator (insulating material) between the two plates
- An Electrolyte consisting of water and sulfuric acid
These elements are contained in a plastic container which acts to keep the battery together. The overall battery typically consists of several cells placed in series within the container.

The lead-acid battery produces a voltage only when it receives a charge. In RV solar setups, the solar panels provide that charge via the charge regulator. The amount of charge a battery can store is determined by the size of positive and negative plates and the amount of electrolyte in the battery. This storage capacity is denoted as the lead-acid battery’s amp-hour (Ah) rating. The higher the battery amp hours, the longer it will last for a given load.
Types of Lead-Acid Batteries
There are two main types and three sub-categories of the lead-acid battery. The two main types include:
- Starting Battery: The starting, also called cranking, battery delivers quick bursts of energy and is ideal for starting engines. In addition, they have more plate counts with thinner composition.
- Deep Cycle Battery: The deep cycle battery has less instant voltage and current, but they promise long-term energy delivery. They have thicker plates and can last longer than starting batteries. Deep cycle batteries provide enough energy for RV solar panels and marine applications.
Besides the main types, there are three versions of the lead-acid battery. These are:
- Wet Cell Battery: The wet cell contains a liquid electrolyte, such as sulfuric acid, that stores the charge. They’re commonly used in electric utilities, aviation, energy storage, etc. However, dry cell batteries, like alkaline or lithium batteries, are also gaining popularity.
- AGM Battery: The AGM batteries contain a glass mat separator that holds the electrolyte. They are maintenance-free with a very low self-discharge rate. They are used to power RVs, boats, UPS, generators, and more.
- Gel Cell Battery: The Gel battery is similar to the AGM battery since it contains a gelified electrolyte. These batteries reduce electrolyte spillage and evaporation that are common issues in wet cell batteries.
Final Thoughts
While hooking up may not be the most challenging part of installing a solar system, it’s still an essential part of the setup. Follow the step-by-step method shared in this post on how to hook up solar panels to RV batteries and make sure to double-check all the wirings. Because you can’t be too careful when it comes to electricity, please ask us in the comments if you still have got questions.


