Setting Up Your Aisitin 3.5W Solar Fountain Pump the Right Way
Updated:
Unpack your Aisitin 3.5W solar fountain pump and position the solar panel where it receives direct, unobstructed sunlight for at least six hours daily—even slight shade from tree branches or roof overhangs can reduce power output by 50% or more. Before placing the pump in water, inspect all connection points between the panel and pump unit to ensure they’re secure and moisture-free, as loose connections are the primary cause of performance issues I’ve seen with these units.
Prime the pump by submerging it completely in your birdbath, pond, or fountain basin, tilting it gently to release trapped air bubbles that prevent water flow. The pump should start automatically within seconds once the solar panel receives adequate sunlight; if it doesn’t, check that the panel faces south (in the Northern Hemisphere) at roughly a 30-45 degree angle for optimal energy capture throughout the day.
Adjust the fountain nozzle attachments included in your Aisitin kit based on your water feature size—the smaller nozzles create higher spray patterns suitable for birdbaths, while wider nozzles produce gentler, broader displays perfect for larger ponds. Clean the pump filter weekly by removing the front cover and rinsing the foam insert under running water, as debris accumulation is the fastest way to kill fountain performance.
The 3.5W power rating means this pump works best in features holding 50-200 gallons, producing spray heights between 12-24 inches depending on sunlight intensity. Understanding these specifications helps set realistic expectations and ensures your setup delivers the peaceful water movement you’re looking for.
What Makes the Aisitin 3.5W Different (And Why It Matters)
Power Output in Plain English
Let me break down what 3.5 watts actually means for your fountain without getting lost in technical speak. Think of watts as the energy your pump has to work with—in this case, 3.5W is a modest amount, which translates to practical, real-world performance.
With the Aisitin 3.5W pump, you can expect a maximum spray height of around 20-28 inches on a bright, sunny day. That’s roughly knee-to-waist height for most people—perfect for a birdbath or small garden pond. The water flow rate typically reaches about 160 liters per hour (42 gallons per hour) under optimal conditions.
Here’s what I learned from my own backyard setup: those maximum numbers happen during peak sunshine, usually between 10 AM and 2 PM. In early morning or late afternoon, expect about 60-70% of that performance. On partly cloudy days, you might see the fountain reach 12-16 inches instead.
The 3.5W rating also means this pump works best for smaller water features—think containers up to 30 gallons. It creates a gentle, relaxing display rather than a dramatic geyser. If you’re hoping for a powerful showpiece fountain, you’d need something in the 7-10W range. But for attracting birds and adding peaceful ambiance to a patio corner, this little pump delivers exactly what most gardeners need.
Is This Pump Right for Your Setup?
Let me be honest with you—the 3.5W Aisitin pump works beautifully in some setups and struggles in others. I learned this the hard way when I first tried using one in a pond that was way too large for its capacity.
Here’s a simple framework to determine if this pump matches your needs:
For small container gardens, birdbaths, or tabletop fountains (up to 20 gallons), the 3.5W is perfect. You’ll get a pleasant spray height of about 20-24 inches in full sunlight, which creates a lovely visual effect without overwhelming smaller spaces.
For medium ponds (20-50 gallons), it works well if you’re okay with a gentler fountain effect. The spray won’t be dramatic, but it’ll provide adequate water circulation and aeration. This is ideal if you’re focused more on pond health than aesthetics.
For larger ponds or installations requiring spray heights above 30 inches, you’ll want to look at higher wattage options. The 3.5W simply doesn’t have enough power to move that volume of water effectively.
Location matters too. If your fountain sits in partial shade for more than 3-4 hours daily, consider upgrading to a 5W or 6.5W pump to compensate for reduced solar input. Think of it like converting electric fountains to solar—you need to match power requirements to performance expectations.
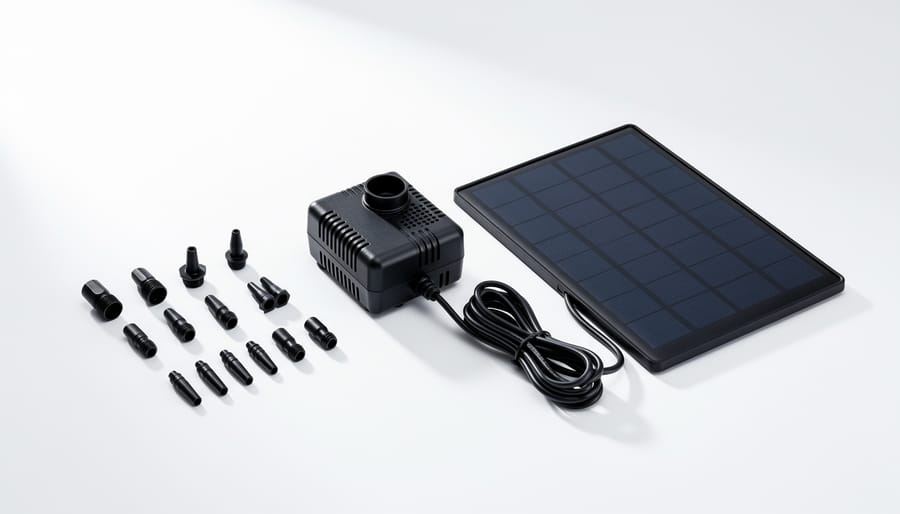
Unboxing and What You Actually Get
The Aisitin 3.5W solar fountain pump includes the main pump unit, solar panel, and multiple nozzle attachments for different spray patterns.
The Nozzle Attachments Explained
Your Aisitin 3.5W pump comes with several nozzle attachments, and choosing the right one really transforms your fountain’s personality. Let me walk you through what each does.
The multi-tier nozzle creates a classic tiered effect with water cascading down in distinct levels, perfect for traditional birdbaths or formal garden settings. It’s my go-to when I want that elegant, wedding-cake look.
The single-stream nozzle shoots water straight up in one powerful jet, reaching the maximum height your pump can achieve. I use this one in deeper ponds where you want dramatic vertical movement and good water circulation.
The mushroom-cap nozzle spreads water outward in a gentle dome shape, creating a soft, umbrella-like pattern. This works beautifully in shallow basins and is ideal for attracting birds since they love the gentle spray.
The flower-spray nozzle disperses water in delicate, petal-like streams radiating outward. It’s gorgeous for decorative containers and smaller features where you want visual interest without too much splash.
For smaller spaces or calm effects, stick with the mushroom or flower patterns. In larger ponds with good depth, the single-stream or multi-tier nozzles really shine. Experiment freely—switching nozzles takes just seconds.
Step-by-Step Installation Instructions
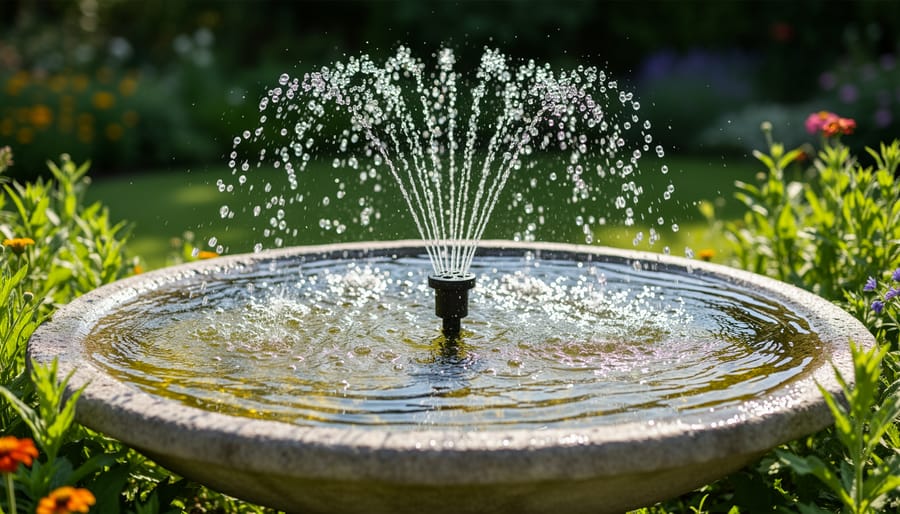
The fountain pump creates an attractive water display while aerating your pond or birdbath during sunny conditions.
Before You Start: Location and Positioning
Getting your Aisitin 3.5W solar fountain pump positioned correctly makes all the difference between a delightful water feature and a disappointing puddle-maker. I learned this the hard way when I first set mine up in a partially shaded corner of my garden—it sputtered along until I moved it to a sunnier spot!
Start by finding a location where your solar panel can receive at least 6-8 hours of direct sunlight daily. South-facing positions work best in the Northern Hemisphere. Check for overhead branches, nearby buildings, or structures that might cast shadows throughout the day. Even partial shade can reduce your pump’s performance significantly.
For the pump itself, you’ll want water that’s deep enough to keep it fully submerged—typically 2-3 inches minimum. Too shallow and the pump might run dry, while excessive depth can reduce spray height. Position the pump near the center of your water feature if you want a symmetrical display, or offset it slightly for a more natural look.
Keep the solar panel within the included cable length of your pump, but don’t stress if you need a little flexibility. The Aisitin typically comes with a decent cable length, giving you options to position the panel for maximum sun exposure even if your fountain sits in partial shade.
Assembling the Pump and Nozzle
Let me share something I learned the hard way: when I first assembled my Aisitin 3.5W pump, I got so excited that I skipped reading which nozzle to use first. Big mistake! I ended up with water spraying sideways across my patio instead of creating that peaceful fountain effect I wanted.
The Aisitin comes with multiple nozzle heads, and here’s the trick: start with the single-tier mushroom nozzle. This one requires the least water pressure and gives you immediate feedback that your pump is working correctly. Attach it by simply screwing it clockwise onto the pump’s outlet tube until it’s finger-tight. Don’t over-tighten or you might crack the plastic threads.
Next, connect the extension tubes if you need extra height. These snap together with a firm push until you hear a soft click. A common mistake here is not pushing hard enough, which causes water to leak at the connections rather than shooting up through the nozzle.
Once assembled, place the pump in your water feature before testing. Running it dry, even briefly, can damage the motor. When you’re comfortable with the basic setup and water flow looks good, you can experiment with the multi-tier nozzles for more dramatic spray patterns. Just remember: fancier nozzles need stronger sunlight to power the higher water pressure required.
Getting It Running (Troubleshooting First Startup)
The first time you drop your Aisitin 3.5W pump into the water, it can feel a bit anticlimactic if nothing happens immediately. Don’t worry, that’s completely normal! Here’s what to expect and how to get things flowing.
When you first place the pump in water with the solar panel exposed to direct sunlight, give it about 30 seconds to a minute to start. The pump needs to build up enough charge to overcome the initial resistance. I remember setting up my first solar fountain on a partly cloudy morning, and I kept thinking I’d gotten a dud unit until the sun peeked out fully and suddenly, whoosh, water everywhere!
If your pump isn’t starting after a couple of minutes in bright sunlight, here’s your quick troubleshooting checklist. First, check that the solar panel is actually in direct sunlight, not shade or filtered light through a window. Indoor light won’t cut it for initial startup. Second, make sure the pump is fully submerged. These pumps need water covering the intake to function properly. Third, check that nothing is blocking the impeller. Give the pump a gentle shake underwater, sometimes debris from manufacturing can lodge in there.
Still nothing? Disconnect and reconnect the cable between the solar panel and pump to reset the connection. Also verify that the nozzle attachments aren’t creating too much back-pressure. Try removing all attachments and running just the base unit first. If it works bare, you can add nozzles back one at a time to find the right balance for your sunlight conditions.
Sizing Your Solar Fountain Pump: Beyond the Aisitin
The Water Volume Calculator Trick
Here’s something I learned the hard way during my first fountain setup: you need to match your pump capacity to your water feature’s actual volume. Too powerful, and you’ll drain your pond in minutes. Too weak, and you get a sad little trickle.
The easiest way to calculate your pond volume is using this simple formula: multiply length times width times depth (all in feet), then multiply by 7.5 to get gallons. For round features, measure diameter, divide by 2 to get radius, then use the formula: 3.14 x radius x radius x depth x 7.5.
For the Aisitin 3.5W pump, you’re looking at a maximum flow rate of about 70 gallons per hour, which works beautifully for small to medium ponds (50-200 gallons). If your calculations show you need more capacity, check out our guide on sizing your solar fountain pump for detailed recommendations.
Pro tip: I always recommend the Spheral Solar calculator tool on that page—it does the math for you and suggests ideal pump sizes based on your specific setup.
When to Choose a Bigger (or Smaller) Pump
Here’s what I’ve learned through trial and error in my own backyard: the 3.5W isn’t a one-size-fits-all solution. If you’re planning a fountain in a large koi pond (anything over 200 gallons), you’ll want something with more muscle—consider stepping up to a 5W or 7W model to maintain adequate water circulation and oxygenation for your fish.
On the flip side, I once helped my neighbor set up a tabletop fountain for her patio, and the 3.5W was overkill. The spray height was too aggressive for her small ceramic bowl, constantly splashing water out. She switched to a 1.4W pump and it performed beautifully.
For small birdbaths or decorative bowls under 12 inches in diameter, go smaller (1.4W-2W). For medium ponds and fountains (50-200 gallons), the 3.5W hits the sweet spot. Larger water features beyond 200 gallons need more power. If you’re still deciding which pump suits your needs best, check out our comparison of other solar fountain pumps to find your perfect match based on your specific water feature size and goals.
Common Problems and How I Fixed Them
The Dirty Solar Panel Problem
Here’s something I learned the hard way during my first summer with solar fountains: a layer of dust no thicker than a credit card can cut your pump’s performance by nearly 40%. I watched my beautiful fountain sputter to a sad trickle before realizing the solar panel was coated in pollen and grime.
Your Aisitin 3.5W pump relies entirely on clean panels to catch every ray of sunlight. Dust, bird droppings, leaves, and water spots all block precious solar energy from reaching the photovoltaic cells. In urban areas, air pollution can create a film in just two weeks, while rural settings might deal more with pollen during spring.
For optimal performance, wipe your panel weekly with a soft, damp cloth—never use abrasive materials that could scratch the surface. Early morning cleaning works best, before the sun heats the panel. If you notice stubborn residue, a mix of water and gentle dish soap does wonders. For those in dustier climates or under tree cover, bump that schedule to twice weekly.
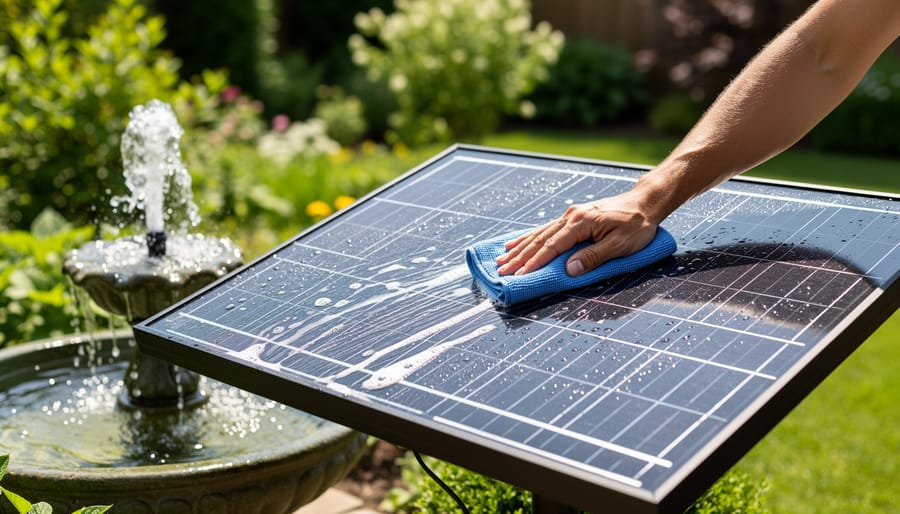
Consider this your fountain’s tune-up routine: clean panels equal happy pumps, which means more enjoyment and less frustration for you.
Regular cleaning of the solar panel surface ensures optimal power output and consistent fountain performance throughout the season.
Winter Storage and Seasonal Care
When autumn arrives, a few simple steps will keep your Aisitin fountain pump in great shape for years to come. I learned this the hard way my first winter—left my pump in the frozen pond and ended up with cracked components come spring!
Before the first freeze, remove your pump completely from the water. Give it a thorough rinse with fresh water to clear out any algae or mineral deposits that built up during the season. Pay special attention to the intake areas where debris loves to hide. Let everything air dry completely before storage—this prevents mold and corrosion during those dormant months.
Store your solar panel and pump in a dry, protected location like a garage or basement. I keep mine in a labeled plastic bin with some silica gel packets to combat moisture. Avoid areas with extreme temperature swings or direct exposure to the elements.
Come spring, your startup checklist is straightforward. Inspect all components for any damage or wear, particularly the pump impeller and solar panel connections. Clean the solar panel with a soft cloth to remove winter grime. Before placing everything back in your water feature, run a quick test in a bucket to ensure proper operation. This five-minute check saves potential headaches and guarantees your fountain starts the season strong.
Maximizing Performance: My Field-Tested Tips
After installing dozens of solar fountain pumps over the years, I’ve picked up some tricks that really make a difference. Let me share what’s worked best for me with the Aisitin 3.5W specifically.
First, panel angle matters more than you’d think. While the Aisitin comes with a fixed panel, I’ve found that tilting it toward the sun’s path makes a huge difference in performance. During spring and summer, I prop mine at about a 30-degree angle using small stones or aquarium-safe wedges. This simple adjustment increased my pump’s running time by nearly two hours on partly cloudy days. Just make sure whatever you use won’t tip over in wind.
Here’s a debris filtering hack that saved me countless cleanings: I cut a piece of fine mesh pond netting and secured it around the pump intake with fishing line. This pre-filter catches leaves and algae before they reach the built-in filter, meaning I only need to clean the pump every three weeks instead of weekly. The netting is nearly invisible underwater too.
For placement, think beyond center-of-the-pond. I’ve had great success positioning the fountain near shallow edges where the panel gets unobstructed sunlight while the pump sits in deeper, cooler water. This setup prevents overheating and provides better lighting angles. One of my favorite DIY solar projects involved creating a small rock platform that elevates the panel above surrounding plants while the pump stays submerged.
Finally, consider the backdrop. Placing your fountain where spray catches afternoon light creates beautiful rainbow effects. I positioned mine so visitors see it against darker foliage rather than sky, making the water columns really pop visually while maintaining optimal solar exposure.
Getting your Aisitin 3.5W solar fountain pump up and running is just the beginning of your solar-powered water feature journey. I’ve found that once you experience how effortlessly these pumps transform a simple water container into a dynamic focal point, you’ll start spotting opportunities for solar fountains everywhere around your property.
The beauty of solar fountain pumps like the Aisitin 3.5W is that they require minimal maintenance and zero electricity costs, making them perfect entry points into renewable energy. You’ve now got the knowledge to set it up properly, troubleshoot common issues, and maximize its performance throughout the seasons.
I’d love to hear about your experience with your Aisitin pump. Did you encounter any unique challenges during setup? Have you discovered creative placement solutions that work particularly well? Drop your thoughts and questions in the comments below. Your insights help everyone in our DIY solar community learn and grow together.
Ready to expand your solar fountain repertoire? Browse our collection of creative solar pond projects to discover innovative designs that take your outdoor space to the next level. Happy fountain building!
How useful was this post?
Click on a star to rate it!
Average rating 0 / 5. Vote count: 0
No votes so far! Be the first to rate this post.
We are sorry that this post was not useful for you!
Let us improve this post!
Tell us how we can improve this post?
charlesnoble
Here at Spheral Solar, I’m a hands-on solar power enthusiast, constantly exploring and experimenting with DIY solutions. I’m dedicated to sharing my discoveries, insights, and even the bumps I hit along the way, all in the pursuit of a more sustainable future.
8 Best Solar Fountain Pump Reviews for 2023 by Adeyomola June 25, 2021 Besides being corrosion-resistant and having a high flow rate, the best solar fountain pump has sufficient maximum lift and spray height to match its application. A solar water fountain pump for reliability comes with high-capacity solar panels and, in some cases, battery backups. Best Solar Fountain Pumps at a Glance…
This Floating Solar Sphere Transformed My Garden… by Charlesnoble October 31, 2025 # Transform Your Garden with a Solar Powered Water Feature Sphere Picture this: a perfectly balanced sphere of water, cascading gently over smooth stone, powered entirely by the sun—no electrical outlets, no tangled extension cords, just pure renewable energy creating a mesmerizing focal point in your outdoor space. **Build your…
Transform Your Yard After Dark: Solar Lights That… by Charlesnoble March 21, 2026 Position your solar path lights along walkways where they’ll receive at least 6-8 hours of direct sunlight daily—shaded placement is the number one reason homeowners complain about dim performance after sunset. I learned this the hard way when I installed a beautiful string of solar lanterns under my patio overhang,…
Mason Jar Solar Lights That Actually Work (And Cost… by Charlesnoble November 12, 2025 Transform ordinary mason jars into enchanting garden lights by securing solar lids to clean, dry containers—no wiring, no electricity bills, just pure sun-powered ambiance. Position them along walkways where they’ll capture at least 6 hours of direct sunlight daily, then watch them automatically illuminate your evenings with a warm, welcoming…
Why Your Flagpole Deserves Solar Light (And How to… by Charlesnoble November 7, 2025 Choose a solar light specifically designed for flagpole tops—not generic garden lights—with at least 20 lumens output and a downward-facing beam angle that creates the proper illumination pattern required by U.S. Flag Code. Mount the solar panel where it receives 6-8 hours of direct sunlight daily, even if that means…
Solar Inground Lights That Actually Survive Winter… by Charlesnoble February 5, 2026 Bury solar inground lights 4-6 inches deep in compacted soil along pathways, ensuring the solar panel faces true south for maximum charge—a lesson I learned after my first installation facing southeast yielded only 3 hours of nightly illumination instead of the promised 8. Test soil drainage before purchasing by digging…
Subscribe for handpicked DIY projects, exclusive tips, and giveaways.
AGM batteries outperform traditional flooded lead acid batteries in nearly every practical measure that matters for solar installations, but whether that performance justifies their 50-100% higher upfront cost depends entirely on how hands-off you want your system to be and how often you’ll cycle the battery deeply. After running both types through real-world solar setups… Read more: AGM vs. Lead Acid Batteries: Which Is Better for Your Solar Setup?
A portable power station will typically run your camping devices for anywhere from a few hours to several days on a single charge, depending on what you’re powering and the station’s capacity. As for lifespan, most quality units last between 3 to 10 years before the battery degrades enough to need replacement. The distinction matters… Read more: Your Portable Power Station Won’t Last as Long as You Think (Here’s Why)
A J1772 solar charger combines a standard J1772 charging connector (the same Type 1 plug used by most North American EVs and electric bikes) with solar panels and battery components to create an off-grid or grid-supplemented charging system. You’ll need three core elements: solar panels (typically 400-800 watts for practical ebike charging), a battery storage… Read more: How to Choose a J1772 Solar Charger for Your Ebike: A Buying Guide


")

")
")
")

")

")
")
")


