Why Your 8 Volt Battery Won’t Charge (And How to Fix It with an Inverter)
Updated:
Match your charger voltage to your battery’s 8-volt requirement, or risk permanent damage to your battery bank. Most standard chargers output 6V or 12V, making them incompatible with the less common 8V configuration found in certain golf carts, floor scrubbers, and older solar setups. Use a dedicated 8-volt charger with an output between 9.0V and 9.6V for proper charging, or connect a 12V charger through a voltage reducer to safely step down the current.
Identify your battery’s chemistry before selecting charging parameters. Lead-acid 8V batteries need bulk charging at 9.2V, absorption at 9.0V, and float maintenance at 8.7V, while gel variants require slightly lower voltages to prevent gassing and internal damage. Check the manufacturer’s label or documentation to determine if you’re working with flooded, AGM, or gel technology, as each demands different charging profiles.
Set your charge controller or adjustable power supply to deliver 10-15% of your battery’s amp-hour capacity as charging current. An 80Ah 8V battery performs best with 8-12 amps during bulk charging, reaching full capacity in 6-10 hours depending on depth of discharge. Faster charging generates excessive heat and reduces battery lifespan, while slower rates below 5% capacity extend charging time beyond practical limits.
Monitor voltage during charging with a multimeter to prevent overcharging beyond 9.6V, which causes electrolyte loss and plate corrosion. I learned this the hard way when I ruined a perfectly good 8V battery bank by leaving it connected to an unregulated power supply overnight. Temperature compensation matters too, with charging voltage decreasing 0.03V per degree Celsius above 25°C to protect against thermal runaway in warm environments.
What Makes 8 Volt Batteries Different
If you’ve ever tried to charge an 8-volt battery with a standard charger and wondered why it didn’t work quite right, you’re not alone. I remember the first time I encountered this challenge in my workshop – I had an 8V golf cart battery that needed charging, and my trusty 6V and 12V chargers just sat there looking useless.
So what makes 8-volt batteries special? These batteries occupy an interesting middle ground in the voltage spectrum. Most of us are familiar with the common 6-volt and 12-volt batteries you find in cars, motorcycles, and standard solar setups. But 8-volt batteries serve specific purposes where they truly shine.
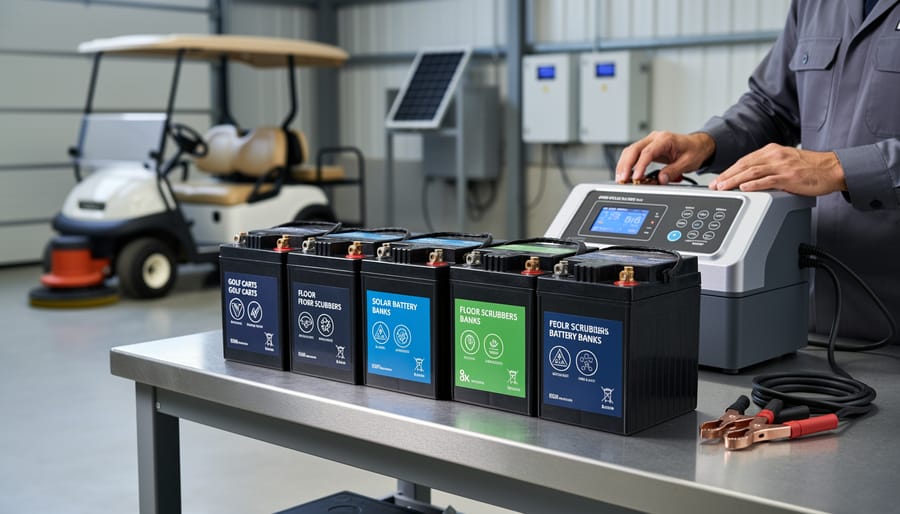
You’ll typically find 8V batteries in golf carts (especially higher-end models), commercial floor scrubbers, and increasingly in solar battery banks where people are choosing the right battery configuration for their off-grid systems. They offer a sweet spot between the power capacity of 6V batteries and the bulkiness of 12V units.
Here’s the critical thing to understand: voltage matters. A lot. An 8-volt battery requires a charging voltage typically between 9.2 and 10.5 volts, depending on the chemistry and charging stage. If you try using a 6-volt charger, it simply won’t deliver enough voltage to fully charge the battery – it’s like trying to fill a bucket with a trickle. On the flip side, a 12-volt charger provides too much voltage and can damage the battery’s internal plates or cause dangerous overheating.
Most 8V batteries use lead-acid chemistry, similar to their 6V and 12V cousins. This means they need the same careful attention to charging rates and proper voltage levels, but finding compatible chargers can be frustrating since they’re less common in retail stores. That’s exactly why understanding alternative charging methods, including using inverters, becomes so valuable for DIY enthusiasts working with these batteries.
8-volt batteries are commonly used in golf carts, floor scrubbers, and solar battery banks, requiring specialized charging approaches.
The Inverter Charging Method Explained
How the Process Works
Here’s how the inverter charging method works, broken down into simple steps. I’ll be honest—when I first tried this approach, I was skeptical that it would actually work smoothly. But once I understood the energy flow, everything clicked into place.
The process starts with your power source. This could be a 12-volt battery bank from your solar setup or even a standard car battery. The DC power from this source flows into your inverter, which converts that direct current into standard household alternating current, typically 120 volts AC. Think of the inverter as your translator, turning solar-stored energy into the kind of electricity your wall outlets provide.
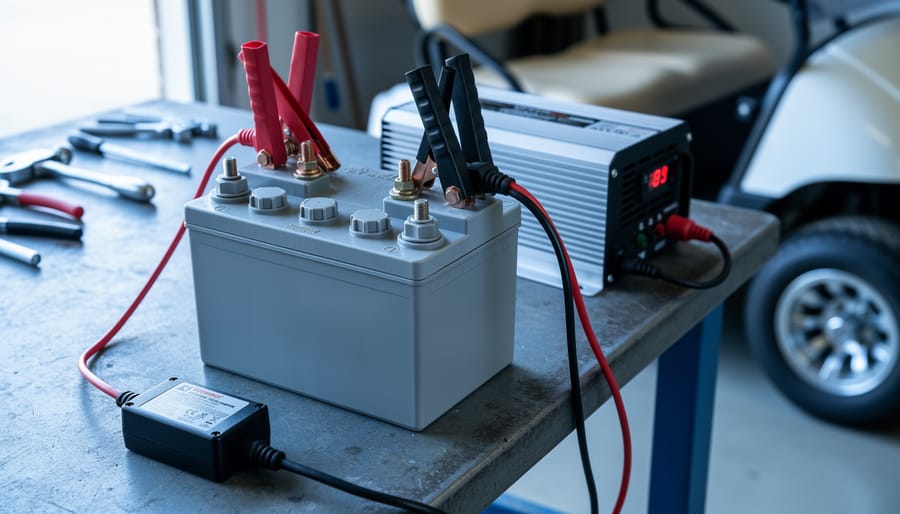
Next, you plug a compatible battery charger into the inverter’s AC outlet. This is where things get interesting—you need a charger specifically designed for 8-volt batteries. Not a 6-volt charger, not a 12-volt charger. The voltage matters tremendously here because charging at the wrong voltage can damage your battery or create safety hazards.
Finally, connect your 8-volt battery to the charger using the proper cables, ensuring positive connects to positive and negative to negative. The charger regulates the current and voltage, safely replenishing your battery.
The beauty of this method is that it lets you use readily available solar equipment to charge these harder-to-find 8-volt batteries. You’re essentially creating a charging station that bridges the gap between common solar components and your specific battery needs. Just monitor the process, especially during your first few charging cycles, to ensure everything runs smoothly.
A quality inverter forms the foundation of the DC-to-AC-to-DC conversion method for charging 8-volt batteries.
When to Use This Technique (And When Not To)
Using an inverter to charge 8 volt batteries works great in specific situations, but it’s not always your best option. Let me share when this method shines and when you should consider alternatives.
This technique makes sense when you already own a quality AC battery charger and don’t want to invest in specialized 8V DC equipment. I’ve used this approach in my workshop countless times when working with vintage golf cart batteries or marine applications. It’s particularly useful for occasional charging needs where purchasing dedicated equipment doesn’t justify the cost.
The inverter method also works well for emergency situations. If your regular charger fails and you need a quick solution, converting your DC power source through an inverter gets the job done safely.
However, direct DC charging beats inverter charging for regular, long-term use. Converting DC to AC and back to DC wastes 10-20% of your energy through conversion losses. If you’re charging 8V batteries weekly, those losses add up on your power bill or drain your solar system unnecessarily.
For dedicated solar setups or if you’re charging multiple 8V batteries frequently, invest in a proper DC-to-DC charge controller designed for 8V systems. The upfront cost of around $50-150 pays for itself through improved efficiency within a year of regular use. Your batteries will thank you with longer lifespans too.
Equipment You’ll Need
Having the right equipment ready before starting ensures a safe and successful 8-volt battery charging process.
Choosing the Right Inverter
When you’re charging 8-volt batteries through an inverter, picking the right one makes all the difference between smooth sailing and frustrating failures. Let me walk you through what actually matters.
First up, wattage. Your inverter needs enough capacity to handle your charger’s power draw. Most standard 8-volt battery chargers pull between 50-150 watts, but here’s my rule of thumb from years of tinkering: go for an inverter rated at least twice your charger’s wattage. If you’re running a 100-watt charger, grab a 200-watt inverter. This headroom prevents overheating and extends your inverter’s lifespan. I learned this the hard way when my undersized inverter kept shutting off mid-charge during a camping trip.
Now for the big debate: pure sine wave versus modified sine wave. Pure sine wave inverters produce clean, smooth power identical to your home outlets. They’re what I always recommend for battery charging because many modern smart chargers have sensitive electronics that get cranky with anything less. Modified sine wave inverters work for simple resistive loads, but they can cause chargers to malfunction, produce buzzing sounds, or even damage charging circuits over time.
Budget-conscious? The AIMS Power 300W pure sine wave inverter runs around 60 dollars and handles most standard chargers beautifully. Need something beefier for multiple batteries? The Renogy 1000W pure sine wave sits around 150 dollars and powers several chargers simultaneously. Yes, modified sine wave inverters cost 20-30 dollars less, but that savings evaporates quickly if you fry a 50-dollar charger.
Finding a Compatible 8V Charger
Finding the right charger for your 8V battery can feel like searching for a needle in a haystack, but I promise it’s easier than you might think. The key is looking for chargers specifically designed for 8-volt systems or models with adjustable voltage settings.
Smart chargers are your best friend here. These intelligent devices automatically adjust their charging profile based on your battery’s needs, preventing overcharging and extending battery life. Look for models that explicitly list 8V compatibility in their specifications. I learned this the hard way when I assumed a “universal” charger would work—it didn’t, and I nearly damaged a perfectly good battery.
If you can’t find an 8V-specific charger, adjustable voltage chargers offer excellent flexibility. These let you dial in the exact voltage you need, typically ranging from 6V to 12V. Just make sure you can set it precisely to your battery’s requirements, usually around 9.2 to 9.6 volts for charging an 8V battery.
Before purchasing any charger, double-check three things: the voltage output matches your needs, the amperage rating suits your battery size (typically 10-20% of your battery’s amp-hour capacity), and the connector type fits your battery terminals. Read user reviews from other DIYers—they’re goldmines of real-world compatibility information.
Safety Equipment and Cables
Before you start charging your 8-volt battery, let’s talk about keeping yourself and your equipment safe. I learned this the hard way when I once skipped checking my wire gauge and ended up with a melted connector. Not fun!
First up, safety glasses and insulated gloves are must-haves when working with batteries. Battery acid can splash, and terminals can spark unexpectedly. Keep these within arm’s reach of your workspace.
For wiring, use the proper gauge cables based on your charging amperage. For most 8-volt battery charging setups pulling 10-15 amps, 10 or 12-gauge wire works well. Going too thin creates heat and fire risk. Always add an inline fuse rated slightly above your charger’s output, typically 15-20 amps. This little device can save your entire system from a short circuit disaster.
Connection hardware matters too. Use corrosion-resistant ring terminals or heavy-duty clamps that create solid contact with battery posts. Loose connections cause voltage drops and heat buildup. A simple wire stripper and crimping tool ensures professional-quality connections every time.
Keep a fire extinguisher nearby, and work in a well-ventilated area since batteries release hydrogen gas during charging. These simple precautions turn a risky project into a safe, successful one.
Step-by-Step Charging Process
Setup and Safety Checks
Before you connect your 8-volt battery to a charger, taking a few minutes for safety checks can prevent headaches down the road. I learned this the hard way when I rushed through a charging session and ended up with corroded terminals that could have been avoided with a quick inspection.
Start with a visual inspection of your battery. Look for any cracks, bulges, or leaking fluid. Check the terminals for corrosion, which appears as a white, crusty buildup. If you spot corrosion, clean it off with a mixture of baking soda and water before charging. Loose connections are another common issue, so make sure all cables and clamps are secure.
Ventilation is absolutely critical when charging batteries. Even sealed batteries release gases during charging, and these can be explosive in confined spaces. Set up your charging station in a well-ventilated area, ideally outdoors or in a garage with open doors. For detailed guidance on this crucial safety step, check our article on proper battery ventilation.
Keep a fire extinguisher nearby and wear safety glasses. Remove any jewelry like rings or watches that could accidentally short across terminals. Finally, double-check your charger settings match your battery’s voltage before connecting anything. These simple precautions make charging both safe and successful.
Connecting Your System
Getting your charger connected properly is crucial for both safety and battery longevity. Let me walk you through this step-by-step, the same way I do it in my own workshop.
First things first: always work in a well-ventilated area and wear safety glasses. Batteries can emit hydrogen gas during charging, which is highly flammable. I learned this the hard way when a friend’s garage filled with gas after charging in a closed space – thankfully nothing ignited, but it was a wake-up call.
Start by making sure both your charger and the battery are turned off. Double-check this. It’s a simple step that prevents sparking and potential damage.
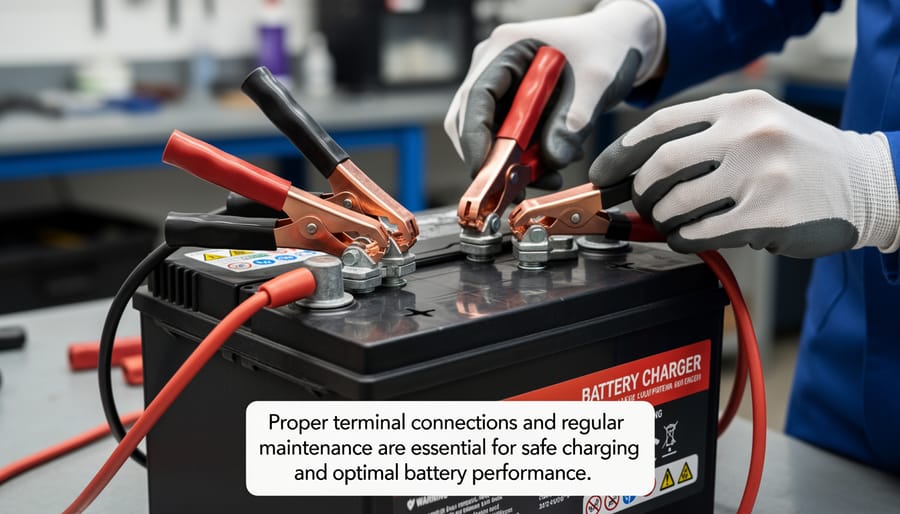
Now for the connection sequence – this matters more than most people realize. Always connect the positive cable first. Locate the positive terminal on your 8-volt battery (marked with a plus sign or red color) and attach the red charger clamp firmly. Make sure it’s making solid contact with the terminal, not just the outer coating or corrosion.
Next, connect the negative cable. Attach the black clamp to the negative terminal (marked with a minus sign or black color). Some people recommend connecting the negative to a grounding point away from the battery, but for 8-volt batteries in stationary applications, the negative terminal works fine.
Before powering on, wiggle each connection gently to ensure they’re secure. Loose connections create resistance, which generates heat and reduces charging efficiency. Only after confirming solid connections should you turn on your charger.
Monitoring the Charge
Once you’ve connected your 8-volt battery and started charging, keeping a watchful eye on the process helps ensure everything goes smoothly. I learned this the hard way when I once left a battery charging overnight without checking—it got uncomfortably warm and could have been damaged if I hadn’t caught it in time.
For a typical 8-volt battery, expect charging times between 4 to 8 hours depending on how depleted it is and your charger’s amperage. A good practice is to verify your inverter is charging by checking that your voltage is rising steadily. Use your multimeter every hour or so—you should see gradual increases from your starting voltage up toward the 9.0-9.2 volt range when fully charged.
Temperature is your biggest warning sign. Touch the battery casing periodically—it should feel warm but never hot. If it’s too uncomfortable to hold your hand on for a few seconds, disconnect immediately and let it cool down. This overheating often indicates charging too fast or a damaged battery.
Watch for bubbling or hissing sounds from flooded batteries, which is normal near full charge but excessive activity early on suggests problems. Also check that your connections stay secure throughout the charging session, as loose terminals can create resistance and heat.
Alternative Charging Methods Worth Considering
While the inverter method works well, it’s not the only way to charge your 8-volt batteries. Let me share a few alternatives I’ve explored over the years that might better suit your specific setup.
Direct solar charging with an MPPT controller is one of my favorite approaches. Modern MPPT (Maximum Power Point Tracking) controllers are incredibly smart and can be configured for various voltage systems. The trick with 8V batteries is finding a controller that allows custom voltage settings. I remember when my neighbor Rick tried this with his golf cart batteries—we spent an afternoon programming his MPPT controller to deliver exactly 9.2 volts for bulk charging and 8.4 volts for float. The beauty of this method is efficiency; MPPT controllers squeeze every bit of power from your solar panels, even on cloudy days.
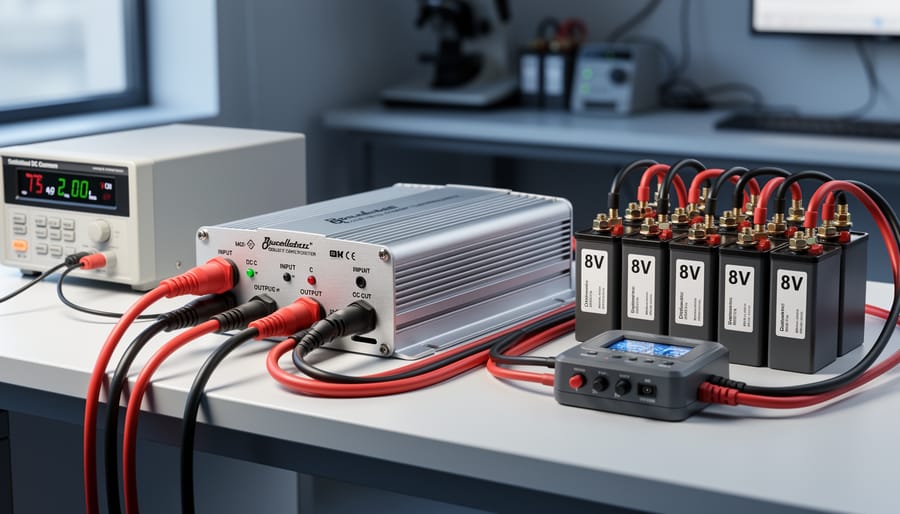
Another practical option involves series and parallel configurations. If you’re charging multiple 8V batteries, you can temporarily wire them in series to create a 12V, 24V, or 36V bank that matches standard charger voltages. Then redistribute them to your devices afterward. Yes, it requires some careful wiring and labeling (trust me, you don’t want to mix up your connections), but it lets you use readily available charging equipment. Just remember to ensure all batteries are at similar charge levels before connecting them together.
Dedicated 8V chargers do exist, though they’re less common than their 6V and 12V cousins. These specialized chargers are designed specifically for golf carts and industrial equipment using 8V batteries. They’re plug-and-play simple but can be pricier. I’ve found them most worthwhile if you’re regularly maintaining multiple 8V batteries—the time savings and peace of mind justify the investment.
Each method has its place depending on your budget, technical comfort level, and how often you’re charging batteries. The key is choosing what fits your lifestyle and energy goals.
Troubleshooting Common Issues
Even with the best setup, you’ll occasionally run into hiccups when charging your 8-volt batteries. Don’t worry—most issues have straightforward solutions, and I’ve definitely encountered my fair share over the years!
One of the most common problems is insufficient charging current. You’ll notice this when your battery takes forever to charge or never quite reaches full capacity. This usually happens when your charger or inverter isn’t sized correctly for your battery’s capacity. As a general rule, your charging current should be about 10-15% of your battery’s amp-hour rating. For example, a 100Ah battery needs roughly 10-15 amps of charging current. If you’re falling short, consider upgrading your charging equipment or connecting fewer batteries to your current setup. I remember trying to charge three golf cart batteries simultaneously with my undersized inverter—it took nearly two days! Splitting them into separate charging sessions solved the problem immediately.
Overheating is another issue that can sneak up on you, especially during warmer months. If your battery feels hot to the touch (above 120°F or too hot to comfortably hold), stop charging immediately. Overheating often stems from overcharging, charging too quickly, or poor ventilation. Make sure you’re in a well-ventilated area and that your charging voltage isn’t exceeding 9.2 volts for flooded batteries or the manufacturer’s specifications for sealed types. Adding a small fan near your charging station can work wonders.
Voltage drops during charging can be frustrating. You set everything up correctly, but the voltage keeps sagging below where it should be. This typically indicates loose connections or corroded terminals. Check every connection point in your charging circuit—clean any corrosion with a wire brush and baking soda solution, then tighten all terminals firmly. Sometimes the culprit is your cables themselves. Undersized wires create resistance, causing voltage drops. For most 8-volt charging applications, 10-gauge wire is the minimum you should use for runs under 10 feet.
If your battery won’t hold a charge at all, it might be sulfated from sitting discharged too long. Try a desulfation charge cycle if your charger has that feature, or consider a dedicated battery reconditioner before giving up on it completely.
Maximizing Battery Life with Proper Charging
Getting the most life out of your 8-volt batteries isn’t rocket science, but it does require some attention to detail. I learned this the hard way when I first started using golf cart batteries for my small solar setup. After replacing a battery bank prematurely, I realized that proper charging habits could have doubled their lifespan.
The golden rule for battery longevity is avoiding deep discharges whenever possible. While 8V batteries can handle being drained, regularly discharging them below 50% significantly shortens their life. Think of it like this: each deep discharge is like running a marathon for your battery, while shallow discharges are more like gentle walks. Your batteries will thank you for the easier workout. Using battery voltage reference charts can help you monitor discharge levels and avoid going too low.
Charging frequency matters too. Many newcomers wait until their batteries are nearly dead before charging, but this creates unnecessary stress. Instead, recharge your batteries when they reach about 50% capacity. For seasonal users like RV owners or those with backup solar systems, this becomes even more important during storage periods.
Speaking of storage, keep your 8V batteries in a cool, dry location and maintain them at full charge. A battery left sitting in a discharged state will develop sulfation, which permanently reduces capacity. I check my stored batteries monthly and give them a top-up charge if needed. It takes just a few minutes but saves hundreds of dollars in replacements.
Equalization charging deserves special mention. This controlled overcharge process, typically performed every 30-90 days, helps balance individual cells within your battery and removes sulfate buildup. Not all charging methods support this feature, but if yours does, use it. Run equalization when batteries show signs of uneven performance or decreased capacity. Just remember to monitor the process closely and ensure good ventilation, as batteries release hydrogen gas during equalization.
So there you have it! Charging 8 volt batteries using an inverter isn’t just possible, it’s a practical solution that many DIYers have successfully implemented. While it might seem unconventional at first, this technique opens up possibilities when you’re working with limited equipment or facing those frustrating moments when nothing else seems to fit your setup.
I’ve personally used this method in a pinch, and while it requires attention to detail and careful monitoring, the satisfaction of solving a tricky charging problem is worth the effort. Remember, safety always comes first. Double-check your connections, never leave batteries charging unattended, and trust your instincts if something doesn’t feel right.
The beauty of DIY solar projects is that there’s always room for creativity and experimentation. Every battery, inverter, and setup is a little different, so what works perfectly for one person might need tweaking for another. Don’t be discouraged if your first attempt needs adjustments.
Before you start your charging project, check out our battery charge time calculator to help plan your charging session and estimate how long the process will take.
We’d love to hear about your experiences! Whether you’ve successfully charged your 8 volt batteries using this method or discovered your own tricks along the way, sharing your story helps our entire community learn and grow. Drop a comment below and let’s keep the conversation going. Happy charging!
How useful was this post?
Click on a star to rate it!
Average rating 0 / 5. Vote count: 0
No votes so far! Be the first to rate this post.
We are sorry that this post was not useful for you!
Let us improve this post!
Tell us how we can improve this post?
charlesnoble
Here at Spheral Solar, I’m a hands-on solar power enthusiast, constantly exploring and experimenting with DIY solutions. I’m dedicated to sharing my discoveries, insights, and even the bumps I hit along the way, all in the pursuit of a more sustainable future.
Why 6 Volt Batteries Might Be Your Solar System’s… by Charlesnoble February 20, 2026 Connect 6-volt batteries in series pairs to create 12-volt banks that deliver superior amp-hour capacity and longer lifespan than single 12-volt alternatives. This wiring configuration doubles your voltage while maintaining the individual battery capacity, giving you more usable power for off-grid applications. Most RV and camping solar setups benefit from…
Why LFP Batteries Changed Everything About Solar… by Charlesnoble April 3, 2026 Match your LFP battery capacity to your actual lighting needs by calculating your nightly watt-hour consumption and multiplying by three—this gives you enough storage for cloudy stretches without overspending on unused capacity. A 20-watt LED running five hours nightly needs a 300Wh minimum battery, which translates to a 100Ah 12V…
How a 7kW Solar System With Battery Backup Keeps… by Charlesnoble October 15, 2025 A 7kW solar system with battery backup represents the sweet spot for residential energy independence, typically powering a 3-4 bedroom home while providing crucial backup during grid outages. This complete solar solution combines high-efficiency solar panels capable of generating 28-32 kWh daily with advanced lithium battery storage systems storing 10-15…
How Solar Energy Actually Works in Your Home (And… by Charlesnoble December 5, 2025 Capture sunlight with photovoltaic panels that convert solar radiation into direct current electricity through semiconductor technology. Position your panels at the optimal angle for your latitude—typically between 30 and 45 degrees in most locations—to maximize energy absorption throughout the day. Store excess electricity in deep-cycle lithium or lead-acid batteries, which…
Your iPhone Doesn’t Need a Wall Outlet Anymore by Charlesnoble November 16, 2025 Charge your iPhone anywhere the sun shines by pairing a solar panel rated at minimum 10 watts with a portable battery bank that has USB output. I learned this the hard way during a week-long camping trip in Colorado when my flimsy 5-watt panel couldn’t keep up with my phone’s…
How to Check Inverter Is Charging Battery by Charlesnoble October 20, 2023 You can check if your inverter is properly charging the battery using a few simple methods. Observing the inverter’s status lights, measuring battery voltage with a multimeter, and performing a load test are straightforward ways to confirm charging status. In this article, we will follow step-by-step instructions for checking whether…
Subscribe for handpicked DIY projects, exclusive tips, and giveaways.
Route your PV wires through UV-resistant conduit within 18 inches of leaving the solar array, securing it every 3 feet with proper clamps to prevent wind damage and code violations. This single step prevents 80% of the wire degradation issues I’ve seen in DIY solar installations over the past decade. Group your positive and negative… Read more: Why Your PV Wire Management Could Fail Inspection (And How to Fix It)
Understand that 6000 volts sounds terrifying but delivers surprisingly low amperage—typically around 120 milliamps for just 3/10,000th of a second per pulse. This combination creates an unforgettable shock that trains animals to avoid the fence without causing lasting harm. The voltage pushes current through thick fur and hide, while the minimal amperage and microsecond duration… Read more: Why 6000 Volts Won’t Kill Your Livestock (But Will Stop Predators Cold)
Check the maximum voltage and current ratings first—these determine whether your controller can actually handle your solar panel array without frying itself on the first sunny day. I learned this the hard way when my first DIY system shut down every afternoon because I’d paired 600 watts of panels with a controller rated for only… Read more: Why Your Solar Setup Needs Both a Charge Controller and Inverter (And How to Pick the Right Ones)

")

")


")

")


