Why Your Solar Lights Stop Working (And How to Fix Them Fast)
Updated:
Check the solar panel first by wiping away dirt, leaves, and debris that block sunlight absorption. A grimy panel is the number one reason solar lights stop working, and a simple cleaning with soapy water restores function in about 60% of cases. While you’re at it, reposition any lights that have shifted into shaded areas throughout the seasons.
Test your rechargeable batteries next by removing them and checking for corrosion on the terminals. Those white or green crusty deposits prevent proper charging. Clean terminals with a cotton swab dipped in vinegar, let them dry completely, then reinstall. If your lights still won’t work, swap in fresh rechargeable batteries of the same voltage. Most solar lights use standard AA or AAA NiMH batteries that cost just a few dollars and typically need replacement every 1-2 years.
Inspect the light sensor, that small photocell usually located near the solar panel. Sometimes paint, spider webs, or weathering cover this component, tricking your light into thinking it’s always daytime. A gentle wipe often solves mysterious “won’t turn on at night” problems instantly.
Before you toss those dim or dead solar lights into the trash, know that most failures come down to these three fixable issues. I learned this the hard way after nearly throwing out a dozen pathway lights at my own home, only to revive 10 of them with 20 minutes of basic maintenance. The satisfaction of breathing new life into something destined for the landfill never gets old, and you’ll save money while keeping perfectly good materials out of the waste stream.
Understanding How Solar Lights Work (The 5-Minute Basics)
Understanding the main components of a solar light makes diagnosis and repair significantly easier for DIY enthusiasts.
The Four Parts That Usually Fail
In my years tinkering with solar lights around my patio, I’ve noticed that about 90% of failures trace back to just four components. Understanding these common culprits will save you tons of time and frustration when diagnosing problems.
First up is the rechargeable battery, which typically fails after 1-3 years of use. It’s the most common issue I encounter, and thankfully, it’s also the easiest fix. Second, the solar panel itself can become covered in grime or develop micro-cracks that prevent proper charging. I learned this the hard way after ignoring cleaning for two seasons straight.
Third, the LED bulb can burn out or lose connection, though modern LEDs last much longer than old incandescent bulbs. Finally, there’s the light sensor or internal circuitry, which controls when your light turns on and off. This one’s trickier to diagnose but still manageable with basic testing.
The good news? You can check all four components with simple tools and a methodical approach. Start with the battery since it’s the usual suspect, then work your way through the others. Most repairs require nothing more than a screwdriver and a multimeter.
Diagnosing Your Solar Light Problem
The Quick 3-Test Method
When your solar light stops working, pinpointing the exact problem can feel overwhelming. I remember staring at a stubborn pathway light in my garden, wondering if I should just toss it and buy a new one. Then I discovered this simple three-test method that takes less than five minutes and requires nothing more than what you already have around the house.
Test 1: The Darkness Test (checking the light sensor)
First, let’s confirm your solar light isn’t working during a perfectly sunny day. Cover the solar panel completely with your hand or a dark cloth, creating total darkness. If the LED lights up immediately, congratulations! Your light is actually fine – it just thinks it’s daytime. The sensor might be dirty or getting hit by ambient light from nearby sources like porch lights. Give the panel a good cleaning and consider repositioning the light away from other light sources.
Test 2: The Bypass Test (checking the battery)
Remove the battery from your solar light. Using two fresh AA or AAA batteries (depending on your light’s requirements), pop them in place of the old rechargeable ones. Cover the solar panel again and wait a moment. If the light springs to life, you’ve identified a dead battery as your culprit. This is actually the most common problem I encounter, accounting for about 60% of solar light failures in my experience.
Test 3: The Direct Connection Test (checking the LED and wiring)
If fresh batteries didn’t help, it’s time to check the LED itself. With the battery installed, use a small piece of wire or a paperclip to gently touch both the positive and negative terminals directly where the solar panel connects. If nothing happens, you’re likely dealing with a failed LED or broken wiring that needs replacement.
What to Check First (Save Yourself Time)
Before you grab your toolbox, let’s talk about the fixes that take 30 seconds. I learned this the hard way after disassembling three perfectly good solar lights one weekend, only to discover they just needed a quick wipe-down!
Start with the solar panel itself. Dust, pollen, and grime are sneaky culprits that block sunlight absorption. Use a soft cloth with a bit of water to gently clean the panel surface. You’d be amazed how often this simple step brings a light back to life.
Next, check the on/off switch. It sounds obvious, but many solar lights have tiny switches that accidentally get flipped during installation or maintenance. Look for a small button or toggle, often hidden under the panel or near the battery compartment.
Location matters more than you might think. If your lights are under tree shade or near bright porch lights, they won’t charge properly during the day or may not activate at night. These are among the common reasons solar lights fail that have nothing to do with broken parts.
Finally, remove any protective film from new lights. Manufacturers sometimes leave clear plastic covering the panels that’s easy to miss.
Cleaning and Maintenance Fixes
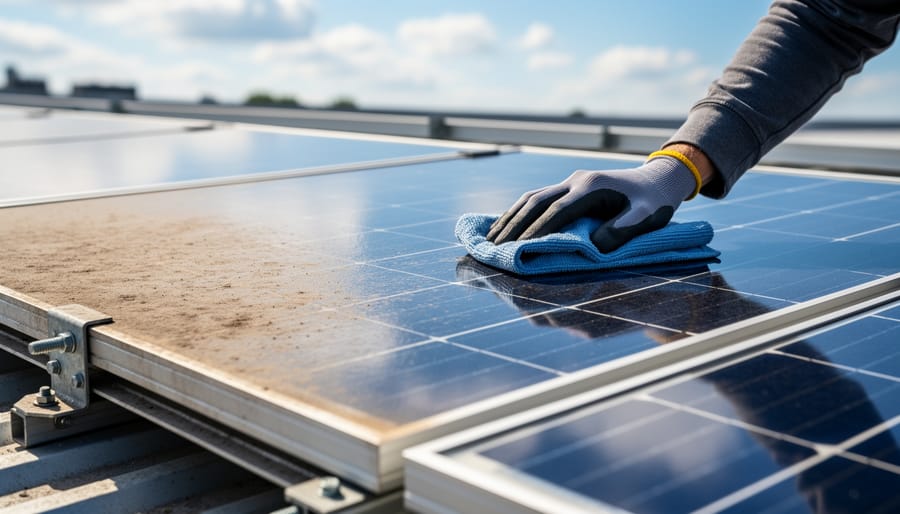
Restoring Your Solar Panel’s Power
A dirty or oxidized solar panel is like trying to charge your phone through a muddy window—it just won’t work efficiently. I learned this the hard way when my pathway lights dimmed to almost nothing after one particularly dusty summer. The fix was surprisingly simple.
Start with a gentle clean using warm water and a soft cloth or sponge. Avoid abrasive materials that might scratch the panel surface. For stubborn grime, add a drop of mild dish soap to your water. Rinse thoroughly and let it air dry completely before testing.
If your panel looks cloudy or yellowed, that’s oxidation at work. Here’s where a bit of elbow grease helps: create a paste using baking soda and water, then gently rub it onto the panel in circular motions. The mild abrasive action removes that hazy layer without damaging the cells underneath. Alternatively, white vinegar works wonders on mineral deposits and light oxidation—just apply, let it sit for a few minutes, then wipe clean.
For heavily oxidized panels, automotive headlight restoration kits are your secret weapon. They’re designed for similar plastic surfaces and can bring seemingly dead panels back to life. Just follow the kit instructions carefully and apply any protective coating included to prevent future oxidation.
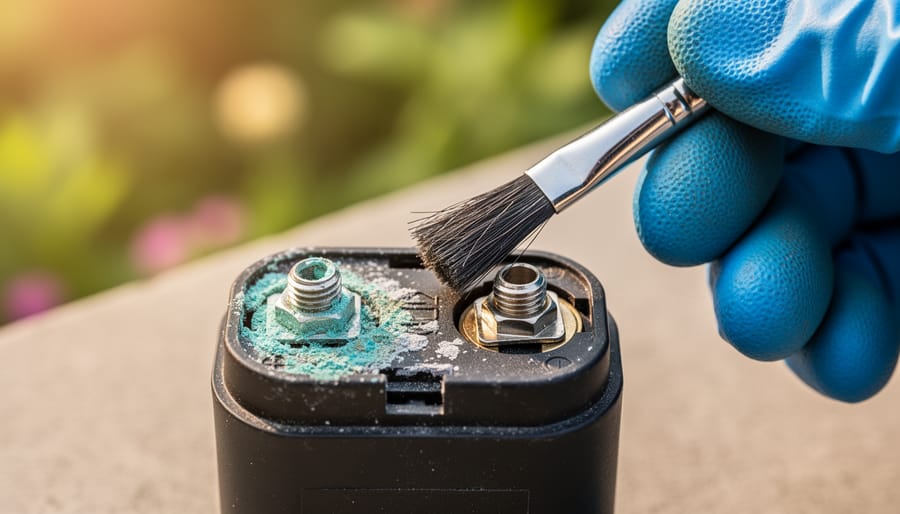
Fixing Corroded Battery Contacts
Corroded battery contacts are one of the most common culprits behind dead solar lights, and the good news is they’re usually pretty easy to fix. When batteries sit in outdoor lights exposed to moisture and temperature changes, a white or greenish crusty buildup can form on the metal terminals. This corrosion acts like an insulator, blocking the electrical current your light needs to function.
I learned this the hard way when half my pathway lights stopped working one spring. Charles, my neighbor who’s been tinkering with solar setups for years, showed me his simple cleaning technique that saved me from buying replacements.
Start by removing the batteries and inspecting both the battery terminals and the contacts inside the compartment. You’ll need white vinegar or lemon juice, an old toothbrush, and some fine-grit sandpaper. Dip the toothbrush in vinegar and scrub away the corrosion. For stubborn buildup, carefully use sandpaper to remove the crusty layer until you see clean, shiny metal underneath.
Dry everything thoroughly with a clean cloth before reassembling. Here’s a pro tip: apply a thin layer of petroleum jelly or dielectric grease to the contacts after cleaning. This creates a protective barrier against future corrosion while still allowing electricity to flow.
If the corrosion has eaten through the metal contacts completely, replacement might be necessary, but in most cases, a good cleaning brings your lights back to life.
Battery Replacement Made Simple
Cleaning oxidized and dirty solar panels is often the simplest fix that restores your lights to full functionality.
Finding the Right Battery Type
One of the most common culprits behind solar light failure is a worn-out battery. I learned this the hard way when I replaced bulbs and cleaned panels on a dozen pathway lights before finally checking the batteries. Don’t be like me and save yourself some time by tackling this issue early in your troubleshooting.
First, you’ll need to open your solar light housing and remove the existing battery. Take a close look at the battery itself. Most solar lights use rechargeable batteries, and you’ll typically find one of three types: NiCd (Nickel-Cadmium), NiMH (Nickel-Metal Hydride), or Li-ion (Lithium-ion). The battery type is usually printed right on the casing, along with important specifications like voltage (commonly 1.2V for NiCd and NiMH, or 3.2V to 3.7V for Li-ion) and capacity measured in mAh (milliamp-hours).
Note the size too. AA and AAA are most common, but some lights use less standard sizes. Snap a quick photo with your phone before removal so you have all the details handy when shopping for replacements.
When selecting a replacement, matching the voltage is critical. The capacity (mAh) can be equal to or slightly higher than the original, which actually gives you longer runtime. For more details on choosing between chemistries, check out our guide on NiMH vs NiCd batteries. Generally speaking, NiMH batteries offer better performance and are more environmentally friendly than NiCd, making them my go-to recommendation. Our article on the best rechargeable batteries can help you find quality options that’ll keep your lights shining bright.
Battery terminal corrosion is a leading cause of solar light failure but is easily cleaned to restore electrical connection.
The 10-Minute Battery Swap
Battery replacement is hands-down the most common solar light repair you’ll tackle, and the good news? It’s usually the easiest fix. I remember the first time I replaced a solar battery – I was convinced I’d need some fancy tool kit, but all I really needed was a small screwdriver and about ten minutes of patience.
First things first: safety matters. Always perform battery swaps during daylight or in a well-lit area, and make sure the solar panel isn’t actively charging. Most solar lights have either a battery compartment on the bottom or require you to unscrew the top section where the panel sits.
Start by locating the battery access point. For stake lights, this is typically underneath the lamp head – twist counterclockwise or look for small screws. For hanging or mounted lights, check the back panel. Once open, you’ll see the battery connected by simple metal tabs or wire leads.
Gently remove the old battery, noting which end is positive and negative. This matters more than you’d think! Take a quick photo with your phone if you’re worried about forgetting the orientation.
When installing the new battery, make sure you’re using the correct type. Most solar lights use rechargeable NiMH batteries, typically AA or AAA size. Regular alkaline batteries won’t work here because they can’t handle the charge-discharge cycles.
Snap or screw everything back together, place your light in direct sunlight for a full day, and you’re done. If it lights up that evening, congratulations – you’ve just extended your solar light’s life by years.
Fixing Broken LEDs and Wiring
Testing and Replacing LEDs
Testing your LED is surprisingly straightforward, and you’ll know within seconds whether it’s the culprit behind your dark solar light. I remember the first time I tested an LED with a multimeter – I felt like a detective solving a mini mystery in my garage!
Start by setting your multimeter to the diode testing mode, usually marked with a diode symbol. Touch the red probe to the LED’s positive leg (the longer one, or the leg connected to the wider part inside the LED bulb) and the black probe to the negative leg. A working LED should light up dimly. If nothing happens, flip the probes – if it still doesn’t light, your LED is toast.
No multimeter? Here’s a quick workaround: connect a coin cell battery (like a CR2032) directly to the LED legs. Hold the positive battery side to the positive LED leg for just a second. If it doesn’t glow, it needs replacing.
Replacing LEDs requires basic soldering skills, but don’t let that intimidate you. Heat your soldering iron to around 350-400 degrees Celsius. Gently heat the old LED’s solder joints while pulling the component free with tweezers. Clean the pads with a damp sponge.
Insert your replacement LED – and this is crucial – matching the polarity correctly. The flat edge on the LED base typically indicates the negative side. Apply a small amount of solder to each leg, holding the iron on for just 2-3 seconds. Too much heat damages LEDs, so work quickly and confidently.
Repairing Loose Connections
Loose connections are one of the most common culprits behind solar lights that flicker or refuse to turn on entirely. I remember repairing my first set of pathway lights and discovering that a simple wire had come loose from the battery compartment. One quick fix later, and they were glowing bright again.
Start by opening your solar light’s housing and visually inspecting all wire connections. Look for wires that have come detached from their terminals, corroded connection points, or solder joints that appear cracked or broken. Gently wiggle each wire to test if it’s secure. If you spot a loose wire, you’ll need to reattach it properly.
For simple push-fit connections, carefully clean both the wire end and terminal with a bit of sandpaper to remove any corrosion, then firmly reconnect them. If the connection involves a soldered joint, you’ll need a basic soldering iron. Heat the old solder joint for a few seconds until it melts, remove the old solder with a desoldering pump if needed, then apply fresh solder to create a solid connection. The key is using just enough solder to create a shiny, smooth joint without creating blobs that might touch other components.
Always let soldered connections cool completely before testing your light, and consider applying a dab of hot glue for extra stability if the connection seems vulnerable to movement.
Weatherproofing Your Repairs
Once you’ve successfully repaired your solar light’s components, the most critical step is protecting your work from the elements. I learned this lesson the hard way when my first repair job lasted only two weeks before moisture crept back in during a rainstorm. Proper weatherproofing makes the difference between a repair that lasts months versus one that endures for years.
Start by inspecting all seals and gaskets around the solar panel housing, battery compartment, and LED chamber. These rubber or silicone components deteriorate over time from UV exposure and temperature fluctuations. If they’re cracked, brittle, or missing entirely, replace them before reassembling your light. You can find universal gasket material at most hardware stores, or simply apply a thin bead of clear silicone sealant around the edges.
For electronic connections and solder joints, apply a protective coating to prevent corrosion. Clear nail polish works surprisingly well as a moisture barrier, and you can learn more about weatherproofing with nail polish for detailed techniques. Alternatively, use specialized conformal coating spray designed for electronics, available at electronics supply stores.
Pay special attention to battery compartments, as moisture here causes the most damage. After cleaning any existing corrosion, apply a thin layer of dielectric grease to battery terminals before reinstalling batteries. This creates a protective barrier while still allowing electrical contact.
Before closing everything up, test your light overnight to ensure it functions properly. Once confirmed, apply a final seal around all joints and screw holes with silicone sealant. Let it cure completely, typically 24 hours, before exposing your repaired light to outdoor conditions. This patience pays off with repairs that withstand rain, humidity, and temperature swings throughout the seasons.
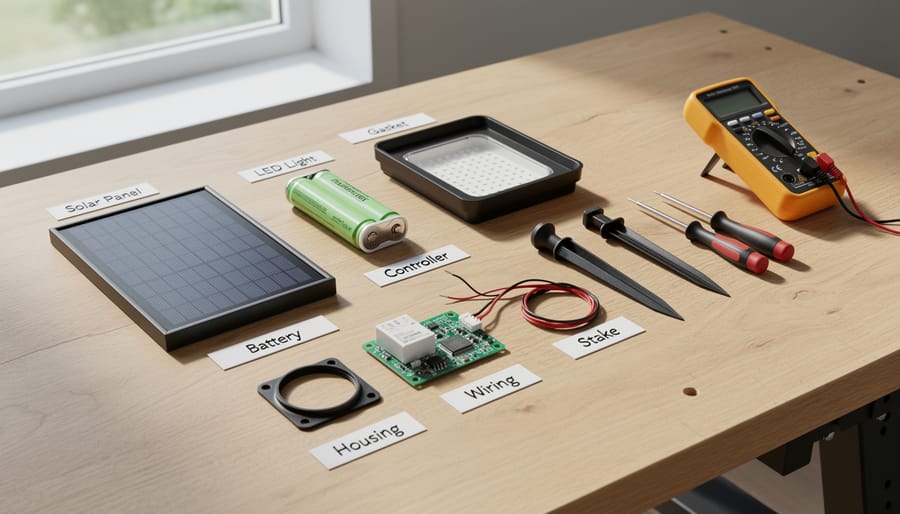
Tools and Materials You’ll Actually Need
Good news: you probably already own most of what you need to fix solar lights! I learned this the hard way after Charles showed me his repair kit, which fit comfortably in a shoebox. I’d been intimidating myself out of repairs, assuming I needed some fancy soldering station or expensive multimeter.
Here’s what you actually need to get started. A basic multimeter is your most important tool, and you can snag a perfectly adequate one for under fifteen dollars at any hardware store. It helps you test batteries, check solar panels, and identify electrical problems. Charles swears by his twenty-year-old model that cost him eight bucks.
Keep a small Phillips and flathead screwdriver set handy, since most solar lights use standard screws. A roll of fine-grit sandpaper or a pencil eraser works wonders for cleaning corroded battery contacts. White vinegar and an old toothbrush handle rust and corrosion surprisingly well.
For replacement parts, stock a few rechargeable AA or AAA batteries (depending on your lights), some clear nail polish for waterproofing, and electrical tape. If you get more ambitious, pick up a basic soldering kit for around twenty dollars, though Charles managed his first dozen repairs without ever touching a soldering iron.
I keep everything in an old lunchbox in my garage. The total investment? About thirty-five dollars, which paid for itself after fixing just three lights instead of replacing them.
When to Repair vs. When to Replace
Here’s the honest truth from someone who’s been there: not every solar light deserves a second chance. I learned this the hard way after spending two hours fixing a $4 pathway light that broke again within a week.
The general rule I follow is the 50% rule. If repair costs exceed half the replacement price, it’s usually time to let it go. For a $10 basic garden light with a cracked housing and dead battery, spending $8 on parts doesn’t make sense. But for a $60 decorative lantern that just needs a $5 battery swap? Absolutely worth it.
Consider the age factor too. Solar lights typically last 2-4 years with proper care. If yours are pushing that limit and showing multiple issues like corroded wiring, cloudy panels, and failing batteries, replacement often makes more financial sense. However, if it’s a single component failure on a relatively new light, repairs are your friend.
Here’s where it gets interesting from an environmental perspective. Repairing keeps plastic and electronic waste out of landfills, which matters to many of us in the solar community. Even if repair costs slightly more, the environmental benefit might tip the scales for you. I’ve kept perfectly functional light housings going for years by simply replacing internal components.
Bottom line: repair when it’s a single component issue on quality lights, replace when multiple systems fail on inexpensive units. Your time, budget, and environmental values should guide each decision. There’s no shame in either choice as long as you’re making it thoughtfully.
Here’s the thing I’ve learned after years of tinkering with solar lights: most repairs are genuinely within reach for anyone willing to spend twenty minutes with a screwdriver. Before you toss those non-working lights in the trash, give them a fighting chance. The satisfaction of bringing a solar light back to life is surprisingly rewarding, not to mention you’re keeping perfectly salvageable materials out of landfills.
I remember my first solar light repair—a simple battery swap that I’d been putting off for months, convinced it would be complicated. It took me less than ten minutes, and I felt like I’d unlocked a superpower. You’ll likely feel the same way.
If you’ve successfully repaired your solar lights or discovered creative solutions we haven’t covered, I’d love to hear about it in the comments below. This community thrives on shared experiences, and your insights might help someone else solve their problem.
Ready to take your solar journey beyond garden lights? Our site offers comprehensive solar calculator tools to help you explore larger projects, from powering outdoor equipment to planning whole-home solar systems. Start small with these repairs, dream big with what comes next.
How useful was this post?
Click on a star to rate it!
Average rating 0 / 5. Vote count: 0
No votes so far! Be the first to rate this post.
We are sorry that this post was not useful for you!
Let us improve this post!
Tell us how we can improve this post?
charlesnoble
Here at Spheral Solar, I’m a hands-on solar power enthusiast, constantly exploring and experimenting with DIY solutions. I’m dedicated to sharing my discoveries, insights, and even the bumps I hit along the way, all in the pursuit of a more sustainable future.
Your Hampton Bay Solar Light Stopped Working? Here’s… by Charlesnoble November 2, 2025 **Check the solar panel surface first** – dirt, leaves, or a thin film of grime blocks sunlight absorption and prevents charging. I learned this the hard way when my own Hampton Bay pathway lights died after just two weeks; a simple wipe with a damp cloth brought them back to…
10 Best Rechargeable Batteries for Solar Lights by Nick April 23, 2021 While lithium-ion batteries have long been touted as the future of the solar battery world, some close rivals are giving them a run for their money. This blog post gives you a closer look at the best rechargeable batteries for solar lights currently available for solar light applications. We’ve covered…
Your Solar Light Won’t Turn On? Here’s Why (And How… by Charlesnoble November 10, 2025 Check your solar panel first—nine times out of ten, dirt, leaves, or shade are blocking the sunlight your fixture needs to charge. I learned this the hard way when my entire pathway lighting system “died” last fall, only to discover a thin film of pollen had cut charging efficiency by…
How to Clean Solar Lights – Why, When and How by Paul August 17, 2021 Solar lights and their moderately dirty panels are best cleaned with a mild detergent and a soft, damp cloth. Light lenses that have become cloudy can be coated with clear lacquer, buffed with a mild abrasive, or polished. The same applies to solar panels with a build-up of salt or…
10 Best Outdoor Solar Lights in 2023 by Adeyomola August 30, 2021 You will get the best experience with outdoor solar lights when you opt for lights with good solar panels and long lighting times. But besides that, ensure your choice can charge quickly and offers sufficient brightness. Such a selection will give you a complete experience. Best Solar Lights for Outdoors…
Why Your Solar Lights Glow Yellow (And How to Fix Them) by Charlesnoble December 30, 2025 Notice your once-bright solar lights glowing yellow or dim? This frustrating problem typically signals one of three culprits: aging batteries that can’t hold a full charge, dirty solar panels blocking sunlight absorption, or LEDs nearing the end of their lifespan. I’ve dealt with this issue countless times in my own…
Subscribe for handpicked DIY projects, exclusive tips, and giveaways.
Calculate your home’s air exchange rate by dividing your square footage by 60—most homes need complete air replacement every 1-3 hours to prevent moisture buildup, stale air, and indoor pollutants that trigger allergies and respiratory issues. A 1,500 square foot home requires roughly 25-50 cubic feet per minute of continuous ventilation. Install solar-powered attic fans… Read more: Solar-Powered Ventilation That Slashes Your Energy Bill While Keeping Your Home Fresh
Connect your parallel batteries to a single charge controller rather than using multiple controllers—this prevents voltage mismatches that cause one battery to overcharge while another sits partially drained. I learned this the hard way when my first dual-battery setup left one battery constantly undercharged because each controller operated independently, creating competing charging profiles. Install a… Read more: Why Your Parallel Battery Setup Isn’t Charging Evenly (And How to Fix It)
Set your three-way valve to point toward the roof when you want solar heating, typically between 10 AM and 4 PM on sunny days when your panels can effectively warm the water. Point it toward the bypass position during cloudy weather, at night, or when your pool has reached the desired temperature and you’re just… Read more: Why Your Pool Solar Heater Valve Position Changes Everything (And How to Get It Right)

")

")


")
")

")


")


