Being able to power a 110v coffee machine in the morning without starting a noisy generator is a great comfort. However, you’ll need an inverter to convert electricity from a 12-volt battery system to 110-volt to enjoy this amenity. Inverter installation is a simple DIY task, but you shouldn’t take anything involving electricity lightly. That’s why we’ve come up with this guide to help you discover how to safely install a power inverter in a camper.
Tools You’ll Need
In addition to a power inverter and battery bank, you’ll need the following tools:
Power inverter
Screwdriver
Cables
Wirecutter
Connectors
Wrench
Electric tape
Basic Things to Know Before the Installation
Once you’ve collected the mentioned tools, there are a few things to know before you begin the installation. These include:
Understanding Your Requirements
Before you get one, you must get a clear idea of the appliances you want to power via the inverter. Fans, lights, smartphones, and laptops are basic equipment you’d prefer to power through the inverter. The installation process will vary depending on the inverter size and capacity.
Knowing the Inverter’s VA Ratings
Like the wattage ratings for power-consuming devices, there’s a VA rating for power-generating equipment like UPS, inverters, and generators. VA rating is apparent power and can be measured as the voltage (volts) and current (amps) supplied by the inverter. The inverter’s spec sheet usually defines these ratings with respect to the ambient temperature.
Choosing a Location for the Inverter
Determining a place to set your inverter seems straightforward but requires some considerations. Choose a spot near the batteries to mitigate energy losses. Avoid installing your inverter anywhere near a flammable object or a heat source. Any area with a constant liquid flow, moisture, or dust can also impact the performance of the inverter.
Once you understand and determine these factors, you can safely begin wiring the inverter.
Wiring the Inverter
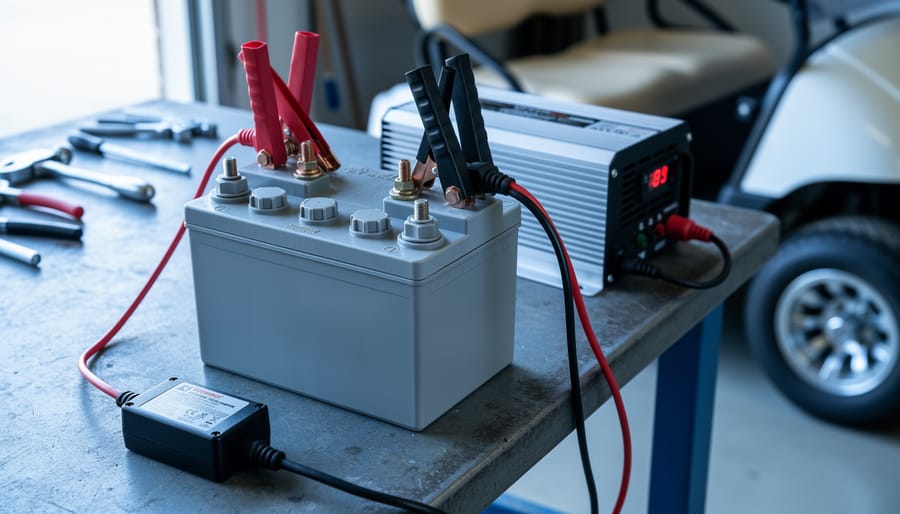
Wiring is the most crucial part of inverter installation since it ensures that your RV electrical system gets power from the inverter through the outlets. Smaller inverters (around 75-watt) do not require lengthy wiring as you can plug them into a cigarette lighter outlet. However, larger inverters need to get power directly to the battery terminals.
See the inverter user manual for wiring diagrams and recommended cable sizes. We suggest you use the recommended size or larger to keep the energy loss to a minimum. If you can’t find the recommended size for your RV inverter, you should go for automotive jumper wires available in 4 to 8 AWG.
There are several methods you can use to wire an inverter. Below we discuss four of them.
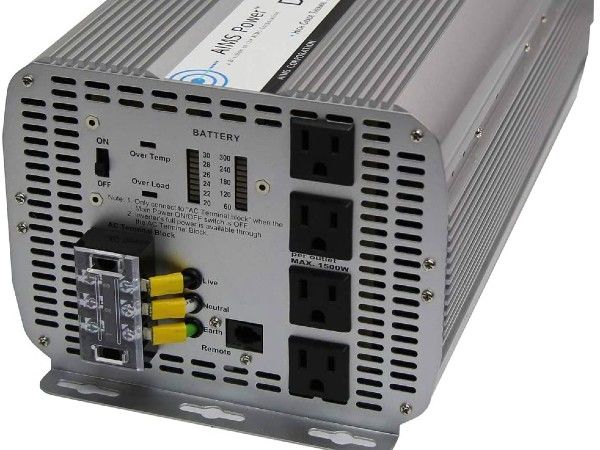
Connecting the Inverter Directly to the RV AC Box
Suppose you want to plug in your RV’s electronics and electrical appliances to the wall outlets. In that case, connecting the inverter to the RV AC box (breaker box/distribution panel) is the right way to go about it. The guiding principle here is that only one AC source can be present at a time. Otherwise, you’ll need some switching arrangement, such as a relay or transfer switch, to ensure that a single power source is connected to the RV.
This method is ideal for off-grid applications where no shore power is available to the RV. To connect the inverter directly to the AC box, follow these steps.
Turn off the power button on the inverter and the AC circuit breaker.
Unscrew the screws on the breaker panel. Hook up the inverter with the new circuit using the right cable size. The cable size depends on the maximum anticipated amperage and voltage of the system.
Use a voltmeter to test the bus bar. Make sure it doesn’t read any voltage.
Connect the white cable from the inverter to the neutral ground bar on the breaker. Similarly, connect the positive wire (black or red) to the selected breaker.
Screw-in, the breaker panel. Now turn on the switches for the inverter and the main power, and test the outlets.
That’s it! You can now run your AC-powered appliances using the AC outlets on your RV.
Using an Extension Cord
A relatively simple method to wire an inverter is using an extension cord. Run the cord from the inverter and plug the appliance you want to run now.
This method works well if you only have a device or two that you want to use with the inverter. However, the constant plugging and unplugging can become tedious if you’ve more devices that require 110V AC power.
Connecting to the Outlets
The third installation method involves wiring the inverter to new outlets on the camper. These are dedicated outlets that are disconnected from the distribution box. Going this route means you’ll end up with some RV outlets that won’t function when you’re connected to a generator or shore power.
Using a 30-amp receptacle
The last method to install an inverter involves using a 30-amp receptacle on the outer end of your RV and connecting it to the output of the power inverter. Unplug the RV from shore power and plug the cable into the 30-amp socket when utilizing inverter power.
Since a converter and inverter shouldn’t operate simultaneously, you can install a breaker to flip between the two sources.
Ground the Inverter
The final step in RV inverter installation involves connecting a 12v ground cable to a suitable ground connection. It can be the RV’s chassis rail or any other connection in good condition.
Safety Tips Campers Must Follow During Inverter Installation
Regardless of the method you use, you need to follow these tips to keep the installation process safe.
Make sure that the inverter and converter don’t run at the same time. The simultaneous connection will result in the current pulling out of the battery bank through the inverter and pushing back into the battery with the help of the converter charger. Each trip the current makes in this loop will waste some power in heat and drain the batteries even if no load is connected. As a result, the inverter will turn off due to low voltage.
Ensure no generator or shore power is linked to the inverter’s output before you begin the installation process.
Avoid connecting the battery charger directly to the inverter. Use a relay (an electrically operated switch) to prevent your battery bank receive power from the inverter.
Never connect shore power and inverter charger to the RV outlets at the same time. This can damage your equipment and potentially hurt you. A smart way to avoid this from happening is to use an automatic transfer switch.
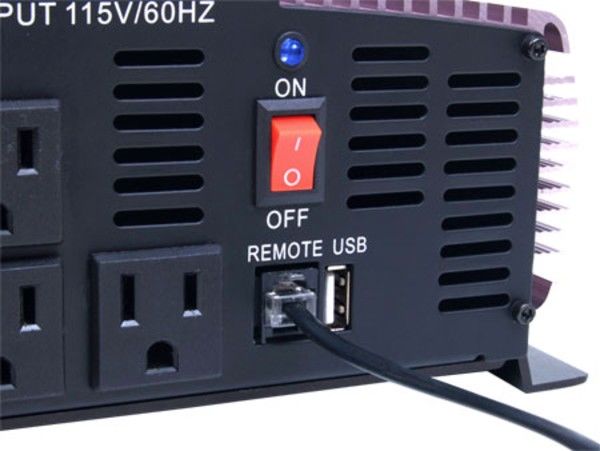
RV Inverter Install – The Remote Switch
A remote switch offers the convenience of turning the inverter ON or OFF remotely. Most inverters come with a remote connection port for a remote switch that can turn the device on or off from distances of up to 30 meters.
Remote switches come in wired or wireless configurations. Here’s how to install them to your inverter.
Turn off the power button on your inverter.
Attach one end of the cable to the remote port on the inverter
Attach the other end of the cable to the remote switch/wireless remote receiver
Pressing the On/Off button on the remote switch will turn on/off the inverter
How Long Wires Can Drop Your Inverter’s Voltage
When current moves through a circuit, a small electric potential is lost due to resistance in the cable. The phenomenon is called voltage drop and results in reduced efficiency. The National Electrical Code recommends keeping voltage drop at 3 percent or less, though most solar systems now come well under this mark.
The amount of electric potential drop depends on the route length, current rating, temperature, and the resistance per unit length of the cable. Once you have these values at hand, you can calculate the energy drop using the formula.
V = L x I x R / ft
In the above formula;
V = Voltage drop
I = Current through the cable
L = Total wire length in meter
R/ft = Resistivity of the cable per foot
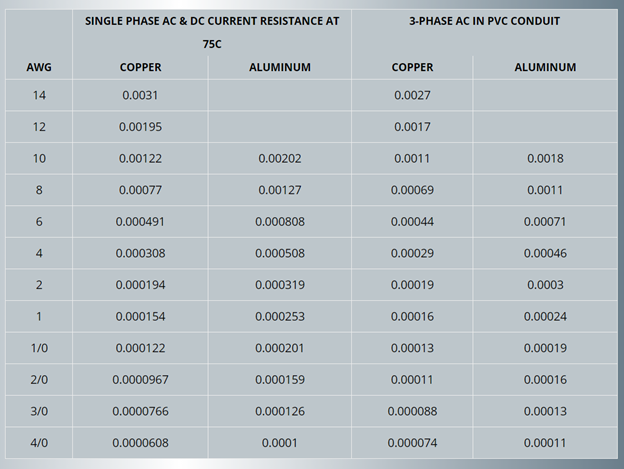
To understand the concept better, let’s assume you’ve installed an RV inverter connected to a battery using 15 feet of 6 AWG copper wire. Since the resistance of a 6 AWG copper wire is 0.000491 Ohm, as shown, we can put these values in the above formula to determine the drop at a particular amperage (10-amps).
V = 30 x 15 amps x 0.000491 = 0.22 volts
Credit: Fawad Ali
The voltage loss in this example comes out to be 0.22 volts. This would mean that if you charged your batteries up to 12 volts, the inverter will show 11.78v (12v – 0.22v). It’s also clear from the equation that increasing the wire’s length or total resistance will result in a higher voltage drop. Hence, the best approach is to keep the inverter closer to the battery and use the largest cable size that fits in the inverter’s terminals.
How to Choose the Right Inverter for Your Needs?
A camper’s power requirements often differ from a home’s requirements. So, you can’t blindly install the same inverter in your travel trailer that you use in your home solar panels set up. There are three factors to consider when choosing an inverter.
Inverter Type
A power inverter comes in two types based on the setup. It can either be;
A standalone unit
An integrated module
The integrated module combines the converter charger and inverter into a single unit. If you have an old converter and want to upgrade it, the integrated module is a better choice. However, the standalone unit can work well if you add an inverter charger to an existing powerful charging system. Installation is easier if the inverter also comes with an internal transfer switch.
Inverter Size
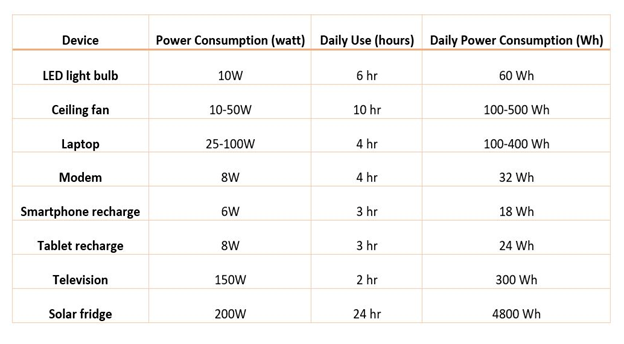
RV inverters come in different sizes in terms of output watts. Since all electrical appliances have a corresponding amperage/wattage rating, you can easily choose an RV inverter that meets your energy needs.
You will usually find the rated watts on the device label or user manual. You can also determine wattage ratings from a device’s current at a specific voltage (i.e., 120v for solar power applications). For instance, if an appliance draws five amps at 120v, multiply the two to get its wattage rating.
To determine the proper inverter size for your needs, add the wattage ratings of all the devices you want to run via the inverter and choose an inverter rated higher than the total output wattage. Here’s a list of the average power consumption (wattage rating) of the most commonly used devices from our solar panels for the RV guide:
Credit: Fawad Ali
Square vs. Modified Sine vs. Pure Sine Wave Inverter
Credit: Fawad Ali
Square Wave Inverter
This inverter produces voltages that flip between positive and negative peaks. It pauses at the positive peak level before instantly reversing to the negative polarity. They are low-cost inverters and can work with lights and mechanical fans. They aren’t suitable for sensitive electrical and electronic equipment.
Modified Sine Wave Inverters
Modified sine wave inverters create a stepped wave rather than flipping between two extreme levels. The voltage increments gradually and produces a smoother waveform compared to a square wave inverter. The modified sine wave inverter output is suitable for many standard appliances but may still damage delicate electronics and appliances with timers.
Pure Sine Wave Inverter
This inverter is more versatile and more expensive than its square and modified sine wave counterparts. It produces a voltage that closely matches the output power from the mains supply. The waveform of pure sine wave inverters is smooth and provides a consistent supply of energy. They cost more than other inverter types and can power all your RV appliances.
Final Thoughts
Installing an RV power inverter is a DIY task and doesn’t require the expertise of a mechanic. However, you must strictly adhere to the safety tips and instructions as the process involves dealing with electricity. Keep the user manual at hand and follow any of the four methods mentioned here to install your RV inverter. And if you’ve any queries, feel free to comment below.
How useful was this post?
Click on a star to rate it!
Average rating 5 / 5. Vote count: 2
No votes so far! Be the first to rate this post.
We are sorry that this post was not useful for you!
Why Your Motorhome Electrical System Keeps Failing… by Charlesnoble November 18, 2025 Picture this: You’re three days into a dream cross-country trip when your lights flicker, the refrigerator stops cooling, and you’re left wondering whether to call for expensive roadside assistance or figure it out yourself. I’ve been there, and here’s what I wish someone had told me before my first electrical…
11 Best Solar Generators for Your 2023 Camping Trip by Adeyomola June 22, 2021 Before buying a solar generator for your next camping trip, you should estimate how much power you need to run your appliances. Consider features like output power rating, charge controller type, weight, portability, charging rate, and battery type. But what truly makes a solar-powered generator stand out is its battery…
Why Quiet Camping Generators Beat Solar (And When… by Charlesnoble November 27, 2025 Choose a generator rated at 50-55 decibels or lower to ensure peaceful camping without disturbing wildlife or neighboring campers—models with inverter technology automatically adjust engine speed based on power demand, reducing noise significantly compared to conventional generators. Look for four-stroke engines with enclosed designs and rubber mounting feet that absorb…
Size Your Off-Grid Solar Inverter Right the First… by Charlesnoble February 10, 2026 Calculate your total daily energy consumption by listing every device you’ll power, multiplying each device’s wattage by hours of daily use, then adding 20% for system losses. This single number becomes your foundation—underestimate it, and you’ll face frustrating power shortages; overestimate significantly, and you’ll waste thousands on oversized equipment. Identify…
Why Your RV Appliances Keep Tripping the Breaker… by Charlesnoble November 17, 2025 Turn off shore power and disconnect your battery bank before touching any wire in your RV—this single step prevents the most common DIY electrical accidents. Check your circuit breaker panel ratings against your actual appliance loads, because that microwave drawing 1500 watts on a 15-amp circuit is exactly why you’re…
Your Camping Trip Needs Silent Power (Here’s How to Get It) by Charlesnoble November 1, 2025 Choose a portable power station with an inverter rating below 50 decibels—quieter than normal conversation—so you can run your essential camping gear without the rattling drone that ruins peaceful mornings at the campsite. Unlike gas generators that shatter the tranquility you came outdoors to find, modern lithium battery power stations…
Subscribe for handpicked DIY projects, exclusive tips, and giveaways.
Calculate your daily energy consumption by examining your electricity bills for the past year—most households use between 20-30 kilowatt-hours per day, which translates to a 5-7 kilowatt solar array for complete energy independence. This single number determines everything: how many panels you’ll mount, the inverter capacity you’ll need, and whether your budget aligns with reality.… Read more: Build Your Own Home Solar Power System and Actually Save Money
Match your charger voltage to your battery’s 8-volt requirement, or risk permanent damage to your battery bank. Most standard chargers output 6V or 12V, making them incompatible with the less common 8V configuration found in certain golf carts, floor scrubbers, and older solar setups. Use a dedicated 8-volt charger with an output between 9.0V and… Read more: Why Your 8 Volt Battery Won’t Charge (And How to Fix It with an Inverter)
Picture this: It’s 2 AM during a power outage, and you’re fumbling in the dark for candles and matches. Now imagine instead reaching for a lamp that’s been charging silently on your windowsill all day, ready to illuminate your space for hours without electricity bills or fire hazards. That’s the everyday magic of solar portable… Read more: Solar Portable Lamps That Actually Work When You Need Light Most


")

")
")
")
")
")

")
")
")
")