How you store a solar pool cover decides how many seasons you get out of it. A cover tossed in a corner of the yard can crack, warp, or grow mildew in a single summer, while one stored well keeps heating your pool for years. The right method depends on how long it will be off the water.
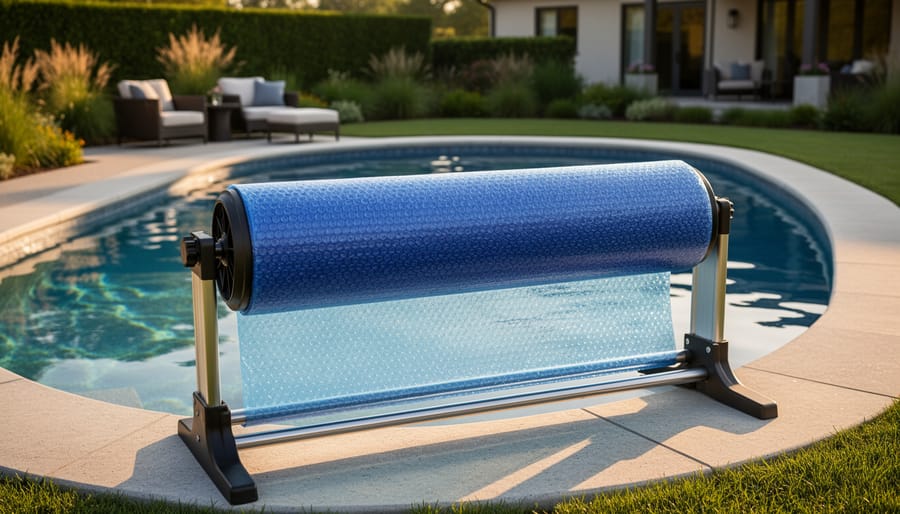
For short-term solar pool cover storage, use a solar reel on an in-ground pool or a cover saddle on an above-ground pool. Both keep the cover off the deck and out of the sun between swims.
Long-term storage takes more work. Clean the cover, let it dry completely, then fold it loosely and keep it somewhere cool and dry. Skip the drying step and you’ll likely pull out a smelly, stuck-together mess next spring.
Below, we walk through each method so your cover lasts longer and keeps its effectiveness season after season.
Let’s start with temporary storage.
How To Temporarily Store Your Solar Pool Covers?
Pulling your solar cover off for a swim party or a quick pool repair is easy. Where it goes afterward is what decides whether it lasts another season or two. Good solar pool cover storage keeps the cover clean, flat-ish, and away from the things that wear it out fastest: direct sun, dirt, and pressure on the bubbles.
Here’s how to handle short-term storage:
For in-ground pools, use a solar reel system. Attach the cover to the reel, roll it up, then wheel the whole unit out of the way. It’s the easiest option if you take the cover off often.
For above-ground pools, install solar cover saddles on the pool wall. Clip the cover to the unused saddle so it stays up and out of the way instead of dragging on the ground.
If you need to lay the cover out to clean it, pick a clean, dry spot like pavement or a patio. Grass collects debris and holds moisture. Sweep the top surface gently with a soft push broom.
Fold loosely or roll the cover up and secure it with straps. Skip tight creases, which can crush the bubbles. A cover storage bag works well here, and it’s best kept upright and out of direct sun.
Don’t stack heavy objects on a stored cover. Weight flattens and damages the air bubbles.
If wind is a concern, use tie-downs or weights along the edges only. Avoid concentrating weight in one spot.
Before putting the cover back on the water, check for rips, holes, or tears. Repair small damage now so it doesn’t spread.
How to Properly Store Your Solar Pool Covers for the Long Term?
As the end of summer nears and cooler temperatures set in, storing your solar pool cover properly is crucial to ensure it survives the undamaged winter.
Solar covers left dirty, damp, or unprotected over winter can develop mold, mildew, holes, tears, and even rodent damage.
Follow these steps to keep your solar cover in great shape for the next pool season.
Step 1. Thorough Cleaning for Long-Lasting Covers
Thoroughly cleaning the solar cover before proper storage is essential for protecting its condition over winter.
Remove the solar pool cover carefully, avoiding rough surfaces to prevent damage. Lay it flat on a clean, dry surface like concrete for cleaning.
Spray off loose debris using a high-pressure garden hose. Prepare a cleaning solution of warm water and mild detergent for stubborn stains, optionally adding a bit of muriatic acid.
Gently scrub both sides of the cover with a soft pool brush or cloth using the cleaning solution. Avoid using excessive pressure or abrasive brushes. Check for any damage, noting areas that need patching.
Rinse both sides thoroughly with clean water to remove all cleaning solutions, as residual chemicals can degrade the material.
Step 2. Proper Drying for Mold Prevention
It’s critical to dry the entire surface of the cover before storage fully. Any remaining moisture can lead to mildew, mold, discoloration, and deterioration over months of storage.
Lay the cover flat in a sunny spot to air dry completely. Flip it over periodically to dry both sides.
You can use a leaf blower on the lowest setting to help speed up the drying process. Keep it 6 inches above the cover and move continuously to prevent any damage to the bubbles.
Check carefully for any remaining wet spots or puddles, which can promote mold growth. Run your hand over the entire surface to feel for moisture.
The drying time depends on the cover size, material thickness, humidity, and weather conditions. It could take several hours to fully dry.
The cover is ready for storage when no moisture remains anywhere on the surface. You should not be able to feel any dampness.
Step 3. Folding the Cover for Compact Storage
Once the cover is completely dry, properly fold it to make a compact bundle that’s easier to handle and takes up less storage space:
First, fold the cover half lengthwise along its central seam for rectangular covers to reduce the size.
Next, fold it from both sides into thirds or quarters until you have a tight, uniformly folded panel approximately 2-3 feet wide.
For round covers, start rolling from the outer edge toward the center. Stop periodically to fold the sides in toward the middle as you roll.
Continue rolling and folding until you have a tightly rolled cylinder shape. This prevents loose folds from unraveling.
Try to remove as much excess air as possible when folding or rolling. This keeps the bundle tighter.
Step 4. Inspect and Patch Any Damage
Before storing the cover, inspect it closely for any:
Small holes, tears, thin spots, or breaches through the top surface. Even pinholes can expand over time.
Bubbles or blisters in the material may indicate delamination issues.
Use a solar cover patching kit to repair holes, tears, or thin areas according to package directions. This prevents further damage over storage time.
Trim off any loose material for delaminated areas, then use patching cement to adhere the layers together.
Step 5. Secure Wrapping and Storage
To protect the folded cover from dirt, moisture, pests, and damage while in storage:
Place the folded/rolled cover inside a large plastic storage bag, tarp, or sheeting. Polytarps work very well to waterproof and protect.
Before sealing, squeeze out excess air from the bag/tarp to keep the cover tightly packed.
Completely seal the storage wrap with duct tape, zip ties, bungee cords, or tie-downs, depending on the type used. Make sure it’s closed on all sides.
Year-round, store the sealed cover in a shed, garage, basement, or other cool, dark, and dry location. Avoid attics with extreme temperature swings.
You can also store it upright in a tightly sealed trash can or barrel. Add mothballs to deter mice and rodents from nesting or chewing on the cover. Be sure to air it out later before reinstalling.
For solar pool covers on a reel system, cover the entire reel frame and cover it tightly with a weatherproof tarp. Secure with bungee cords or ropes. Store the covered reel somewhere shaded and protected from sun, rain, snow, etc.
Following proper solar cover winter storage guidelines helps ensure your cover stays in great shape and lasts many years.
How Not to Store Your Solar Pool Cover This Winter?
After a long summer of pool days, the last thing you want is a shredded, moldy solar blanket come springtime. Avoid these common mistakes when storing your solar blankets or bubbles this winter:
Don’t: Leave it Sitting Out in Your Yard
Rolling up your solar cover and leaving it exposed in the yard may seem convenient, but wind, rain, snow, and UV rays will steadily degrade the material. Rodents may start nesting in it, or dogs could chew on it.
Do: Seal It Up Inside a Storage Bag or Bin
Don’t: Toss it in the Attic
Extreme hot and cold temps in unconditioned attics can severely damage the bubbles in solar covers. They can also promote moisture buildup.
Do: Find a Storage Area That Stays Between 60°F and 80°F
Don’t: Ignore Holes and Rips
Even tiny holes will expand into major rips over time. Inspect closely for damage and patch with a specialty solar cover adhesive kit before storage.
Do: Repair Any and All Rips, No Matter How Small
Don’t: Leave Debris, Grime, and Gunk
Leaving dirt, leaves, and mineral deposits traps moisture and reduces light permeability. Always scrub the cover completely clean before storage.
Do: Gently Wash Both Sides to Remove All Debris and Buildup
Don’t: Toss in Crumpled Mess
Improperly folding leads to excess material and creases. Neatly fold along seams into a tight, uniformly stacked bundle secured with straps.
Do: Fold/Roll Tightly from Sides to Minimize Loose Material
Don’t: Weigh it Down with Stuff
Crushing weight damages the fragile air bubbles needed for insulation and heating. Always store flat or upright without objects placed on top.
Do: Allow Cover to Sit Freely Without Added Weight
By following these methods, you can make sure that your pool cover remains in top condition, so you don’t have to invest in a new solar cover when the next swim season arrives
Safety Warnings
Before you fold, roll, or haul anything, run through a few quick checks. Most storage injuries and cover damage happen because someone rushed a wet, heavy cover into a corner.
Don’t lift a soaked cover alone. A wet cover for a standard 18-foot round pool can weigh far more than you’d expect, and water pooled in the folds shifts as you move. Drain it, drape it over the pool edge, and get a second person before you carry it.
Wear gloves and closed-toe shoes. Wet vinyl bubbles are slippery, and rough concrete or pool coping can scrape your hands and feet. Grippy gloves also keep you from dropping the roll.
Never store it damp in a sealed space. Trapped moisture breeds mildew and leaves a sour smell. Let it dry fully in shade first.
Keep it away from heat sources. Water heaters, furnaces, and parked cars in summer sun can warp the material and ruin the bubbles.
Stop and reassess if you see standing water you can’t drain, cracks in the film, or a roll too heavy to lift without straining. Slow down. A cover is cheaper to dry again than a back is to repair.
Tools and materials
You don’t need much to store a solar pool cover properly. Most of it is probably already in your garage or shed. Gather everything before you start so the cover isn’t sitting wet on the deck while you hunt for a hose.
Garden hose with a spray nozzle: for rinsing off chlorine, salt, and pool chemicals before the cover goes away.
Soft-bristle brush or push broom: to lift leaves, grit, and sunscreen residue without scratching the bubble side.
Mild dish soap and a bucket: only needed if the cover has oily buildup or algae spots.
Cover reel or a 4-inch PVC pipe: a reel is easiest. A length of PVC works fine if you cut it a bit wider than the cover.
Old towels or microfiber cloths: for blotting standing water off the surface.
Nylon or Velcro straps: to hold the rolled cover snug. Skip bungee cords and rope, which can dent the bubbles.
Breathable storage bag or opaque tarp: this keeps dust and sunlight off. Avoid sealed plastic that traps moisture.
Clean, dry shelf or rack: somewhere off the floor, in the shade, away from heat sources.
One small tip: lay a clean sheet or tarp on the ground first. It gives you a spot to fold or roll the cover without picking up dirt on the way.
Verification and next steps
Before you call it done, spend five minutes checking your work. A cover that looks fine rolled up in the garage can still be hiding problems that show up next spring.
Unroll a small section and run through this quick check:
Dryness: Press a paper towel against the bubble side and the flat side. Any dampness means mildew risk, so let it air out another day.
Bubbles: Look for flattened or cloudy patches. Those spots won’t hold heat well, and they usually mean something heavy sat on the cover.
Residue: Check for leftover chemical film or debris. Rinse it off now, because it bakes in over a long storage stretch.
Wrap: Make sure the reel or storage bag is intact, with no tears where pests or moisture could get in.
Next, do a mid-season spot check. Once a month, peek at the stored cover and confirm nothing has been stacked against it and the area is still dry. Thirty seconds is plenty.
When pool season returns in 2026 or any year after, unroll the cover in the sun for an hour before putting it on the water. That relaxes the creases and gives you one last chance to catch damage before it costs you heat.
How useful was this post?
Click on a star to rate it!
Average rating 5 / 5. Vote count: 1
No votes so far! Be the first to rate this post.
We are sorry that this post was not useful for you!
Let us improve this post!
Tell us how we can improve this post?
charlesnoble
Here at Spheral Solar, I’m a hands-on solar power enthusiast, constantly exploring and experimenting with DIY solutions. I’m dedicated to sharing my discoveries, insights, and even the bumps I hit along the way, all in the pursuit of a more sustainable future.
9 Best Solar Pool Heaters in 2026 by Adeyomola June 20, 2021 When buying solar pool heaters, people often give precedence to features like square footage, mounting type, water pressure limit, and the type of pool the solar pool heater is suitable for. But, in the end, the best solar pool heaters tip above the rest by offering superior temperature rise in…
Best Solar Pool Covers in 2026 by Adeyomola May 13, 2021 The quality and effectiveness of a solar pool cover are typically defined by the following features: thickness, size, UV stability or resistance, and color. So, when compiling this list, we focused on solar pool covers offering the best features. In the interest of transparency, we earn a commission on some…
Heat Your Pool for Pennies Using Solar Panels You… by Charlesnoble April 12, 2026 Imagine cutting your pool heating costs by 70% while extending your swimming season by months—that’s the reality when you harness your existing solar panel system to warm your pool water. If you’ve already invested in rooftop solar or are planning an installation, you’re sitting on an untapped heating solution that…
How Does Solar Pool Heating Work? by Charlesnoble August 27, 2023 Solar pool heating systems work by is a sustainable and cost-effective way to extend the swimming season and enjoy warmer water in your pool. Solar pool heating systems work by harnessing heat from sunlight and transferring it to the pool water pumped through the collectors. This solar-heated water is returned…
Why Your Oval Pool Needs a Solar Cover (And How to… by Charlesnoble March 21, 2026 Measure your oval pool at its longest and widest points before shopping—oval solar covers aren’t one-size-fits-all, and ordering the wrong dimensions means dealing with gaps that let heat escape or excess material that creates a frustrating installation headache. Unlike rectangular pools where cutting to fit is straightforward, oval shapes require…
Pool Heating Mats: The Solar Solution That Pays for… by Charlesnoble May 1, 2026 Harness the sun’s energy to warm your pool water passively by laying dark-colored mats on your pool deck or floating them directly on the water surface—this simple solar collection method can raise water temperature by 5-15°F depending on your climate and setup. Position these mats where they’ll receive maximum sunlight…
Subscribe for handpicked DIY projects, exclusive tips, and giveaways.
The DJI Power 2000 is our top pick for most people shopping for a portable solar generator in 2026, because it gets you back to full power fast without…
For most weekend campers, a 20,000mAh USB-C power bank is the right place to start, and a solar power bank only earns its spot if you’re out long enough…
A 3 phase solar inverter is a device that converts the DC power from your solar panels into three-phase AC power: three alternating currents running in a…