Why Your Solar Lights Stopped Working After Rain (And How to Fix Them Fast)
Updated:
Check the solar panel surface first—wipe away any water droplets, dirt, or debris that accumulated during the rain, as even a thin film can block up to 25% of light absorption. I learned this the hard way last spring when my pathway lights stayed dark for three days straight, and a simple cleaning brought them right back to life.
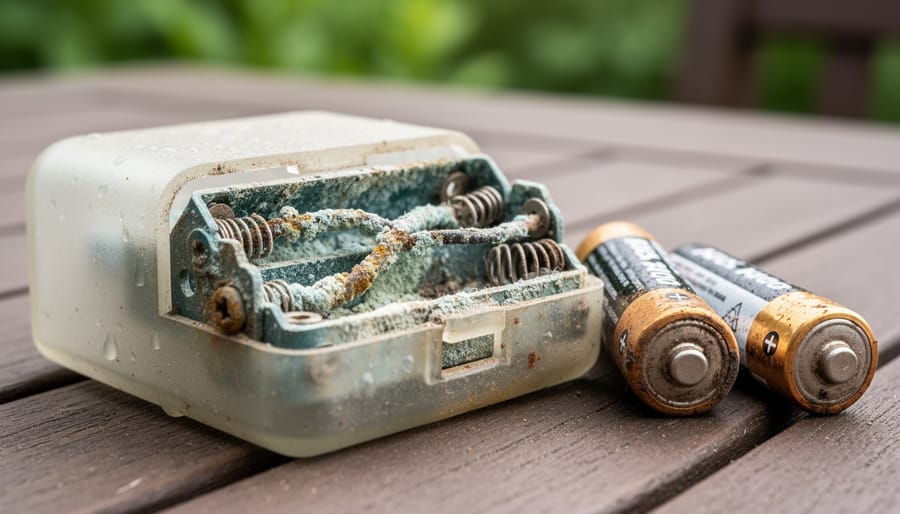
Inspect the battery compartment immediately by unscrewing the panel housing and looking for moisture, corrosion, or condensation inside. Rain can seep through worn seals, and even a small amount of water wreaks havoc on battery connections. If you spot moisture, remove the batteries, dry everything thoroughly with a cloth, and leave the compartment open in a warm space for 24 hours before reassembling.
Test the on-off switch position, as rain can sometimes trigger the light sensor prematurely or cause the switch to shift. Many solar lights have a small toggle or button that might have been accidentally moved during the storm. This is one of the most overlooked common solar light problems that takes seconds to check but saves hours of frustration.
Replace batteries if your lights are older than two years, since rechargeable batteries degrade over time and lose their ability to hold a charge. Rain often exposes this underlying weakness rather than causing it directly. I keep spare NiMH batteries on hand now after dealing with this issue repeatedly on my deck lights.
The good news? Most post-rain solar light failures stem from simple, fixable issues rather than permanent damage, and you’ll have your lights working again within the hour once you identify the culprit.
The Real Reason Rain Kills Solar Lights
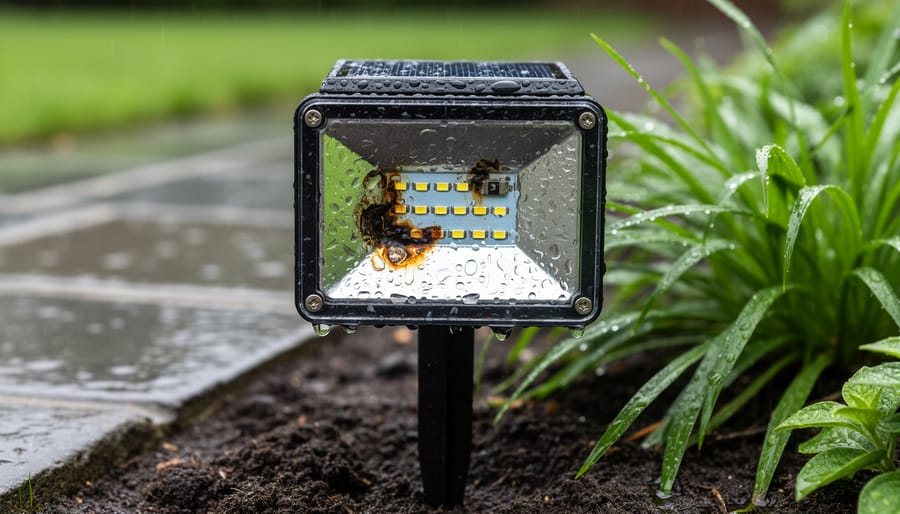
Water infiltration inside solar light housing is one of the primary causes of failure after rainfall.
Water Sneaks In Where You’d Least Expect
You know what I’ve learned from fixing dozens of solar lights over the years? Water is sneaky. Really sneaky. Even lights labeled “waterproof” or “weatherproof” can let moisture creep in where you’d never think to look.
The most common culprit I see is degraded rubber seals around the battery compartment. These seals start out nice and flexible, but after a few seasons of sun exposure and temperature swings, they become brittle and crack. That’s when rain finds its way inside during the next storm.
Charging ports are another weak spot. If your solar light has a USB port or auxiliary charging connection, check if there’s a protective cap. I once had a friend whose entire garden lighting setup failed because he’d removed the rubber port covers “just temporarily” six months earlier. The rain had other plans.
Here’s something that surprised me: manufacturing defects happen more often than you’d think. I’ve opened brand-new lights and found gaps in the housing seams or missing gaskets. Sometimes the plastic casing doesn’t quite align properly at the factory, leaving microscopic channels for water infiltration.
The lesson? Don’t trust the “waterproof” label alone. Always inspect the seals, check those ports, and look for obvious gaps before installation.
When Sensors Get Confused
Here’s something I’ve seen countless times in my workshop, and it drove me crazy until I figured out what was happening. After a heavy rain, you’d expect your solar lights to turn on beautifully at dusk, right? Instead, they just sit there like they’re on strike.
The culprit is often moisture playing tricks on your light sensor. These sensors are basically tiny decision-makers that tell your solar light when it’s dark enough to turn on. When water droplets, condensation, or even morning dew settles on or near the sensor, it can scatter and refract light in weird ways. Think of it like looking through a foggy bathroom mirror—everything gets distorted.
This moisture creates what I call “false daylight.” The sensor detects the scattered light bouncing around and thinks, “Oh, it’s still daytime!” So your lights stay off, even when you’re standing there in the dark wondering what went wrong. These sensor malfunction issues are surprisingly common after rainfall.
The good news? This problem usually fixes itself once everything dries out. But if you’re impatient like me, a gentle wipe with a dry cloth can speed things up considerably. Just make sure everything’s completely dry before testing again.
Quick Diagnostics: Finding What’s Actually Broken
The 5-Minute Visual Inspection
Before you grab any tools, let’s do a quick visual check that takes just a few minutes but can reveal a lot about what’s going wrong. I learned this the hard way after dismantling a perfectly fine solar light, only to discover the issue was a simple muddy panel!
Start by examining the solar panel itself. Is there condensation trapped under the panel’s surface? A light fog or water droplets inside indicates moisture has breached the seal, which prevents the panel from charging properly. Next, look closely for any visible cracks in the panel or the light housing. Even hairline fractures can let water seep in.
Check the panel surface for corrosion, which often appears as white, green, or rust-colored buildup around metal contacts or along the edges. This is especially common in coastal areas or regions with acidic rain.
Finally, inspect all seals and gaskets where the solar panel meets the housing, around the battery compartment, and at the base. These rubber or silicone seals can degrade over time, becoming brittle or misshapen. Run your finger along them, feeling for gaps, tears, or areas where the seal has pulled away from the plastic. If the seal feels sticky or leaves residue on your finger, it’s deteriorating and needs replacement.
Testing Individual Components
You don’t need fancy equipment to test your solar light components – just a little patience and some household items. Here’s how I approach it when my lights act up after a storm.
For the solar panel, bring your light indoors to a dark room and shine a bright flashlight directly onto the panel. If the LED lights up, your panel is working fine. No response? The panel likely needs replacing.
Testing the battery is straightforward. Pop it out and check for corrosion on the terminals – that white or green crusty stuff is a dead giveaway. If you have a battery tester, great, but here’s my go-to method: swap in a fresh rechargeable battery of the same voltage. If the light works with the new battery, you’ve found your culprit.
For the LED, this is trickier without a multimeter, but you can do a visual inspection. Look for any blackened spots or broken connections on the bulb itself. Sometimes water damage leaves telltale discoloration.
Charles here – I keep a small bag of spare batteries specifically for this testing process. It’s saved me countless trips to the hardware store and helps me diagnose problems in minutes rather than hours.
The Overnight Test
Here’s the simplest way I’ve found to diagnose whether you’re dealing with a charging problem or something else entirely. After cleaning your solar panel and making sure everything looks okay on the outside, position your light in direct sunlight for a full day. I mean really direct sunlight, not that dappled shade under a tree that looks bright but isn’t doing much charging work.
Once the sun goes down, check if your light turns on. If it does and stays lit for several hours, congratulations! Your solar panel and battery are doing their jobs just fine. The rain probably just left a film that blocked charging temporarily. But if the light doesn’t turn on at all, or it flickers on briefly then dies, you’ve got a deeper issue. This could mean your battery has reached the end of its life (they typically last 1-3 years), or moisture has gotten into the LED housing and caused damage. This overnight test saved me hours of troubleshooting once when I thought I had a complex wiring issue, but really just needed to reposition my lights away from tree coverage.
Fix #1: Drying Out Water Damage
Safe Disassembly Without Breaking Clips
I learned this the hard way after snapping three clips on my favorite pathway lights! Most solar lights use either twist-off tops or small plastic clips that hold the housing together. Before you start prying with a screwdriver, take a moment to inspect your light carefully.
For twist-off designs, grip the top dome firmly and rotate counterclockwise. If it’s stuck from weather exposure, try wrapping a rubber band around it for better grip, or gently warm the seam with a hairdryer for 30 seconds to expand the plastic slightly.
For clip-based models, look for small indentations or seams around the housing. These indicate clip locations. Use a plastic spudger or old credit card rather than metal tools, which can crack the housing. Insert your tool gently between the seam and apply light, even pressure while slowly working your way around the entire perimeter. Think of it like opening a paint can, not forcing a lock.
Pro tip from my toolkit: Keep a small bowl nearby to collect screws and small parts as you work. I once spent twenty minutes searching my garage floor for a tiny spring that bounced away!
If clips feel resistant, stop and reassess. A broken clip means your light won’t seal properly against future rain, defeating the whole purpose of your repair.
The Rice Trick (And Better Alternatives)
You’ve probably heard that burying your wet electronics in rice will save them—it’s the internet’s go-to fix for everything from dropped phones to rain-soaked solar lights. Here’s the truth from my experience: rice works, but it’s painfully slow and not your best option.
When I tested the rice method on a waterlogged solar panel unit, it took nearly 72 hours to fully dry out the interior components. That’s three days of waiting in the dark! Rice absorbs moisture through passive contact, which means you’re relying on humidity slowly migrating from your solar light into the grains.
Better alternatives? Silica gel packets are your champion here. Those little packets that come with shoes and electronics are specifically designed to absorb moisture efficiently. I keep a container of them in my workshop just for situations like this. Place your disassembled solar light components in a sealed container with silica gel, and you’ll see results in 24-36 hours—half the time of rice.
For the truly impatient among us, a desk fan pointed at the opened solar light speeds things up dramatically. Just ensure you’ve removed the battery first and keep the temperature moderate. High heat can damage sensitive electronic components, so skip the hair dryer temptation.
Corroded battery contacts and connections are common culprits when solar lights fail after exposure to moisture.
Fix #2: Cleaning Corroded Connections
What You’ll Need (Already in Your Kitchen)
Good news – you probably already have everything you need to get your solar lights working again! I learned this the hard way after spending money on specialized cleaners, only to discover my kitchen pantry held the perfect solutions all along.
Here’s what to gather:
White vinegar is your corrosion-fighting champion. Its mild acidity dissolves mineral deposits and rust without damaging delicate solar components. Grab baking soda too – when mixed with a few drops of water, it creates a gentle paste that scrubs away stubborn grime.
You’ll also want cotton swabs or Q-tips for reaching tight corners around battery contacts, a soft cloth or old toothbrush for general cleaning, and some paper towels for drying. If you have rubbing alcohol, that’s excellent for removing water spots from solar panels.
A small bowl for mixing your cleaning solution and a toothpick can help dislodge debris from tiny crevices. That’s it – simple household items that cost pennies but work like magic on rain-damaged solar lights.
The Gentle Cleaning Process
I learned this technique after accidentally frying a solar panel circuit by spraying it directly with a garden hose—trust me, gentleness is key here! Start by removing the solar light from its stake or mounting. Mix a solution of warm water with just a drop of mild dish soap in a small bowl. Dampen a soft microfiber cloth with this solution, making sure it’s damp, not dripping wet. This is important because excess water can seep into vulnerable spots.
Gently wipe the solar panel surface using circular motions to lift away dirt, pollen, and water spots. For stubborn grime around the edges, use a soft-bristled toothbrush dipped in your cleaning solution. Next, wipe down the entire light housing with the damp cloth, paying attention to any seams where moisture might have entered.
Here’s the crucial part: use a completely dry microfiber cloth to thoroughly dry every surface, especially the solar panel and any visible seams. Don’t rush this step. Before reassembling, let the light sit in a warm, dry indoor location for at least two hours. This allows any trapped moisture inside the housing to evaporate naturally, preventing future corrosion and electrical issues.
Fix #3: Replacing Water-Damaged Batteries
Battery Types and Where to Find Replacements
Most outdoor solar lights use rechargeable NiMH or NiCd batteries, typically in AA or AAA sizes. I learned this the hard way when I grabbed regular alkaline batteries from my kitchen drawer—they don’t recharge and can actually damage your solar lights! NiMH batteries are the newer standard and generally perform better in varied weather conditions, while NiCd batteries are the older technology but still found in many budget lights.
Finding replacements is easier than you’d think. Most hardware stores like Home Depot or Lowe’s carry solar light batteries in their outdoor lighting sections. I’ve also had great luck at battery specialty stores. Online, Amazon offers countless options, and direct manufacturer websites often sell exact replacements for your specific light model.
Before buying, check your existing battery’s voltage (usually 1.2V) and capacity (measured in mAh). Understanding battery compatibility ensures you get the right replacement. Pro tip: snap a photo of your old battery’s label before heading to the store—it saves so much guesswork at the checkout counter.
Installation Without Mix-Ups
When reconnecting wires after cleaning or replacing batteries, getting the polarity right is crucial. I learned this the hard way when I once reassembled a solar light in dim lighting and wondered why it wouldn’t charge. Turned out I’d reversed the battery connections.
Here’s a simple trick: before disconnecting anything, snap a quick photo with your phone. This becomes your visual reference guide when putting things back together. Look for the plus and minus symbols on both the battery compartment and the batteries themselves. Red wires typically connect to positive terminals, while black connects to negative.
When pushing connectors back together, you should feel a firm click or snap. Loose connections let moisture creep in, which brings us right back to square one after the next rain shower. Give each wire a gentle tug to confirm it’s seated properly. If something feels wobbly or loose, disconnect and reconnect until it’s snug and secure.
Weatherproofing Your Lights (So This Never Happens Again)
Upgrading Seals and Gaskets
Sometimes the best fix doesn’t require replacing anything at all. After dealing with my own flooded solar lights one too many times, I discovered that upgrading the existing seals and gaskets can work wonders. This approach is budget-friendly and surprisingly effective.
Start by removing the solar panel cap and inspecting the rubber gasket or O-ring that sits between the housing pieces. These deteriorate over time from UV exposure and temperature changes. If the gasket feels hard, cracked, or brittle, it’s time for a replacement. You can find universal rubber gaskets at most hardware stores for just a few dollars.
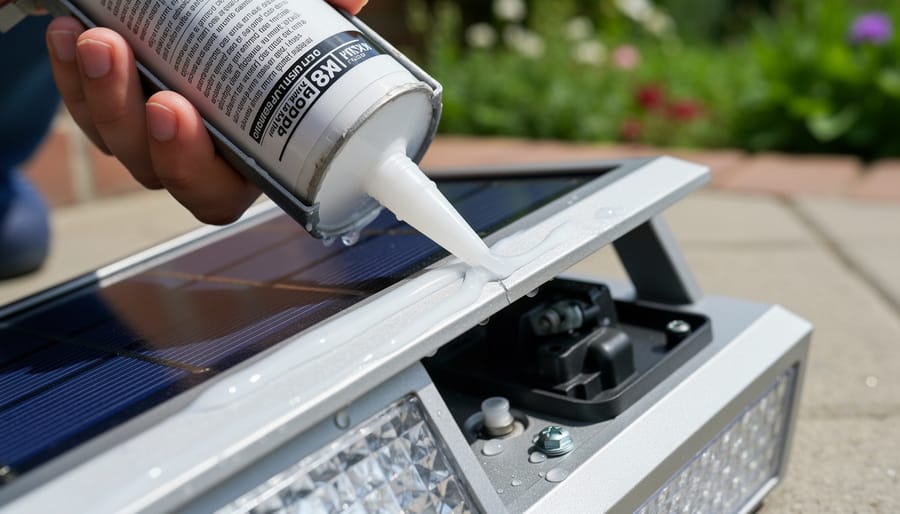
For a more comprehensive waterproofing solution, apply a thin bead of clear silicone sealant around the seam where the top and bottom housing meet. Let it cure completely (usually 24 hours) before exposing it to moisture. This creates an additional barrier against water intrusion.
Don’t forget to check where the wiring enters the housing. These entry points are notorious weak spots. A small dab of silicone here can prevent future water damage. If you’re looking for an even quicker temporary solution, sealing with nail polish can work in a pinch for tiny gaps.
Remember, prevention is cheaper than replacement, and these simple upgrades can extend your solar lights’ lifespan by years.
Applying silicone sealant to vulnerable seams helps prevent future water infiltration into solar light components.
Strategic Placement Matters More Than You Think
Here’s something I learned the hard way after my pathway lights kept failing every spring: location is everything. Even the most waterproof solar light will struggle if you place it where rain pools or where water constantly drips from above.
Think about microclimates in your yard. Avoid positioning lights directly under roof drip lines, tree branches that funnel water, or spots where ground water naturally collects. I repositioned three of my garden lights just six inches away from a gutter downspout, and they’ve worked flawlessly ever since.
Consider installing lights on slight slopes where water naturally runs off rather than pooling around the base. If you’re using stake lights, angle them slightly so rain doesn’t settle on the solar panel surface. For wall-mounted fixtures, position them under small overhangs or eaves when possible, but make sure they still receive adequate sunlight during the day.
The sweet spot is protection from heavy rain exposure while maintaining clear access to sunlight. Sometimes moving a light just a foot or two makes all the difference between constant failures and years of reliable performance.
When to Call It and Buy New Lights
Look, I’ll be straight with you—sometimes the kindest thing you can do is recognize when it’s time to let go. I learned this the hard way after spending three hours trying to resurrect a $6 solar pathway light that had been through one too many storms. My wife found me in the garage at 11 PM, soldering iron in hand, and just shook her head.
Here’s my honest rule of thumb: if your solar light costs under $15 and has multiple issues (corroded battery compartment, cracked solar panel, and water damage), buying new is usually smarter than repairing. Your time has value, and cheap lights often lack the sealed construction needed to survive repeated rain exposure.
However, if you’ve got quality lights that just need a battery replacement or simple seal refresh, those are absolutely worth saving. I’ve kept some well-made fixtures running for over five years with basic maintenance.
When shopping for replacements, I’ve learned to prioritize a few key features through my own testing. Look for lights with IP65 rating or higher—this means they’re genuinely waterproof, not just water-resistant. Check for lights with removable battery compartments that have rubber gasket seals. The solar panel should be firmly sealed to the housing, not just glued on.
I’ve had excellent results with units featuring marine-grade stainless steel hardware and thick polycarbonate lenses rather than thin plastic. Yes, they cost more upfront—usually $25-50 per light—but they’ll outlast five sets of budget lights. Consider it an investment in never dealing with this rain-damage headache again.
Here’s the good news: you don’t need to be an electrician or spend a fortune to get your solar lights working again after rain. Most of the time, we’re talking about simple fixes that take minutes, not hours. I’ve been there myself, standing in my yard with a handful of supposedly “dead” solar lights, only to realize a quick cleaning session brought them all back to life.
The real power here is in understanding what went wrong. Whether it’s water intrusion, dirty panels, or corroded batteries, you now have the knowledge to diagnose and fix these issues yourself. Keep those basic tools handy—a screwdriver, some cotton swabs, and silicone sealant will solve most problems you’ll encounter.
I’d love to hear how these solutions worked for you. Did you discover any unique tricks while fixing your lights? Share your experiences in the comments below and help build our community of solar enthusiasts.
Ready to dive deeper into solar troubleshooting? Browse our other guides and resources to become even more confident in maintaining your solar setup. Remember, every problem you solve is another step toward energy independence and a greener home.
How useful was this post?
Click on a star to rate it!
Average rating 0 / 5. Vote count: 0
No votes so far! Be the first to rate this post.
We are sorry that this post was not useful for you!
Let us improve this post!
Tell us how we can improve this post?
charlesnoble
Here at Spheral Solar, I’m a hands-on solar power enthusiast, constantly exploring and experimenting with DIY solutions. I’m dedicated to sharing my discoveries, insights, and even the bumps I hit along the way, all in the pursuit of a more sustainable future.
Your Hampton Bay Solar Light Stopped Working? Here’s… by Charlesnoble November 2, 2025 **Check the solar panel surface first** – dirt, leaves, or a thin film of grime blocks sunlight absorption and prevents charging. I learned this the hard way when my own Hampton Bay pathway lights died after just two weeks; a simple wipe with a damp cloth brought them back to…
Your Solar Light Won’t Turn On? Here’s Why (And How… by Charlesnoble November 10, 2025 Check your solar panel first—nine times out of ten, dirt, leaves, or shade are blocking the sunlight your fixture needs to charge. I learned this the hard way when my entire pathway lighting system “died” last fall, only to discover a thin film of pollen had cut charging efficiency by…
Why Your Solar Area Lights Keep Failing (And How to… by Charlesnoble April 21, 2026 Mount your solar area lights where they’ll receive at least 6-8 hours of direct sunlight daily, avoiding shade from trees, buildings, or eaves that can cut charging efficiency by 70% or more. I learned this the hard way when my driveway lights barely lasted two hours each night until I…
Why Your Solar Lights Stop Working (And How to Fix… by Charlesnoble December 1, 2025 Check the solar panel first by wiping away dirt, leaves, and debris that block sunlight absorption. A grimy panel is the number one reason solar lights stop working, and a simple cleaning with soapy water restores function in about 60% of cases. While you’re at it, reposition any lights that…
Why Your Solar Lights Glow Yellow (And How to Fix Them) by Charlesnoble December 30, 2025 Notice your once-bright solar lights glowing yellow or dim? This frustrating problem typically signals one of three culprits: aging batteries that can’t hold a full charge, dirty solar panels blocking sunlight absorption, or LEDs nearing the end of their lifespan. I’ve dealt with this issue countless times in my own…
10 Best Outdoor Solar Lights in 2023 by Adeyomola August 30, 2021 You will get the best experience with outdoor solar lights when you opt for lights with good solar panels and long lighting times. But besides that, ensure your choice can charge quickly and offers sufficient brightness. Such a selection will give you a complete experience. Best Solar Lights for Outdoors…
Subscribe for handpicked DIY projects, exclusive tips, and giveaways.
A portable power station will typically run your camping devices for anywhere from a few hours to several days on a single charge, depending on what you’re powering and the station’s capacity. As for lifespan, most quality units last between 3 to 10 years before the battery degrades enough to need replacement. The distinction matters… Read more: Your Portable Power Station Won’t Last as Long as You Think (Here’s Why)
A J1772 solar charger combines a standard J1772 charging connector (the same Type 1 plug used by most North American EVs and electric bikes) with solar panels and battery components to create an off-grid or grid-supplemented charging system. You’ll need three core elements: solar panels (typically 400-800 watts for practical ebike charging), a battery storage… Read more: How to Choose a J1772 Solar Charger for Your Ebike: A Buying Guide
Installing a whole house ventilation system powered by solar takes about 6 to 8 hours for a moderately skilled DIYer and delivers continuous fresh air circulation without touching your electric bill. The core method involves mounting a solar panel on your roof to power an intake or exhaust fan, routing ductwork through your attic or… Read more: How to Install a Whole House Ventilation System Using Solar Power

")
")
")
")
")

")
")
")
")
")


