Build a Solar Kiln That Actually Works (Without Breaking the Bank)
Updated:
Build a solar kiln in your backyard and you’ll cut lumber drying time from months to weeks while spending zero on electricity. Position your kiln where it receives 6-8 hours of direct southern exposure daily, construct the framework using pressure-treated 2x4s with transparent polycarbonate panels for maximum heat capture, and install basic circulation fans powered by a small solar panel system to move heated air efficiently through your stacked lumber.
I’ve watched dozens of woodworkers transform their craft after building their first solar kiln. The beauty of this project lies in its elegant simplicity—the sun does the heavy lifting while you maintain precise control over moisture content, preventing the warping and cracking that plague air-dried wood. Whether you’re milling your own lumber from fallen trees or trying to salvage that stack of green boards taking up space in your shop, a properly designed solar kiln becomes an invaluable workshop asset.
The best part? You don’t need advanced carpentry skills or a massive budget. Most builders complete a functional 200-board-foot solar kiln for $300-500, with the solar electrical components adding minimal cost while eliminating ongoing operating expenses. This guide walks you through every step—from selecting the ideal location and sizing your kiln appropriately, to wiring the solar circulation system and monitoring moisture levels like a professional sawmill operator. By week’s end, you’ll have a working solar kiln ready to process your first load of lumber.
Why Solar Kilns Make Perfect Sense for DIYers
If you’ve ever looked at your lumber costs or felt frustrated watching beautiful wood warp and crack during the drying process, a solar kiln might be exactly what you need. I remember when I first built mine—my neighbor thought I was building a greenhouse for vegetables! In reality, I was creating a simple yet powerful tool that’s transformed my woodworking hobby.
At its core, a solar kiln is basically a greenhouse designed specifically for drying wood. It uses the sun’s energy to warm the air inside, creating a controlled environment that pulls moisture from your lumber gradually and evenly. The beauty of this approach is threefold: you’re not paying a dime for electricity, the gentle heat prevents the stress cracks and warping that plague rushed drying methods, and it’s perfectly sized for hobbyists who aren’t processing thousands of board feet.
Let’s address the elephant in the room: “Aren’t solar kilns painfully slow?” This is the biggest misconception I hear. Yes, solar kilns take longer than commercial operations—but we’re talking weeks instead of months of air-drying, not years. For a DIYer working on weekend projects, that timeline actually works perfectly. You’re not racing against production deadlines; you’re planning ahead for your next build.
The no-electricity-cost factor can’t be overstated. Commercial kiln operators spend thousands annually on energy bills. Your solar kiln? Zero ongoing costs once it’s built. That’s money back in your pocket for better tools or more exotic wood species.
Another advantage is the forgiving nature of solar drying. Because temperatures rise and fall naturally with the sun, your wood isn’t subjected to harsh, sudden heat changes. This gentle process preserves wood color better and reduces defects—meaning more usable lumber and less waste from your precious hardwood stash. For small-scale operations processing a few hundred board feet at a time, solar kilns hit that sweet spot of efficiency without complexity.
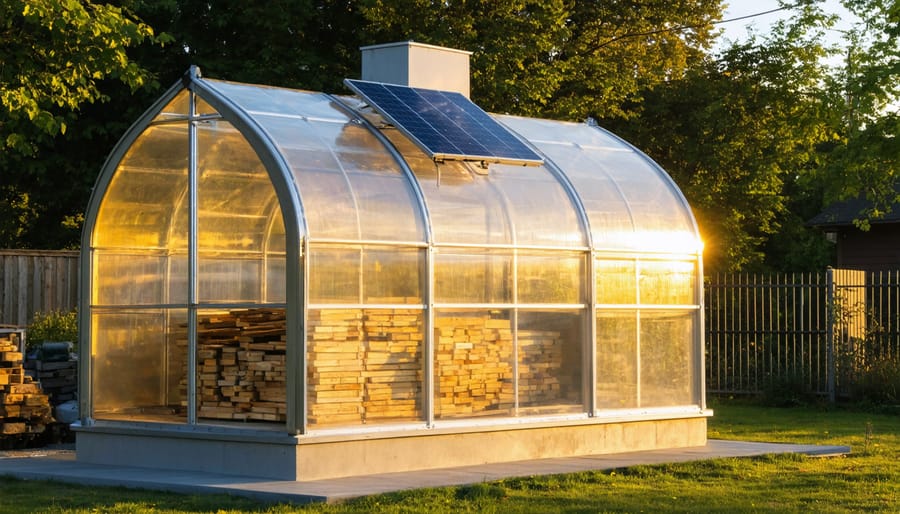
A completed DIY solar kiln provides an efficient, cost-effective solution for drying lumber using only the power of the sun.
Understanding the Solar Wiring Component
Passive vs. Active Solar Kiln Designs
When I built my first solar kiln, I wrestled with this exact question: should I go fully passive or add active components? Let me break down both approaches so you can choose what works best for your situation.
**Passive solar kilns** operate like greenhouses—they’re beautifully simple. Sunlight enters through glazing, heats the air and wood, and natural ventilation (through adjustable vents) controls moisture. There are no fans, no electronics, just physics doing its thing. The upside? Zero operating costs and minimal maintenance. The downside? You’re at the mercy of weather patterns, and drying times can be unpredictable. I recommend passive designs if you’re processing smaller batches, live in consistently sunny climates, or want the simplest possible build.
**Active solar kilns** incorporate solar-powered fans and sometimes monitoring equipment to circulate air and regulate conditions. This accelerates drying, improves consistency, and gives you more control—especially valuable in humid or variable climates. The trade-off is increased complexity and upfront cost for solar panels, fans, and controllers.
Here’s my rule of thumb: start passive if you’re new to kiln-drying or working with small quantities. Once you understand the process and your local climate patterns, you can always upgrade to active components later. Many successful kiln operators begin with passive designs and add fans when production demands increase.
The Role of Solar-Powered Circulation
Adding a small solar panel and circulation fan transforms your basic solar kiln into a much more effective drying system. Here’s why this matters: as wood dries, it releases moisture into the air inside your kiln. Without air movement, this humid air sits stagnant, creating the perfect environment for mold and dramatically slowing down the drying process.
I learned this lesson the hard way with my first kiln—beautiful cherry boards ruined by surface mold because I relied solely on passive airflow. A simple 12-volt circulation fan, powered by a 20-30 watt solar panel, keeps air moving constantly across your lumber stack.
The electrical setup is surprisingly straightforward. Your solar panel generates DC (direct current) electricity when sunlight hits it—think of it like water flowing through a pipe. This electricity flows directly to your 12-volt fan, which only needs about as much power as a car’s interior fan. No batteries required during daylight hours, though adding one helps maintain airflow on cloudy days.
The beauty of this system? It’s self-regulating. Bright sunny days generate more heat in your kiln *and* more power for stronger fan circulation. Connect your panel to the fan using simple wire connectors (follow basic polarity—positive to positive, negative to negative), mount the panel facing south, and you’re set.
Essential Materials and Tools You’ll Need
Building a solar kiln is one of those projects where having the right materials upfront saves countless headaches later. I learned this the hard way on my first attempt—trust me, you don’t want to be halfway through assembly and realize you’re missing a critical component!
**Structural Materials ($200-400)**
Your frame forms the skeleton of your kiln. You’ll need pressure-treated 2x4s for the base and framing (approximately 20-30 boards depending on your size). Add 3/4-inch plywood or OSB for walls and flooring, exterior-grade screws, and metal corner brackets for stability. Local lumber yards often have “seconds” or slightly warped boards at 30-40% discounts that work perfectly for this application.
**Glazing and Insulation ($150-300)**
The magic of solar kilns happens through proper heat capture and retention. Polycarbonate twin-wall panels (4-6 sheets) create excellent solar collectors while being more durable and affordable than glass. For insulation, grab rigid foam board (R-10 to R-15 rating) for walls and ceiling—typically 4-8 sheets. Don’t skimp here; good insulation dramatically improves drying efficiency and reduces energy costs.
**Solar Electrical Components ($300-600)**
This is where your kiln becomes truly independent. You’ll need one or two 100-watt solar panels (budget $100-150 each), a 20-30 amp charge controller to protect your battery ($40-80), a deep-cycle battery for energy storage ($100-200), and two to four 12-volt DC fans for air circulation ($20-30 each). Basic electrical wire (14-gauge), connectors, and mounting hardware round out the list. I’ve found great deals on solar components through online marketplaces and surplus electronics stores—just verify they’re compatible before purchasing.
**Monitoring Equipment ($50-100)**
Temperature and humidity sensors with digital displays help you track drying progress. Simple wireless thermometer/hygrometer combos work beautifully and typically cost $20-40 each. Consider getting two: one for inside the kiln and one for ambient conditions.
**Pro tip**: Many materials can be sourced from Habitat for Humanity ReStores, salvage yards, or online classifieds at fraction of retail costs. Budget approximately $700-1,400 total, though creative sourcing can cut this by 30-50%.
Choosing Your Solar Kiln Design
The Simple Greenhouse-Style Kiln
If you’re just starting out with solar kilns, the greenhouse-style design is your perfect entry point. I remember my neighbor Charles built one of these in a weekend using mostly reclaimed windows and 2x4s – five years later, it’s still drying his woodworking lumber beautifully.
This passive design works like a simple greenhouse. You’ll create an insulated box with a transparent south-facing wall (or roof) to capture sunlight. The sun heats the air inside, which naturally draws moisture from your stacked lumber. No fancy electronics required – just physics doing its thing.
The beauty here is simplicity. Your main materials are framing lumber, clear polycarbonate panels or old windows, and basic insulation for the walls. Paint the interior black to maximize heat absorption. Add adjustable vents at the top and bottom for airflow control.
Want to speed things up? A small 20-watt solar panel can power a single 12-volt computer fan to improve air circulation. This is completely optional – your kiln works fine without it, but the fan helps reduce drying time by about 20-30%. Mount the panel directly to the fan with simple wiring; no batteries needed since you only need airflow during sunny hours anyway.
The Mid-Range Active Circulation Kiln
This is where things get exciting – the mid-range kiln offers the sweet spot between investment and results. When I first upgraded from my basic setup, I was amazed at how much more control I had over the drying process.
For this design, you’ll install a small solar panel array (around 200-300 watts total) to power multiple circulation fans strategically placed throughout the kiln. This creates consistent airflow that dramatically reduces drying time and prevents those frustrating moisture pockets. The real game-changer here is adding basic humidity monitoring – even an inexpensive digital hygrometer gives you valuable insights into what’s happening inside.
Position three to four fans to create cross-ventilation patterns, ensuring air moves through your lumber stack rather than just around it. Your solar panels can mount directly on the kiln roof or on an adjacent stand, feeding power to a small battery bank that keeps fans running during cloudy periods.
This setup typically costs $400-700 in materials but delivers professional-grade results that’ll have your woodworking buddies asking questions. You’re looking at drying times comparable to commercial kilns while maintaining the satisfaction of building it yourself.
The Advanced Smart Solar Kiln
For those ready to take their kiln to the next level, an advanced smart solar system transforms wood drying into a precision operation. I remember when Charles first added automated controls to his kiln—he could monitor moisture levels from his phone while having morning coffee!
This setup integrates humidity sensors that trigger ventilation adjustments automatically, temperature probes that track drying progress throughout the stack, and a data logger that records conditions over weeks or months. Everything runs on solar power, making it completely off-grid capable.
The brain of the system is a microcontroller (like an Arduino) paired with sensors and relays. Your solar panels charge a battery bank—similar to how solar generators work—which powers the electronics 24/7. Add WiFi connectivity, and you’ll receive alerts if conditions drift outside your target range.
While this sounds complex, the components are surprisingly affordable and well-documented online. Start with basic sensors, then expand functionality as you gain confidence. The investment pays off through better wood quality and fewer losses to over-drying or mold.
Step-by-Step: Building Your Solar Kiln Frame and Structure
Let me walk you through building the physical structure of your mid-range solar kiln—the project that transformed my backyard and taught me more about construction than any YouTube tutorial ever could. Trust me, if I can do this with two left hands and a tendency to measure twice and cut three times, you’ve got this.
**Selecting Your Site**
Location matters more than you’d think. I learned this the hard way when my first attempt faced north (rookie mistake). Choose a spot with southern exposure to maximize solar gain throughout the day. You’ll need a level area at least 10 feet by 8 feet for our mid-range design. Avoid shade from trees or buildings, and ensure good drainage—standing water near your kiln creates humidity problems you don’t want.
**Foundation Basics**
For a structure that weighs several hundred pounds when loaded with lumber, you need solid footing. I went with concrete blocks on compacted gravel, creating four corner piers plus two center supports. Dig down about 6 inches, add 4 inches of gravel, tamp it down firmly, then level your blocks. Use a 4-foot level and shims—this step determines everything that follows. My first kiln had a 2-inch slope that caused endless ventilation headaches.
**Framing the Structure**
Using pressure-treated 2x4s for the base frame prevents rot from ground contact. Build a rectangular base measuring 8 feet by 6 feet, securing corners with 3-inch deck screws. For vertical supports, 2×4 studs at 24-inch intervals provide adequate strength without excessive material costs. The front wall should be 7 feet tall, sloping down to 6 feet at the rear—this 12-inch slope is crucial for proper air circulation and condensation runoff.
Pro tip from experience: assemble wall frames flat on the ground before raising them. It’s infinitely easier than fighting gravity while holding a level.
**Installing Glazing Panels**
The glazing captures solar heat, so quality matters. For the mid-range design, use twin-wall polycarbonate panels on the south-facing wall and roof section. Cut panels slightly oversized, then trim to fit—easier than making them too small. Secure using aluminum U-channel at the base and special closure strips at the top to prevent moisture intrusion. Leave a 1/8-inch expansion gap at panel edges; polycarbonate expands noticeably in summer heat.
**Insulation and Sealing**
Line the north, east, and west walls with R-13 fiberglass insulation between studs, then cover with plywood sheathing. Seal every seam with weatherproof caulk—air leaks undermine your temperature control. I use a smoke pencil to find drafts during testing, though a stick of incense works perfectly well.
**Ventilation Design**
Install adjustable vents at both the bottom (intake) and top (exhaust). I built simple wooden frames with sliding covers, allowing precise airflow control as wood dries.
Wiring Your Solar Power System
Sizing Your Solar Panel Array
Getting your solar panel sizing right is crucial for keeping those kiln fans running smoothly. When I first built my solar kiln, I underestimated my power needs and ended up with inconsistent drying—lesson learned!
Start by identifying your fan’s wattage (usually printed on the motor housing) and multiply by your daily operating hours. Most small kilns need fans running 8-12 hours daily. For example, a 50-watt fan running 10 hours requires 500 watt-hours per day. The process is similar to calculating power needs for household appliances.
Add 25-30% extra capacity to account for cloudy days and battery inefficiencies. This is where portable solar panels can offer flexibility—you can start small and expand as needed.
Spheral Solar’s online calculator tools make this process simple. Just input your fan specifications and desired run time, and it’ll recommend the appropriate panel size and battery capacity for your location’s average sunlight hours.
Installing the Charge Controller and Battery Bank
Your solar kiln needs a charge controller to prevent battery damage from overcharging during sunny days and excessive discharge during cloudy periods. Think of it as a traffic cop for your electrical system—it keeps everything flowing safely.
When I built my first solar kiln, I learned the hard way that skipping the charge controller meant replacing batteries within six months. Don’t make that mistake!
**Selecting Your Charge Controller**
Choose a PWM (Pulse Width Modulation) controller for basic setups or an MPPT (Maximum Power Point Tracking) controller for 20-30% better efficiency. Calculate your system’s maximum amperage: divide your total panel wattage by battery voltage. Add 25% as a safety buffer. For example, a 300-watt panel system with 12-volt batteries needs at least a 31-amp controller (300÷12=25, plus 25%).
**Wiring the Battery Bank**
Connect batteries in parallel to maintain 12 volts while increasing amp-hour capacity. Use heavy-gauge cables (typically 10-gauge minimum) with proper fuses between the controller and batteries. Label everything clearly—your future self will thank you during maintenance. Position batteries in a ventilated, temperature-stable location near your kiln. This setup ensures your fans and controls keep running even during three-day cloudy stretches, maintaining consistent drying conditions.
Installing a charge controller and proper wiring connections ensures safe, reliable operation of your solar-powered kiln system.
Wiring Circulation Fans and Sensors
Now let’s get your kiln properly wired so everything works together seamlessly. I remember Charles telling me about his first attempt at wiring fans—he connected everything backward and wondered why his kiln felt like a refrigerator instead of a dryer! Learn from his mistakes, and you’ll be fine.
Start by selecting 12V DC fans, which work perfectly with your solar panel setup. Position one fan near the top of your kiln to pull hot air across the wood, and another near the bottom for intake. Connect your fans to the charge controller using 14-gauge wire—red for positive, black for negative. Never skip the inline fuse (10-amp works well) on the positive wire about six inches from the battery connection. This simple safety device could save your entire system.
For monitoring, install an affordable DHT22 temperature and humidity sensor near the wood stack’s center. These digital sensors connect easily to a basic Arduino controller with just three wires. Check our solar wiring diagrams for proper connection sequences.
Consider adding a simple timer switch to run fans during peak sun hours only, maximizing efficiency while extending battery life. Always disconnect power before working on any wiring, and test connections with a multimeter before energizing your system. Proper ventilation is crucial—your wood drying depends on steady airflow circulation.
Safety Considerations and Code Compliance
Building a solar kiln involves wiring electrical systems that require careful attention to safety. Always use proper gauge wiring for your fans and sensors—undersized wires are fire hazards. Ground all metal components and install appropriate fuses or breakers to protect circuits from overloads.
Check local building codes before construction. Some municipalities require permits for structures over certain sizes or those with electrical systems. Your homeowner’s insurance may also have requirements.
When I built my first kiln, I had an electrician verify my wiring plan—money well spent for peace of mind. If you’re uncomfortable working with electricity, consult a licensed professional. This isn’t the place to cut corners. Proper ventilation prevents moisture buildup and potential mold issues, protecting both your lumber and your health.
Testing and Calibrating Your Solar Kiln
Before you load your first board of precious hardwood, you’ll want to run your solar kiln through its paces. Think of this as your dress rehearsal—it’s when you discover what works, what needs tweaking, and how your kiln performs throughout the day.
Start by running your kiln empty for at least three full sunny days. Place several thermometers at different heights and locations inside the chamber to check for temperature consistency. You’re looking for even heat distribution, typically between 100-140°F during peak sun hours. If you notice cold spots, you might need to adjust your fan placement or add reflective material to redirect sunlight.
Monitor humidity levels closely using a reliable hygrometer. Your kiln should maintain controllable moisture levels—you’ll adjust this later based on your wood species, but during testing, simply verify that your vents actually change the humidity when you open and close them. This seems obvious, but you’d be surprised how many builders skip this step.
Check your fan performance by feeling the airflow at various points inside. Air should circulate continuously and reach all corners. If your solar panel isn’t generating enough power on partly cloudy days, you might need to upgrade to a larger panel or add battery backup.
Charles learned this lesson the hard way during his first test run. “I was so excited that I loaded my kiln with oak after just one sunny afternoon of testing,” he recalls with a laugh. “Then we had three overcast days in a row, my fan barely ran, and I nearly lost the whole batch to mold. Now I always test through various weather conditions first.”
Take notes on temperature fluctuations throughout the day and track how quickly your kiln heats up each morning. These patterns will help you understand your kiln’s personality and schedule future drying projects effectively. Adjust vent positions, fan angles, and glazing coverage until you achieve consistent, controllable results.
Operating Your Kiln: Best Practices
Now that your solar kiln is built, let’s talk about how to get the best results from it. I remember when I first started drying lumber—I was so eager that I threw everything in without much planning. Big mistake! Wood drying is part science, part patience, and these practices will save you from the headaches I experienced.
**Stacking Your Wood Properly**
The secret to even drying is airflow. Stack your boards horizontally with stickers (thin strips of dry wood, usually ¾” thick) between each layer. Place stickers every 16-24 inches along the length, and make sure they align vertically—this prevents warping and distributes weight evenly. Leave at least 1-2 inches of space between boards on the same layer. Think of it like building a breathing tower; every piece needs its own space to release moisture.
**Monitoring Moisture Content**
Invest in a good moisture meter—it’s your kiln’s best friend. Check multiple boards in different locations weekly. Your target moisture content depends on your project: aim for 6-8% for indoor furniture, 12-15% for outdoor projects. Don’t rush it! I once pulled boards too early because I was excited about a project, and they warped within weeks.
**Typical Drying Times**
This varies wildly based on wood species, thickness, and weather. As a general guideline, expect 1-inch thick hardwoods to take 4-8 weeks in good conditions, while softwoods might finish in 3-6 weeks. Two-inch lumber? Double those times. Your solar-powered fans help significantly here—without circulation, you’re looking at much longer waits.
**Seasonal Considerations**
Summer is your kiln’s power season! Long days and intense sun mean faster drying. Winter and cloudy periods slow things down considerably. During high humidity days, you might actually want to close vents partially to prevent the wood from reabsorbing moisture.
**Troubleshooting Common Issues**
If boards are checking (developing cracks), you’re drying too fast—reduce ventilation. Surface hardening (case hardening) where exteriors dry much faster than interiors? Add humidity by placing water pans inside temporarily. Uneven drying usually means poor sticker placement or inadequate airflow, so revisit your stacking technique.
Properly stacked lumber with adequate spacing allows optimal air circulation and even drying throughout the solar kiln.
Expanding and Upgrading Over Time
One of the best parts about building your own solar kiln? It grows with you! When I first started, my kiln was pretty basic—just enough panels to get the job done. But as I got more comfortable with the system, I couldn’t resist tinkering and improving it.
The modular nature of solar systems makes upgrades surprisingly straightforward. Want more drying power? Simply add another panel or two to your array. Most charge controllers can handle additional capacity, and if yours is maxed out, swapping to a higher-capacity model takes maybe an hour. I added a second panel to mine after six months, and the increased heat made a noticeable difference in drying times.
Consider integrating smart home controls as you get comfortable with the basics. Simple WiFi-enabled switches let you monitor power consumption from your phone, while smart thermostats can help maintain optimal temperatures automatically. These don’t have to break the bank—I found a basic monitoring setup for under $50 that gives me real-time data.
If you’re processing more lumber, expanding the kiln chamber itself is often easier than building a second unit from scratch. The same solar system can typically handle a larger space with minor adjustments.
Remote monitoring is another game-changer, especially if your kiln isn’t right next to your house. Temperature and humidity sensors connected to your smartphone mean you can check conditions without making the trip outside—perfect for those cold winter mornings when you’re still in your pajamas!
Building your own solar kiln is more than just a weekend project—it’s an investment in self-sufficiency that pays dividends for years to come. I remember the first batch of lumber I dried in my homemade kiln; the satisfaction of seeing perfectly seasoned wood, dried entirely by the sun’s energy, was incredible. Beyond the immediate benefit of kiln-dried lumber, you’ve gained valuable skills in solar wiring and renewable energy systems that apply to countless other projects.
The cost savings add up quickly. After the initial investment in materials, your kiln operates for free, powered entirely by sunlight. Compare that to commercial kiln-drying services or the energy costs of conventional kilns, and you’ll likely recoup your expenses within the first year.
We’d love to hear about your solar kiln journey! Share your build photos, challenges, and successes with the Spheral Solar community in the comments below. Your experience might help the next person tackle their first solar project with confidence.
Ready for your next solar adventure? Explore our collection of DIY solar projects, from simple garden lighting to complete off-grid power systems. Each project builds on the foundational skills you’ve just mastered.
How useful was this post?
Click on a star to rate it!
Average rating 0 / 5. Vote count: 0
No votes so far! Be the first to rate this post.
We are sorry that this post was not useful for you!
Let us improve this post!
Tell us how we can improve this post?
charlesnoble
Here at Spheral Solar, I’m a hands-on solar power enthusiast, constantly exploring and experimenting with DIY solutions. I’m dedicated to sharing my discoveries, insights, and even the bumps I hit along the way, all in the pursuit of a more sustainable future.
Why Your Qi Solar Power Bank Might Be Wasting Your… by Charlesnoble December 8, 2025 Expect your qi solar power bank to charge your phone wirelessly, but don’t count on the solar panel as your primary power source. I learned this the hard way during a three-day camping trip when I thought the built-in solar panel would keep my devices running indefinitely. The reality? Those…
Solar Power Brought My Garden Fountain to Life… by Charlesnoble March 14, 2026 Picture this: I’m sitting by my campsite last summer, watching a small solar fountain I’d just installed bubble away in a portable basin, powered entirely by the sun overhead. No extension cords snaking through the wilderness, no battery changes at midnight, just pure, peaceful water movement that attracted birds and…
Why Your Camper Van Power System Keeps Failing (And… by Charlesnoble January 24, 2026 Picture this: You’re parked along a stunning coastline, laptop open, fridge humming, and lights glowing as the sun sets—all powered by the system you built yourself. A well-designed camper van power system transforms your vehicle from basic transportation into true freedom on wheels, letting you work remotely, cook meals, and…
10 Best Solar Panels for RV in 2023 by Nick April 2, 2021 You’ve decided to build an RV, and your feelings of excitement are through the roof. Though in the back of your mind, you still feel a bit of anxiety, thinking about the things that go into building an RV. One of these things is probably your RV electric system. Best…
10 Best Solar Panels for Camping in 2023 by Adeyomola May 24, 2021 With resources limited when you go camping, an unreliable solar panel will be more of a liability than an asset. The best solar panels for camping are revered for their portability, high efficiency, power output, and weather resistance. Every feature ensures the panels stay working in the wilderness. So, when…
Why Your Motorhome Electrical System Keeps Failing… by Charlesnoble November 18, 2025 Picture this: You’re three days into a dream cross-country trip when your lights flicker, the refrigerator stops cooling, and you’re left wondering whether to call for expensive roadside assistance or figure it out yourself. I’ve been there, and here’s what I wish someone had told me before my first electrical…
Subscribe for handpicked DIY projects, exclusive tips, and giveaways.
Match your solar panels to microinverters or power optimizers based on your roof’s shading patterns—even partial shade from a chimney or tree during morning hours means module-level power electronics will recover 15-25% more energy than string inverters lose to the weakest panel. Install power optimizers when you’re working with mixed panel orientations across multiple roof… Read more: Why Smart Solar Modules Could Save Your DIY Array (Before It’s Too Late)
Measure your conduit run before purchasing materials by mapping the exact path from your solar array to the inverter and battery location, accounting for a 10% waste factor and additional length for bends. PVC electrical conduit remains the most cost-effective protective solution for DIY solar installations, but improper installation creates fire hazards, code violations, and… Read more: Why Your Solar Conduit Installation Could Start a Fire (And How to Do It Right)
Walk down to your nearest stream with a five-gallon bucket and a stopwatch. Fill that bucket and time how long it takes—this simple test reveals whether you have enough flowing water to power your off-grid home. If you can fill it in under 10 seconds from a source that drops at least 10 feet in… Read more: The Stream Behind Your House Could Power It (Here’s How Micro Hydro Works)
")
")
")


")
")
")
")


")


